


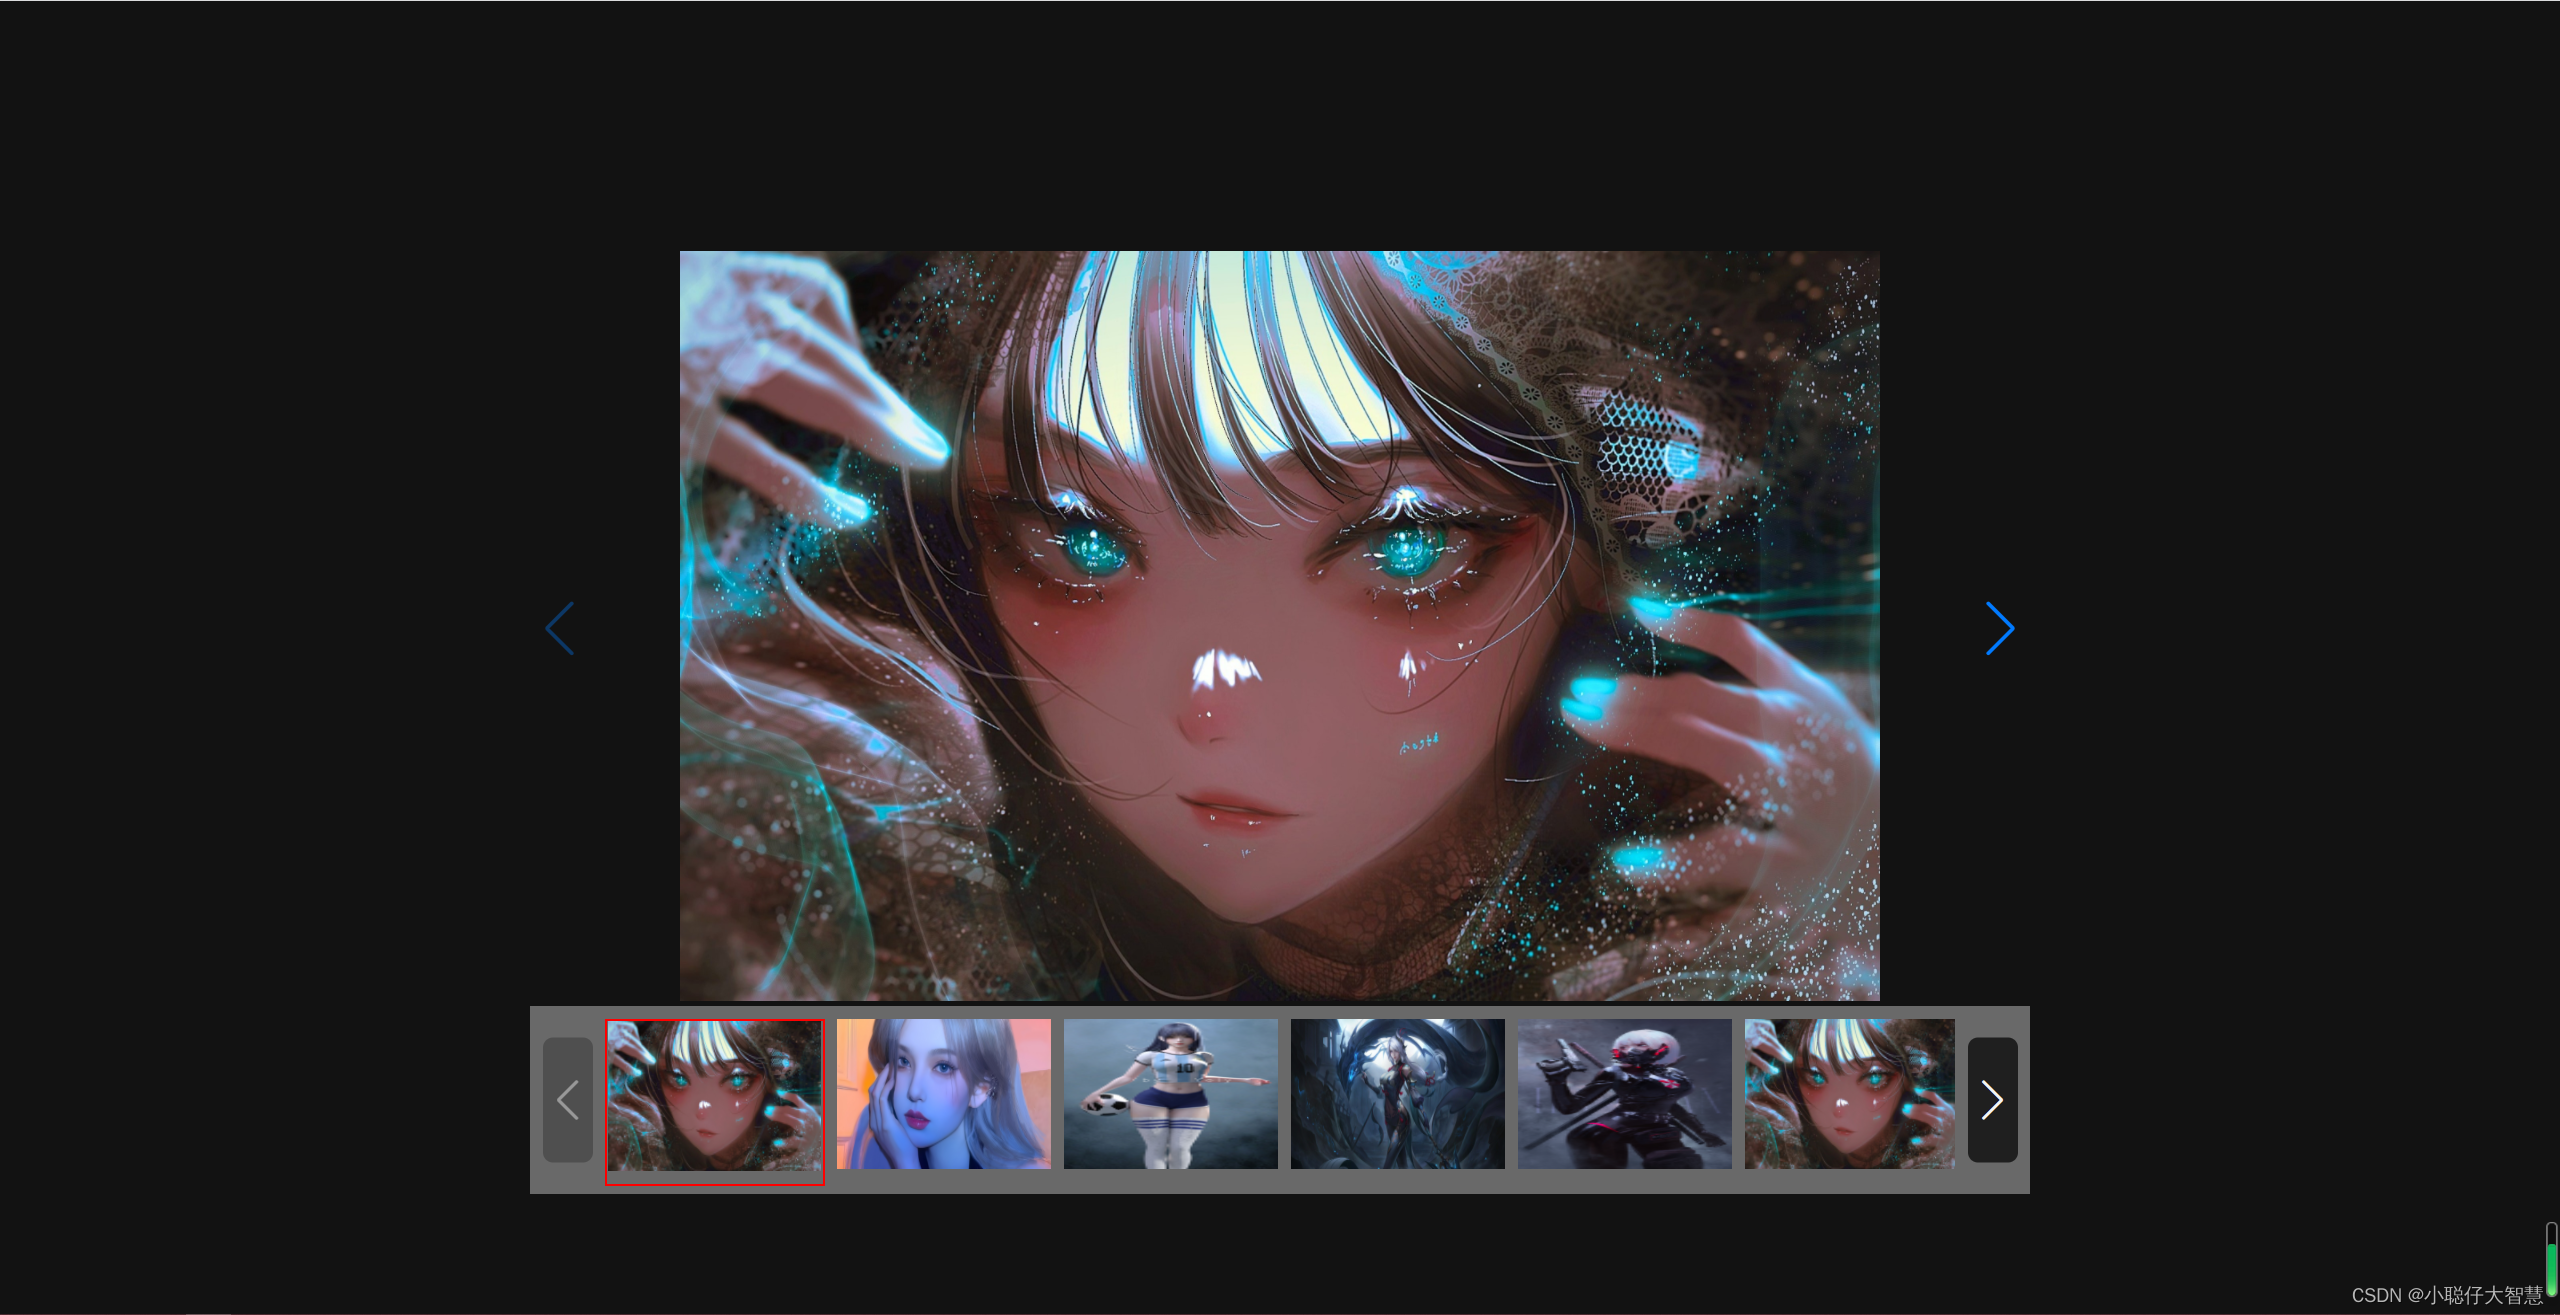
首先看效果图先,毕竟需求都是不一样的嘛,我发这个文章主要是看了一些网页上的好多都存在缩略图那里的高亮居中问题,所以本文章主要就是实现当前图片看到的一些效果。(声明一下,本人第一次发文章,还有很多要学习的地方,所以不适合的话勿喷。)
供第一,装依赖要对得上,我这里用的是 "swiper": "5.4.5"和"vue-awesome-swiper": "^3.1.3",很多人在这就会有疑问,这两版本不对应啊,不急,这就是我发这文章的意义,一是记录一下自己的坑,二是同道中人参考。我为啥不装对应的包呢,因为我这个项目前面写的人已经装了这个了,我不能改呀,改了别人的就会出错了。这里我也提供下对应版本吧,影响不大,只要是"swiper": "5.4.5"应该都可以实现图中效果。(对了,记得在main.js全局引入swiper)

我就按照个人习放顺序了,
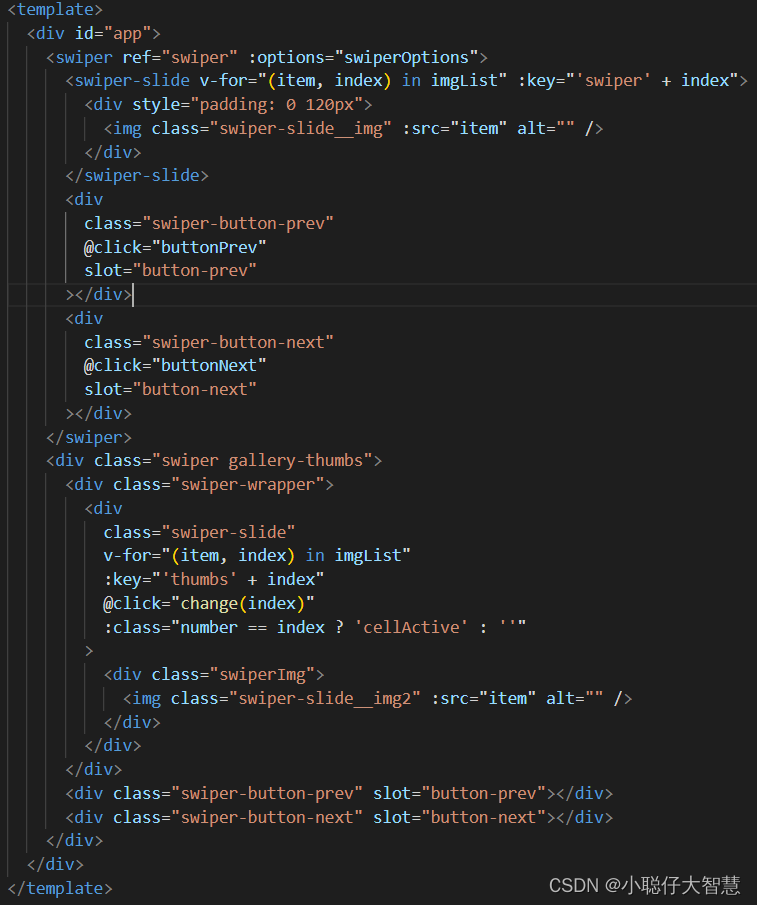
图中可以看到有三个点击事件,目的就是为了拿取到图片的下标给相对应的缩略图高亮边框,在swiper官网中是通过slideChangeTransitionEnd(swiper)函数回调下标index的,我还没研透它的gallerySwiper.thumbs.swiper.$el.css({'border':'1px solid #ff6600'})复制样式,所以就先用我的傻瓜方法了。看看轮播图的轮播数据,
这里没有太多可以说的地方,注释也有写了,所以就过了
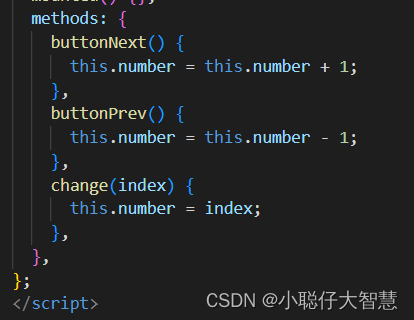
这三个就是对应上面的下标获取的问题, 最后放上我的CSS样式吧。
注释部分的代码是用了相对应的swiper版本的,我这个版本是不对应的。最后放个可以整体的代码吧。
<template>
  <div id="app">
    <swiper ref="swiper" :options="swiperOptions">
      <swiper-slide v-for="(item, index) in imgList" :key="'swiper' + index">
        <div style="padding: 0 120px">
          <img class="swiper-slide__img" :src="item" alt="" />
        </div>
      </swiper-slide>
      <div
        class="swiper-button-prev"
        @click="buttonPrev"
        slot="button-prev"
      ></div>
      <div
        class="swiper-button-next"
        @click="buttonNext"
        slot="button-next"
      ></div>
    </swiper>
    <div class="swiper gallery-thumbs">
      <div class="swiper-wrapper">
        <div
          class="swiper-slide"
          v-for="(item, index) in imgList"
          :key="'thumbs' + index"
          @click="change(index)"
          :class="number == index ? 'cellActive' : ''"
        >
          <div class="swiperImg">
            <img class="swiper-slide__img2" :src="item" alt="" />
          </div>
        </div>
      </div>
      <div class="swiper-button-prev" slot="button-prev"></div>
      <div class="swiper-button-next" slot="button-next" id="myNext"></div>
    </div>
  </div>
</template>

<script>
export default {
  name: "App",
  components: {},
  data() {
    return {
      number: 0,
      swiperOptions: {
        spaceBetween: 10,//大轮播图间距
        navigation: {//大轮播图的切图按钮,如果想放在轮播图中可以看swiper官方文档
          nextEl: ".swiper-button-next",
          prevEl: ".swiper-button-prev",
        },
        thumbs: {
          swiper: {
            el: ".gallery-thumbs",
            slidesPerView: 6,//缩略图显示张数
            slidesPerGroup: 6,//缩略图每组切图张数
            spaceBetween: 10,//缩略图间距
            slideToClickedSlide: true,
            navigation: {//缩略图的切图按钮,如果想放在轮播图中可以看swiper官方文档
              nextEl: ".swiper-button-next",
              prevEl: ".swiper-button-prev",
            },
          },
          autoScrollOffset: true,
        },
      },
      imgList: [
        "https://w.wallhaven.cc/full/jx/wallhaven-jx5xyw.jpg",
        "https://w.wallhaven.cc/full/zy/wallhaven-zym92v.jpg",
        "https://w.wallhaven.cc/full/9d/wallhaven-9d6wg8.jpg",
        "https://w.wallhaven.cc/full/jx/wallhaven-jx5x7y.jpg",
        "https://w.wallhaven.cc/full/jx/wallhaven-jx5ro5.jpg",
      ],
    };
  },
  mounted() {},
  methods: {
    buttonNext() {
      this.number = this.number + 1;
//这里因为一些原因我找不到它原来问题,但我解决了自己问题了,这里是六张一组缩列图,当第七张的时候缩列图就该切组
      if (this.number == 6) {
        document.getElementById("myNext").click();
      }
    },
    buttonPrev() {
      this.number = this.number - 1;
    },
    change(index) {
      this.number = index;
    },
  },
};
</script>

<style>
html {
  background-color: #121212;
}
</style>

<style lang="scss" scoped>
#app {
  width: 1200px;
  margin: 200px auto 0;
}
.swiper-slide {
  &__img {
    width: 100%;
    height: 600px;
  }
}
.swiper {
  &.gallery-thumbs {
    position: relative;
    overflow: hidden;
    box-sizing: border-box;
    height: 150px;
    padding: 10px 60px;
    background-color: rgb(105, 105, 105);
    &::before,
    &::after {
      z-index: 2;
      position: absolute;
      top: 0;
      content: "";
      height: 150px;
      width: 60px;
      background-color: rgb(105, 105, 105);
    }
    &::before {
      left: 0;
    }
    &::after {
      right: 0;
    }
    .swiper-button-next,
    .swiper-button-prev {
      top: 50% !important;
      transform: translateY(-50%) !important;
      width: 40px;
      height: 100px;
      margin-top: 0 !important;
      border-radius: 8px;
      color: #f3f4f4;
      background-color: rgba(0, 0, 0, 0.7);
      &::after {
        font-size: 2rem;
      }
    }
  }
  // &.gallery-thumbs .swiper-slide {
  //   opacity: 0.4;
  //   overflow: hidden;
  // }
  // &.gallery-thumbs .swiper-slide-thumb-active {
  //   border: 2px solid red;
  // }
}
.swiperImg {
  width: 171px;
  height: 120px;
}
.swiper-slide__img2 {
  height: 120px;
  width: 100%;
}
.cellActive {
  border: 2px solid red;
}
</style>


 1511
1511


 被折叠的 条评论
为什么被折叠?
被折叠的 条评论
为什么被折叠?
 到【灌水乐园】发言


