


Spring MVC
新建Spring Boot 项目可以从这个网站中生成,也可以手动从idea中生成不过较为麻烦。
Spring Controller
我们请求一个网页时,web服务做了什么事情?

1. Controller 注解
Spring Controller 本身也是一个Spring Bean,只需要在类上加一个注解即可,一般我们将控制类都放在一个control文件夹下
import org.springframework.stereotype.Controller;

@Controller
public class HelloControl {

}
2. 加载网页
一般我们将需要使用的html、css等文件放在src/main/resources/static目录下,在controller中会自动加载static下面的html内容。
import org.springframework.stereotype.Controller;

@Controller
public class HelloControl {

	// 下面对该注解做了解释
	@RequestMapping("/hello")
    public String say(){
    	// 这里返回的是需要显示的html文件的路径
        return "hello.html";
    }

}
3. RequsetMapping 注解
该注解的功能是配置路由,只需要在需要提供Web访问的方法上添加该注解即可
搭建好并运行SpringBoot项目后,若在本地浏览器访问可输入:127.0.0.1:8080/hello
如果需要修改端口号,可在文件application.properties中加入:server.port=8081
Get Request
定义参数时,只需要添加一个注解@RequestParam,例如我们要访问https://域名/songlist?id=xxxx时:
@RequestMapping("/songlist")
public String index( @RequestParam("id") String id){
	// 通过传入的参数id进行歌单查找然后返回结果(略)
    return "html/songList.html";
}
该注解的包路径:
org.springframework.web.bind.annotation.RequestParam
非必须传参只需要:@RequestParam(name="pageNum",required = false) int pageNum即表示参数名为pageNum的参数为非必须
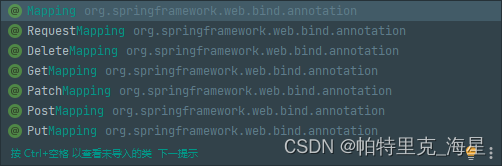
常用的几种请求方式的注解:
输出Json数据
只需要在相应的方法上加上注解@ResponseBody,同时该注解还可以将Java对象转换成Json字符串输出
@GetMapping("/api/foos")
@ResponseBody
public String getFoos(@RequestParam("id") String id) {
  return "ID: " + id;
}
@Controller
public class UserController {

    private static Map<String, User> users = new HashMap<>();

    @PostConstruct
    public void init() {
        User user = new User();
        user.setId("2020");
        user.setName("kevin");
        users.put(user.getId(),user);
    }

    @GetMapping("/api/user")
    @ResponseBody
    public User getUser(@RequestParam("id") String id) {
        return users.get(id);
    }

}
Thymeleaf
1. 添加依赖
<dependency>
  <groupId>org.springframework.boot</groupId>
  <artifactId>spring-boot-starter-thymeleaf</artifactId>
</dependency>
2. 数据传送
- 导入类
import org.springframework.ui.Model; - 在控制类中添加相应的
Model
@Controller
public class SongListControl {

  @Autowired
  private SongListService songListService;

  @RequestMapping("/songlist")
  public String index(@RequestParam("id")String id,Model model){

    SongList songList = songListService.get(id);
    // 第一个 songList 是模板中使用的变量名
    // 第二个 songList 是当前的对象实例
    // 设置模板变量到模板上下文中去
    model.addAttribute("songList",songList);

    return "songList";
  }
}
3. 模板文件
Spring MVC模板文件放在工程的src/main/resources/templates中,所以上面的return "songlist"就是在这个目录下查找文件并返回。
<!DOCTYPE html>
<html lang="en" xmlns:th="http://www.thymeleaf.org">
  <head>
    <meta charset="UTF-8" />
    <meta name="viewport" content="width=device-width, initial-scale=1.0" />
    <meta http-equiv="X-UA-Compatible" content="ie=edge" />
    <link rel="stylesheet" href="/css/songList.css" />
    <title>豆瓣歌单</title>
  </head>
  <body>
    <h1 th:text="${songList.name}"></h1>
  </body>
</html>
代码中
xmlns:th="http://www.thymeleaf.org"是为了让软件能识别Thymeleaf的语法
具体语法有th:text="${songList.name}
4. 常用的语句
- 变量
// 控制类中添加模板变量
model.addAttribute("songList",songList);
<!--1. th:text-->
<p th:text="'歌名:' + ${songList.name}"></p>

<!--2. 内联标签 [[]]-->
<p>歌名:[[${songList.name}]]</p>
- 循环
<ul th:each="song,it: ${songs}">
  <li>
    <span th:text="${it.count}"></span>
    <span th:text="${song.name}"></span>
  </li>
</ul>
其中
it为可选参数,具体用来实现统计需求,如索引、计数、对象大小等
- 字符串拼接
<!--1. 使用单引号包住字符串,在使用+进行连接-->
<span th:text="'00:00/' + ${totalTime}"></span>

<!--2. 使用 || 包围整个字符串-->
<span th:text="|00:00/${totalTime}|"></span>
- 数据转化(日期)
一般使用最多的是dates工具类,如果需要处理LocalDate和LocalDateTime类则需要添加依赖,一个新的工具类temporals,两个工具类的方法是一样的,只是支持的类型不一样,dates支持Date类。而temporals支持LocalDate和LocalDateTime类。
工具类的使用方法:#{工具类}
<dependency>
  <groupId>org.thymeleaf.extras</groupId>
  <artifactId>thymeleaf-extras-java8time</artifactId>
  <version>3.0.4.RELEASE</version>
</dependency>
<p th:text="${#dates.format(dateVar, 'yyyy-MM-dd')}"></p>

<p th:text="${#temporals.format(dateVar, 'yyyy年MM月dd日')}"></p>
- 数据转化(字符串)
除了日期方法,#{strings}也使用的很多,他有很多方法,如:大小写转换、字符串分割、判断字符串相等、获取字符串长度等。可查看这篇文章和官方文档。
- 条件语句
th:if如果是,th:unless如果不是
<span th:if="${user.sex == 'male'}">男</span>
<span th:unless="${user.sex == 'male'}">女</span>
#strings中有isEmpty()、contains()、endsWith()等方法也可以作为判断
<p th:if="${#strings.isEmpty(str1)}">String str1 = "a";</p>
<p th:if="${#strings.contains(str1,'人')}">匹配到人这个字啦</p>
5. Thymeleaf 表单
action:表单提交后的跳转路径;method:表单提交的方法,要与控制类中的一致;button:按钮的类型有submit、button和reset,第一个用于表单提交并清空表单;input:其属性name需要与相应的对象的属性值相同
<body>
  <h2>添加书籍</h2>
  <form action="/book/save" method="POST">
    <div>
      <label>书的名称:</label>
      <input type="text" name="name">
    </div>
    <div>
      <label>书的作者:</label>
      <input type="text" name="author">
    </div>
    <div>
      <label>书的描述:</label>
      <textarea name="desc"></textarea>
    </div>
    <div>
      <label>书的编号:</label>
      <input type="text" name="isbn">
    </div>
    <div>
      <label>书的价格:</label>
      <input type="text" name="price">
    </div>
    <div>
      <label>书的封面:</label>
      <input type="text" name="pictureUrl">
    </div>
    <div>
      <button type="submit">注册</button>
    </div>
  </form>
</body>
Spring Validation
1. 添加依赖
<dependency>
  <groupId>jakarta.validation</groupId>
  <artifactId>jakarta.validation-api</artifactId>
  <version>2.0.1</version>
</dependency>
<dependency>
    <groupId>org.springframework.boot</groupId>
    <artifactId>spring-boot-starter-validation</artifactId>
</dependency>
2.常用的几个注解
@NotNull、@AssertTrue、@Size、@Min、@Max、@Email、@NotEmpty、@NotBlank
package com.bookstore.model;

import javax.validation.constraints.*;

public class User {

    @NotEmpty(message = "名称不能为 null")
    private String name;

    @Min(value = 18, message = "你的年龄必须大于等于18岁")
    @Max(value = 150, message = "你的年龄必须小于等于150岁")
    private int age;

    @NotEmpty(message = "邮箱必须输入")
    @Email(message = "邮箱不正确")
    private String email;

    // standard setters and getters
}
3. 控制类中使用校验注解
在加上校验注解的User类的实例前加上@Valid注解,并添加BindlingResult其方法hasErroes()可以用于校验成功还是失败
package com.bookstore.control;

import ...

@Controller
public class UserControl {

    @GetMapping("/user/add.html")
    public String addUser() {
        return "user/addUser";
    }

    @PostMapping("/user/save")
    public String saveUser(@Valid User user, BindingResult errors) {
        if (errors.hasErrors()) {
            // 如果校验不通过,返回用户编辑页面
            return "user/addUser";
        }
        // 校验通过,返回成功页面
        return "user/addUserSuccess";
    }

}
Spring Boot Logger
1. 配置文件
在src/main/respurces/application.properties增加日志级别配置,设置级别之后日志将输出不低于当前级别的日志信息
// 所有日志级别均为info
logging.level.root=info

// 不同的包设置不同的级别
logging.level.fm.douban.app=info
2. 编码
import org.slf4j.Logger;
import org.slf4j.LoggerFactory;
import org.springframework.web.bind.annotation.RestController;
import javax.annotation.PostConstruct;

@RestController
public class SongListControl {
    private static final Logger LOG = LoggerFactory.getLogger(SongListControl.class);

    @PostConstruct
    public void init(){
    	// 注意这里实例的函数名需要与配置文件中的级别相对应
        LOG.info("SongListControl 启动啦");
    }
}
Spring Boot Properties
自定义配置项并使用配置文件中的值
application.properties文件中:
server.port=8081
logging.level.root=info
author.name=kevin
类中:
@Value("${author.name}")
public String authorName;
Cookie
Cookie是网络编程中使用最广泛的一项技术,主要用于辨识用户身份,类似Token
读 Cookie
为control类的方法中添加参数HttpServletRequest,通过request.getCookies()取得cookie数组,在循环遍历数组即可找到该用户的cookie
import javax.servlet.http.Cookie;
import javax.servlet.http.HttpServletRequest;

@RequestMapping("/cookie")
public Map index(HttpServletRequest request) {
  Map returnData = new HashMap();
  returnData.put("result", "this is test of cookie");
  returnData.put("author", "kevin");

  Cookie[] cookies = request.getCookies();
  returnData.put("cookies", cookies);

  return returnData;
}
使用注解读取 cookie
如果知道cookie的名字,则可以通过传入其名字来读取,需要为control类的方法添加一个参数@CookieCValue("xxx") String xxx,系统会自动解析并传入同名的cookie,但是如果系统解析不到指定名字的cookie则会报错。
import org.springframework.web.bind.annotation.CookieValue;

@RequestMapping("/cookie")
public Map index(@CookieValue("JSESSIONID") String jSessionId) {
  Map returnData = new HashMap();
  returnData.put("result", "this is test of cookie");
  returnData.put("author", "kevin");
  returnData.put("JSESSIONID", jSessionId);

  return returnData;
}
写 Cookie
为control类中的方法添加一个参数HttpServletResponse,调用response.addCookie()方法即可完成添加,同时还有设置cookie的属性。
import javax.servlet.http.Cookie;
import javax.servlet.http.HttpServletResponse;

@RequestMapping("/setCookie")
public Map index(HttpServletResponse response) {
  Map returnData = new HashMap();
  returnData.put("result", "this is test of cookie");
  returnData.put("name", "kevin");

  // cookie的构造函数,第一个参数为名称,第二个参数为其值
  Cookie cookie = new Cookie("sessionId","CookieTestInfo");
  // 设置的是 cookie 的域名,就是会在哪个域名下生成 cookie 值
  cookie.setDomain("kevin.com");
  // 是 cookie 的路径,一般就是写到 / ,不会写其他路径的
  cookie.setPath("/");
  // 设置cookie 的最大存活时间,-1 代表随浏览器的有效期,也就是浏览器关闭掉,这个 cookie 就失效了。单位是秒
  cookie.setMaxAge(-1);
  // 设置是否只能服务器修改,浏览器端不能修改,安全有保障
  cookie.setHttpOnly(false);
  response.addCookie(cookie);

  returnData.put("message", "add cookie successful");
  return returnData;
}
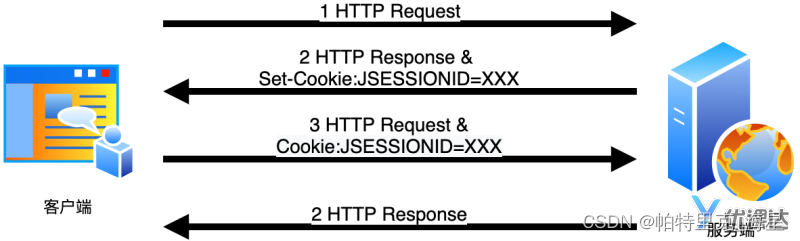
Spring Session API
使用cookie存放用户信息存在安全隐患,采用Session会话机制可以解决这个问题
读操作
import javax.servlet.http.HttpServletRequest;
import javax.servlet.http.HttpServletResponse;
import javax.servlet.http.HttpSession;

@RequestMapping("/songlist")
public Map index(HttpServletRequest request, HttpServletResponse response) {
  Map returnData = new HashMap();
  returnData.put("result", "this is song list");

  // 取得 HttpSession 对象
  HttpSession session = request.getSession();
  // 读取登录信息
  UserLoginInfo userLoginInfo = (UserLoginInfo)session.getAttribute("userLoginInfo");
  if (userLoginInfo == null) {
    // 未登录
    returnData.put("loginInfo", "not login");
  } else {
    // 已登录
    returnData.put("loginInfo", "already login");
  }

  return returnData;
}
写操作
import javax.servlet.http.HttpServletRequest;
import javax.servlet.http.HttpServletResponse;
import javax.servlet.http.HttpSession;

@RequestMapping("/loginmock")
public Map loginMock(HttpServletRequest request, HttpServletResponse response) {
  Map returnData = new HashMap();

  // 假设对比用户名和密码成功
  // 仅演示的登录信息对象
  UserLoginInfo userLoginInfo = new UserLoginInfo();
  userLoginInfo.setUserId("12334445576788");
  userLoginInfo.setUserName("ZhangSan");
  // 取得 HttpSession 对象
  HttpSession session = request.getSession();
  // 写入登录信息
  session.setAttribute("userLoginInfo", userLoginInfo);
  returnData.put("message", "login successful");

  return returnData;
}
Spring Session 配置
依赖库
<!-- spring session 支持 -->
<dependency>
    <groupId>org.springframework.session</groupId>
    <artifactId>spring-session-core</artifactId>
</dependency>
配置类
@Bean表示将此方法返回的对象实例注册成为Bean;@Configuration表示这是一个配置类,系统会自动扫描并处理;@EnableSpringHttpSession开启session。
CookieSerializer:读写Cookies中的SessionId信息;MapSessionRepository:Session信息在服务器上的储存仓库;
import org.springframework.session.MapSessionRepository;
import org.springframework.session.config.annotation.web.http.EnableSpringHttpSession;
import org.springframework.session.web.http.CookieSerializer;
import org.springframework.session.web.http.DefaultCookieSerializer;

import java.util.concurrent.ConcurrentHashMap;

@Configuration
@EnableSpringHttpSession
public class SpringHttpSessionConfig {
  @Bean
  public CookieSerializer cookieSerializer() {
    DefaultCookieSerializer serializer = new DefaultCookieSerializer();
    serializer.setCookieName("JSESSIONID");
    // 用正则表达式配置匹配的域名,可以兼容 localhost、127.0.0.1 等各种场景
    serializer.setDomainNamePattern("^.+?\\.(\\w+\\.[a-z]+)$");
    serializer.setCookiePath("/");
    serializer.setUseHttpOnlyCookie(false);
    // 最大生命周期的单位是秒
    serializer.setCookieMaxAge(24 * 60 * 60);
    return serializer;
  }

  // 当前存在内存中
  @Bean
  public MapSessionRepository sessionRepository() {
    return new MapSessionRepository(new ConcurrentHashMap<>());
  }
}
Spring Request 拦截器
创建拦截器
在包interceptor中创建一个类实现接口HandlerInterceptor,有三个拦截点可供选择,控制类执行前、控制类执行后程序结束前和程序结束后:
import javax.servlet.http.HttpServletRequest;
import javax.servlet.http.HttpServletResponse;

import org.springframework.web.servlet.HandlerInterceptor;
import org.springframework.web.servlet.ModelAndView;

public class InterceptorDemo implements HandlerInterceptor {

  // Controller方法执行之前
  @Override
  public boolean preHandle(HttpServletRequest request, HttpServletResponse response, Object handler) throws Exception {

    // 只有返回true才会继续向下执行,返回false取消当前请求
    return true;
  }

  //Controller方法执行之后
  @Override
  public void postHandle(HttpServletRequest request, HttpServletResponse response, Object handler,
      ModelAndView modelAndView) throws Exception {

  }

  // 整个请求完成后(包括Thymeleaf渲染完毕)
  @Override
  public void afterCompletion(HttpServletRequest request, HttpServletResponse response, Object handler, Exception ex) throws Exception {

  }
}
实现 WebMvcConfigurer
在配置包config中创建一个类实现接口WebMvcConfigurer,并重写方法addInterceptors(),这个步骤用于管理拦截器,该类需要加上注解@Configuration,让系统自动扫描处理。管理拦截器比较重要的是设置拦截器的拦截范围,常用addPathPatterns("/**")表示拦截所有URL,当然也可以使用excludePathPatterns()来排除某些URL。
import org.springframework.context.annotation.Configuration;
import org.springframework.web.servlet.config.annotation.InterceptorRegistry;
import org.springframework.web.servlet.config.annotation.WebMvcConfigurer;

@Configuration
public class WebAppConfigurerDemo implements WebMvcConfigurer {

  @Override
  public void addInterceptors(InterceptorRegistry registry) {
    // 多个拦截器组成一个拦截器链
    // 仅演示,设置所有 url 都拦截
    registry.addInterceptor(new InterceptorDemo()).addPathPatterns("/**");
  }
}
页面跳转:
response.sendRedirect("/login");
MongoDB
- 新增数据
import org.springframework.data.mongodb.core.MongoTemplate;

  @Autowired
  private MongoTemplate mongoTemplate;

  public void test() {
    Song song = new Song();
    song.setSubjectId("s001");
    song.setLyrics("...");
    song.setName("成都");

    mongoTemplate.insert(song);
  }
- 查询数据
// 根据主键进行查询
mongoTemplate.findById(songId, Song.class)
// 多条件查询
import org.springframework.data.mongodb.core.query.Query;
import org.springframework.data.mongodb.core.query.Criteria;

public List<Song> list(Song songParam) {
    // 总条件
    Criteria criteria = new Criteria();
    // 可能有多个子条件
    List<Criteria> subCris = new ArrayList();
    if (StringUtils.hasText(songParam.getName())) {
      subCris.add(Criteria.where("name").is(songParam.getName()));
    }

    if (StringUtils.hasText(songParam.getLyrics())) {
      subCris.add(Criteria.where("lyrics").is(songParam.getLyrics()));
    }

    if (StringUtils.hasText(songParam.getSubjectId())) {
      subCris.add(Criteria.where("subjectId").is(songParam.getSubjectId()));
    }

    // 必须至少有一个查询条件
    if (subCris.isEmpty()) {
      LOG.error("input song query param is not correct.");
      return null;
    }

    // 三个子条件以 and 关键词连接成总条件对象,相当于 name='' and lyrics='' and subjectId=''
    criteria.andOperator(subCris.toArray(new Criteria[]{}));

    // 条件对象构建查询对象
    Query query = new Query(criteria);
    // 仅演示:由于很多同学都在运行演示程序,所以需要限定输出,以免查询数据量太大
    query.limit(10);
    List<Song> songs = mongoTemplate.find(query, Song.class);

    return songs;
}
- 修改数据
// 修改 id=1 的数据
Query query = new Query(Criteria.where("id").is("1"));

// 把歌名修改为 “new name”
Update updateData = new Update();
updateData.set("name", "new name");

// 执行修改,修改返回结果的是一个对象
UpdateResult result = mongoTemplate.updateFirst(query, updateData, Song.class);
// 修改的记录数大于 0 ,表示修改成功
System.out.println("修改的数据记录数量:" + result.getModifiedCount());
- 删除数据
// 执行删除
DeleteResult result = mongoTemplate.remove(song);
// 删除的记录数大于 0 ,表示删除成功
System.out.println("删除的数据记录数量:" + result.getDeletedCount());


 373
373


 被折叠的 条评论
为什么被折叠?
被折叠的 条评论
为什么被折叠?
 到【灌水乐园】发言


