


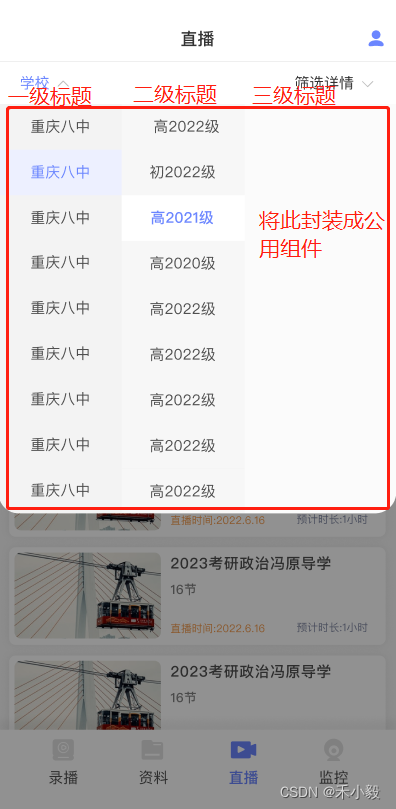
筛选弹窗
需求:
(1)当前菜单只有 “一级标题” 的情况
点击一级标题时,展示选中效果,关闭筛选弹窗,加载课程列表
(2)当前菜单有 “一级标题和二级标题” 的情况
点击一级标题时,展示选中效果并展示二级标题列表
点击二级标题时,展示选中效果,关闭筛选弹窗,加载课程列表
(2)当前菜单有 “一级标题、二级标题和三级标题” 的情况
点击一级标题时,展示选中效果并展示二级标题列表
点击二级标题时,展示选中效果并展示三级标题列表
点击三级标题时,展示选中效果,关闭筛选弹窗,加载课程列表
解决思路:
1、当点击一级标题时,获取点击的id,传给需要id参数的接口
2、当点击二级标题时,找到一级下的二级标题id,传给需要id参数的接口
3、当点击三级标题时,找到一级下的二级下的三级标题id,传给需要id参数的接口
一、筛选弹窗组件 MenuLeft.vue
调用页面传递过来的 menuList数组数据
   "menuList": [
        {
            "Id": 1,
            "Name": "奉节第一中学",
            "Children": [
                {
                    "Id": 2,
                    "Name": "初中",
                    "Children": null
                },
                {
                    "Id": 12,
                    "Name": "高中",
                    "Children": null
                }
            ]
        },
        {
            "Id": 22,
            "Name": "奉节第二中学",
            "Children": [
                {
                    "Id": 23,
                    "Name": "初中",
                    "Children": null
                },
                {
                    "Id": 33,
                    "Name": "高中",
                    "Children": null
                }
            ]
        }
    ]
组件封装详情
<template>
	<view class="search_box">
		<view class="search_text" @click="isShowCilck" :class="[person.isDialogShow?'search_text_active':'']">
			{{prop.defaultValue?prop.defaultValue:prop.popupTitle}}
			<i v-if="person.isDialogShow" :class="['iconfont', 'icon-Frame5']" style="margin-left:10rpx;font-size: 30rpx;"/>
			<i v-if="!prop.defaultValue&&!person.isDialogShow" :class="['iconfont', 'icon-Frame-51']" style="margin-left:10rpx; font-size:30rpx;"/>
			<icon v-if="prop.defaultValue" @click.stop="clearCilck" type="clear" size="14" color="#ddd"/>
		</view>
		<view class="search_dialog" v-if="person.isDialogShow" @click.stop="person.isDialogShow=false">
			<div class="dialog_box">
				<view class="sorcll_left">
					<view class="dialog_item" v-if="menusList&&menusList.length>0">
						<view class="dialog_padding" v-for="(menu,meIndex) of menusList" :key="meIndex" @click.stop="menusChange(menu,meIndex)"
						:class="person.menusActive===meIndex?'dialog_left_active':''">
							{{menu.text}}
							<view class="sorcll_center" v-if="person.menusActive===meIndex">
								<view class="dialog_item" v-if="menu.children&&menu.children.length>0">
									<view class="dialog_padding" v-for="(child,chIndex) of menu.children" :key="chIndex"
									:class="person.childActive===chIndex?'dialog_center_active':''" @click.stop="childChange(child,chIndex)">
										{{child.text}}
										<view class="sorcll_right" v-if="person.childActive===chIndex">
											<view class="dialog_item" v-if="child.children&&child.children.length>0">
												<view class="dialog_padding" v-for="(grand,graIndex) of child.children" :key="graIndex"
												:class="person.grandActive===graIndex?'dialog_right_active':''" @click.stop="grandChange(grand,graIndex)">
													{{grand.text}}
												</view>
											</view>
										</view>
									</view>
								</view>
							</view>
						</view>
					</view>
				</view>
			</div>
		</view>
	</view>
</template>

<script lang="ts" setup>
import { reactive,watch,defineEmits } from 'vue'

let person:any=reactive({
	isDialogShow:false,
	menusActive:null,
	childActive:null,
	grandActive:null,
	activeItem:{}, // 选中的文字
	seltitle:''
})

// 获取传递的参数
type TProps = {
	popupTitle:string,
	menusList:Array<any>,
	defaultValue:string,
	isDialogShow:boolean
}
const prop = withDefaults(defineProps<TProps>(), {})

// 显示弹窗
const isShowCilck=()=>{
	person.isDialogShow=!person.isDialogShow
}

const emit = defineEmits(['oneMenu','twoMenu','threeMenu','clearText'])

// 清空
const clearCilck=()=>{
	prop.defaultValue=''
	person.menusActive=null
	person.childActive=null
	person.grandActive=null
	emit('clearText',person.activeItem)
}
// 一级
const menusChange=(item:any,index:number)=>{
	person.menusActive=index
	// 是否在第一级就关闭弹窗
	if(item.children===null){
		person.isDialogShow=false
	}
	person.activeItem=item
	emit('oneMenu',person.activeItem)
}
// 二级
const childChange=(item:any,index:number)=>{
	person.childActive=index
	person.isDialogShow=false
	emit('twoMenu',person.activeItem,item)
}
// 三级
const grandChange=(item:any,index:number)=>{
	person.grandActive=index
	emit('threeMenu',item)
}

watch(()=>prop.isDialogShow,(newval)=>{
	person.isDialogShow=newval
})
</script>

<style lang="scss" scoped>
.search_box{
	margin: 0 40rpx;
	.search_text{
		color: #4F4F4F;
		font-size: 28rpx;
		display: flex;
		align-items: center;
		image{
			width: 28rpx;
			height: 16rpx;
			margin-left: 10rpx;
		}
		icon{
			margin-left: 10rpx;
		}
	}
	.search_text_active{
		color: #6B86FF !important;
	}
	.search_dialog{
		font-size: 28rpx;
		position: absolute;
		top: 170rpx;
		left: 0;
		width: 100%;
		height: 100vh;
		background: rgba(0,0,0,.2);
		.dialog_box{
			background: #FBFBFB;
			height: calc(100vh - 700rpx);
			border-radius:0rpx 0rpx 40rpx 40rpx;
			text-align: center;
			display: flex;
			width: 100%;
			position: relative;
			.sorcll_left{
				width: 33.3%;
				background: #F3F3F3;
			}
			.sorcll_center{
				position: absolute;
				top: 0;
				left: 33.3%;
				width: 33.3%;
				background: rgba(241, 241, 241, 0.41);
			}
			.sorcll_right{
				position: absolute;
				top: 0;
				left: 100%;
				width: 100%;
			}
			.dialog_item{
				height: calc(100vh - 700rpx);
				overflow-y: scroll;
				color: #4F4F4F;
			}
			.dialog_padding{
				padding: 20rpx 0;
			}
			.dialog_left_active{
				background: #EDF0FF !important;
				color:  #6B86FF !important;
			}
			.dialog_center_active{
				background: #fff !important;
				color: #6B86FF !important;
			}
			.dialog_right_active{
				background: #EDF0FF !important;
				color:  #666 !important;
			}
		}
	}
}
</style>
二、页面调用
<template>
<view class="top">
	<head headText="录播"></head>
	<view class="search" v-if="person.itemMenu&&person.itemMenu.length>0">
		<search v-if="person.itemMenu&&person.itemMenu.length>0" @clearText="leftClear" :isDialogShow="person.selectIsShow1" @oneMenu="oneMenuLeft" @twoMenu="twoMenuLeft" :defaultValue="person.selectValue1" :menusList="person.itemMenu" popupTitle="请选择学校/年级"/>
	</view>
</view>
<view class="list" v-if="person.recordList&&person.recordList.length>0">
	<view class="item" v-for="(record,reIndex) of person.recordList" :key="reIndex" @click="toDetails(record)">
		<image class="uni_image" v-if="record.CoverUrl" :src="record.CoverUrl"></image>
		<image class="uni_image" v-else src="@/static/lizi_pic.png"></image>
		<view class="item_right">
			<view class="item_title">{{record.Name}}</view>
			<view class="item_techer">主讲:{{record.TeacherName}}</view>
			<view class="item_bottom">
				<label><i :class="['iconfont', 'icon-Frame-11']" style="color:#FF8A1F;margin-right: 10rpx;"/> 课时:{{record.ClassHour}}</label>
				<label><i :class="['iconfont', 'icon-Frame1']" style="color:#AF7EFF;margin-right: 10rpx;"/> 时长:{{record.SumTime}}分钟</label>
			</view>
		</view>
	</view>
</view>
<view v-else class="empty_box">
	<image src="@/static/null_icon.png" mode=""></image>
</view>
</template>

<script  lang="ts" setup>
import { reactive } from 'vue'
import { getRecordList,getRecordMenu } from '@/api/record';
let person:any=reactive({
	// 录播列表
	recordList:[],
	itemMenu:[],
	gradeList:[],
	selectValue1:'',
	selectValue2:'',
	selectIsShow1: false,
	selectIsShow2: false
})

// 获取menu接口
const GetRecordMenu= async (Id: number)=> {
	if(Id === 0){
		let result = await api(Id)
		person.itemMenu = result
		if(person.itemMenu&&person.itemMenu.length>0){
			const perent=person.itemMenu[0].text
			if(person.itemMenu[0].children&&person.itemMenu[0].children.length>0){
				person.selectValue1=perent+'/'+person.itemMenu[0].children[0].text
				getData(person.itemMenu[0].children[0].value)
			}else{
				person.selectValue1=perent
				getData(person.itemMenu[0].value)
			}
		}
	}
}
const api = (Id:number)=>{
	return new Promise((resolve,reject)=>{
		getRecordMenu({ ParentId: Id }).then((res:any)=>{
			let {Code,Data}=res.data
			if(Code===200){
				let a = JSON.parse(JSON.stringify(Data).replace(/Name/g, 'text').replace(/Id/g, 'value').replace(/Children/g,'children'))
				resolve(a)
			}
		})
	})
}

// 跳转至详情页
let toDetails=(item:any)=>{
	uni.navigateTo({
		url: `/pages/recording/recordDetails?NodeId=${item.Id}&Id=${item.Chapter[0].Id}`
	});
}
// 获取录播列表
let GetRecordList = (id:number) => {
	getRecordList({ Id: id }).then((res:any)=>{
		let {Code,Data}=res.data
		if(Code===200){
			person.recordList=Data
		}
	})
}

const getData=(node:number) =>{
	GetRecordMenu(node)
	GetRecordList(node)
}
getData(0)

// 左侧
// 清空
const leftClear=()=>{
	GetRecordList(0)
	person.selectValue1=''
}
// 一级
const oneMenuLeft=(node:any)=>{
	person.selectValue1=node.text
	getData(node.value)
}
// 二级
const twoMenuLeft=(node:any,node1:any)=>{
	if(node1.value){
		person.selectValue1=node.text+'/'+node1.text
     	getData(node1.value)
	}
}

</script>
<style lang="scss" scoped>
page{
	background: #F5F5F5;
}
</style>
希望我的愚见能够帮助你哦~,若有不足之处,还望指出,你们有更好的解决方法,欢迎大家在评论区下方留言支持,大家一起相互学习参考呀~


 5587
5587


 被折叠的 条评论
为什么被折叠?
被折叠的 条评论
为什么被折叠?
 到【灌水乐园】发言


