


C#上位机开发-2-串口通信
文章目录
前言
使用c#加visual studio 制作一个简单的串口通信软件。
一、窗口组件
1. 组件
panel
label
button
textbox
numericUpDown
checkbox
radiobutton
groupbox
progressbar
picturebox
serialport
timer
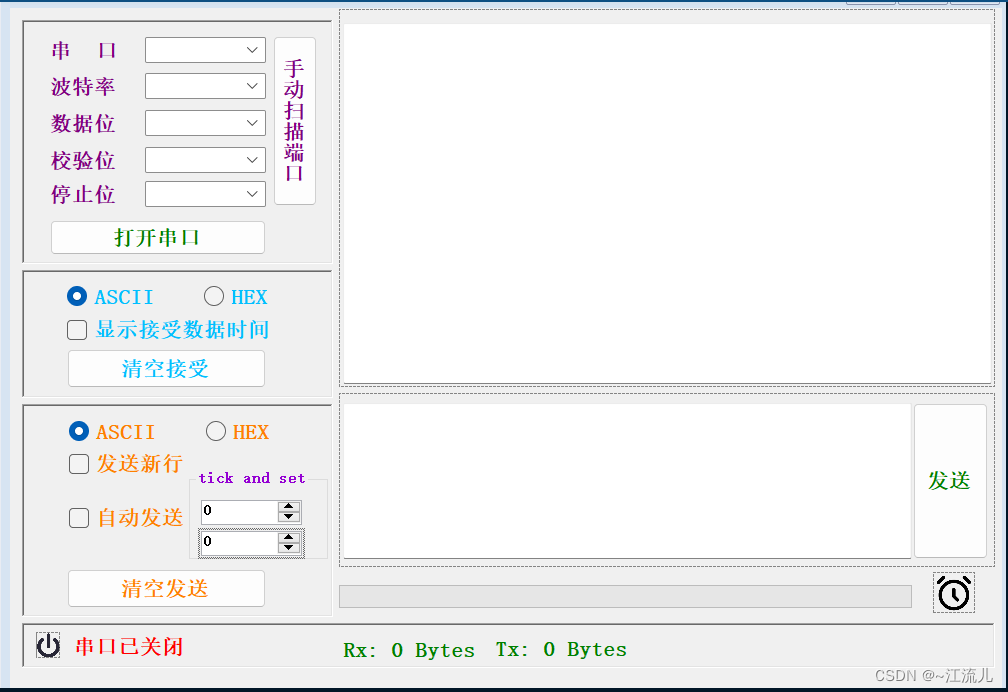
2.界面布局
二、事件部分
1. 窗体初始加载
//初始化时界面加载内容配置
        private void Form1_Load(object sender, EventArgs e)
        {
            //获取电脑当前可用串口并添加到选项列表中
            comboBox1.Items.AddRange(System.IO.Ports.SerialPort.GetPortNames());
            int i;
            //单个添加
            for (i = 300; i <= 38400; i = i * 2)
            {
                comboBox2.Items.Add(i.ToString());  //添加波特率列表
            }

            //批量添加波特率列表
            string[] baud = { "43000", "56000", "57600", "115200", "128000", "230400", "256000", "460800" };
            comboBox2.Items.AddRange(baud);

            //设置默认值
            //comboBox1.Text = "COM1";
            comboBox2.Text = "115200";
            comboBox3.Text = "8";
            comboBox4.Text = "None";
            comboBox5.Text = "1";
            btn_data_send.Enabled = false;//开始界面发送失能
            numericUpDown1_tick.Value = 500;
            numericUpDown2_set.Value = 5;

        }
2. 串口开关
//串口开关按键
        private void btn_serial_switch_Click(object sender, EventArgs e)
        {
            try
            {
                //将可能产生异常的代码放置在try块中
                //根据当前串口属性来判断是否打开
                if (serialPort1.IsOpen)
                {
                    //串口已经处于打开状态
                    serialPort1.Close();    //关闭串口
                    btn_serial_switch.Text = "打开串口";
                    btn_serial_switch.ForeColor = Color.ForestGreen;
                    //串口状态显示
                    label6.Text = "串口已关闭";
                    label6.ForeColor = Color.Red;

                    comboBox1.Enabled = true;
                    comboBox2.Enabled = true;
                    comboBox3.Enabled = true;
                    comboBox4.Enabled = true;
                    comboBox5.Enabled = true;
                    btn_data_send.Enabled = false;
                    btn_com_scan.Enabled = true;
                    textBox_receive.Text = "";  //清空接收区
                    textBox_send.Text = "";     //清空发送区
                }
                else
                {
                    //串口已经处于关闭状态,则设置好串口属性后打开
                    comboBox1.Enabled = false;
                    comboBox2.Enabled = false;
                    comboBox3.Enabled = false;
                    comboBox4.Enabled = false;
                    comboBox5.Enabled = false;
                    btn_data_send.Enabled = true;
                    btn_com_scan.Enabled = false;
                    serialPort1.PortName = comboBox1.Text;
                    serialPort1.BaudRate = Convert.ToInt32(comboBox2.Text);
                    serialPort1.DataBits = Convert.ToInt16(comboBox3.Text);

                    if (comboBox4.Text.Equals("None"))
                        serialPort1.Parity = System.IO.Ports.Parity.None;
                    else if (comboBox4.Text.Equals("Odd"))
                        serialPort1.Parity = System.IO.Ports.Parity.Odd;
                    else if (comboBox4.Text.Equals("Even"))
                        serialPort1.Parity = System.IO.Ports.Parity.Even;
                    else if (comboBox4.Text.Equals("Mark"))
                        serialPort1.Parity = System.IO.Ports.Parity.Mark;
                    else if (comboBox4.Text.Equals("Space"))
                        serialPort1.Parity = System.IO.Ports.Parity.Space;

                    if (comboBox5.Text.Equals("1"))
                        serialPort1.StopBits = System.IO.Ports.StopBits.One;
                    else if (comboBox5.Text.Equals("1.5"))
                        serialPort1.StopBits = System.IO.Ports.StopBits.OnePointFive;
                    else if (comboBox5.Text.Equals("2"))
                        serialPort1.StopBits = System.IO.Ports.StopBits.Two;

                    serialPort1.Open();     //打开串口
                    btn_serial_switch.Text = "关闭串口";
                    btn_serial_switch.ForeColor = Color.Firebrick;

                    //串口状态显示
                    label6.Text = "串口已打开";
                    label6.ForeColor = Color.Green;

                }
            }
            catch (Exception ex)
            {
                //捕获可能发生的异常并进行处理

                //捕获到异常,创建一个新的对象,之前的不可以再用
                serialPort1 = new System.IO.Ports.SerialPort();
                //刷新COM口选项
                comboBox1.Items.Clear();
                comboBox1.Items.AddRange(System.IO.Ports.SerialPort.GetPortNames());
                //响铃并显示异常给用户
                System.Media.SystemSounds.Beep.Play();
                btn_serial_switch.Text = "打开串口";
                btn_serial_switch.ForeColor = Color.ForestGreen;
                MessageBox.Show(ex.Message);
                comboBox1.Enabled = true;
                comboBox2.Enabled = true;
                comboBox3.Enabled = true;
                comboBox4.Enabled = true;
                comboBox5.Enabled = true;
            }
        }
3. COM端口扫描
在窗体加载函数中使用了一次,使得软件在开始时自动扫描加载一遍COM端口
 //端口扫描按键
        private void btn_com_scan_Click(object sender, EventArgs e)
        {
            //获取电脑当前可用串口并添加到选项列表中
            comboBox1.Items.Clear();
            comboBox1.Items.AddRange(System.IO.Ports.SerialPort.GetPortNames());
        }
4. 串口接受函数
串口接受时分hex,ascill两种类型,通过对radiobutton进行选择
//串口数据接受回调函数
        private void SerialPort1_DataReceived(object sender, SerialDataReceivedEventArgs e)
        {
            int num = serialPort1.BytesToRead;      //获取接收缓冲区中的字节数
            byte[] received_buf = new byte[num];    //声明一个大小为num的字节数据用于存放读出的byte型数据

            receive_count += num;                   //接收字节计数变量增加nun
            serialPort1.Read(received_buf, 0, num);   //读取接收缓冲区中num个字节到byte数组中

            sb.Clear();     //防止出错,首先清空字符串构造器
            //遍历数组进行字符串转化及拼接
            if (btn_received_hex.Checked)
            {
                //选中HEX模式显示
                foreach (byte b in received_buf)
                {
                    sb.Append(b.ToString("X2") + ' ');    //将byte型数据转化为2位16进制文本显示,用空格隔开
                }
            }
            else
            {
                //选中ASCII模式显示
                sb.Append(Encoding.ASCII.GetString(received_buf));  //将整个数组解码为ASCII数组
            }
            try
            {
                //因为要访问UI资源,所以需要使用invoke方式同步ui
                Invoke((EventHandler)(delegate
                {
                    textBox_receive.AppendText(sb.ToString());
                    rx_count.Text = "Rx:" + receive_count.ToString() + "Bytes";
                }
                  )
                );
            }
            catch (Exception ex)
            {
                //响铃并显示异常给用户
                System.Media.SystemSounds.Beep.Play();
                MessageBox.Show(ex.Message);
            }


        }
5. 发送内容
同接受函数一样,可以选择发送hex格式还是ascill格式
//数据发送按键
        private void btn_data_send_Click(object sender, EventArgs e)
        {
            byte[] temp = new byte[1];
            try
            {
                //首先判断串口是否开启
                if (serialPort1.IsOpen)
                {
                    int num = 0;   //获取本次发送字节数
                                   //串口处于开启状态,将发送区文本发送

                    //判断发送模式
                    if (btn_send_hex.Checked)
                    {
                        //以HEX模式发送
                        //首先需要用正则表达式将用户输入字符中的十六进制字符匹配出来
                        string buf = textBox_send.Text;
                        string pattern = @"\s";
                        string replacement = "";
                        Regex rgx = new Regex(pattern);
                        string send_data = rgx.Replace(buf, replacement);

                        //不发送新行
                        num = (send_data.Length - send_data.Length % 2) / 2;
                        for (int i = 0; i < num; i++)
                        {
                            temp[0] = Convert.ToByte(send_data.Substring(i * 2, 2), 16);
                            serialPort1.Write(temp, 0, 1);  //循环发送
                        }
                        //如果用户输入的字符是奇数,则单独处理
                        if (send_data.Length % 2 != 0)
                        {
                            temp[0] = Convert.ToByte(send_data.Substring(textBox_send.Text.Length - 1, 1), 16);
                            serialPort1.Write(temp, 0, 1);
                            num++;
                        }
                        //判断是否开启自动发送新行
                        if (send_new_line.Checked)
                        {
                            serialPort1.WriteLine("\r\n");
                        }
                    }
                    else
                    {
                        //以ASCII模式发送
                        //判断是否需要发送新行
                        if (send_new_line.Checked)
                        {
                            //自动发送新行
                            serialPort1.WriteLine(textBox_send.Text);
                            serialPort1.WriteLine("\r\n");
                            num = textBox_send.Text.Length + 2; //回车占两个字节
                        }
                        else
                        {
                            //不发送新行
                            serialPort1.Write(textBox_send.Text);
                            num = textBox_send.Text.Length;
                        }
                    }

                    send_count += num;      //计数变量累加
                    tx_count.Text = "Tx:" + send_count.ToString() + "Bytes";   //刷新界面
                }
            }
            catch (Exception ex)
            {
                serialPort1.Close();
                //捕获到异常,创建一个新的对象,之前的不可以再用
                serialPort1 = new System.IO.Ports.SerialPort();
                //刷新COM口选项
                comboBox1.Items.Clear();
                comboBox1.Items.AddRange(System.IO.Ports.SerialPort.GetPortNames());
                //响铃并显示异常给用户
                System.Media.SystemSounds.Beep.Play();
                btn_serial_switch.Text = "打开串口";
                btn_serial_switch.ForeColor = Color.ForestGreen;
                MessageBox.Show(ex.Message);
                comboBox1.Enabled = true;
                comboBox2.Enabled = true;
                comboBox3.Enabled = true;
                comboBox4.Enabled = true;
                comboBox5.Enabled = true;
            }
        }
6. 清除发送内容
private void btn_clear_send_Click(object sender, EventArgs e)
        {
            textBox_send.Text = "";
            send_count = 0;
            tx_count.Text = "Tx:" + " 0 " + "Bytes";
        }
7. 清除接受内容
 private void btn_clear_received_Click(object sender, EventArgs e)
        {
            textBox_receive.Text = " ";
            receive_count = 0;
            rx_count.Text = "Rx:" + " 0 " + "Bytes";
        }
8. 自动发送内容
当自动发送复选框被选中后会按照设定要求自动发送内容,在界面中可以看到两个numericUpDown组件,一个是给定时器设置interval时间间隔,一个是设置自动发送的次数。在界面中还添加了进度条,进度条可以显示自动发送的完成量
private void checkBox2_CheckedChanged(object sender, EventArgs e)
        {
            if (btn_auto_send.Checked)
            {
                //自动发送功能选中,开始自动发送
                numericUpDown1_tick.Enabled = false;     //失能时间选择
                timer1.Interval = (int)numericUpDown1_tick.Value;     //定时器赋初值
                set_timer = (int)numericUpDown2_set.Value;
                timer1.Start();     //启动定时器
                label6.Text = "串口已打开" + " 自动发送中...";
                numericUpDown1_tick.Enabled = false;
                numericUpDown2_set.Enabled = false;
                timer_set_progress.Maximum = set_timer;

            }
            else
            {
                //自动发送功能未选中,停止自动发送
                numericUpDown1_tick.Enabled = true;     //使能时间选择
                timer1.Stop();     //停止定时器
                label6.Text = "串口已打开";
                numericUpDown1_tick.Enabled = true;
                numericUpDown2_set.Enabled = true;
                timer_set_progress.Value = 0;//进度条归零

            }

        }
9. 定时器处理
private void timer1_Tick(object sender, EventArgs e)
        {
            if (set_timer == 0)
            {
                //timer_set_progress.Value = timer_set_progress.Maximum ;
                timer1.Stop();
                set_timer = 0;
            }
            else
            {
                //定时时间到,调用发送按钮回调函数
                btn_data_send_Click(btn_data_send, new EventArgs());
                set_timer -= 1;
                //进度条
                timer_set_progress.Value = timer_set_progress.Maximum - set_timer;
            }
        }
总结
显示接受数据时间没加~
简洁版串口上位机开发学习内容如上。


 7670
7670


 被折叠的 条评论
为什么被折叠?
被折叠的 条评论
为什么被折叠?
 到【灌水乐园】发言


