


1、整体架构和组件
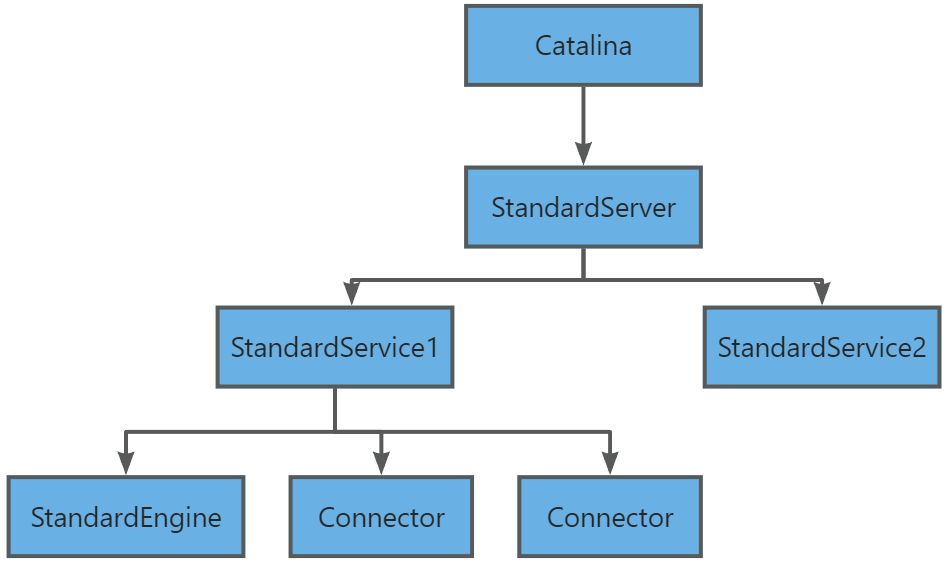
(1)整体架构
- Connector:用于处理连接事件,并提供Socket与Request,Response的转化;
- Container:封装和管理Servlet,用户处理Request请求;
- 一个Tomcat只有一个Server,一个Server有多个Service;
- 一个Service中只有一个Container,但有多个Connector,因为一个Service可以有多个连接;其生命周期由Server控制;

(2)组件
①组件介绍
- Server:服务器,启动和停止整个系统;
- Service:服务,一个Server上可以由多个服务,如订单服务,支付服务;
- Connector:连接器,一个服务可以支持多种协议,每个协议对应一个Connector来处理;
- Container:表示容器,即Servlet容器,包括Engine(引擎)、Host(主机)、Context(上下文)、Wrapper(包装器);
- Connector和Container关系:所有请求到达Tomcat后,首先经过Service交由Connector进行处理,Connector会将请求封装为Request,然后将请求交给Container处理,Container处理完后交给Connector,Connector底层通过socket进行数据返回客户端;

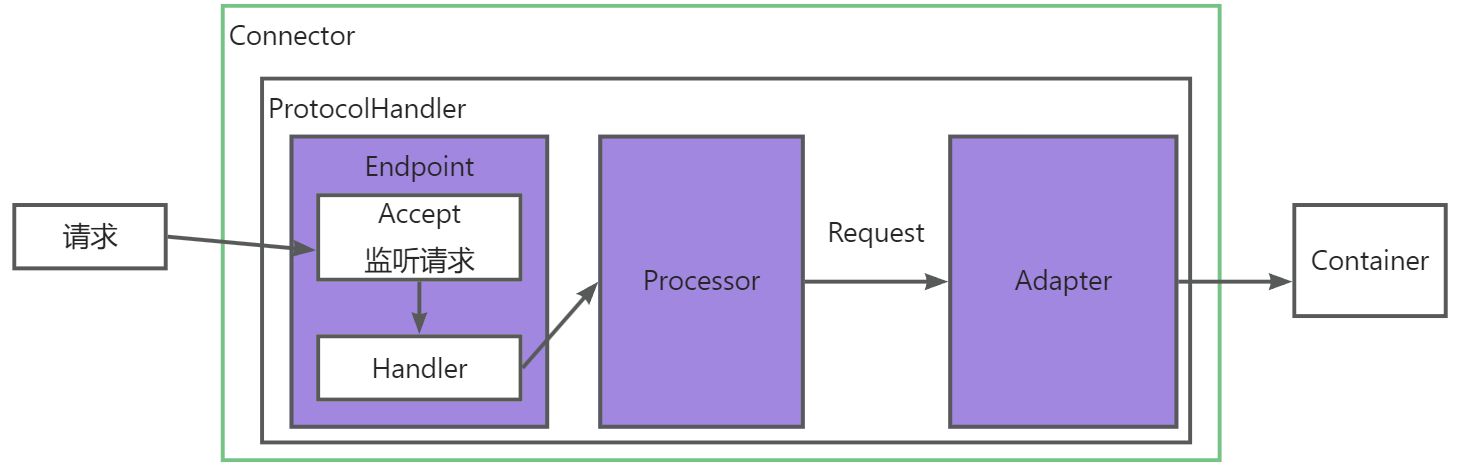
②Connector
- Connector内部通过ProtocolHandler来处理请求,一个ProtocolHandler代表一个连接处理(如HTTP、HTTPS各有一个对应的ProtocolHandler);
- Endpoint用于处理底层socket的连接,Processor用于将Endpoint处理的socket连接封装为Request,Adpater将Request转发给Container;
- Endpoint用来实现TCP/IP协议,Processor用来实现HTTP协议,Adpater用于将请求适配到Servlet容器中处理;
③Container
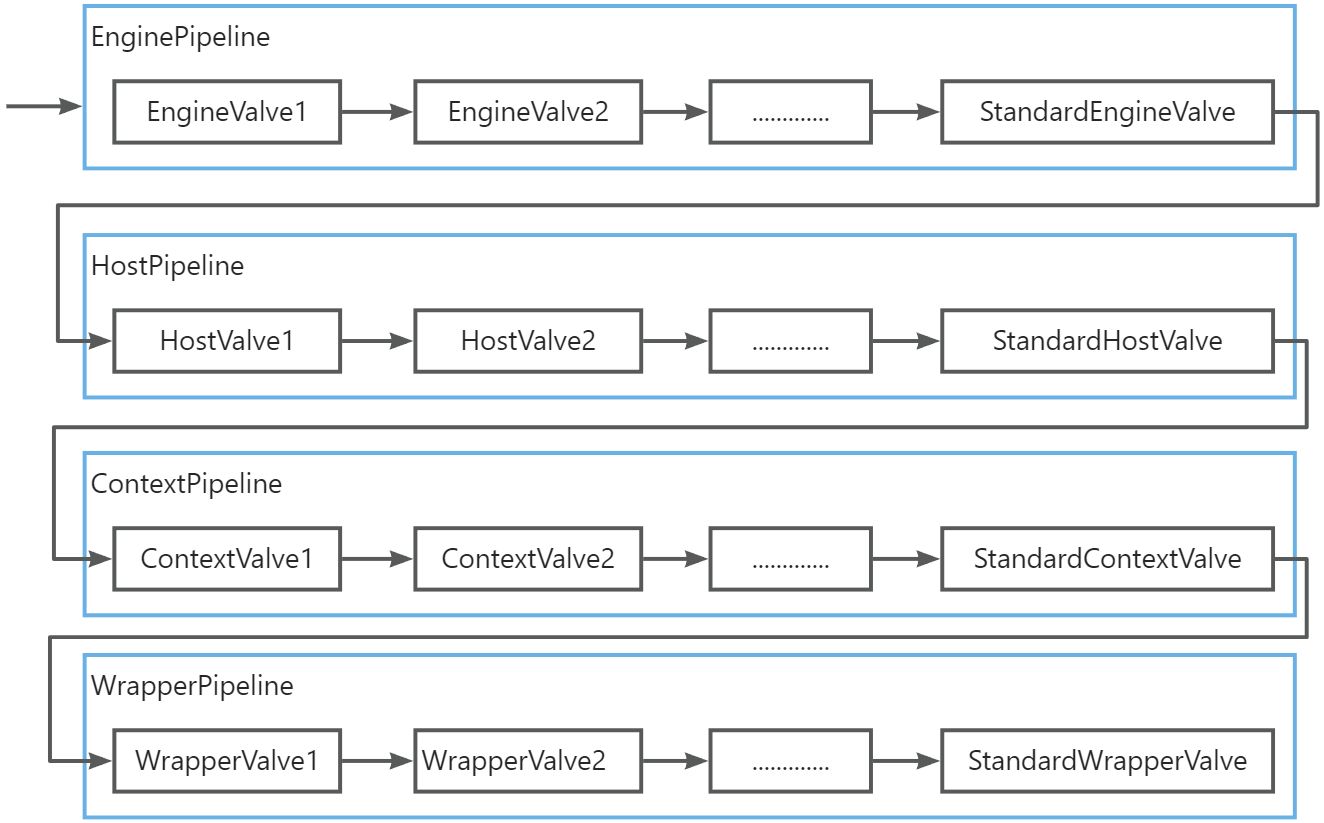
- Container接收到请求后,会调用最顶层PipeLine,即EnginePipeline;
- 然后会依次执行Pipeline中的value,每个Pipeline的最后一个Standard*Value会调用下一个PipeLine;
- 执行到最后一个StandardWrapperValue,会创建FIlterChain,FilterChain包括与请求匹配的filter(过滤器)和Servlet,依次执行FIlterChain中的doFilter()方法,执行完后会调用service方法;
- 请求处理完毕后,会将结果返回给Connector;
2、生命周期Lifecycle机制
(1)LIfecycle
- Lifecycle是一个状态机,管理组件的生命周期;
- 当组件状态为starting_prep(准备启动),starting(正在启动),started(已经启动),调用star()方法是无效的;
- 当组件状态为new(新创建),调用start()方法会先执行init()方法,然后执行start();
- 当组件状态为stop_prep(准备停止),stopping(正在停止),stoped(已经停止),调用stop()方法为无效的;
- stop()方法可以将new状态变为stoped状态;
(2)LifecycleBase
①监听器增加,删除,返回
- 生命周期的监听器保存在CopyOnWriteArrayList集合中,保证线程安全;
- 返回监听器是返回一个新的数组;
- 采用模板设计模式来实现;
②init()
- setStateInternal():修改状态state,state用volite修饰;
- initInternal():为abstract类型,需要组件自己实现对应方法;
public final synchronized void init() throws LifecycleException {
    if (!state.equals(LifecycleState.NEW)) {//不是NEW状态,不能调用
        invalidTransition(Lifecycle.BEFORE_INIT_EVENT);
    }
    try {
        setStateInternal(LifecycleState.INITIALIZING, null, false);//修改状态
        initInternal();//初始化方法,需要组件自己实现
        setStateInternal(LifecycleState.INITIALIZED, null, false);//修改状态
    } catch (Throwable t) {
        handleSubClassException(t, "lifecycleBase.initFail", toString());//异常处理
    }
}
③start()
public final synchronized void start() throws LifecycleException {
	//不是启动,准备启动,正在启动状态
    if (LifecycleState.STARTING_PREP.equals(state) || LifecycleState.STARTING.equals(state) ||
        LifecycleState.STARTED.equals(state)) {
    	//代码忽略
        return;
    }
	//为new状态,调用init()方法
    if (state.equals(LifecycleState.NEW)) {
        init();
    } else if (state.equals(LifecycleState.FAILED)) {//启动失败
        stop();
    } else if (!state.equals(LifecycleState.INITIALIZED) &&
               !state.equals(LifecycleState.STOPPED)) {
        invalidTransition(Lifecycle.BEFORE_START_EVENT);
    }
    try {
        setStateInternal(LifecycleState.STARTING_PREP, null, false);
        startInternal();//组件自己实现
        if (state.equals(LifecycleState.FAILED)) {
            stop();
        } else if (!state.equals(LifecycleState.STARTING)) {
            invalidTransition(Lifecycle.AFTER_START_EVENT);
        } else {
            setStateInternal(LifecycleState.STARTED, null, false);//设置为已启动状态
        }
    } catch (Throwable t) {
        handleSubClassException(t, "lifecycleBase.startFail", toString());
    }
}
④stop()
public final synchronized void stop() throws LifecycleException {
    if (LifecycleState.STOPPING_PREP.equals(state) || LifecycleState.STOPPING.equals(state) ||
        LifecycleState.STOPPED.equals(state)) {//为这些状态,不能调用
    	//代码忽略
        return;
    }
	//将new状态设置为stopped状态
    if (state.equals(LifecycleState.NEW)) {
        state = LifecycleState.STOPPED;
        return;
    }
    if (!state.equals(LifecycleState.STARTED) && !state.equals(LifecycleState.FAILED)) {
        invalidTransition(Lifecycle.BEFORE_STOP_EVENT);
    }
    try {
        if (state.equals(LifecycleState.FAILED)) {
            fireLifecycleEvent(BEFORE_STOP_EVENT, null);
        } else {
            setStateInternal(LifecycleState.STOPPING_PREP, null, false);
        }
        stopInternal();//组件自己实现
        if (!state.equals(LifecycleState.STOPPING) && !state.equals(LifecycleState.FAILED)) {
            invalidTransition(Lifecycle.AFTER_STOP_EVENT);
        }
        setStateInternal(LifecycleState.STOPPED, null, false);
    }
    //代码忽略
}
⑤destory()
public final synchronized void destroy() throws LifecycleException {
    if (LifecycleState.FAILED.equals(state)) {
        try {
            stop();//failed状态触发stop方法
        }
        //代码忽略。。。。
    }
	//处于销毁或已经销毁状态
    if (LifecycleState.DESTROYING.equals(state) || LifecycleState.DESTROYED.equals(state)) {
    	//代码忽略。。。。。
        return;
    }
	//检查不合法状态代码忽略。。。
    try {
        setStateInternal(LifecycleState.DESTROYING, null, false);
        destroyInternal();//组件自己实现
        setStateInternal(LifecycleState.DESTROYED, null, false);
    } catch (Throwable t) {
        handleSubClassException(t, "lifecycleBase.destroyFail", toString());
    }
}
3、类加载
(1)类加载机制
- java虚拟机把描述类的数据从Class类加载进行内存,并对数据进行校验、解析转换、初始化,最终形成可被虚拟机直接使用的java类型;
- 对于任何一个类,需要由加载他的类加载器和该类确定其在java虚拟机中的唯一性,每一个类加载器都有一个唯一的命名空间;
- 比较两个类是否相等,不同类加载器的类比较肯定不相等;
(2)双亲委派模型
类加载器:
- 启动类加载器(Bootstrap ClassLoader):加载存放于JAVA_HOME/lib目录下文件,由虚拟机识别,按照文件名称识别;
- 扩展类加载器(Extension ClassLoader):加载存放于JAVA_HOME/lib/ext目录下的类库;
- 应用程序类加载器(Application ClassLoader):加载ClassPath下的类库(即我们自己开发的类);
双亲委派工作原理:
- 一个类加载器收到类加载请求,自己不会加载,会传给父类加载器加载;
- 最终传送到启动类加载器,若父类加载器无法加载该类,子类会尝试加载;
使用双亲委派原因:
- 若不这样做,当用户写了一个java.lang.String类,并放在ClassPath下,那系统中会出现多个String类,会破坏java类型体系;
- 当开启双亲委派,当用户写了一个java.lang.String类,并放在ClassPath下,会直接报错;
protected Class<?> loadClass(String name, boolean resolve) throws ClassNotFoundException{
    synchronized (getClassLoadingLock(name)) {
        // 查看类是否被加载过
        Class<?> c = findLoadedClass(name);
        if (c == null) {
            long t0 = System.nanoTime();
            try {
                if (parent != null) {
                    //让父类加载类
                    c = parent.loadClass(name, false);
                } else {
                    c = findBootstrapClassOrNull(name);
                }
            } catch (ClassNotFoundException e) {
                //父类加载不了,抛出异常
            }
            if (c == null) {//父类未加载到
                long t1 = System.nanoTime();
                c = findClass(name);//调用本身类加载器加载
                //类记录代码忽略。。。。。
            }
        }
        if (resolve) {
            resolveClass(c);
        }
        return c;
    }
}
(3)Tomcat类加载
Tomcat不能使用默认类加载机制:
- 多个不同应用程序依赖同一个类库的不同版本,默认类加载器只能加载一份唯一的类库,不会管类库的版本号;
- 当修改jsp文件时,默认类加载器会直接获取方法区中的jsp文件(旧的),修改的jsp是不会被加载进去,解决方法就是将jsp类加载器卸载,重新创建类加载器;
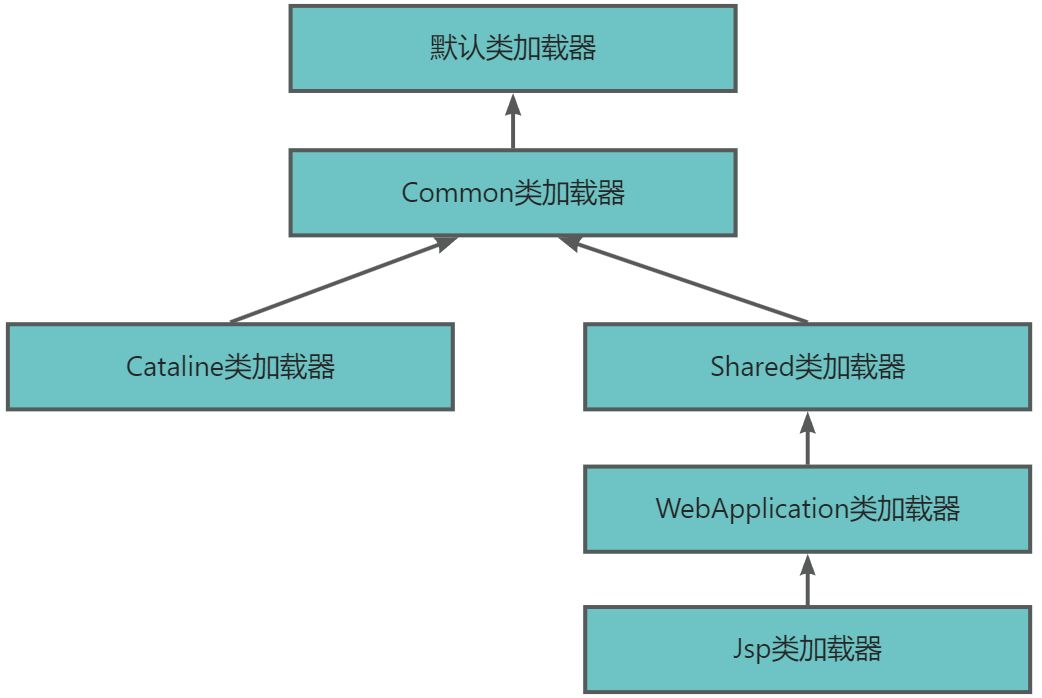
Tomcat新增类加载器:
- Common类加载器:加载Tomcat和Web都复用的类;
- Cataline类加载器:加载Tomcat专用的类;
- Shared类加载器:加载Tomcat下所有应用程序复用的类;
- WebApplication类加载器:加载具体的web应用中所使用的类;
- Jsp类加载器:加载每一个Jsp页面,实现热插拔(修改代码后,不用重启也会生效);
4、Tomcat启动过程
(1)启动脚本
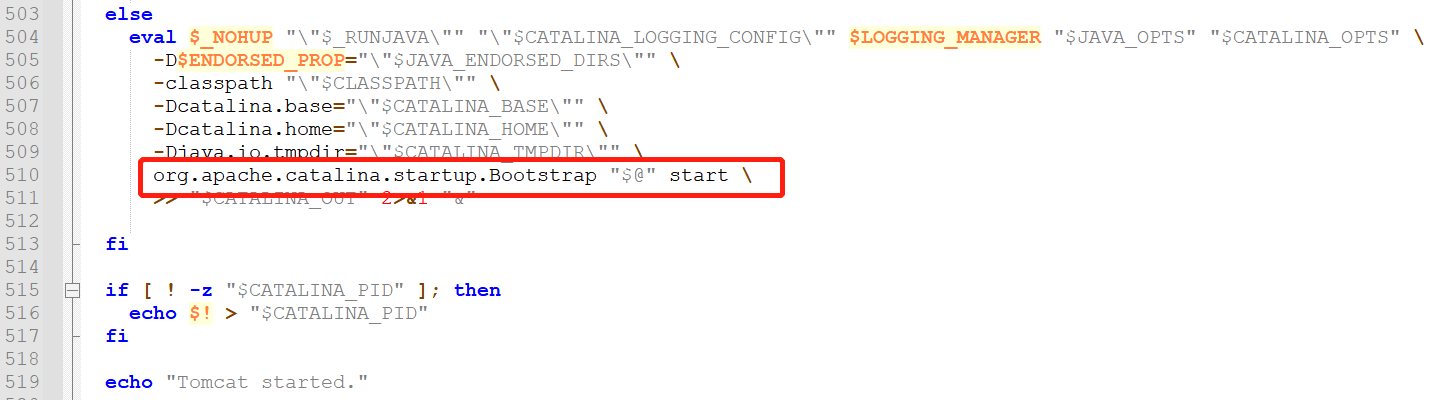
- startup.sh是Tomcat的启动脚本,会调用catalina.sh脚本,并且传入start参数;

- catalina.sh脚本会调用Bootstrap中的main()方法,并且携带start参数;
(2)Bootstrap.main()
public static void main(String args[]) {
    synchronized (daemonLock) {
        if (daemon == null) {//daemon为bootstrap,刚启动时,dameon为null
            Bootstrap bootstrap = new Bootstrap();
            try {
                //类加载
                bootstrap.init();
            } catch (Throwable t) {
                //异常处理代码忽略。。。。。
                return;
            }
            daemon = bootstrap;
        } else {
            Thread.currentThread().setContextClassLoader(daemon.catalinaLoader);
        }
    }

    try {
        String command = "start";
        if (args.length > 0) {//获取最后一个参数,catalina.sh传入参数为start
            command = args[args.length - 1];
        }
        if (command.equals("startd")) {//启动状态
            args[args.length - 1] = "start";
            daemon.load(args);
            daemon.start();
        } else if (command.equals("stopd")) {//停止状态
            args[args.length - 1] = "stop";
            daemon.stop();
        } else if (command.equals("start")) {//启动状态
            daemon.setAwait(true);//设置catalina实例setAwait()方法
            daemon.load(args);///调用catalina的load()方法
            daemon.start();//反射调用Catalina的start()方法
            if (null == daemon.getServer()) {
                System.exit(1);
            }
        }
        //代码忽略。。。。。
}
Bootstrap.init():
- 反射创建类Catalina实例,并赋值给catalinaDaemon;
public void init() throws Exception {
    initClassLoaders();//加载启动需要的相关类
    //代码忽略。。。。。。。
	//反射实例化Catalina类
    Class<?> startupClass = catalinaLoader.loadClass("org.apache.catalina.startup.Catalina");
    Object startupInstance = startupClass.getConstructor().newInstance();
    //代码忽略。。。。。。。
    String methodName = "setParentClassLoader";
    //参数设置代码忽略。。。。。。。
    startupInstance.getClass().getMethod(methodName, paramTypes);
    method.invoke(startupInstance, paramValues);//执行setParentClassLoader()方法
    catalinaDaemon = startupInstance;
}
(3)daemon.load(args)【main方法中】
①Catalina.load()方法
- daemon.load()方法,反射调用Catalina.load()方法;
- 核心方法为getServer.init(),该方法初始化了server,server为Tomcat中的最外容器;
//Catalina.load()
public void load() {
    if (loaded) {//已经加载过
        return;
    }
    loaded = true;
    long t1 = System.nanoTime();
    initDirs();
    initNaming();//初始化jmx
    //代码忽略。。。。。。。。
    Digester digester = createStartDigester();//告知digester,哪个xml应该解析成生命类型

    try (ConfigurationSource.Resource resource = ConfigFileLoader.getSource().getServerXml()) {
        InputStream inputStream = resource.getInputStream();
        InputSource inputSource = new InputSource(resource.getURI().toURL().toString());
        inputSource.setByteStream(inputStream);
        digester.push(this);
        digester.parse(inputSource);
    } catch (Exception e) {
       //异常处理代码忽略。。。。。。
    }
	//server设置catalina信息
    getServer().setCatalina(this);
    getServer().setCatalinaHome(Bootstrap.getCatalinaHomeFile());
    getServer().setCatalinaBase(Bootstrap.getCatalinaBaseFile());
    initStreams();
    try {
        getServer().init();//调用lifecycle的init方法,server初始化
    }
    //代码忽略
}
②Server初始化
- Server的实现类为StandardServer,下面的initInternal()方法会调用StandardServer中的方法;
- StandardServer中,遍历每一个Service,对每一个Service中的组件进行初始化;
//lifecycleBase.init()
public final synchronized void init() throws LifecycleException {
	//代码忽略
    try {
        setStateInternal(LifecycleState.INITIALIZING, null, false);
        initInternal();//初始化各种service组件
        setStateInternal(LifecycleState.INITIALIZED, null, false);
    }
    //代码忽略
}
//StandardServer.class
protected void initInternal() throws LifecycleException {
super.initInternal();
//代码忽略。。。
for (int i = 0; i < services.length; i++) {
services[i].init();
}
}③Service初始化
- StandardServer中遍历services数组,调用init()方法初始化,最终调用StandardService中的initInternal()方法;
- 该方法会初始化Engine。Connector组件;
//StandardService.class
protected void initInternal() throws LifecycleException {
    super.initInternal();
    if (engine != null) {//初始化engine
        engine.init();
    }
    for (Executor executor : findExecutors()) {//默认没有
        if (executor instanceof JmxEnabled) {
            ((JmxEnabled) executor).setDomain(getDomain());
        }
        executor.init();
    }
    mapperListener.init();
	//初始化Connector组件
    synchronized (connectorsLock) {
        for (Connector connector : connectors) {
            connector.init();
        }
    }
}
⑤Engine初始化
- StandardEngine初始化时,会调用父类ContainerBase的初始化方法,初始化stopstartExcutor线程池;
- startstopExceutor线程池:在start和stop阶段,会将子容器的start或stop放入该线程池中执行;
- Engine初始化时,不会初始化子容器,子容器初始化是在start时初始化的;
//StandardEngine.class
protected void initInternal() throws LifecycleException {
    getRealm();
    super.initInternal();//调用ContainerBase中方法
}
//ContainerBaase.class
protected void initInternal() throws LifecycleException {
reconfigureStartStopExecutor(getStartStopThreads());
super.initInternal();
}
private void reconfigureStartStopExecutor(int threads) {
if (threads == 1) {
if (!(startStopExecutor instanceof InlineExecutorService)) {
startStopExecutor = new InlineExecutorService();
}
} else {
// Delegate utility execution to the Service
Server server = Container.getService(this).getServer();
server.setUtilityThreads(threads);//初始化线程池
startStopExecutor = server.getUtilityExecutor();
}
}//StandardServer.class
public void setUtilityThreads(int utilityThreads) {
//代码忽略.......
if (oldUtilityThreads != utilityThreads && utilityExecutor != null) {
reconfigureUtilityExecutor(getUtilityThreadsInternal(utilityThreads));
}
}
private synchronized void reconfigureUtilityExecutor(int threads) {
if (utilityExecutor != null) {
utilityExecutor.setCorePoolSize(threads);
} else {
ScheduledThreadPoolExecutor scheduledThreadPoolExecutor =
new ScheduledThreadPoolExecutor(threads, new TaskThreadFactory("Catalina-utility-", utilityThreadsAsDaemon, Thread.MIN_PRIORITY));
//查过10秒未获取任务,线程池销毁
scheduledThreadPoolExecutor.setKeepAliveTime(10, TimeUnit.SECONDS);
scheduledThreadPoolExecutor.setRemoveOnCancelPolicy(true);
scheduledThreadPoolExecutor.setExecuteExistingDelayedTasksAfterShutdownPolicy(false);
utilityExecutor = scheduledThreadPoolExecutor;
utilityExecutorWrapper = new org.apache.tomcat.util.threads.ScheduledThreadPoolExecutor(utilityExecutor);
}
}⑥Connector初始化
- 初始化adapter,adapter用于将请求转发给Container处理;
- 设置接收body的方法列表;
- 初始化protocolHandler,protocolHandler用于处理请求;
//Connector.class
protected void initInternal() throws LifecycleException {
    super.initInternal();
    //代码忽略
    // 初始化adapter
    adapter = new CoyoteAdapter(this);
    protocolHandler.setAdapter(adapter);
    if (service != null) {
        protocolHandler.setUtilityExecutor(service.getServer().getUtilityExecutor());
    }
    //设置接收body的method列表
    if (null == parseBodyMethodsSet) {
        setParseBodyMethods(getParseBodyMethods());
    }
    //代码忽略。。。。。。
    try {
        protocolHandler.init();//初始化protocolHandler,调用AbstractProtocol的init()
    } catch (Exception e) {
        throw new LifecycleException( sm.getString("coyoteConnector.protocolHandlerInitializationFailed"), e);
    }
}
protocolHandler初始化:
- ProtocolHanlder继承了AbstractProtocol,其init()方法调用抽象父类的init()方法;
- 接着调用AbstractEndpoint中的init()方法,其核心方法为bindWithCLeanup(),该方法调用了bind()方法;
- 最终调bind()方法(有三个实现类,以NioEndpoint为例),实现了端口和IP地址的绑定;
//AbstractProtocol.class
public void init() throws Exception {
    //代码忽略
    //设置endpoint
    String endpointName = getName();
    endpoint.setName(endpointName.substring(1, endpointName.length()-1));
    endpoint.setDomain(domain);
    endpoint.init();//初始化endpoint
}
//AbstractEndpoint.class
public final void init() throws Exception {
if (bindOnInit) {
bindWithCleanup();//该方法实现端口地址绑定
bindState = BindState.BOUND_ON_INIT;
}
//代码忽略。。。。。
}
private void bindWithCleanup() throws Exception {
try {
bind();
} catch (Throwable t) {
//代码忽略
}//NioEndpoint.class
public void bind() throws Exception {
initServerSocket();
//代码忽略。。。。
}
protected void initServerSocket() throws Exception {
if (!getUseInheritedChannel()) {
serverSock = ServerSocketChannel.open();
socketProperties.setProperties(serverSock.socket());
InetSocketAddress addr = new InetSocketAddress(getAddress(), getPortWithOffset());
//绑定端口和地址
serverSock.socket().bind(addr,getAcceptCount());
}
//代码忽略。。。
}(4)daemon.start()【main方法中】
①Catalina.start()方法
- daemon.start()方法中,反射调用Catalina.start()方法
- await()方法:在独立线程中运行,在shutdown端口中阻塞监听关闭命令,收到关闭命令后,调用stop方法
//Catalina
public void start() {
    if (getServer() == null) {
        load();
    }
	//代码忽略
    try {
        getServer().start();//server中start方法
    } catch (LifecycleException e) {
        //代码忽略。。。
    }
	//代码忽略

    // 安全关闭Tomcat
    if (useShutdownHook) {
        if (shutdownHook == null) {
            shutdownHook = new CatalinaShutdownHook();
        }
        //代码忽略
    }
    if (await) {//默认为true
        await();//在shutdown端口阻塞监听关闭命令
        stop();//关闭Tocmat
    }
}
②StandardServer.start()方法
- LifecycleBase中的start()方法,为模板方法,启动时调用StandardServer.startInternal()方法;
- startInternal()方法:事件发出,启动前做准备,启动每一个service组件
//LifecycleBase.class
public final synchronized void start() throws LifecycleException {
	//代码忽略。。。。。。。。。
    setStateInternal(LifecycleState.STARTING_PREP, null, false);
    startInternal();
    //代码忽略
}
//StandServer.class
protected void startInternal() throws LifecycleException {
fireLifecycleEvent(CONFIGURE_START_EVENT, null);
setState(LifecycleState.STARTING);
globalNamingResources.start();
synchronized (servicesLock) {
for (int i = 0; i < services.length; i++) {
services[i].start();//启动组件
}
}
//代码忽略
}③StandardService.startInternal()方法
- 通过LifecycleBase中的start()方法,调用StandardService.startInternal()方法,原理同上;
- startInternal()方法会启动engine,connector组件;
//StandardService.class
protected void startInternal() throws LifecycleException {
    //代码忽略。。。。。
    //启动engine组件
    if (engine != null) {
        synchronized (engine) {
            engine.start();
        }
    }
    synchronized (executors) {//启动线程池
        for (Executor executor: executors) {
            executor.start();
        }
    }
    mapperListener.start();
    synchronized (connectorsLock) {
        for (Connector connector: connectors) {
            if (connector.getState() != LifecycleState.FAILED) {
                connector.start();//启动conector组件
            }
        }
    }
}
④Engine启动
- StandardEngine,StandardHost,StandardContext,StandardWrapped各个容器存在父子关系;
- 一个父容器对应多个子容器,一个子容器只能对应一个父容器;
- 一个StandardContext对饮一个webapp应用,一个StandardWrapped对应一个webapp中的servlet;
- 这些容器都继承ContainerBase,容器的启动由父容器调子容器start方法启动;如StandardEngine调用StandardHost的start(),StandardHost调用StandardContext的start()方法;

ContainerBase:
- 调用start()方法会启动Container容器,然后执行ContainerBase的startInternal()方法,启动子容器;
- ContainerBase会将启动子线程任务交给线程池处理,并遍历所有Future的get()方法,将异步转换为同步,只有容器全部启动后,才会继续执行下面代码;
- pipeline.start()启动Valve链表,若Valve是Lifecycle的实现类,则会调用start()方法启动
//ContainerBase.class
protected synchronized void startInternal() throws LifecycleException {
    //代码忽略
    Container children[] = findChildren();//寻找子容器
    List<Future<Void>> results = new ArrayList<>();
    for (int i = 0; i < children.length; i++) {
        //线程池启动子容器
        results.add(startStopExecutor.submit(new StartChild(children[i])));
    }

    MultiThrowable multiThrowable = null;

    for (Future<Void> result : results) {
        try {
            result.get();
        }
        //代码忽略
    }
    //代码忽略
    if (pipeline instanceof Lifecycle) {
        ((Lifecycle) pipeline).start();//启用pipeline
    }
    setState(LifecycleState.STARTING);
    // Start our thread
    if (backgroundProcessorDelay > 0) {
        monitorFuture = Container.getService(ContainerBase.this).getServer()
        .getUtilityExecutor().scheduleWithFixedDelay(
            new ContainerBackgroundProcessorMonitor(), 0, 60, TimeUnit.SECONDS);
    }
}
⑤Host
- valve添加到链表中,是添加在basic之前;
- Context、Wrapper启动方法与Host类似;
//StandardHost.class
protected synchronized void startInternal() throws LifecycleException {
    String errorValve = getErrorReportValveClass();
    if ((errorValve != null) && (!errorValve.equals(""))) {
        try {
            boolean found = false;
            Valve[] valves = getPipeline().getValves();
            for (Valve valve : valves) {//遍历所有valve,若已经存在,不添加
                if (errorValve.equals(valve.getClass().getName())) {
                    found = true;
                    break;
                }
            }
            if(!found) {
                Valve valve =(Valve) Class.forName(errorValve).getConstructor().newInstance();
                getPipeline().addValve(valve);//添加到pipeline
            }
        }
        //代码忽略
    }
    super.startInternal();//调用父类启动下一个
}
⑥Connector启动
- 调用顺序:Connector中的startInternal()-->AbstractProtocol中的start()-->NioEndpoint中的startInternal()方法;
- 启动poller线程,用于处理请求事件,最终调用protocolHandler处理;
- 启动acceptor线程,用于处理请求连接;
//Connector.class
protected void startInternal() throws LifecycleException {
	//代码忽略
    try {
        protocolHandler.start();
    } catch (Exception e) {
        throw new LifecycleException(sm.getString("coyoteConnector.protocolHandlerStartFailed"), e);
    }
}
//AbstractProtocol.class
public void start() throws Exception {
//代码忽略
endpoint.start();
monitorFuture = getUtilityExecutor().scheduleWithFixedDelay(
new Runnable() {//异步超时线程
@Override
public void run() {
if (!isPaused()) {
startAsyncTimeout();
}
}
}, 0, 60, TimeUnit.SECONDS);
}
public final void start() throws Exception {
//代码忽略。。。
startInternal();
}//NioEndpoint.class
public void startInternal() throws Exception {
if (!running) {
running = true;
paused = false;
//代码忽略
// 启动工作线程
if (getExecutor() == null) {
createExecutor();
}
initializeConnectionLatch();//初始化最大并发请求数
// 启动poller线程,该线程用于接收请求事件,最终调用handler代码
poller = new Poller();
Thread pollerThread = new Thread(poller, getName() + "-ClientPoller");
pollerThread.setPriority(threadPriority);
pollerThread.setDaemon(true);
pollerThread.start();
startAcceptorThread();//开启accept线程,处理连接请求
}
}5、HTTP请求处理过程
(1)Connector请求连接处理

①Acceptor
- Acceptor用于监听套接字(socket),将请求转发给poller线程;
- 实现了Runable接口,run()方法为其执行请求连接转发逻辑;
- setSocketOptions()方法:将socket请求注册到poller中;
//Acceptor.class
public void run() {
    int errorDelay = 0;
    while (endpoint.isRunning()) {
    	//运行过程中Endpoint停止,进行自旋
        while (endpoint.isPaused() && endpoint.isRunning()) {
            state = AcceptorState.PAUSED;
            try {
                Thread.sleep(50);
            } catch (InterruptedException e) {
            }
        }
        if (!endpoint.isRunning()) {//停止运行直接退出
            break;
        }
        state = AcceptorState.RUNNING;
        try {
            //请求超过最大连接数,阻塞等待,直到连接数低于最大连接数
            endpoint.countUpOrAwaitConnection();
            if (endpoint.isPaused()) {
                continue;
            }
            U socket = null;
            try {
                //接收新的连接请求
                socket = endpoint.serverSocketAccept();
            } catch (Exception ioe) {
                // 代码忽略
            }
            errorDelay = 0;
            // Configure the socket
            if (endpoint.isRunning() && !endpoint.isPaused()) {
                /** 将请求以事件方式传递到poller线程中**/
                if (!endpoint.setSocketOptions(socket)) {
                    endpoint.closeSocket(socket);
                }
            } else {
                endpoint.destroySocket(socket);
            }
        }
        //代码忽略。。。。。
    }
    state = AcceptorState.ENDED;
}
//NioEndpoint.class
protected boolean setSocketOptions(SocketChannel socket) {
NioSocketWrapper socketWrapper = null;
try {
// Allocate channel and wrapper
NioChannel channel = null;
if (nioChannels != null) {
channel = nioChannels.pop();
}
if (channel == null) {
SocketBufferHandler bufhandler = new SocketBufferHandler(
//代码忽略
if (isSSLEnabled()) {
channel = new SecureNioChannel(bufhandler, selectorPool, this);
} else {
channel = new NioChannel(bufhandler);
}
}
NioSocketWrapper newWrapper = new NioSocketWrapper(channel, this);
//代码忽略。。。。。。
poller.register(channel, socketWrapper);//将NioChannel注册到poller中
return true;
} catch (Throwable t) {
//代码忽略
}
return false;
}②Poller
- Poller线程主要用于以较小的资源轮询以连接套接字,以保持连接,当数据可用时,传递给工作线程;
- register()方法:主要用于Acceptor将请求连接注册到Poller线程中,存放在events同步队列中;
//NioEndpoint.Poller.class
public void register(final NioChannel socket, final NioSocketWrapper socketWrapper) {
    socketWrapper.interestOps(SelectionKey.OP_READ);//this is what OP_REGISTER turns into.
    PollerEvent r = null;
    if (eventCache != null) {
        r = eventCache.pop();//是否有连接可以复用
    }
    if (r == null) {
        r = new PollerEvent(socket, OP_REGISTER);
    } else {
        r.reset(socket, OP_REGISTER);
    }
    addEvent(r);//添加到events队列中
}
private void addEvent(PollerEvent event) {
    events.offer(event);//添加到事件同步队列中
    if (wakeupCounter.incrementAndGet() == 0) {
        selector.wakeup();
    }
}
PollerEvent:
- events同步队列,存储的类型为PollerEvent;
- 实现Runable接口,run()方法中判断若为register事件,表示为处理过,注册READ事件,不为register事件,则获取套接字原selectionKey中的事件注册;
//NioEndpoint.PollerEvent.class
public void run() {
    if (interestOps == OP_REGISTER) {
        try {//为register事件,注册read事件
            socket.getIOChannel().register(socket.getSocketWrapper().getPoller().getSelector(), SelectionKey.OP_READ, socket.getSocketWrapper());
        }
        //代码忽略
    } else {
        //获取注册事件
        final SelectionKey key = socket.getIOChannel().keyFor(socket.getSocketWrapper().getPoller().getSelector());
        try {
            if (key == null) {
                //代码忽略。。。。。
            } else {
                final NioSocketWrapper socketWrapper = (NioSocketWrapper) key.attachment();
                if (socketWrapper != null) {
                    //代码忽略。。。
                } else {
                    //注册事件到selcetor中
                    socket.getSocketWrapper().getPoller().cancelledKey(key, socket.getSocketWrapper());
                }
            }
        }
        //代码忽略
    }
}
Poller.run()方法:
- events()方法:会执行队列中的每一个PollerEvent的run()方法,run()方法会将通道(socket)注册道Poller的selector中;
- select():返回所有selcetionKey,接着调用processKey()方法对连接进行处理;
//NioEndPoint.Poller.class
public void run() {
    // Loop until destroy() is called
    while (true) {
        boolean hasEvents = false;
        try {
            if (!close) {
                hasEvents = events();//调用PollerEvnet中的run()方法注册事件
                if (wakeupCounter.getAndSet(-1) > 0) {
                    keyCount = selector.selectNow();
                } else {
                    keyCount = selector.select(selectorTimeout);
                }
                wakeupCounter.set(0);
            }
            //代码忽略。。。。。。。
        }
        //代码忽略。。。。。。。
        Iterator<SelectionKey> iterator = keyCount > 0 ? selector.selectedKeys().iterator() : null;
        //对准备好的连接进行处理
        while (iterator != null && iterator.hasNext()) {
            SelectionKey sk = iterator.next();
            NioSocketWrapper socketWrapper = (NioSocketWrapper) sk.attachment();
            if (socketWrapper == null) {
                iterator.remove();
            } else {
                iterator.remove();
                processKey(sk, socketWrapper);//真正处理key的逻辑
            }
        }
        timeout(keyCount,hasEvents);
    }

    getStopLatch().countDown();
}
processKey():
- 处理读事件,将请求封装为Request;
- 处理写事件,将请求封装为Response写回客户端;
- processSocket()为独立读写事件的核心方法;
//NioEndpoint.Poller.class
protected void processKey(SelectionKey sk, NioSocketWrapper socketWrapper) {
    try {
        if (close) {
            cancelledKey(sk, socketWrapper);
        } else if (sk.isValid() && socketWrapper != null) {
            if (sk.isReadable() || sk.isWritable()) {
                if (socketWrapper.getSendfileData() != null) {
                    processSendfile(sk, socketWrapper, false);
                } else {
                    unreg(sk, socketWrapper, sk.readyOps());
                    boolean closeSocket = false;
                    //处理读事件
                    if (sk.isReadable()) {
                        //代码忽略
                        //处理读事件
                        else if (!processSocket(socketWrapper, SocketEvent.OPEN_READ, true)) {
                            closeSocket = true;
                        }
                    }
                    //处理读事件
                    if (!closeSocket && sk.isWritable()) {
                        //代码忽略
                    	//处理写事件
                        else if (!processSocket(socketWrapper, SocketEvent.OPEN_WRITE, true)) {
                            closeSocket = true;
                        }
                    }
                    if (closeSocket) {//取消事件
                        cancelledKey(sk, socketWrapper);
                    }
                }
            }
        } else {
            // Invalid key
            cancelledKey(sk, socketWrapper);
        }
    }
    //代码忽略。。。。。
}
ProcessSocket():
- 获取ProcessSocket来处理请求;
- 将ProcessSocket放入线程池中执行;
//AbstractEndpoin.class
public boolean processSocket(SocketWrapperBase<S> socketWrapper,
                             SocketEvent event, boolean dispatch) {
    try {
        //代码忽略
        SocketProcessorBase<S> sc = null;
        if (processorCache != null) {
            sc = processorCache.pop();
        }
        if (sc == null) {//创建一个socketProcessor处理请求
            sc = createSocketProcessor(socketWrapper, event);
        }//代码忽略。。。。。
        Executor executor = getExecutor();
        if (dispatch && executor != null) {
            executor.execute(sc);//放入线程池中执行
        } else {
            sc.run();
        }
    } //代码忽略。。。。。。
    return true;
}
SocketProcessor.doRun():
- 线程池执行SocketProcessorBase的run()方法,最终调用SocketProcessor的doRun()方法;
- doRun()方法最终将请求交给handler去处理,最终调用的是Processor.process()方法;
//NioEndpoint.SocketProcessor.class
protected void doRun() {
    NioChannel socket = socketWrapper.getSocket();
    SelectionKey key = socket.getIOChannel().keyFor(socket.getSocketWrapper().getPoller().getSelector());
    Poller poller = NioEndpoint.this.poller;
	//代码忽略
    try {
        int handshake = -1;
        //代码忽略........
        if (handshake == 0) {
            SocketState state = SocketState.OPEN;
            //请求交给handler处理,event为null,则为读请求
            if (event == null) {
                state = getHandler().process(socketWrapper, SocketEvent.OPEN_READ);
            } else {
                state = getHandler().process(socketWrapper, event);
            }
            if (state == SocketState.CLOSED) {
                poller.cancelledKey(key, socketWrapper);
            }
        }
        //代码忽略。。。。。。。
    }
    //代码忽略。。。。
}
③Processor
- SocketProcessor中doRun()方法中,调用了process()方法处理请求;
- AbstractProcessorLight.process():最终调用service()方法进行请求处理;
- service():会生成request和response对象,最终调用Adapter.service()将请求转发出去;

//AbstractProtocol.class
public SocketState process(SocketWrapperBase<S> wrapper, SocketEvent status) {
	//代码忽略
	if (processor == null) {
        processor = getProtocol().createProcessor();
        register(processor);
        if (getLog().isDebugEnabled()) {
            getLog().debug(sm.getString("abstractConnectionHandler.processorCreate", processor));
        }
    }
	//代码忽略
      do {
        state = processor.process(wrapper, status);//核心方法
	//代码忽略
}
//AbstractProcessorLight.class
public SocketState process(SocketWrapperBase<?> socketWrapper, SocketEvent status)throws IOException {
SocketState state = SocketState.CLOSED;
Iterator<DispatchType> dispatches = null;
do {
if (dispatches != null) {
//代码忽略
} else if (status == SocketEvent.DISCONNECT) {
// Do nothing here, just wait for it to get recycled
} else if (isAsync() || isUpgrade() || state == SocketState.ASYNC_END) {
state = dispatch(status);
state = checkForPipelinedData(state, socketWrapper);
} else if (status == SocketEvent.OPEN_WRITE) {
state = SocketState.LONG;
} else if (status == SocketEvent.OPEN_READ) {//处理读
state = service(socketWrapper);
} else if (status == SocketEvent.CONNECT_FAIL) {
logAccess(socketWrapper);
} else {
state = SocketState.CLOSED;
}
//代码忽略
} while (state == SocketState.ASYNC_END ||
dispatches != null && state != SocketState.CLOSED);
return state;
}④Adapter
- Adapter用于连接Connecto和Container,Processor会调用Adapter.service();
- 生成request和response对象,添加请求头;
- postParseRequest(req, request, res, response):解析请求,该方法会设置请求头等信息;
- 真正进入Container,调用pipeline中的方法;
- 最后执行finidhRequest()和finishResponse刷新请求;
public void service(org.apache.coyote.Request req, org.apache.coyote.Response res)
throws Exception {
	//生成connector的request和response请求
    Request request = (Request) req.getNote(ADAPTER_NOTES);
    Response response = (Response) res.getNote(ADAPTER_NOTES);
    if (request == null) {
        //设置request,代码忽略。。。。。。
    }
    if (connector.getXpoweredBy()) {//添加请求头
        response.addHeader("X-Powered-By", POWERED_BY);
    }
	//代码忽略
    try {
        postParseSuccess = postParseRequest(req, request, res, response);
        if (postParseSuccess) {
            request.setAsyncSupported(connector.getService().getContainer().getPipeline().isAsyncSupported());
            // 进入容器COntianer
            connector.getService().getContainer().getPipeline().getFirst().invoke(
                request, response);
        }
        if (request.isAsync()) {
            //代码忽略
        } else {
            request.finishRequest();
            response.finishResponse();
        }
    	//代码忽略
 }
(2)Engin处理
- Adapter处理:
-
- Conncetor调用getService()返回StandardService;
- StandardService调用getContainer返回StandardEngine;
- StandEngine调用getPipeline返回StandardPipeline;
- 最终调用StandEngineValve的invoke()方法,判断host不为空,调用HostPipeline第一个Valve;
connector.getService().getContainer().getPipeline().getFirst().invoke( request, response);public final void invoke(Request request, Response response)throws IOException, ServletException {
Host host = request.getHost();
if (host == null) {//hostweinull直接返回
return;
}
if (request.isAsyncSupported()) {
request.setAsyncSupported(host.getPipeline().isAsyncSupported());
}
host.getPipeline().getFirst().invoke(request, response);
}(3)Host处理
- Host的pipeLine中一定存在ErrorReportValve和StandardHostVlve;
- 先执行ErrorReportValve,主要是检测Http中是否有异常;
- 后执行StandardHostValve,调用context的pipeline;
//ErroReportValve.class
public void invoke(Request request, Response response) throws IOException, ServletException {
    // 调用下一个valve,即StandardHostValve
    getNext().invoke(request, response);
    if (response.isCommitted()) {
        //正常提交,代码忽略。。。。
        return;
    }

    Throwable throwable = (Throwable) request.getAttribute(RequestDispatcher.ERROR_EXCEPTION);
    if (request.isAsync() && !request.isAsyncCompleting()) {
        return;
    }

    if (throwable != null && !response.isError()) {
        response.reset();
        //500异常
        response.sendError(HttpServletResponse.SC_INTERNAL_SERVER_ERROR);
    }
    response.setSuspended(false);

    try {
        report(request, response, throwable);//异常输出浏览器
    } catch (Throwable tt) {
        ExceptionUtils.handleThrowable(tt);
    }
}
//StandardHostValve.class
public final void invoke(Request request, Response response)throws IOException, ServletException {
Context context = request.getContext();
if (context == null) {
return;
}
//代码忽略。。。。。
try {
context.bind(Globals.IS_SECURITY_ENABLED, MY_CLASSLOADER);
if (!asyncAtStart && !context.fireRequestInitEvent(request.getRequest())) {
return;
}
try {
if (!response.isErrorReportRequired()) {
//调用context
context.getPipeline().getFirst().invoke(request, response);
}
} catch (Throwable t) {
//异常处理
}
//代码忽略。。。。
}(4)Context处理
通过执行StandardContextValve中的invoke方法,调用Wrapper的pipeline;
//StandardContextValve
public final void invoke(Request request, Response response)throws IOException, ServletException {
    // 禁止直接访问提下资源
    MessageBytes requestPathMB = request.getRequestPathMB();
    if ((requestPathMB.startsWithIgnoreCase("/META-INF/", 0))
        || (requestPathMB.equalsIgnoreCase("/META-INF"))
        || (requestPathMB.startsWithIgnoreCase("/WEB-INF/", 0))
        || (requestPathMB.equalsIgnoreCase("/WEB-INF"))) {
        response.sendError(HttpServletResponse.SC_NOT_FOUND);
        return;
    }
    Wrapper wrapper = request.getWrapper();
    if (wrapper == null || wrapper.isUnavailable()) {
        response.sendError(HttpServletResponse.SC_NOT_FOUND);
        return;
    }
	//代码忽略
    wrapper.getPipeline().getFirst().invoke(request, response);
}
(5)Wrapper处理
- Wrapper对应一个Servlet,是对Servlet的包装,主要执行StandardWrapperValve的invoke()方法;
- invoke主要执行如下逻辑:
- 调用Wrapper的allocate分配一个Servlet;

- 创建过滤器链;

- 调用过滤器链的doFilter方法;

- 释放资源,如过滤器链,Servlet相关资源;
①allocate分配Servlet
- 如果不为单线程模型,每次返回同一个Servlet,使用道单例设计模式;
- 为单线程模型,会采用Servlet池化技术,复用Servlet,避免频繁创建销毁;
//StandWrapper.class
public Servlet allocate() throws ServletException {
    if (unloading) {
        throw new ServletException(sm.getString("standardWrapper.unloading", getName()));
    }
    boolean newInstance = false;
    if (!singleThreadModel) {//每次返回一个相同的Servlet实例
        // Load and initialize our instance if necessary
        if (instance == null || !instanceInitialized) {
            synchronized (this) {
                if (instance == null) {
                    try {
                        if (log.isDebugEnabled()) {
                            log.debug("Allocating non-STM instance");
                        }
                        instance = loadServlet();//加载Servlet
                        newInstance = true;
                        if (!singleThreadModel) {
                            countAllocated.incrementAndGet();
                        }
                    }
                    //代码忽略。。。。
                }
                if (!instanceInitialized) {
                    initServlet(instance);//初始化Servlet
                }
            }
        }

        if (singleThreadModel) {
            if (newInstance) {
                synchronized (instancePool) {
                    instancePool.push(instance);
                    nInstances++;
                }
            }
        } else {//非单线程模型,返回一个相同的Servlet
           //代码忽略
            return instance;
        }
    }
    //单线程模式,用Servlet对象池加载
    synchronized (instancePool) {
        while (countAllocated.get() >= nInstances) {
            // Allocate a new instance if possible, or else wait
            if (nInstances < maxInstances) {
                try {
                    instancePool.push(loadServlet());
                    nInstances++;
                }
                //忽略代码
    }
}
loadServlet():
- 通过实例对戏管理器,创建Servlet,实例管理器通过特定类加载加载器加载;
- initServlet():调用Servlet的init()方法(我们实现Servlet接口的init方法在此调用);
//StandardWrapperValve.class
public synchronized Servlet loadServlet() throws ServletException {
	//代码忽略
    Servlet servlet;
    try {
       //代码忽略
    	//创建Servlet
        InstanceManager instanceManager = ((StandardContext)getParent()).getInstanceManager();
        try {
            servlet = (Servlet) instanceManager.newInstance(servletClass);
        }
        //代码忽略。。。

        initServlet(servlet);//初始化Servlet
        fireContainerEvent("load", this);
        loadTime=System.currentTimeMillis() -t1;
    } finally {
       //代码忽略
    }
    return servlet;
 }
②创建过滤器链createFilterChain
- 过滤器链会放入Request缓存中,避免重复生成过滤器链;
//ApplicationFilterChain.class
public static ApplicationFilterChain createFilterChain(ServletRequest request,
    if (servlet == null)     return null;
    ApplicationFilterChain filterChain = null;//过滤器链
    if (request instanceof Request) {//Request缓存中找
        Request req = (Request) request;
        if (Globals.IS_SECURITY_ENABLED) {
            filterChain = new ApplicationFilterChain();
        } else {
            filterChain = (ApplicationFilterChain) req.getFilterChain();
            if (filterChain == null) {
                filterChain = new ApplicationFilterChain();
                req.setFilterChain(filterChain);
            }
        }
    } else {
        filterChain = new ApplicationFilterChain();
    }
    filterChain.setServlet(servlet);
    filterChain.setServletSupportsAsync(wrapper.isAsyncSupported());
    StandardContext context = (StandardContext) wrapper.getParent();
    FilterMap filterMaps[] = context.findFilterMaps();//过滤器链对象
    //代码忽略。。。。。
	//类型与路径匹配情况下,将filterConfig放入到过滤器链中
    for (int i = 0; i < filterMaps.length; i++) {
        if (!matchDispatcher(filterMaps[i] ,dispatcher)) {
            continue;
        }
        if (!matchFiltersURL(filterMaps[i], requestPath))
            continue;
        ApplicationFilterConfig filterConfig = (ApplicationFilterConfig)
                                                context.findFilterConfig(filterMaps[i].getFilterName());
        if (filterConfig == null) {
            // FIXME - log configuration problem
            continue;
        }
        filterChain.addFilter(filterConfig);
    }
	//servlet与类型匹配下,将Filter放入过滤器链
    for (int i = 0; i < filterMaps.length; i++) {
        if (!matchDispatcher(filterMaps[i] ,dispatcher)) {
            continue;
        }
        if (!matchFiltersServlet(filterMaps[i], servletName))
            continue;
        ApplicationFilterConfig filterConfig = (ApplicationFilterConfig)
                                                context.findFilterConfig(filterMaps[i].getFilterName());
        if (filterConfig == null) {
            continue;
        }
        filterChain.addFilter(filterConfig);
    }
    return filterChain;
}
③调用过滤器链doFilter方法
- filter.doFilter(request, response, this):
-
- 通过pos和n来控制过滤器遍历,pos为当前访问过滤器下标,n为总过滤器数;
- doFilter会将this传入(filterChain),我们在实现自定义filter时,会重写doFilter()方法,doFilter里面会有业务逻辑,执行后调用filterChain.doFilter()方法,继续执行下一个过滤器;
- 当某个过滤器不匹配时,我们通过return,不执行filterChain.doFilter(),从而不执行后面的过滤器以及service方法;
- servlet.service(request, response):所有过滤器执行完后,会执行我们Servlet的service()方法,即我们的业务逻辑;
- 整体执行流程如下:

//ApplicationFilterChain.class
public void doFilter(ServletRequest request, ServletResponse response)throws IOException, ServletException {
    if( Globals.IS_SECURITY_ENABLED ) {
        final ServletRequest req = request;
        final ServletResponse res = response;
        try {
            java.security.AccessController.doPrivileged( new java.security.PrivilegedExceptionAction<Void>() {
                    @Override
                    public Void run() throws ServletException, IOException {
                        internalDoFilter(req,res);//执行该方法
                        return null;
                    }
                }
            );
        }
        //代码忽略
    } else {
        internalDoFilter(request,response);
    }
}
//ApplicationFilterChain.class
private void internalDoFilter(ServletRequest request, ServletResponse response)throws IOException, ServletException {
if (pos < n) {
ApplicationFilterConfig filterConfig = filters[pos++];//获取过滤器
try {
Filter filter = filterConfig.getFilter();
//代码忽略
if( Globals.IS_SECURITY_ENABLED ) {
//代码忽略
} else {
filter.doFilter(request, response, this);//执行所有过滤器doFilter
}
} //代码忽略
return;
}
try {
//代码忽略
if ((request instanceof HttpServletRequest) &&
(response instanceof HttpServletResponse) &&
Globals.IS_SECURITY_ENABLED ) {
//代码忽略
} else {
servlet.service(request, response);//调用service方法
}
}
//代码忽略
}


 63万+
63万+


 被折叠的 条评论
为什么被折叠?
被折叠的 条评论
为什么被折叠?
 到【灌水乐园】发言


