Ant Design Upload 自定义上传 customRequest

本文章重点描述上传组件 Upload 的 customRequest 自定义文件上传逻辑的实现
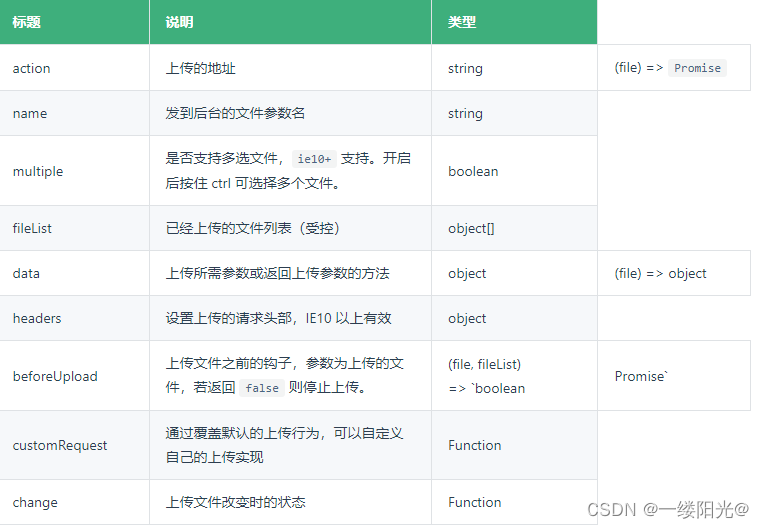
Upload 常用属性和方法

在这里插入图片描述

默认上传

 <Upload
            action="http://xx.xx.xxx.xx:3000/upload/rich_editor_upload"
            listType="picture"
            defaultFileList={[...fileList]}
            onChange={change}
          >
            <Button icon={<UploadOutlined />}>Upload</Button>
  </Upload>

优点:只用写接口,就可以上传文件(内部封装了 上传状态函数,及进度条状态)
缺点:默认上传可以满足我们大部分需求,但是具有局限性,不能够灵活开发。

customRequest 自定义上传

 <Upload
            action="http://xx.xx.xxx.xx:3000/upload/rich_editor_upload"
            customRequest={uploadFile}
            listType="picture"
            defaultFileList={[...fileList]}
            onChange={change}
          >
            <Button icon={<UploadOutlined />}>Upload</Button>
 </Upload>
 uploadFile(file=>{
 	update(file).then(res=>{
		
	})
 ])

customRequest属性覆盖默认上传行为,此时action属性不在触发

优点:可根据自己的需求对上传文件前后的回调做相应的处理

缺点:上传状态函数,及进度条状态展示 都需要后来自己添加

Upload 自定义上传逻辑的实现+进度条实现

 <Upload
            action="http://47.95.197.56:3000/upload/rich_editor_upload"
            customRequest={uploadFile}
            listType="picture"
            defaultFileList={[...fileList]}
            onChange={change}
          >
            <Button icon={<UploadOutlined />}>Upload</Button>
 </Upload>
  const uploadFile = async (file) => {
    console.log("uploadFile方法")
    console.log(file)

    uploadApi({
      file: file.file,
      onUploadProgress: (ev) => {
        // ev - axios 上传进度实例,上传过程触发多次
        // ev.loaded 当前已上传内容的大小,ev.total - 本次上传请求内容总大小
        console.log(ev)
        const percent = (ev.loaded / ev.total) * 100
        // 计算出上传进度,调用组件进度条方法
        file.onProgress({ percent })
      },
    })
      .then((res) => {
        console.log("上传成功" + res)
        file.onSuccess(res, file)
      })
      .catch((err) => {
        file.onError(err)
      })
  }
  const uploadApi = async ({ file, onUploadProgress }) => {
    console.log("uploadApi方法")
    const fd = new FormData()
    fd.append("file", file)
    const res = await upLoad(fd, onUploadProgress)
    // //上传成功后
    // onSuccess(res.data, file)
    console.log(res)
    // console.log(fileList)
  }

写完后就跟默认上传是一样的效果了

  • 1
    点赞
  • 7
    收藏
    觉得还不错? 一键收藏
  • 打赏
    打赏
  • 0
    评论
Ant Design Pro 中,可以通过使用 Upload 组件来实现文件上传的功能。如果需要自定义上传并且需要回调函数,则可以在 Upload 组件中使用 `customRequest` 属性来自定义上传行为,并且可以在这个函数中进行上传成功或失败的回调。 下面是一个示例代码: ```jsx import { Upload, message } from 'antd'; function handleUpload(options) { const { onSuccess, onError, file } = options; // 这里可以自定义上传行为,例如使用 axios 发送请求 // 如果上传成功,调用 onSuccess 回调函数,并传入返回的数据 // 如果上传失败,调用 onError 回调函数,并传入错误信息 if (上传成功) { onSuccess(返回的数据); } else { onError(错误信息); } } function MyUploadComponent() { return ( <Upload customRequest={handleUpload} onChange={(info) => { if (info.file.status !== 'uploading') { console.log(info.file, info.fileList); } if (info.file.status === 'done') { message.success(`${info.file.name} 上传成功`); } else if (info.file.status === 'error') { message.error(`${info.file.name} 上传失败`); } }} > {/* 这里可以添加上传按钮 */} </Upload> ); } ``` 在上面的代码中,我们定义了一个名为 `handleUpload` 的函数来自定义上传行为。在这个函数中,我们可以使用自己的上传逻辑,并根据上传结果调用 `onSuccess` 或 `onError` 回调函数。在 `MyUploadComponent` 组件中,我们将 `handleUpload` 函数赋值给了 `customRequest` 属性,这样就可以使用自定义上传行为了。同时,我们还在 `onChange` 事件中添加了处理函数,用来处理上传结果并显示提示信息。

“相关推荐”对你有帮助么?

  • 非常没帮助
  • 没帮助
  • 一般
  • 有帮助
  • 非常有帮助
提交
评论
添加红包

请填写红包祝福语或标题

红包个数最小为10个

红包金额最低5元

当前余额3.43前往充值 >
需支付:10.00
成就一亿技术人!
领取后你会自动成为博主和红包主的粉丝 规则
hope_wisdom
发出的红包

打赏作者

一缕阳光@

你的鼓励将是我创作的最大动力

¥1 ¥2 ¥4 ¥6 ¥10 ¥20
扫码支付:¥1
获取中
扫码支付

您的余额不足,请更换扫码支付或充值

打赏作者

实付
使用余额支付
点击重新获取
扫码支付
钱包余额 0

抵扣说明:

1.余额是钱包充值的虚拟货币,按照1:1的比例进行支付金额的抵扣。
2.余额无法直接购买下载,可以购买VIP、付费专栏及课程。

余额充值