


Docker基础
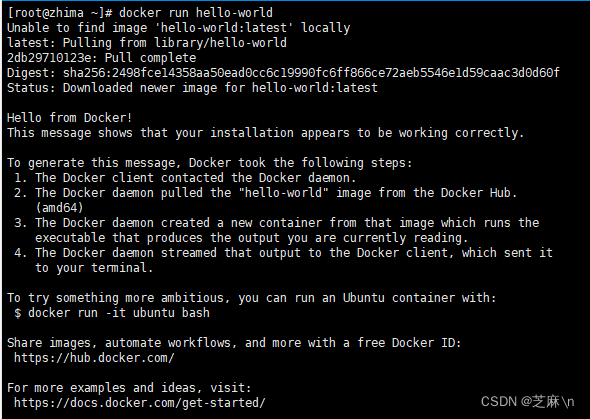
hello-world
我们先来运行一下hello-world的案例
下面是完整的流程图
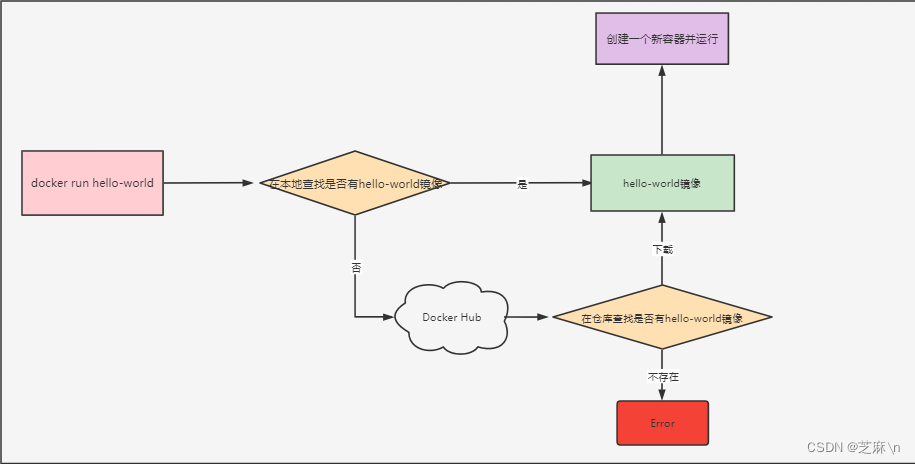
先在本地查找是否存在hello-world镜像
	有则直接使用此镜像创建一个容器并运行

	没有则连接镜像服务器查找是否存在hello-world镜像

		如果在镜像服务器查找到了该镜像,则将该镜像下载到本地,然后建一个容器并运行

		如果没有,则报错
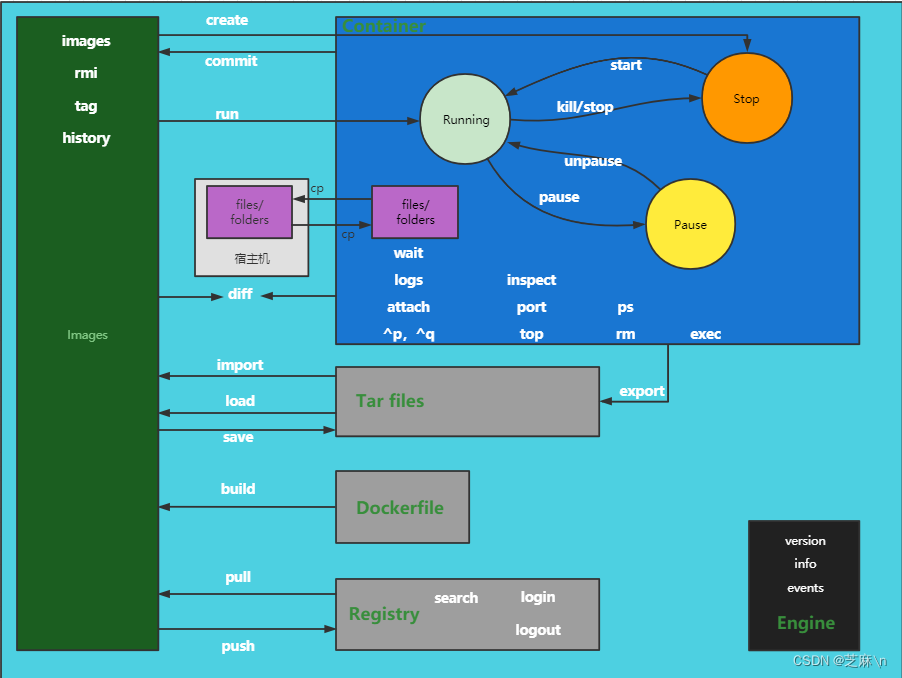
下面介绍关于镜像和容器的命令
Docker镜像命令
搜索镜像
[root@zhima ~]# docker search --help
# 使用说明
Usage:  docker search [OPTIONS] TERM
# 在docker hub上搜索TERM镜像
Search the Docker Hub for images
# 可选参数
Options:
# 过滤
# 栗子 -f=STARS=3000意思的筛选出STARS大于3000的
  -f, --filter filter   Filter output based on conditions provided
# 格式化输出,使用go语言的模板
      --format string   Pretty-print search using a Go template
# 限制数量
      --limit int       Max number of search results (default 25)
      --no-trunc        Don't truncate output
拉取镜像
[root@zhima ~]# docker pull --help

Usage:  docker pull [OPTIONS] NAME[:TAG|@DIGEST]
# 从仓库拉取一个镜像或者一个仓库
Pull an image or a repository from a registry
# 可选项
Options:
# 下载全部的版本
  -a, --all-tags                Download all tagged images in the repository
# 跳过镜像认证,默认开启
      --disable-content-trust   Skip image verification (default true)
      --platform string         Set platform if server is multi-platform capable
# 跳过冗长的输出,等到下载结束后再输出镜像id
  -q, --quiet                   Suppress verbose output
查看本地镜像
[root@zhima ~]# docker images --help

Usage:  docker images [OPTIONS] [REPOSITORY[:TAG]]
# 列举镜像
List images

Options:
# 展示全部的镜像,默认添加
  -a, --all             Show all images (default hides intermediate images)
# 显示完整的镜像id
      --digests         Show digests
# 过滤
  -f, --filter filter   Filter output based on conditions provided
# 格式化输出
      --format string   Pretty-print images using a Go template
      --no-trunc        Don't truncate output
# 只显示镜像简写id
  -q, --quiet           Only show image IDs
删除本地镜像
[root@zhima ~]# docker rmi --help

Usage:  docker rmi [OPTIONS] IMAGE [IMAGE...]
# 删除镜像
Remove one or more images

Options:
# 强制删除
  -f, --force      Force removal of the image
      --no-prune   Do not delete untagged parents
查看镜像层级构建信息
[root@zhima ~]# docker history --help

Usage:  docker history [OPTIONS] IMAGE
# 展示镜像的历史(构建信息)
Show the history of an image

Options:
# 格式化输出
      --format string   Pretty-print images using a Go template
# 以可读化好的方式展示
  -H, --human           Print sizes and dates in human readable format (default true)
      --no-trunc        Don't truncate output
# 只显示镜像id
  -q, --quiet           Only show image IDs
打标签
[root@zhima ~]# docker tag --help

Usage:  docker tag SOURCE_IMAGE[:TAG] TARGET_IMAGE[:TAG]
# 给SOURCE_IMAGE打上新的标签,并使用TARGET_IMAGE保存
Create a tag TARGET_IMAGE that refers to SOURCE_IMAGE
Docker容器命令
创建一个容器
这里因为可选项太多,我只放一些常用的
[root@zhima ~]# docker run --help

Usage:  docker run [OPTIONS] IMAGE [COMMAND] [ARG...]
# 创建并使用COMMAND运行一个容器
Run a command in a new container

Options:
# 后台启动容器
  -d, --detach                         Run container in background and print container ID
# 保持标准输出流打开
  -i, --interactive                    Keep STDIN open even if not attached
# 挂载宿主机文件系统
      --mount mount                    Attach a filesystem mount to the container
# 指定容器名字
      --name string                    Assign a name to the container
# 指定容器所在网络
      --network network                Connect a container to a network
# 给容器登录用户的特权
      --privileged                     Give extended privileges to this container
# 指定端口映射 -p 宿主机端口:容器暴露端口
  -p, --publish list                   Publish a container's port(s) to the host
# 随机指定端口映射
  -P, --publish-all                    Publish all exposed ports to random ports
# 容器的根文件系统只读
      --read-only                      Mount the container's root filesystem as read only
# 推出容器的时候,自动删除容器
	  --rm							   Automatically remove the container when it exits
# 分配一个伪终端并绑定到容器的标准输入上
  -t, --tty                            Allocate a pseudo-TTY
# 数据卷,将容器内的目录挂载到宿主机的目录
  -v, --volume list                    Bind mount a volume
[root@zhima ~]# docker create --help

Usage:  docker create [OPTIONS] IMAGE [COMMAND] [ARG...]
# 创建一个容器,但是不运行
Create a new container

Options:
# 与docker run 一致,这里不重复了
删除一个容器
[root@zhima ~]# docker rm --help

Usage:  docker rm [OPTIONS] CONTAINER [CONTAINER...]
# 删除一个或者多个容器
Remove one or more containers

Options:
# 强制删除,即使它在运行状态
  -f, --force     Force the removal of a running container (uses SIGKILL)
# 删除挂载的宿主机目录
  -v, --volumes   Remove anonymous volumes associated with the container
查看容器
[root@zhima ~]# docker ps --help

Usage:  docker ps [OPTIONS]
# 展示容器
List containers

Options:
# 展示所有的容器
  -a, --all             Show all containers (default shows just running)
# 条件过滤
  -f, --filter filter   Filter output based on conditions provided
# 格式化输出
      --format string   Pretty-print containers using a Go template
# 控制显示个数,包括停止的容器
  -n, --last int        Show n last created containers (includes all states) (default -1)
# 显示最近创建的容器,包括停止的容器
  -l, --latest          Show the latest created container (includes all states)
      --no-trunc        Don't truncate output
# 只显示容器id
  -q, --quiet           Only display container IDs
# 显示容器占用内存
  -s, --size            Display total file sizes
停止容器
[root@zhima ~]# docker stop --help

Usage:  docker stop [OPTIONS] CONTAINER [CONTAINER...]
# 停止一个或者多个容器
Stop one or more running containers

Options:
# 在ints后停止容器
  -t, --time int   Seconds to wait for stop before killing it (default 10)
运行容器
[root@zhima ~]# docker start --help

Usage:  docker start [OPTIONS] CONTAINER [CONTAINER...]
# 启动一个或者多个已经停止的容器
Start one or more stopped containers

Options:
# 启动并进入容器
  -a, --attach               Attach STDOUT/STDERR and forward signals
# 启动并进入容器的标准输出设备
  -i, --interactive          Attach container's STDIN
重启容器
[root@zhima ~]# docker restart --help

Usage:  docker restart [OPTIONS] CONTAINER [CONTAINER...]

Restart one or more containers

Options:
  -t, --time int   Seconds to wait for stop before killing the container (default 10)
暂停容器
[root@zhima ~]# docker pause --help

Usage:  docker pause CONTAINER [CONTAINER...]

Pause all processes within one or more containers
取消暂停容器
[root@zhima ~]# docker unpause --help

Usage:  docker unpause CONTAINER [CONTAINER...]

Unpause all processes within one or more containers
查看容器的源数据
[root@zhima ~]# docker inspect --help

Usage:  docker inspect [OPTIONS] NAME|ID [NAME|ID...]

Return low-level information on Docker objects

Options:
# 格式化输出
  -f, --format string   Format the output using the given Go template
# 展示容器的占用内存
  -s, --size            Display total file sizes if the type is container
# 将JSON数据转化为特殊类型
      --type string     Return JSON for specified type
查看容器日志
[root@zhima ~]# docker logs --help

Usage:  docker logs [OPTIONS] CONTAINER

Fetch the logs of a container

Options:
# 显示详细的数据
      --details        Show extra details provided to logs
# 日志继续输出
  -f, --follow         Follow log output
# 只展示尾部n条数据
  -n, --tail string    Number of lines to show from the end of the logs (default "all")
# 展示时间戳
  -t, --timestamps     Show timestamps
进入容器内部
[root@zhima ~]# docker attach --help

Usage:  docker attach [OPTIONS] CONTAINER
# 直接进入容器当前正在运行的标准输出
Attach local standard input, output, and error streams to a running container
[root@zhima ~]# docker exec --help

Usage:  docker exec [OPTIONS] CONTAINER COMMAND [ARG...]
# 在运行的容器中运行一个新的command
Run a command in a running container

Options:
# 在后台运行command
  -d, --detach               Detached mode: run command in the background
# 设置环境变量
  -e, --env list             Set environment variables
# 读取文件中的环境变量
      --env-file list        Read in a file of environment variables
# 保持输出流开启
  -i, --interactive          Keep STDIN open even if not attached
# 给予此command登录用户的权力
      --privileged           Give extended privileges to the command
# 分配一个伪终端
  -t, --tty                  Allocate a pseudo-TTY
一般我们都会使用docker exec -it containerId|containerName /bin/bash进入容器
退出容器
# 关闭当前的输出流,如果容器中没有其他输出流,容器就会自己关闭
exit
# 保持当前输出流开启
Ctrl+p+q
如果容器中没有前台运行的command,则会自动关闭容器
查看容器开放端口
[root@zhima ~]# docker port --help

Usage:  docker port CONTAINER [PRIVATE_PORT[/PROTO]]

List port mappings or a specific mapping for the container
查看容器内进程信息
[root@zhima ~]# docker top --help

Usage:  docker top CONTAINER [ps OPTIONS]

Display the running processes of a container
宿主机和容器内的文件复制
[root@zhima ~]# docker cp --help

Usage:
# 将容器内的文件复制到宿主机内
docker cp [OPTIONS] CONTAINER:SRC_PATH DEST_PATH|-
# 将宿主机中的文件复制到容器内
docker cp [OPTIONS] SRC_PATH|- CONTAINER:DEST_PATH

Copy files/folders between a container and the local filesystem

Use '-' as the source to read a tar archive from stdin
and extract it to a directory destination in a container.

Use '-' as the destination to stream a tar archive of a
container source to stdout.
命令总结
镜像的理解
什么是镜像
镜像是一种轻量级、可执行的独立软件包
它包含运行某个软件所需要的所有内容,包括代码,运行时(一个程序在运行或者在被执行的依赖)、库,环境变量和配置文件。
镜像加载原理
UnionFS
UnionFS (联合文件系统) 是一种分层、轻量级并且高性能的文件系统
它支持对文件系统的修改作为一次一次的提交做一层层的叠加
联合加载会把各层文件系统叠加起来,这样最终的文件系统会包含所有底层的文件和目录
BootFS
BootFS(Boot file system)主要包含Bootloader和Kernel
Bootloader主要是引导加载Kernel内核,Linux刚启动时会加载Bootfs文件系统
当Bootloader加载完成之后整个内核就都在内存中了
此时内存的使用权已由Bootfs转交给内核,系统也会卸载BootFS
RootFS
RootFS (root file system) ,在Bootfs之上。包含的就是典型Linux系统中的/dev, /proc, /bin, /etc等标准目录和文件。Rootfs就是
各种不同的操作系统发行版,比如Ubuntu , Centos等等。
docker的centos镜像为什么那么小?
对于一个精简的OS,RootFS可以很小,只包含一些最基本的命令、工具、库就可以了
当我们启动了一个容器,它底层可以直接使用宿主机已经加载好的Kernel
就不需要自己再虚拟一套环境,重新使用BootFS加载一个新的内核,大大节省了开销
Union 文件系统是Docker镜像的基础。
镜像可以通过分层来进行继承,基于基础镜像(没有父镜像) , 可以制作各种具体的应用镜像。
当我们拉取一个镜像
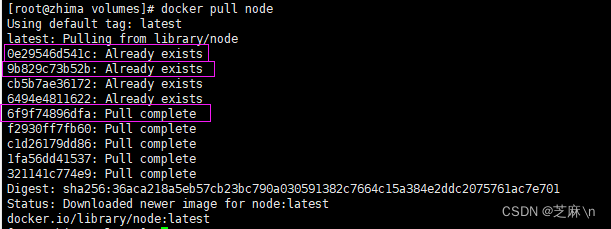
我们可以发现
该镜像是一层一层下载的而不是一整个下载的
这就符合了UnionFS的特性
前面几层是在我下载其他镜像的时候已经下载过了
就可以直接拿来使用,不需要再次下载,实现了资源共享,极大的节省了内存
查看镜像分层
docker image inspect imageId|imageName
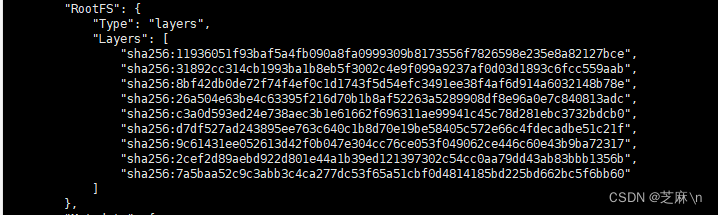
特点
Docker镜像都是只读的
当使用命令启动了一个新的容器的时候
该镜像先被复制
接着一个新的可写层被添加到该复制后的镜像的顶层
这一层就是容器层
所以当我们新建了一个容器后,如果想将本次修改后的容器打包成一个新的镜像,就需要使用docker commit命令
[root@zhima volumes]# docker commit --help

Usage:  docker commit [OPTIONS] CONTAINER [REPOSITORY[:TAG]]

Create a new image from a container's changes

Options:
  -a, --author string    Author (e.g., "John Hannibal Smith <hannibal@a-team.com>")
  -c, --change list      Apply Dockerfile instruction to the created image
  -m, --message string   Commit message
  -p, --pause            Pause container during commit (default true)
数据卷
数据卷技术,说白了,其实就是文件的同步
我们创建了一个MySQL的容器,我们不对其做任何措施
如果我们误删除或者有人恶意删除了该容器
那么里面保存的数据也就随之丢失了
这是一件十分恶劣的事情
所以为了防止这种事情
我们就需要使用一种技术,将容器内保存数据的目录挂载到宿主机上
这种技术就是数据卷技术
使用
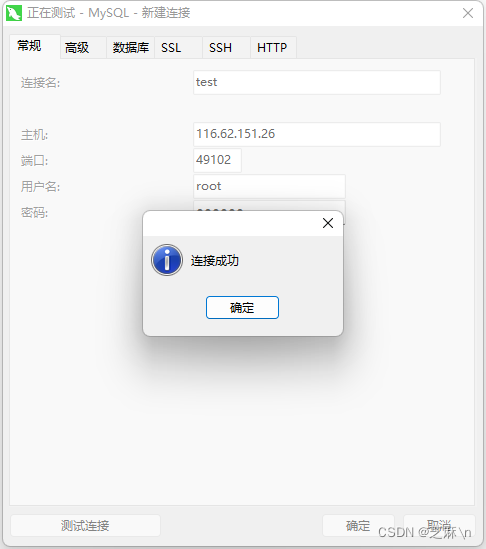
这里我们部署一个MySQL来让大家明白如何使用卷技术
# -v 宿主机目录:容器内目录
# -p 宿主机短裤:容器端口
# -d 后台启动
# -e 设置环境变量
[root@zhima home]# docker run --name mysql01 -v /home/mysql:/usr/share/mysql -v /home/mysql/conf:/etc/mysql/conf.d -p 49102:3306  -d -e MYSQL_ROOT_PASSWORD=123456  mysql

[root@zhima home]# docker ps
CONTAINER ID   IMAGE          COMMAND                  CREATED         STATUS         PORTS                                NAMES
d49309c0ab18   mysql          "docker-entrypoint.s…"   6 seconds ago   Up 4 seconds   33060/tcp, 0.0.0.0:49102->3306/tcp   mysql01
[root@zhima conf]# cd /home/mysql/data/
[root@zhima data]# ls
auto.cnf       binlog.000002  ca-key.pem  client-cert.pem  #ib_16384_0.dblwr  ib_buffer_pool  ib_logfile0  ibtmp1        mysql      performance_schema  public_key.pem   server-key.pem  undo_001
binlog.000001  binlog.index   ca.pem      client-key.pem   #ib_16384_1.dblwr  ibdata1         ib_logfile1  #innodb_temp  mysql.ibd  private_key.pem     server-cert.pem  sys             undo_002
删除容器之后,宿主机中仍然保存着容器内的数据
[root@zhima data]# docker stop mysql01
mysql01
[root@zhima data]# ls
auto.cnf       binlog.000002  ca-key.pem  client-cert.pem  #ib_16384_0.dblwr  ib_buffer_pool  ib_logfile0  #innodb_temp  mysql.ibd           private_key.pem  server-cert.pem  sys       undo_002
binlog.000001  binlog.index   ca.pem      client-key.pem   #ib_16384_1.dblwr  ibdata1         ib_logfile1  mysql         performance_schema  public_key.pem   server-key.pem   undo_001
具名挂载和匿名挂载
# 匿名挂载,我不指定宿主句的路径,指定容器内的路径
[root@zhima home]# docker run --name mysql01 -v /usr/share/mysql -v /etc/mysql/conf.d -p 49102:3306  -d -e MYSQL_ROOT_PASSWORD=123456  mysql

# 具名挂载,我不指定宿主句的路径,但是指定一个名字,并指定容器内的路径
[root@zhima home]# docker run --name mysql01 -v mysql_data:/usr/share/mysql -v mysql_config:/etc/mysql/conf.d -p 49102:3306  -d -e MYSQL_ROOT_PASSWORD=123456  mysql
不管是具名挂载还是匿名挂载都是docker自动在/var/lib/docker/volumes目录下创建文件夹
只不过具名挂载可以自己指定该文件夹的名字
数据卷容器
如何做到多个容器间数据共享呢?
那就需要使用数据卷容器技术,其实就是一个可选项,下面看使用
[root@zhima home]# docker run --name mysql01 -v mysql_data:/usr/share/mysql -v mysql_config/etc/mysql/conf.d -p 49102:3306  -d -e MYSQL_ROOT_PASSWORD=123456  mysql
[root@zhima home]# docker run --name mysql02 --volumes-from mysql01 -p 49103:3306  -d -e MYSQL_ROOT_PASSWORD=123456  mysql
[root@zhima home]# docker run --name mysql03 --volumes-from mysql01 -p 49103:3306  -d -e MYSQL_ROOT_PASSWORD=123456  mysql
mysql01就叫数据卷容器
mysql02、mysql03就会和mysql01的挂载是一样的
即mysql02和mysql03都和mysql01一样挂载到了宿主机的同个目录
/var/lib/docker/volumes/mysql_data和/var/lib/docker/volumes/mysql_cofig
对数据卷的操作
# 对卷的操作
[root@zhima etc]# docker volume --help

Usage:  docker volume COMMAND

Manage volumes

Commands:
  create      Create a volume
  inspect     Display detailed information on one or more volumes
  ls          List volumes
  prune       Remove all unused local volumes
  rm          Remove one or more volumes
Dockerfile
Dockerfile就是用来构建docker镜像的文件
1、Dockerfile中的保留关键词使用的时候都必须是大写
2、指令是从上到下执行的
3、#表示注释
4、每一个指令都会创建并提交一层镜像层
指令
Dockerfile中的指令
| 指令 | 说明 |
|---|---|
| FROM | 说明镜像使用的基础镜像 |
| MAINTAINER | 设置镜像的作者 |
| ADD | 构建镜像的时候复制文件到容器内 |
| COPY | 构建镜像的时候复制文件到容器内 |
| RUN | 设置容器的启动命令 |
| ONBUILD | 设置镜像的ONBUILD指令 |
| WORKDIR | 设置运行RUN CMD ENTRYPOINT COPY ADD指令的工作目录 |
| USER | 设置运行RUN CMD ENTRYPOINT的用户名 |
| STOPSIGNAL | 设置容器退出的时候的信号量 |
| ARG | 设置编译镜像的时候加入的参数 |
| LABEL | 设置镜像的标签 |
| CMD | 编译镜像的时候运行的脚本 |
| ENV | 设置容器的环境变量 |
| EXPOSE | 设置镜像暴露的端口 |
| ENTRYPOINT | 设置容器的入口程序 |
| VOLUME | 设置容器的挂载卷 |
小试牛刀
自己制作一个带网络配置和vim的centos镜像
FROM centos

MAINTAINER zhima<1158778689@qq.com>

ENV MYPATH /usr/local

WORKDIR $MYPATH

# 下面三行RUN命令是为了解决以下这个错误的
# Error: Failed to download metadata for repo 'appstream': Cannot prepare internal mirrorlist: No URLs in mirrorlist
RUN cd /etc/yum.repos.d/

RUN sed -i 's/mirrorlist/#mirrorlist/g' /etc/yum.repos.d/CentOS-*

RUN sed -i 's|#baseurl=http://mirror.centos.org|baseurl=http://vault.centos.org|g' /etc/yum.repos.d/CentOS-*

RUN yum -y install vim

RUN yum -y install net-tools

EXPOSE 80

CMD echo $MYPATH

CMD ["ls","-l"]

CMD /bin/bash
构建
构建命令
[root@zhima home]# docker build --help

Usage:  docker build [OPTIONS] PATH | URL | -

Build an image from a Dockerfile

Options:
# Dockerfile的名字
  -f, --file string             Name of the Dockerfile (Default is 'PATH/Dockerfile')
# 生成的镜像的标签
  -t, --tag list                Name and optionally a tag in the 'name:tag' format

docker build -f Dockerfile -t myImageName:tag ./
构建镜像
[root@zhima lizhi]# docker build -t mycentos:1.0 .
启动容器
[root@zhima lizhi]# docker run -it --name centos1  mycentos:1.0
[root@49ea92e17942 local]#
CMD和ENTRYPOINT
我们来试一下构建这个Dockerfile,并运行
FROM centos

CMD ["ls","-a"]
构建
[root@zhima lizhi]# docker build -t mycentos .
Sending build context to Docker daemon  17.92kB
Step 1/2 : FROM centos
 ---> 5d0da3dc9764
Step 2/2 : CMD ["ls","-a"]
 ---> Running in a1e70a05d8dd
Removing intermediate container a1e70a05d8dd
 ---> 00433fd4c299
Successfully built 00433fd4c299
Successfully tagged mycentos:latest
运行
[root@zhima lizhi]# docker run -it --name "centos1" mycentos
.   .dockerenv	dev  home  lib64       media  opt   root  sbin	sys  usr
..  bin		etc  lib   lost+found  mnt    proc  run   srv	tmp  var
可以发现,进入容器之后,就执行了ls -a命令
我们尝试一下在启动的时候加入一些参数
[root@zhima lizhi]# docker run -it --name "centos2" mycentos -l
docker: Error response from daemon: OCI runtime create failed: container_linux.go:380: starting container process caused: exec: "-l": executable file not found in $PATH: unknown.
我们发现容器并没有执行ls -al,而是直接报错了
其实这就是CMD的特性,当我在启动容器的时候添加了一个CMD后
镜像中定义的CMD就被覆盖掉了
单独的-l当然会报错了
我们来看一下使用ENTRYPOINT会怎么样
修改Dockerfile
FROM centos

ENTRYPOINT ["ls","-a"]
重新构建
[root@zhima lizhi]# docker build -t mycentos .
Sending build context to Docker daemon  17.92kB
Step 1/2 : FROM centos
 ---> 5d0da3dc9764
Step 2/2 : ENTRYPOINT ["ls","-a"]
 ---> Running in 22ef40dea625
Removing intermediate container 22ef40dea625
 ---> 73a3d51b4d84
Successfully built 73a3d51b4d84
Successfully tagged mycentos:latest
运行容器
[root@zhima lizhi]# docker run -it --name "centos1" mycentos -l
total 56
drwxr-xr-x   1 root root 4096 Jul 14 08:52 .
drwxr-xr-x   1 root root 4096 Jul 14 08:52 ..
-rwxr-xr-x   1 root root    0 Jul 14 08:52 .dockerenv
lrwxrwxrwx   1 root root    7 Nov  3  2020 bin -> usr/bin
drwxr-xr-x   5 root root  360 Jul 14 08:52 dev
drwxr-xr-x   1 root root 4096 Jul 14 08:52 etc
drwxr-xr-x   2 root root 4096 Nov  3  2020 home
lrwxrwxrwx   1 root root    7 Nov  3  2020 lib -> usr/lib
lrwxrwxrwx   1 root root    9 Nov  3  2020 lib64 -> usr/lib64
drwx------   2 root root 4096 Sep 15  2021 lost+found
drwxr-xr-x   2 root root 4096 Nov  3  2020 media
drwxr-xr-x   2 root root 4096 Nov  3  2020 mnt
drwxr-xr-x   2 root root 4096 Nov  3  2020 opt
dr-xr-xr-x 191 root root    0 Jul 14 08:52 proc
dr-xr-x---   2 root root 4096 Sep 15  2021 root
drwxr-xr-x  11 root root 4096 Sep 15  2021 run
lrwxrwxrwx   1 root root    8 Nov  3  2020 sbin -> usr/sbin
drwxr-xr-x   2 root root 4096 Nov  3  2020 srv
dr-xr-xr-x  13 root root    0 Jan 29 10:27 sys
drwxrwxrwt   7 root root 4096 Sep 15  2021 tmp
drwxr-xr-x  12 root root 4096 Sep 15  2021 usr
drwxr-xr-x  20 root root 4096 Sep 15  2021 var
可以发现,容器执行的是ls -al,-l指令被追加给了ENTRYPOINT定义的语句


 3563
3563


 被折叠的 条评论
为什么被折叠?
被折叠的 条评论
为什么被折叠?
 到【灌水乐园】发言


