


使用两种方法对比识别车牌
1.轮廓查找
首先对读取图片,做基本处理
将原图片转为灰度图片
再进行双边滤波
img = cv2.imread("img")
gray = cv2.cvtColor(img, cv2.COLOR_BGR2GRAY)
# 双边滤波
gray1 = cv2.bilateralFilter(gray, 13, 15, 15)

plt.imshow(gray,cmap="gray")
plt.imshow(gray1,cmap="gray")
plt.show()
如图

寻找轮廓
imutils是一个 OpenCV 的 Python 封装库,简化了图像的处理,可以更方便的实现图像显示(使用 Matplotlib)、平移(Translate)、旋转(Rotate)、缩放(Resize)、骨架化(Skeletonizate)等操作。
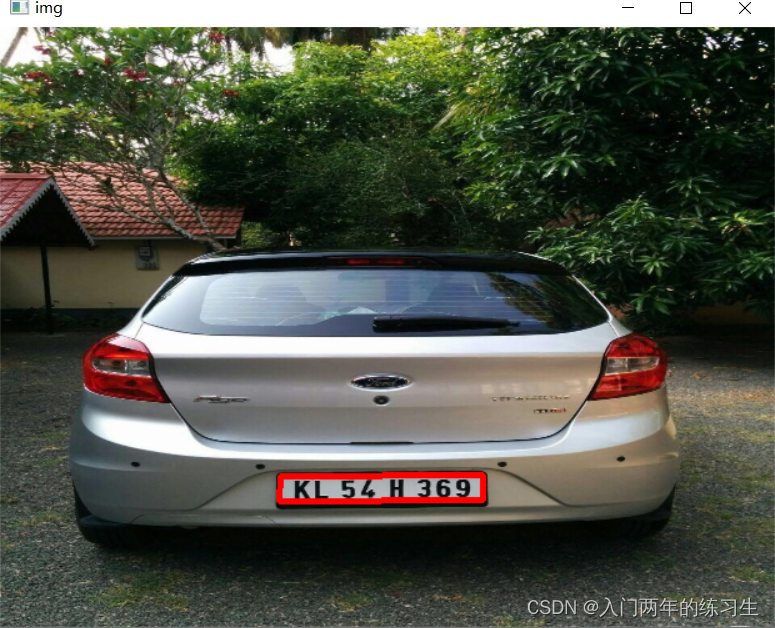
 contours = cv2.findContours(edged.copy(), cv2.RETR_TREE, cv2.CHAIN_APPROX_SIMPLE)

    contours = imutils.grab_contours(contours)
    # 根据区域大小排序取前十个
    contours = sorted(contours, key=cv2.contourArea, reverse=True)[:10]
    screenCnt = None
    # 遍历轮廓,找到车牌轮廓
    for c in contours:
        # 计算轮廓周长(轮廓,是否闭合)
        peri = cv2.arcLength(c, True)
        # 折线化(轮廓,阈值(越小越接近曲线),是否闭合)返回折线顶点坐标
        approx = cv2.approxPolyDP(c, 0.018 * peri, True)
        # 获取四个顶点(即四边形)
        if len(approx) == 4:
            screenCnt = approx
            break
    # 如果找到了四边形
    if screenCnt is not None:
        # 根据四个顶点坐标对img画线(图像矩阵,轮廓坐标集,轮廓索引,颜色,线条粗细)
        cv2.drawContours(img, [screenCnt], -1, (0, 0, 255), 3)
标记车牌区域:
# 创建一个灰度图一样大小的图像矩阵
    mask = np.zeros(gray.shape, np.uint8)
    # 将创建的图像矩阵的车牌区域画成白色
    cv2.drawContours(mask, [screenCnt], 0, 255, -1, )
    # 图像位运算进行遮罩
    new_image = cv2.bitwise_and(img, img, mask=mask)
对车牌进行处理:
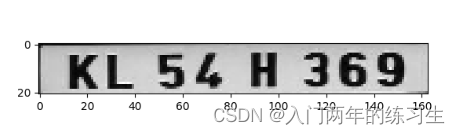
将车牌区域裁剪
# 获取车牌区域的所有坐标点
    (x, y) = np.where(mask == 255)
    # 获取底部顶点坐标
    (topx, topy) = (np.min(x), np.min(y))
    # 获取底部坐标
    (bottomx, bottomy,) = (np.max(x), np.max(y))
    # 剪裁
    Cropped = gray[topx:bottomx, topy:bottomy]
最后使用pytesseract库进行车牌内容识别
 text = ts.image_to_string(Cropped, config='--psm 11')
 print("车牌结果:", text)
运行结果:

附上完整代码
import cv2
import matplotlib.pyplot as plt
import imutils
import pytesseract as ts
import numpy as np
if __name__ == '__main__':
    img = cv2.imread("img")

    img = cv2.resize(img, (620, 480))

    gray = cv2.cvtColor(img, cv2.COLOR_BGR2GRAY)
    # 双边滤波
    gray1 = cv2.bilateralFilter(gray, 13, 15, 15)

    # 显示效果
    plt.subplot(1,2,1)
    plt.imshow(gray,cmap="gray")
    plt.subplot(1,2,2)
    plt.imshow(gray1,cmap="gray")
    plt.show()

    edged = cv2.Canny(gray, 50, 200)
    plt.imshow(edged,cmap="gray")
    plt.show()
    contours = cv2.findContours(edged.copy(), cv2.RETR_TREE, cv2.CHAIN_APPROX_SIMPLE)

    contours = imutils.grab_contours(contours)
    # 根据区域大小排序取前十个
    contours = sorted(contours, key=cv2.contourArea, reverse=True)[:10]
    screenCnt = None
    # 遍历轮廓,找到车牌轮廓
    for c in contours:
        # 计算轮廓周长(轮廓,是否闭合)
        peri = cv2.arcLength(c, True)
        # 折线化(轮廓,阈值(越小越接近曲线),是否闭合)返回折线顶点坐标
        approx = cv2.approxPolyDP(c, 0.018 * peri, True)
        # 获取四个顶点(即四边形)
        if len(approx) == 4:
            screenCnt = approx
            break
    # 如果找到了四边形
    if screenCnt is not None:
        # 根据四个顶点坐标对img画线(图像矩阵,轮廓坐标集,轮廓索引,颜色,线条粗细)
        cv2.drawContours(img, [screenCnt], -1, (0, 0, 255), 3)
    """遮罩"""
    # 创建一个灰度图一样大小的图像矩阵
    mask = np.zeros(gray.shape, np.uint8)
    # 将创建的图像矩阵的车牌区域画成白色
    cv2.drawContours(mask, [screenCnt], 0, 255, -1, )
    # 图像位运算进行遮罩
    new_image = cv2.bitwise_and(img, img, mask=mask)
    """图像剪裁"""
    # 获取车牌区域的所有坐标点
    (x, y) = np.where(mask == 255)
    # 获取底部顶点坐标
    (topx, topy) = (np.min(x), np.min(y))
    # 获取底部坐标
    (bottomx, bottomy,) = (np.max(x), np.max(y))
    # 剪裁
    Cropped = gray[topx:bottomx, topy:bottomy]
    #显示效果
    cv2.imshow('img', img)
    cv2.imshow('gray', gray)
    cv2.imshow('edged', edged)
    cv2.imshow('new_image ',new_image )
    cv2.imshow('Cropped',Cropped)
    cv2.waitKey(0)
    cv2.destroyAllWindows()
    plt.imshow(Cropped,cmap='gray')
    plt.show()
    text = ts.image_to_string(Cropped, config='--psm 11')
    print("车牌结果:", text)
在这里可能会出现pytesseract库调用识别导致无法识别车牌内容,详情请参考pytesseract的下载和调用。

2.使用Haar级联模型车牌检测
依旧是先读取图片
carplate_img = cv2.imread('img')
carplate_img_rgb = cv2.cvtColor(carplate_img, cv2.COLOR_BGR2RGB)

plt.subplot(1, 2, 1)
plt.imshow(carplate_img)
plt.subplot(1,2,2)
plt.imshow(carplate_img_rgb);
plt.show() 
写一个可以调整图片大小的函数,并且进行保存
def enlarge_plt_display(image, scale_factor):
    width = int(image.shape[1] * scale_factor / 100)
    height = int(image.shape[0] * scale_factor / 100)
    dim = (width, height)
    plt.figure(figsize = dim)
    plt.axis('off')
    plt.imshow(image)
使用方法enlarge_plt_display(carplate_img, 1)
其中数字参数表示对该图片的大小处理的倍数
接下来我们调用Haar级联的车牌检测模型
Haar级联检测5个特征:边缘特征、线特征、四角-矩形的特征,计算特征需要从黑色区域下的像素总和中减去白色区域下的像素总和。
这里我们所用的是Haar级联已经训练好的模型,本质上属于四角-矩形的特征检测
这里是一些常用的模型简介 可以点击此处从官方github中下载
- haarcascade_frontalface_default.xml:检测面部
- haarcascade_eye.xml:检测左眼和右眼
- haarcascade_smile.xml:检测面部是否存在嘴部
- haarcascade_eye_tree_eyeglasses.xml:检测是否带墨镜🕶
- haarcascade_frontalcatface.xml:检测猫脸
- haarcascade_frontalcatface_extended.xml:检测猫脸延伸
- haarcascade_frontalface_alt.xml:检测人脸属性
- haarcascade_frontalface_alt_tree.xml
- haarcascade_frontalface_alt2.xml
- haarcascade_fullbody.xml:检测全身
- haarcascade_lefteye_2splits.xml:检测左眼
- haarcascade_licence_plate_rus_16stages.xml:检测证件
- haarcascade_lowerbody.xml:检测下半身
- haarcascade_profileface.xml
- haarcascade_righteye_2splits.xml:检测右眼
- haarcascade_russian_plate_number.xml:检测俄罗斯字母车牌号
- haarcascade_upperbody.xml:检测上半身
调用模型,并使用模型标记出车牌
carplate_haar_cascade = cv2.CascadeClassifier('./haar_cascades/haarcascade_russian_plate_number.xml')
def carplate_detect(image):
    carplate_overlay = image.copy() #将原图复制
    carplate_rects =carplate_haar_cascade.detectMultiScale(carplate_overlay,scaleFactor=1.1, minNeighbors=3)

    for x,y,w,h in carplate_rects:
        cv2.rectangle(carplate_overlay, (x,y), (x+w,y+h), (255,0,0), 5)

    return carplate_overlay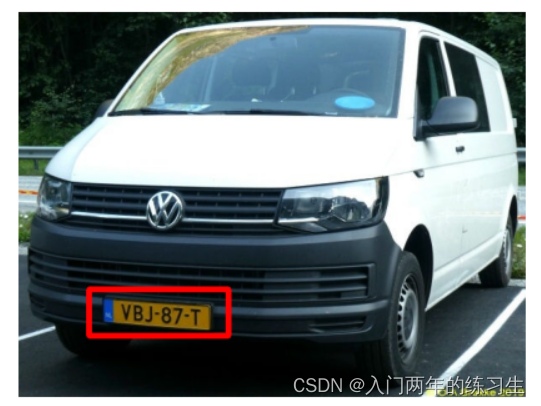
最后将车牌裁剪:
def carplate_extract(image):

    carplate_rects = carplate_haar_cascade.detectMultiScale(image,scaleFactor=1.1, minNeighbors=5)

    for x,y,w,h in carplate_rects:
        carplate_img = image[y-10:y+h+10 ,x+27:x+w+15]

    return carplate_img
carplate_extract_img = carplate_extract(carplate_img_rgb)
plt.imshow(carplate_extract_img) 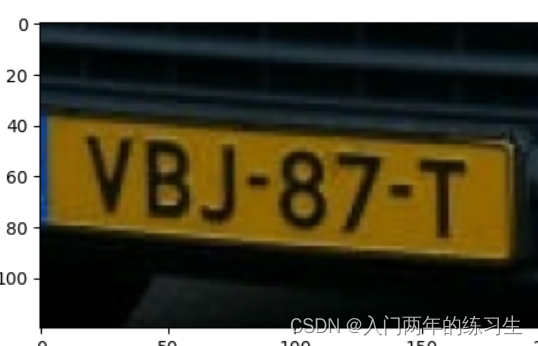
附上完整代码:
import cv2
import numpy as np
import matplotlib.pyplot as plt

import pytesseract as ts


def car_plate_detection(img):
    def enlarge_plt_display(image, scale_factor):
        width = int(image.shape[1] * scale_factor / 100)
        height = int(image.shape[0] * scale_factor / 100)
        dim = (width, height)
        plt.figure(figsize=dim)
        plt.axis('off')
        plt.imshow(image)

    def carplate_detect(image):
        carplate_overlay = image.copy()  # Create overlay to display red rectangle of detected car plate
        carplate_rects = carplate_haar_cascade.detectMultiScale(carplate_overlay, scaleFactor=1.1, minNeighbors=1)

        for x, y, w, h in carplate_rects:
            cv2.rectangle(carplate_overlay, (x, y), (x + w, y + h), (255, 0, 0), 5)

        return carplate_overlay

    def carplate_extract(image):

        carplate_rects = carplate_haar_cascade.detectMultiScale(image, scaleFactor=1.1, minNeighbors=5)

        for x, y, w, h in carplate_rects:
            carplate_img = image[y - 10:y + h + 10, x + 27:x + w + 15]

        return carplate_img

    def enlarge_img(image, scale_percent):
        width = int(image.shape[1] * scale_percent / 100)
        height = int(image.shape[0] * scale_percent / 100)
        dim = (width, height)
        resized_image = cv2.resize(image, dim, interpolation=cv2.INTER_AREA)
        return resized_image


    carplate_img = cv2.imread(img)
    carplate_img_rgb = cv2.cvtColor(carplate_img, cv2.COLOR_BGR2RGB)

    carplate_haar_cascade = cv2.CascadeClassifier('./Car-Plate-Detection-OpenCV-TesseractOCR-main/haar_cascades/haarcascade_russian_plate_number.xml')

    detected_carplate_img = carplate_detect(carplate_img_rgb)
    enlarge_plt_display(detected_carplate_img, 1)
    carplate_extract_img = carplate_extract(carplate_img_rgb)
    car_plate_area = enlarge_img(carplate_extract_img, 150)

    return car_plate_area


car_plate_area=car_plate_detection("img")
plt.imshow(car_plate_area,cmap="gray")
plt.show()
总结:
相比较使用轮廓检测来剪裁车牌的效果要弱于使用Haar级联模型,在Haar级联模型中,对图像的轮廓进行了多次的标识,最终通过参数决定标记大于多少次的轮廓将其保留下来,有更好的鲁棒性。


 304
304


 被折叠的 条评论
为什么被折叠?
被折叠的 条评论
为什么被折叠?
 到【灌水乐园】发言


