


项目地址: http://codeape.site:8181/#/protectTheHorse
b站地址: https://www.bilibili.com/video/bv1xZ4y1v7ju
基本介绍
开发技术:canvas,vue2,js
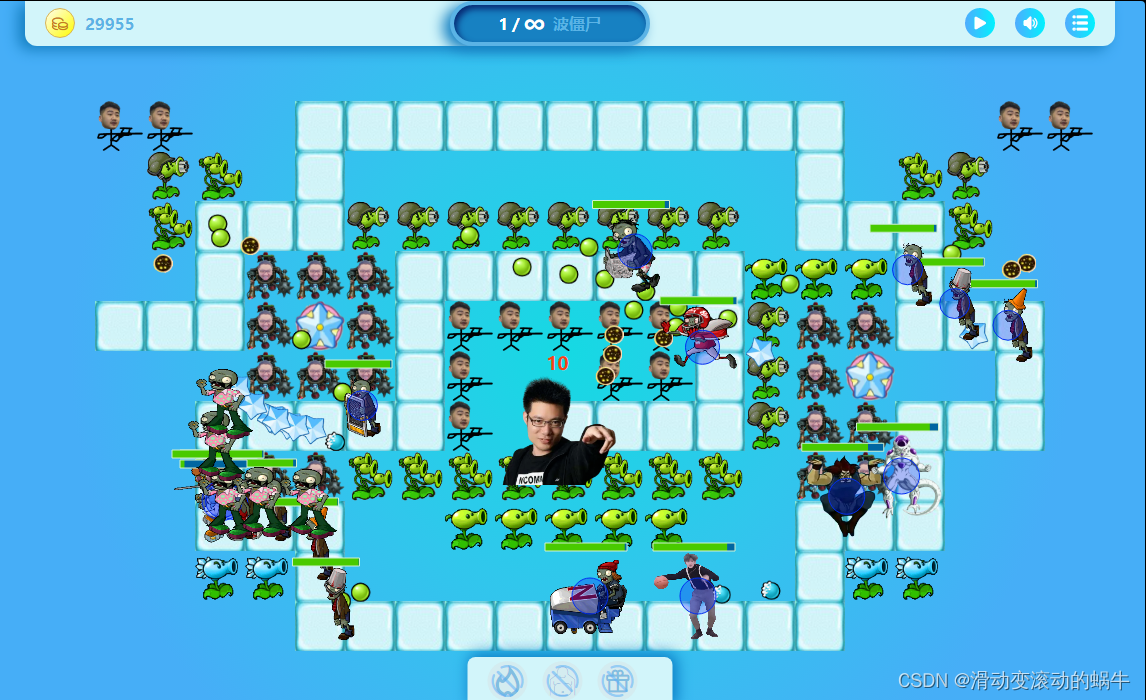
这是一款网页版的塔防小游戏,名称叫做保卫大司马(类似于保卫萝卜),大司马作为终点,有生命值,选用植物大战僵尸的素材来充当敌人和塔防,部分塔防使用一些主播ps扣的或火柴人图片(自己画的,有点丑)。
开发过程主要功能及其代码
1. 初始化加载图片
await this.allGifToStaticImg() // 等待所有的gif图片转成静态图片
this.imgOnloadObj = await loadImage(this.imgObj);
this.towerOnloadImg = await loadImage(this.towerList, 'img');
this.towerBulletOnloadImg = await loadImage(this.towerList, 'bulletImg');
等待所有的gif图生成静态图片 promise 方法: 由于canvas是一帧一帧将内容画出来的,所以gif图对于canvas不管用,需要转成多张静态图片。这里就需要用到Promise.all了,等待所有图片都转成静态图片再开始下面的操作。
async allGifToStaticImg() {
  return Promise.all(this.enemySource.map(async (item, index) => {
    this.enemySource[index].imgList = await gifToStaticImg(item)
    this.progress += this.progressStep
    return
  })).then(res => {

  })
}
gif转canvas静态图片: 而其中单张gif转静态图片需要用到libgif.js,其中的SuperGif方法可以用来操作gif图片。
export function gifToStaticImg(target) {
  return new Promise((resolve, reject) => {
    try {
      const {type, imgSource} = target
      if(type !== 'gif') {
        const newImg = new Image();
        newImg.src = imgSource
        resolve([newImg])
      }
      const gifImg = document.createElement('img');
      gifImg.src = imgSource
      // gifImg.style.transform = 'rotate(90deg)';
      // 创建gif实例
      const rub = new SuperGif({ gif: gifImg } );
      rub.load(() => {
        const imgList = [];
        for (let i = 1; i <= rub.get_length(); i++) {
          // 遍历gif实例的每一帧
          rub.move_to(i);
          const imgUrl = rub.get_canvas()
          imgList.push(imgUrl)
        }
        resolve(imgList)
      });
    } catch (error) {
      console.log('error: ', error);
      reject(error)
    }
  })
}
canvas加载图片: canvas绘画的图像需要创建一个Image对象,等待图片加载完成,再将数据保存下来。
/** 加载图片 imgUrl: 图片数组, objKey: 在数组中的key值  */
export function loadImage(imgUrl, objKey) {
  return new Promise((resolve, reject) => {
    try {
      const imgObj = {}; // 保存图片资源
      let tempImg, imgLength = 0, loaded = 0;
      for (let key in imgUrl) {
        imgLength++; // 初始化要加载图片的总数
        tempImg = new Image();
        tempImg.src = !objKey ? imgUrl[key] : imgUrl[key][objKey];
        imgObj[key] = tempImg;
        tempImg.onload = function () {
          loaded++; // 统计已经加载完毕的图像
          // 所有的图片都加载完毕
          if (loaded >= imgLength) {
            resolve(imgObj)
          }
        };
      }
    } catch (error) {
      console.log('error: ', error);
      reject(error)
    }
  })
}
2. 初始化数据
将所需要的数据进行初始化,这里需要初始化页面中所有的格子数据(根据变量定为每格大小50*50px),初始化行动轨迹(就是页面中地下可供移动的格子,同时也是敌人在上面的移动轨迹)
/** 初始化所有格子 */
initAllGrid() {
  const { x_num, y_num } = this.gridInfo
  const arr = []
  for(let i = 0; i < x_num; i++) {
    arr.push([])
    for(let j = 0; j < y_num; j++) {
      arr[i][j] = 0
    }
  }
  this.gridInfo.arr = arr
},
/** 初始化行动轨迹 */
initMovePath() {
  const size = this.gridInfo.size
  // 刚开始就右移了,所有该初始格不会算上去
  const movePathItem = JSON.parse(JSON.stringify(this.mapGridInfoItem))
  delete movePathItem.num
  const movePath = []
  // 控制x y轴的方向 1:左 2:下 3:右 4:上
  let x_y = 3
  for(let i = 0; i < this.floorTile.num; i++) {
    const newXY = mapData[this.mapLevel][i]
    if(newXY) {
      x_y = newXY
    }
    if(x_y % 2) movePathItem.x += x_y === 3 ? size : -size
    else movePathItem.y += x_y === 4 ? size : -size
    movePathItem.x_y = x_y
     // 将该份数据保存下来
    movePath.push(JSON.parse(JSON.stringify(movePathItem)))
     // 给格子数组中赋值,标记该位置情况为:有地板了
    this.gridInfo.arr[movePathItem.y / size][movePathItem.x / size] = 1
  }
  this.terminal = movePath[movePath.length - 1]
  this.movePath = movePath
}
// 地图数据大概等于这样
this.mapGridInfoItem = {
  28: 1, 73: 1,
  46: 2, 85: 2,
  53: 3, 88: 3,
  19: 4, 68: 4,
}
3. 开始动画绘画
这里使用requestAnimationFrame()来进行绘画,它的作用类似于定时器,但是它能做到比定时器更加流程的动画效果,能达到每秒60帧的刷新率,对于需要高刷新的小游戏很适合。
/** 开启动画绘画 */
startAnimation() {
  const that = this;
  (function go() {
    that.startDraw();
    if (!that.isPause) {
      // 时间间隔为 1000/60 每秒 60 帧
      that.animationFrame = requestAnimationFrame(go);
    } else {
      cancelAnimationFrame(that.animationFrame)
    }
  })();
},
/** 页面卸载前清除一下 */
beforeDestroy() {
  cancelAnimationFrame(this.animationFrame)
}
4. 开始绘画和操作数据
当上面准备工作做好后,就开始游戏开发了,主要开发模式为:操作数据,然后绘画图像。由于页面的绘画一直是持续的,对于场上的内容,只需处理数据就好了,对于建造塔防,发射子弹等就需要额外绘画了。
需要绘画的有:
/** 画地板 */
this.drawFloorTile()
/** 画塔防 */
this.drawTower()
/** 画并处理子弹 */
this.drawAndMoveBullet()
/** 画敌人 */
this.drawEnemy()
5. 判断敌人是否进入塔防攻击范围
敌人进入攻击范围,返回进入范围的敌人id。主要是通过以下函数来进行判断,判断敌人图片的四个角是否进入了攻击范围(这里就不复杂化:数学中一个圆和一个矩形相遇),四个角都计算到圆心的距离是否小于半径即可。
/** 返回进入攻击范围的值的数组 */
enterAttackScopeList(enemyList, tower) {
  const list = enemyList.reduce((pre, enemy) => {
    if(this.checkValInCircle(enemy, tower)) {
      pre.push({curFloorI: enemy.curFloorI, id: enemy.id})
    }
    return pre
  }, [])
  list.sort((a, b) => b.curFloorI - a.curFloorI)
  return list.map(item => item.id)
},
/** 判断值是否在圆内 */
checkValInCircle(enemy, tower) {
  const {x, y, w, h} = enemy
  const angleList = [
    this.calculateDistance(tower, x, y),
    this.calculateDistance(tower, x + w, y),
    this.calculateDistance(tower, x + w, y + h),
    this.calculateDistance(tower, x , y + h),
  ]
  return angleList.some(item => item <= tower.r)
},
/** 计算点到圆心的距离之间的距离 */
calculateDistance(tower, x, y) {
  const {x: _x, y: _y} = tower
  const size_2 = this.gridInfo.size / 2
  return this.powAndSqrt(_x + size_2 - x, _y + size_2 - y)
},
/** 两值平方相加并开方 求斜边 */
powAndSqrt(val1, val2) {
  return Math.sqrt(Math.pow(val1, 2) + Math.pow(val2, 2))
},
6. 塔防射击子弹
每次建造塔防,需要为其添加一个防抖的射击函数,每次只有有敌人进入攻击范围就触发该函数即可。
// 射击的防抖函数
const shootFun = this.$lodash.throttle((eIdList, t_i) => {
  this.shootBullet(eIdList, t_i)
}, rate, { leading: true, trailing: false })
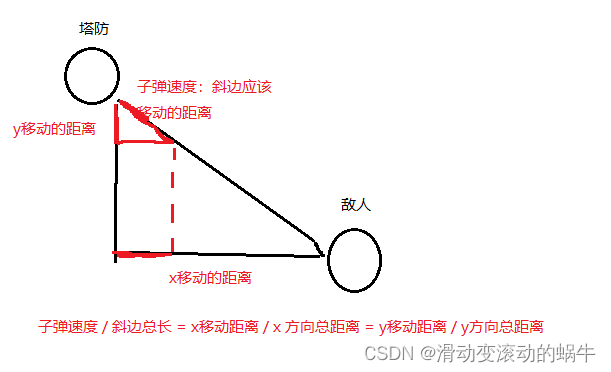
发射的子弹的移动设计思路为:将该塔防的子弹速度取出来,作为塔防和敌人在斜边上应该移动的距离,根据子弹速度和斜边总长的比值,计算得出x,y方向应该增加的值。
(子弹速度 / 斜边总长 = x移动距离 / x 方向总距离 = y移动距离 / y方向总距离)红边和黑边的比值相等
/** 发射子弹  enemy:敌人索引数组,t_i:塔索引 */
shootBullet(eIdList, t_i) {
  // 添加攻击目标的索引
  this.tower[t_i].targetIndexList = eIdList
  for(const e_id of eIdList) {
    const enemy = this.enemy.find(e => e.id === e_id)
    if(!enemy) break
    const {x, y, w, h} = enemy
    // 敌人中心坐标
    const _x = x + w / 2, _y = y + h / 2
    const {x: t_x, y: t_y, speed, name, id } = this.tower[t_i]
    const size_2 = this.gridInfo.size / 2
    // 子弹初始坐标
    const begin = {x: t_x + size_2, y: t_y + size_2}
    // 两坐标间的差值
    const diff = {x: _x - begin.x, y: _y - begin.y}
    // 子弹和敌人的距离
    const distance = this.powAndSqrt(diff.x, diff.y)
    const addX = speed * diff.x / distance, addY = speed * diff.y / distance
    const bullet = {x: begin.x, y: begin.y, addX, addY, xy: 0, x_y: distance, e_id}
    this.tower[t_i].bulletArr.push(bullet)
    if(name === 'PDD') {
      this.playDomAudio(id, 0.4)
    }
  }
},
7. 可暂停和继续的定时器
在本项目中的使用场景就是:暂停和继续游戏,但是直接对定时器进行打开和关闭的话,无法得知定时器距离下次执行的时间,所以这里封装一个全局用来存储定时器的集合。
- 使用方法
import keepInterval from './utils/keepInterval'
const id = 'hello world'
// 开启单个计时器 set(唯一的id, 计时器的执行函数, 间隔时间)
keepInterval.set(id, ()  => {}, 2000)
// 暂停单个计时器
keepInterval.pause(id)
// 删除单个计时器
keepInterval.delete(id)
// 全部暂停 / 开始
keepInterval.allPause(true || false)
// 清空数据
keepInterval.clear()
- 封装的定时器集合实例
/**
 * 储存所有的定时器集合
 * 可以暂停与继续
 */
class KeepInterval {
  timerMap = new Map()
  /** 私有的静态的实例对象 */
  static _instance
  /** 公有的、静态的、访问该实例对象的方法 */
  static get instance(){
    if(!this._instance){
      this._instance = new KeepInterval()
    }
    return this._instance
  }
  /** 设置/开启计时器 */
  set(key, fn, intervalTime = 1000) {
    if(!this.timerMap.has(key)) {
      this.timerMap.set(key, {
        timeout: null,
        interval: null,
        cur: 0,
        end: 0,
        fn,
        intervalTime,
        remainTime: intervalTime
      })
    }
    // console.log(`---${key}---`);
    const timeItem = this.timerMap.get(key)
    this.stopTime(key)
    timeItem.remainTime -= timeItem.end - timeItem.cur
    timeItem.cur = Date.now()
    timeItem.end = Date.now()
    timeItem.timeout = setTimeout(() => {
      timeItem.cur = Date.now()
      timeItem.interval = setInterval(() => {
        timeItem.cur = Date.now()
        timeItem.fn()
      }, timeItem.intervalTime)
      timeItem.fn()
    }, timeItem.remainTime)
  }
  /** 关闭计时器 */
  pause(key) {
    const timeItem = this.timerMap.get(key)
    if(timeItem) {
      timeItem.end = Date.now()
      this.stopTime(key)
      return timeItem.end - timeItem.cur
    }
  }
  /** 全部暂停或开始 */
  allPause(isPause = true) {
    this.timerMap.forEach((val, key) =>
      isPause ? this.pause(key) : this.set(key)
    )
  }
  /** 删除其中一个 */
  delete(key) {
    this.stopTime(key)
    if(this.timerMap.has(key)) {
      this.timerMap.delete(key)
    }
  }
  /** 清空数据 */
  clear() {
    if(this.timerMap) {
      this.timerMap.forEach((val, key) => {
        this.stopTime(key)
      })
      this.timerMap.clear()
    }
  }
  /** 停止定时器 */
  stopTime(key) {
    const timeItem = this.timerMap.get(key)
    if(timeItem) {
      if(timeItem.timeout) {
        clearTimeout(timeItem.timeout)
        timeItem.timeout = null
      }
      if(timeItem.interval) {
        clearInterval(timeItem.interval)
        timeItem.interval = null
      }
    }
  }
}

export default KeepInterval.instance
以上就是本塔防游戏开发的主要设计思路以及主要功能代码了。
总结
在本项目的开发过程中也涉及到不少的知识点,学到了不少,也锻炼了思维和js基本功的,由于之前忙着毕业答辩和工作上的一些事情,前前后后花了两个多月,现在这个版本也还有很多功能有待完善。


 1436
1436

 被折叠的 条评论
为什么被折叠?
被折叠的 条评论
为什么被折叠?
 到【灌水乐园】发言


