


sshd
初识 ssh
SSH是一套网络协议,目的在于 安全的网络服务 与 加密远程登录
实现了SSH协议的最主流的开源软件 OpenSSH
为什么需要SSH
如果一个用户从本地计算机,使用 SSH 协议登录 另一台远程计算机,我们就可以认为,这种登录是安全的,即使中途截获,密码也不会泄露。
Secure Shell 是 Linux系统首先的登录方式,以前使用FTP或telnet登录服务器,都是以明文的形式在网络中发送账号密码,很容易被黑客截取到数据,篡改后威胁服务器数据安全。因此如何对数据加密,安全传输是重中之重,主要方式有两种:
linux 的 ssh 命令是实现了 ssh 协议的一个操作
并且以 sshd 服务的形式在 linux 上运行
对 ssh 协议管理的开源软件是主流的 openssh 的工具
为什么要 ssh 呢?
如果一个用户,从自己的笔记本,使用 ssh 协议登录另一台机器,我们就认为这个登录的方式是安全的,因为你的登录信息在传输的时候,是被加密了的,即使被黑客抓取到了信息,也无法破解你的密码,保证服务器的安全。
以前运维人员都是用 FTP 协议,和 telnet 工具进行服务器的远程登录,但是这两种协议登录都是基于明文的传输,你的账号密码是以明文形式,暴露在互联网中,很容易被黑客截取到数据,对服务器造成安全隐患。
因此为了保证数据传输时的安全性,加密性,因此出现了两种主流的加密方式;
-
对称加密 (使用同一个钥匙进行对数据加密,解密的时候,也得使用这个钥匙)
-
非对称加密(有2个密钥,一个是公钥(锁),一个是私钥(开锁的钥匙))
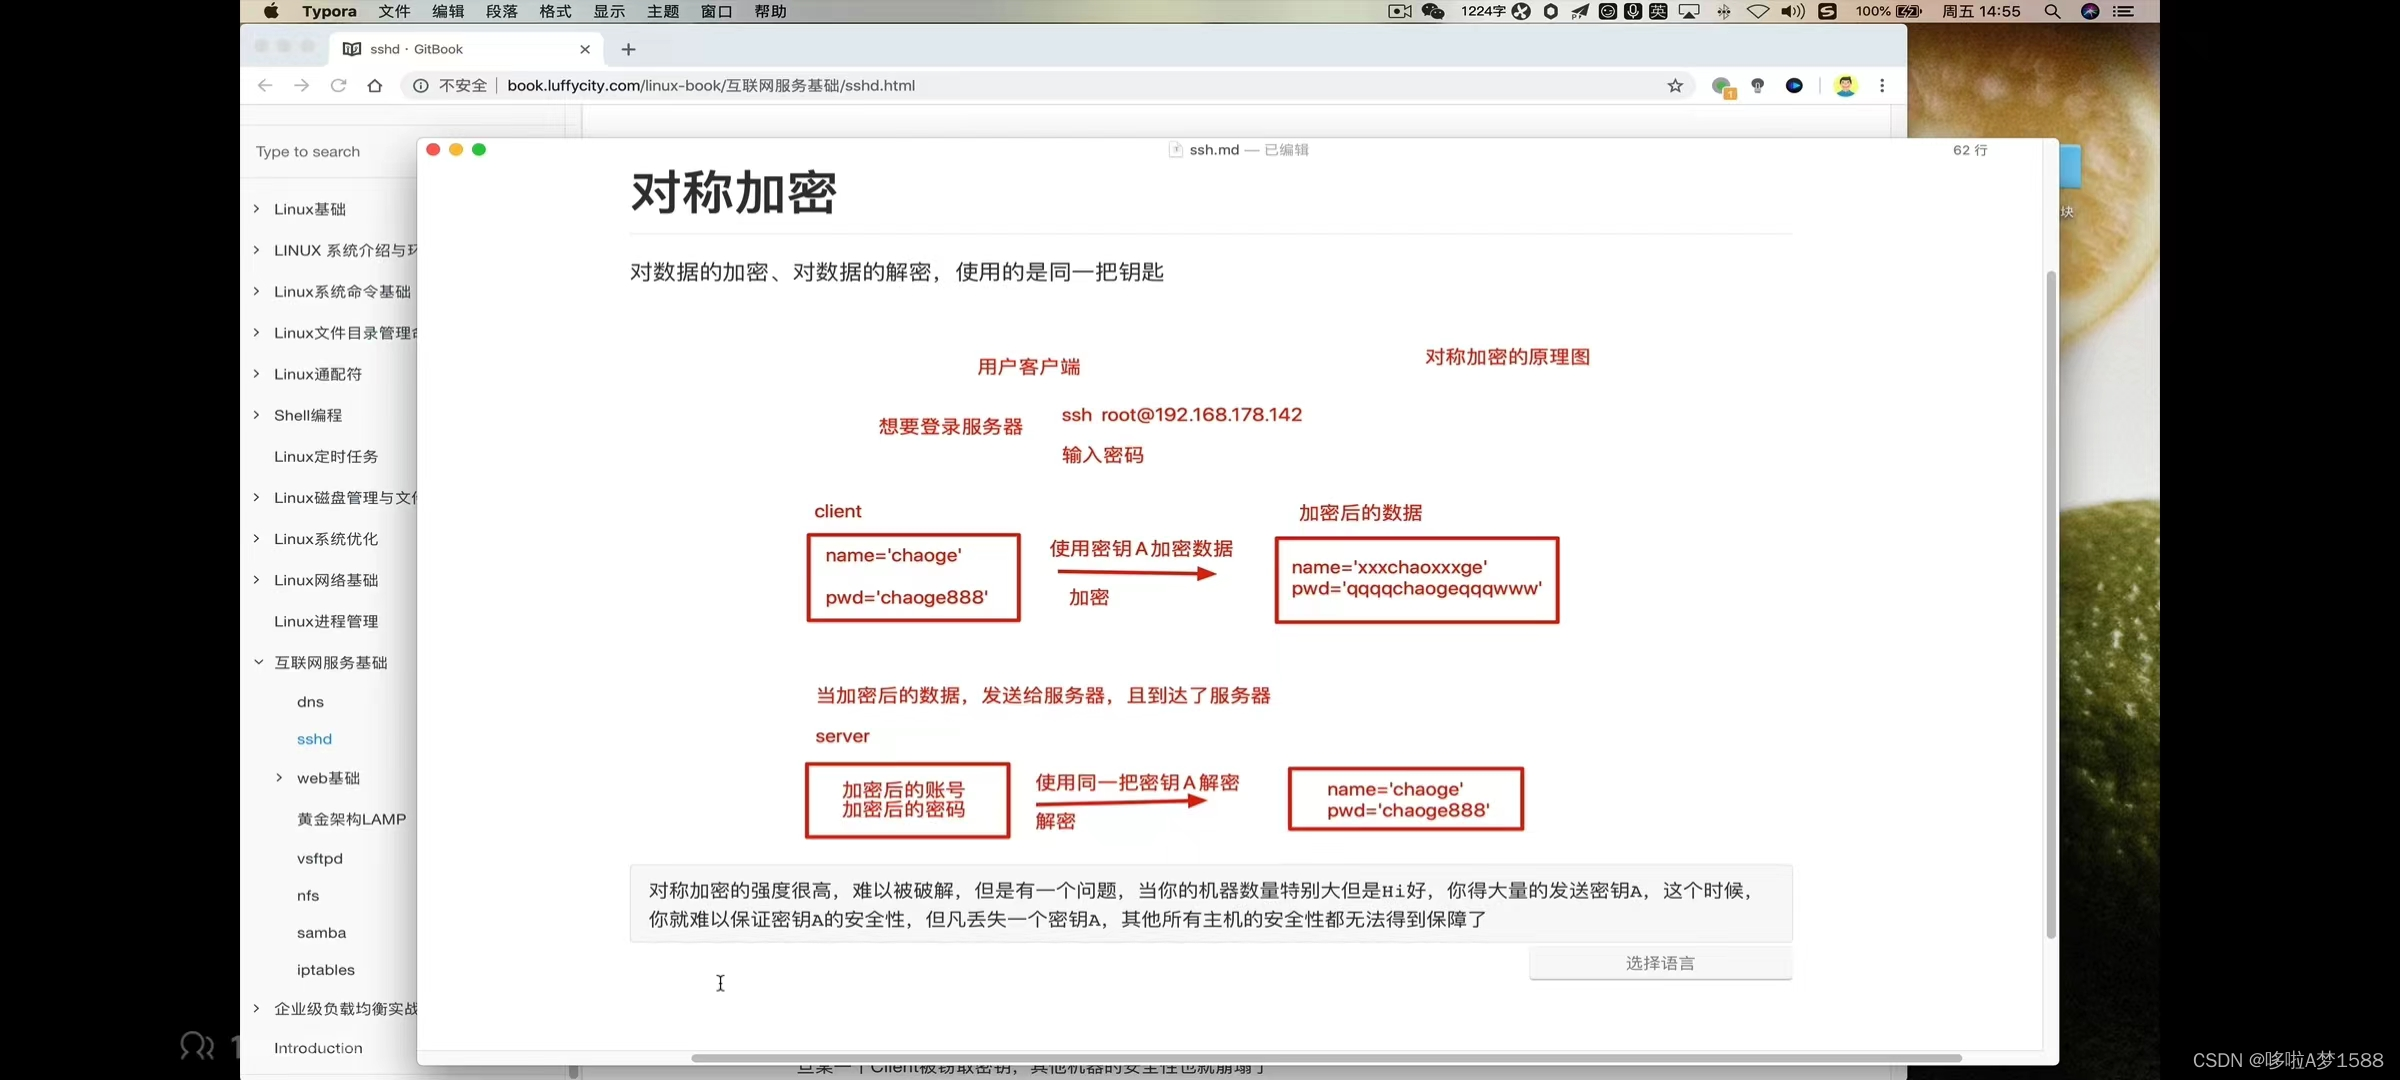
对称加密
对数据的加密,对数据的解密,使用的是同一把钥匙。
非对称加密
非对称加密就解决了对称加密的安全隐患防止秘钥丢失的问题
对称加密,只有一个密钥
非对称加密,有一对密钥(公钥 public key(就是一把锁),私钥 private key(开这把锁的钥匙)公私钥是成对出现的)
使用公钥加密后的数据,只能使用对应的私钥才能够解开。除非私钥丢失,否则数据被破解的可能性极低。
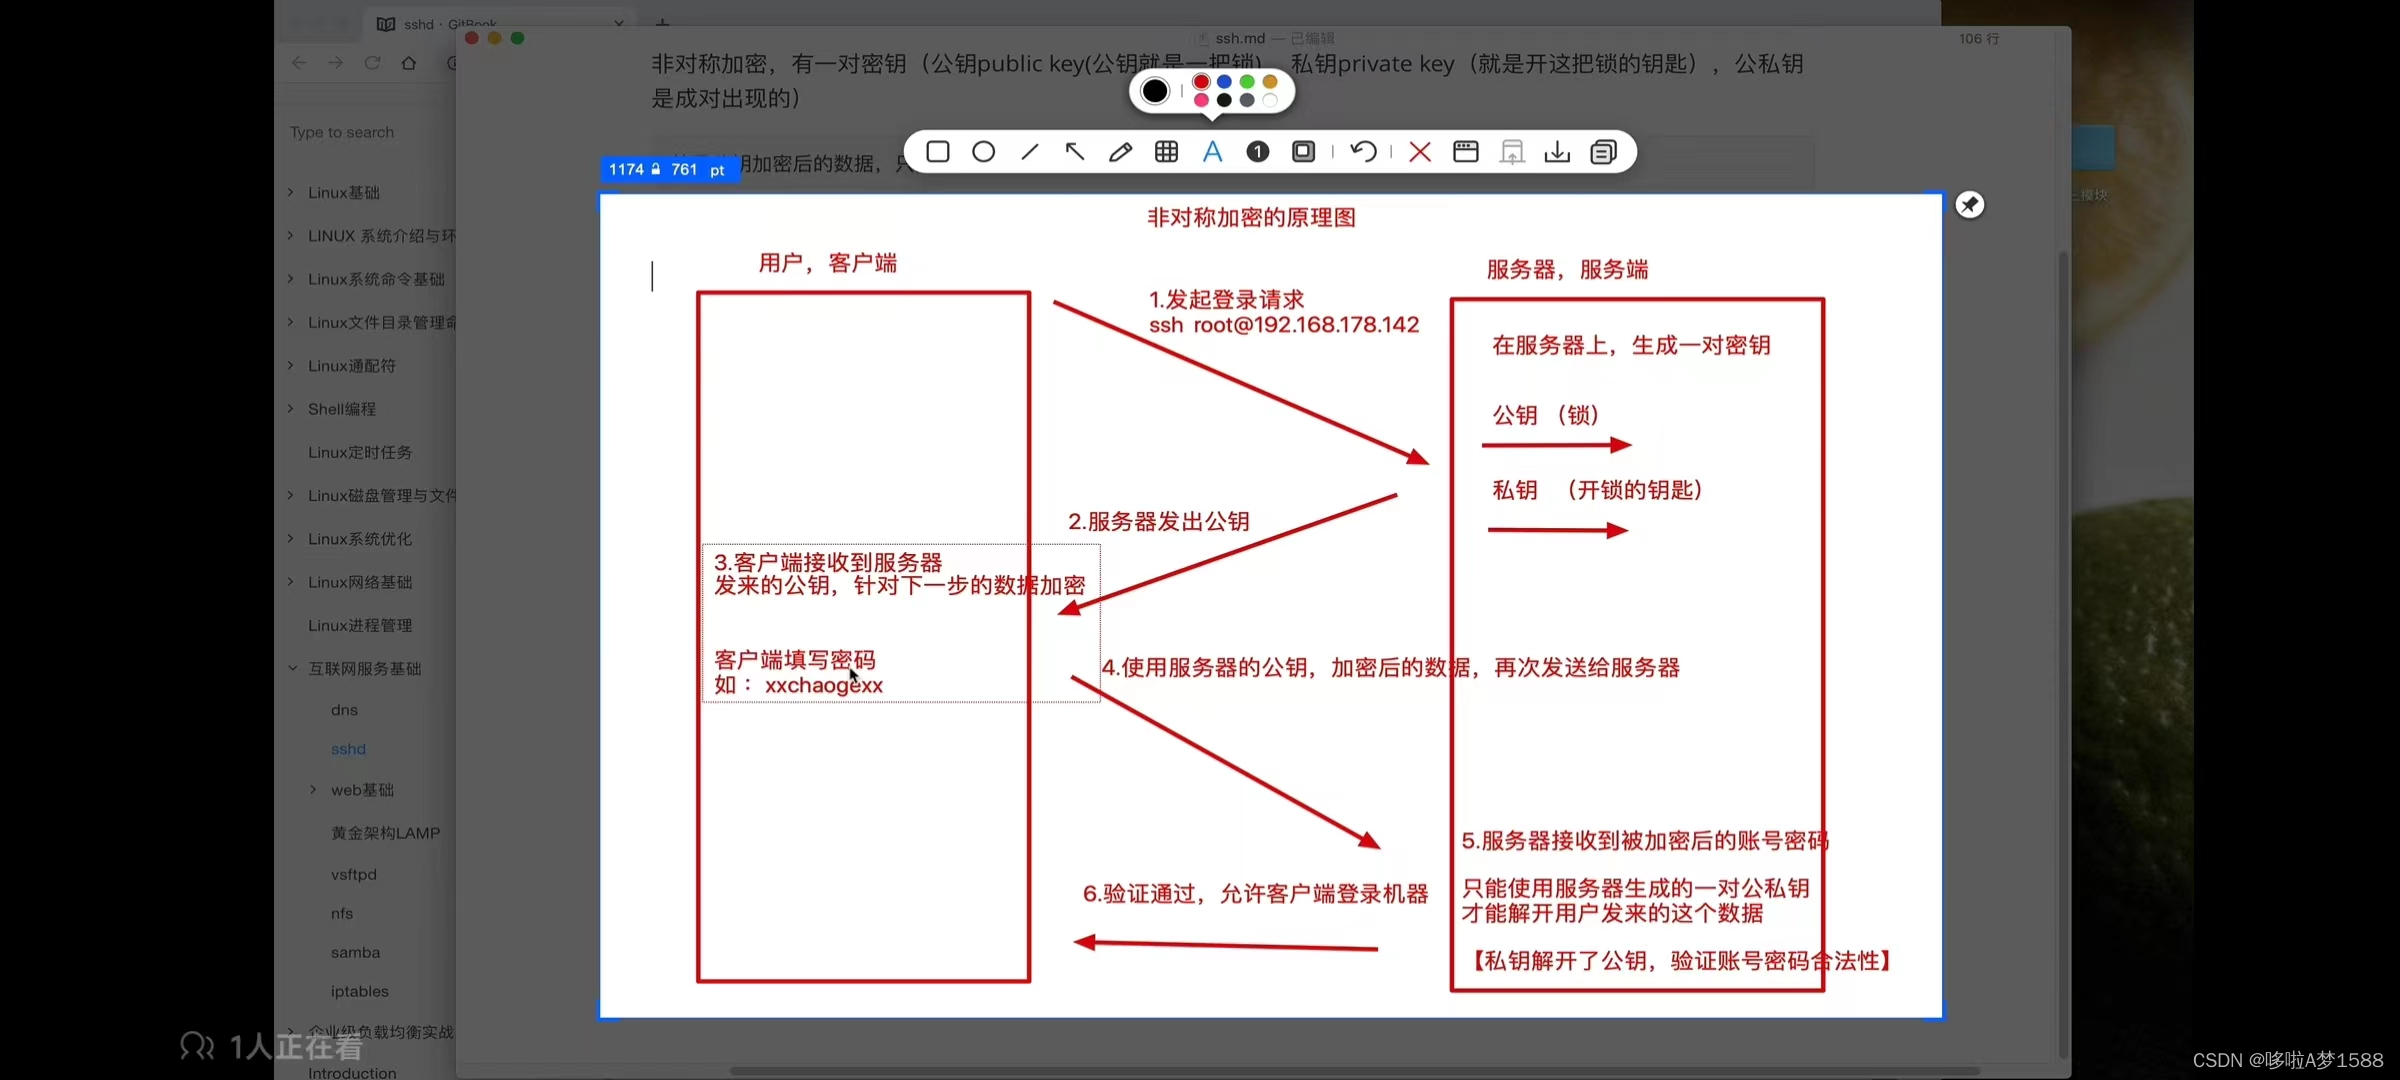
非对称加密的好处在于,私钥(开锁的钥匙在服务器上)是放在服务器上的,即使你传输的数据被黑客截取,黑客也没有钥匙能够打开这个加锁了的数据,因此对数据进行保护。
中间人攻击
客户端,用户如何确认自己收到的公钥就是来自于目标服务器的呢?
中间人攻击原理图如下:
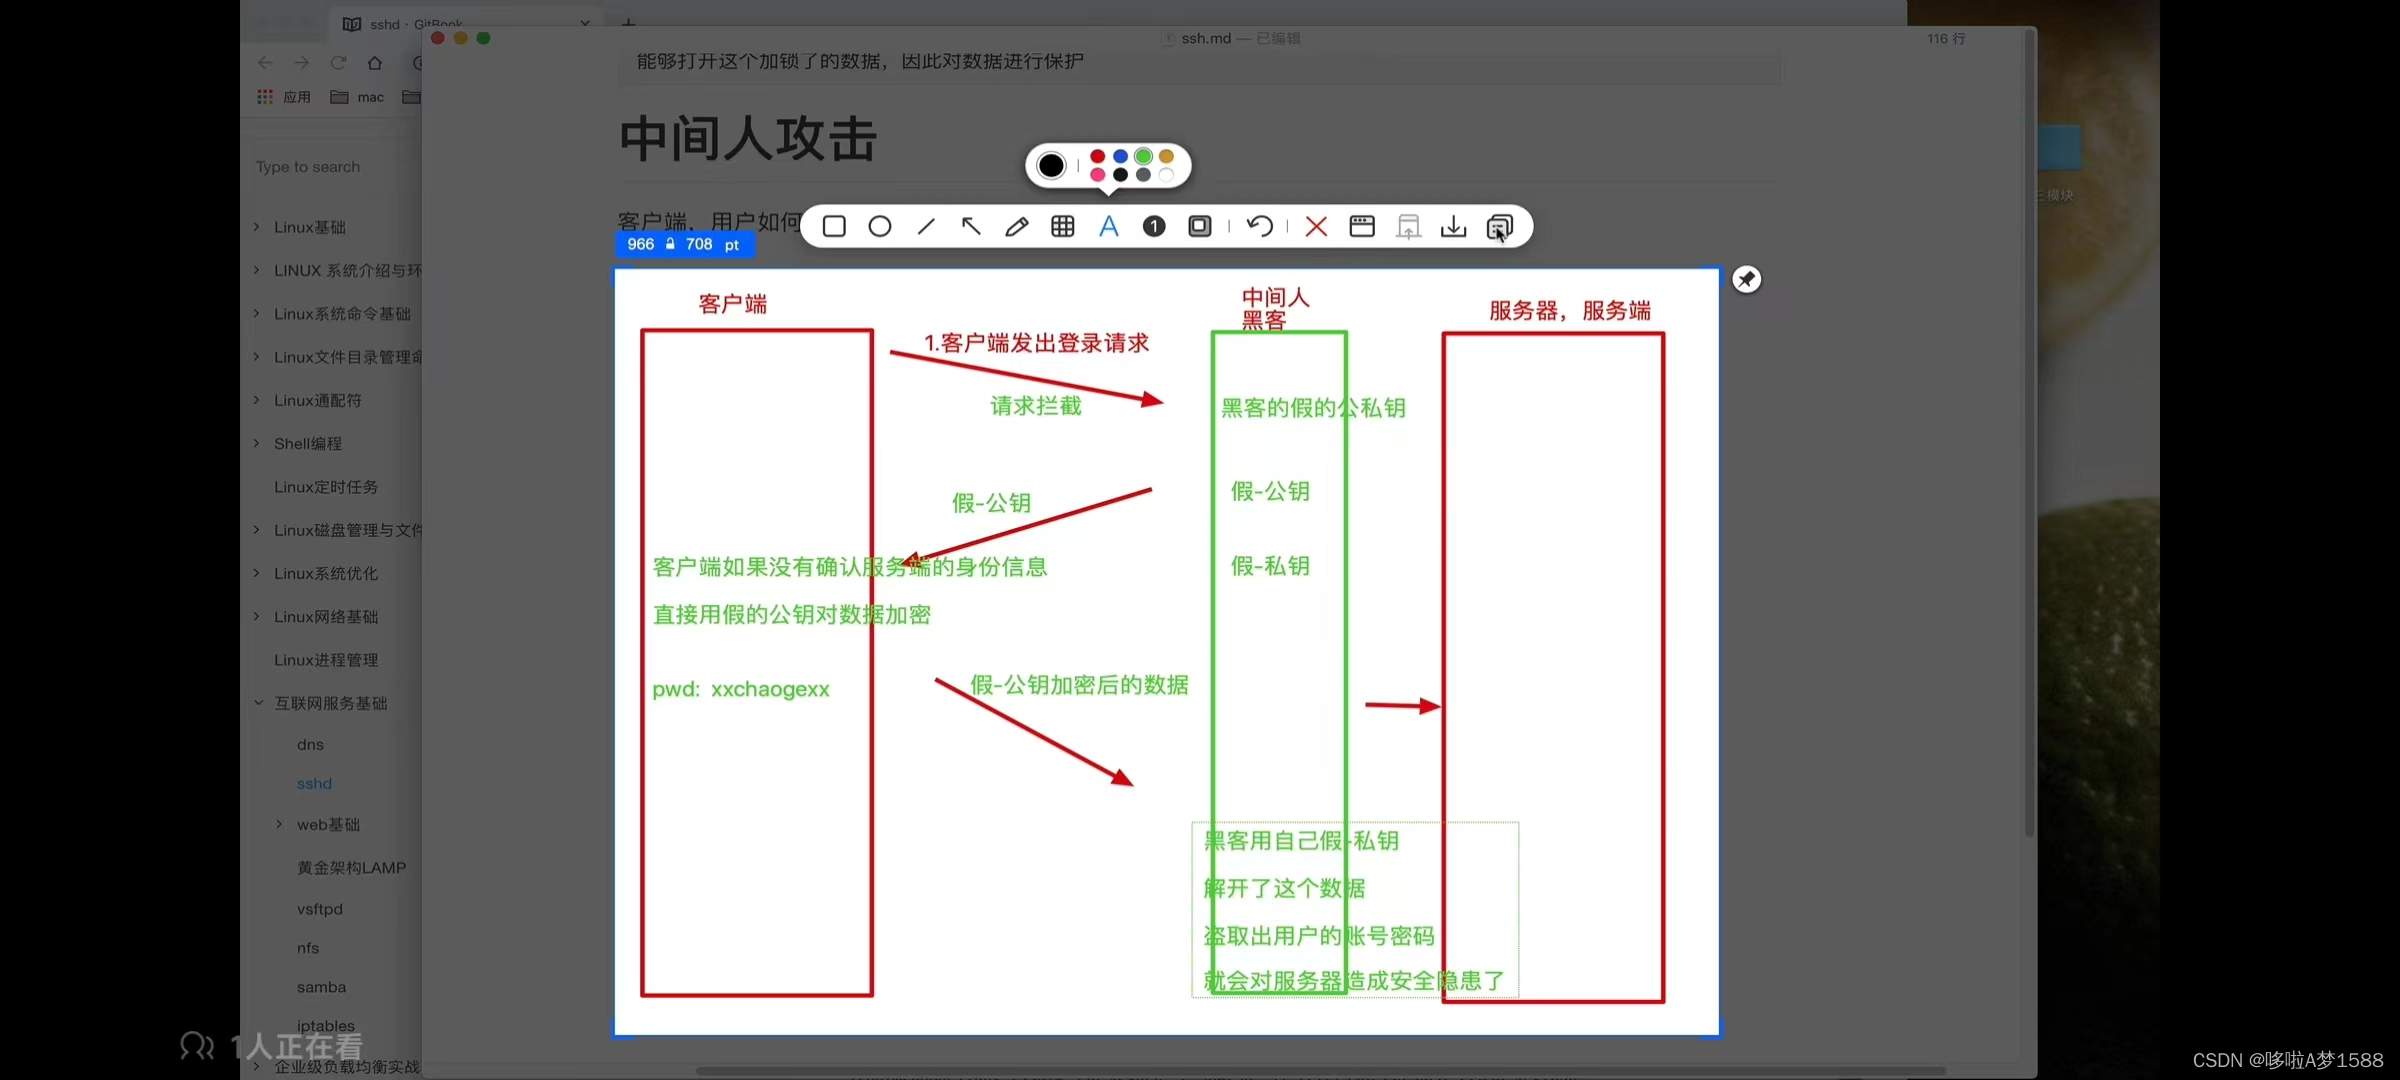
1. 拦截客户的登录请求
2. 向客户端发送自己,假的公钥,此时客户端如果不知情的情况下,使用该假的公钥对数据加密处理。
3. 客户端发送自己的数据,已经发给了黑客,黑客拿到了该数据,再用自己的私钥进行解密
4. 客户端的账号密码此时已经被黑客获取,造成了对服务器的安全隐患。
如何避免中间人攻击?
如何避免登录服务器时的安全隐患
如何保证服务器的目标正确
1. 基于口令的服务器验证
登录服务器的指纹信息为 'MD5:Eq/qt1Lp2MVnKFG34bocWamA4hGzt2jyi18+Cx/kknE.'

C:\Users\Administrator>ssh root@172.18.22.128
The authenticity of host '172.18.22.128 (172.18.22.128)' can't be established.
ECDSA key fingerprint is MD5:Eq/qt1Lp2MVnKFG34bocWamA4hGzt2jyi18+Cx/kknE.
Are you sure you want to continue connecting (yes/no/[fingerprint])? yes

这一段 ssh 首次连接返回的信息,说的是无法确认 172.18.22.128这台机器的真实性,但是已知了这个机器的指纹信息,


验证远程主机的指纹信息,是否正确?
我们可以通过一个命令远程扫描服务端的指纹信息

远程扫描服务端的指纹信息命令:
ssh-keyscan -t ecdsa 172.18.22.128 | ssh-keygen -lf -

这是一个固定用法


查看服务器的指纹信息为 'MD5:Eq/qt1Lp2MVnKFG34bocWamA4hGzt2jyi18+Cx/kknE '
C:\Users\Administrator>ssh-keyscan -t ecdsa 172.18.22.128 | ssh-keygen -lf -
# 172.18.22.128:22 SSH-2.0-OpenSSH_8.9p1 Ubuntu-3ubuntu0.6
256 MD5:Eq/qt1Lp2MVnKFG34bocWamA4hGzt2jyi18+Cx/kknE 172.18.22.128 (ECDSA)
# 返回服务器的指纹信息 该指纹信息与登录服务器信息时的指纹一致,你就可以安心去登录服务器。
C:\Users\Administrator>

参数说明
'-keyscan' : 代表秘钥扫描
'-t': 指定一个加密方式,写上 'ecdsa'这么一个加密方式,然后指定该服务器的地址。
'|' : 管道符,进行二次处理,


总结:
命令返回服务器的指纹信息 该指纹信息与登录服务器信息时的指纹一致,你就可以安心去登录服务器。
[确认服务器身份之后,即可输入 yes 进行安全的连接]
# 登录远程服务器
C:\Users\Administrator>ssh root@172.18.22.128
The authenticity of host '172.18.22.128 (172.18.22.128)' can't be established.
ECDSA key fingerprint is MD5:Eq/qt1Lp2MVnKFG34bocWamA4hGzt2jyi18+Cx/kknE.
Are you sure you want to continue connecting (yes/no/[fingerprint])? yes
Warning: Permanently added '172.18.22.128' (ECDSA) to the list of known hosts.
root@172.18.22.128's password:
Welcome to Ubuntu 14.04.4 LTS (GNU/Linux 5.15.0-102-generic x86_64)
* Documentation: https://help.ubuntu.com
* Management: https://landscape.canonical.com
* Support: https://ubuntu.com/pro
System information as of Mon Apr 22 08:58:31 PM UTC 2024
System load: 0.07666015625 Processes: 216
Usage of /: 44.0% of 18.53GB Users logged in: 1
Memory usage: 10% IPv4 address for docker0: 172.17.0.1
Swap usage: 0% IPv4 address for ens33: 172.18.22.128
* Strictly confined Kubernetes makes edge and IoT secure. Learn how MicroK8s
just raised the bar for easy, resilient and secure K8s cluster deployment.
https://ubuntu.com/engage/secure-kubernetes-at-the-edge
Expanded Security Maintenance for Applications is not enabled.
30 updates can be applied immediately.
14 of these updates are standard security updates.
To see these additional updates run: apt list --upgradable
Enable ESM Apps to receive additional future security updates.
See https://ubuntu.com/esm or run: sudo pro status
The list of available updates is more than a week old.
To check for new updates run: sudo apt update
Last login: Sat Apr 13 09:27:01 2024 from # 登录远程服务器
C:\Users\Administrator>ssh root@172.18.22.128
The authenticity of host '172.18.22.128 (172.18.22.128)' can't be established.
ECDSA key fingerprint is MD5:Eq/qt1Lp2MVnKFG34bocWamA4hGzt2jyi18+Cx/kknE.
Are you sure you want to continue connecting (yes/no/[fingerprint])? yes
Warning: Permanently added '172.18.22.128' (ECDSA) to the list of known hosts.
root@172.18.22.128's password:
Welcome to Ubuntu 14.04.4 LTS (GNU/Linux 5.15.0-102-generic x86_64)
* Documentation: https://help.ubuntu.com
* Management: https://landscape.canonical.com
* Support: https://ubuntu.com/pro
System information as of Mon Apr 22 08:58:31 PM UTC 2024
System load: 0.07666015625 Processes: 216
Usage of /: 44.0% of 18.53GB Users logged in: 1
Memory usage: 10% IPv4 address for docker0: 172.17.0.1
Swap usage: 0% IPv4 address for ens33: 172.18.22.128
* Strictly confined Kubernetes makes edge and IoT secure. Learn how MicroK8s
just raised the bar for easy, resilient and secure K8s cluster deployment.
https://ubuntu.com/engage/secure-kubernetes-at-the-edge
Expanded Security Maintenance for Applications is not enabled.
30 updates can be applied immediately.
14 of these updates are standard security updates.
To see these additional updates run: apt list --upgradable
Enable ESM Apps to receive additional future security updates.
See https://ubuntu.com/esm or run: sudo pro status
The list of available updates is more than a week old.
To check for new updates run: sudo apt update
Last login: Sat Apr 13 09:27:01 2024 from
# 登录远程服务器
C:\Users\Administrator>ssh root@172.18.22.128
The authenticity of host '172.18.22.128 (172.18.22.128)' can't be established.
ECDSA key fingerprint is MD5:Eq/qt1Lp2MVnKFG34bocWamA4hGzt2jyi18+Cx/kknE.
Are you sure you want to continue connecting (yes/no/[fingerprint])? yes
Warning: Permanently added '172.18.22.128' (ECDSA) to the list of known hosts.
root@172.18.22.128's password:
Welcome to Ubuntu 14.04.4 LTS (GNU/Linux 5.15.0-102-generic x86_64)
* Documentation: https://help.ubuntu.com
* Management: https://landscape.canonical.com
* Support: https://ubuntu.com/pro
System information as of Mon Apr 22 08:58:31 PM UTC 2024
System load: 0.07666015625 Processes: 216
Usage of /: 44.0% of 18.53GB Users logged in: 1
Memory usage: 10% IPv4 address for docker0: 172.17.0.1
Swap usage: 0% IPv4 address for ens33: 172.18.22.128
* Strictly confined Kubernetes makes edge and IoT secure. Learn how MicroK8s
just raised the bar for easy, resilient and secure K8s cluster deployment.
https://ubuntu.com/engage/secure-kubernetes-at-the-edge
Expanded Security Maintenance for Applications is not enabled.
30 updates can be applied immediately.
14 of these updates are standard security updates.
To see these additional updates run: apt list --upgradable
Enable ESM Apps to receive additional future security updates.
See https://ubuntu.com/esm or run: sudo pro status
The list of available updates is more than a week old.
To check for new updates run: sudo apt update
Last login: Sat Apr 13 09:27:01 2024 from 172.18.22.1
root@ubuntu-master:~#
此时就表明客户端已经确认了服务器的身份,准备开始连接,输入服务器的账号对应的密码,即可登录。.1
root@ubuntu-master:~#
此时就表明客户端已经确认了服务器的身份,准备开始连接,输入服务器的账号对应的密码,即可登录。.1
root@ubuntu-master:~#
此时就表明客户端已经确认了服务器的身份,准备开始连接,输入服务器的账号对应的密码,即可登录。
[点击并拖拽以移动]
[ssh重要的配置文件]
和 ssh 相关的配置文件,主要放在该目录  $HOME/.ssh/
ls ~/.ssh
'~' 表示当前用户家目录

root@ubuntu-master:~# ls ~/.ssh
authorized_keys
root@ubuntu-master:~# cat ~/.ssh/authorized_keys
root@ubuntu-master:~#

表示此时 'authorized_keys' 该文件是空的
可以用 $HOME 获取用户的家目录
echo $HOME

root@ubuntu-master:~# echo $HOME
/root    # 表明root的家目录在 '/root'目录下
root@ubuntu-master:~#


root@ubuntu-master:~# ls ~/.ssh
config  id_rsa  id-rsa.pub  known_hosts

# ssh 常见的配置文件 ,作用如下:

1. 'id_rsa' 表示 就是一个私钥文件,存放了私钥的密码

2. 'id_rsa.pub' 表示 就是公钥文件,存放公钥的密码信息

3. 'known_hosts' 表示当客户端接收到服务器的公钥之后,服务器的公钥信息就记录在该文件中,也就代表着客户端
相信该服务器的公钥信息了,以便于下次连接,不在需要一个确认的过程。

4. 'authorized_keys' 该文件是服务器将客户端的公钥信息,保存在这个文件中(用于客户端免密登录时使用)因为我们基于账号密码的形式登录,每次都是 ssh root@xxx.xxx.xxx.xxx 密码的形式登录态麻烦,如果不想输入密码,如果你的机器数量之多,你要将每一台服务器密码全部记住,是很累的,我们可以在客户端本地生成一对公私钥,然后用公私钥进行登录。也就实现了免密登录。不需要记住这种隐晦的,复杂的密码。如果密码太简单,也容易受到攻击。

总结: 只要你输入服务器正确的地址,用户名,密码之后,就可以登录服务器了
ssh 常见的配置文件 ,作用如下:
1. 'id_rsa' 表示 就是一个私钥文件,存放了私钥的密码

2. 'id_rsa.pub' 表示 就是公钥文件,存放公钥的密码信息

3. 'known_hosts' 表示当客户端接收到服务器的公钥之后,服务器的公钥信息就记录在该文件中,也就代表着客户端
相信该服务器的公钥信息了,以便于下次连接,不在需要一个确认的过程。

4. 'authorized_keys' 该文件是服务器将客户端的公钥信息,保存在这个文件中(用于客户端免密登录时使用)因为我们基于账号密码的形式登录,每次都是 ssh root@xxx.xxx.xxx.xxx 密码的形式登录态麻烦,如果不想输入密码,如果你的机器数量之多,你要将每一台服务器密码全部记住,是很累的,我们可以在客户端本地生成一对公私钥,然后用公私钥进行登录。也就实现了免密登录。不需要记住这种隐晦的,复杂的密码。如果密码太简单,也容易受到攻击。

总结: 只要你输入服务器正确的地址,用户名,密码之后,就可以登录服务器了
登录 linux 服务器的形式
[基于口令,账号,密码的登录形式]
基于密码的登录,需要记住复杂的密码,且如果机器数量太多,难以使用密码进行管理
C:\Users\Administrator>ssh root@172.18.22.128
The authenticity of host '172.18.22.128 (172.18.22.128)' can't be established.
ECDSA key fingerprint is MD5:Eq/qt1Lp2MVnKFG34bocWamA4hGzt2jyi18+Cx/kknE.
Are you sure you want to continue connecting (yes/no/[fingerprint])? yes
Warning: Permanently added '172.18.22.128' (ECDSA) to the list of known hosts.
root@172.18.22.128's password:
[基于公钥的认证方式]
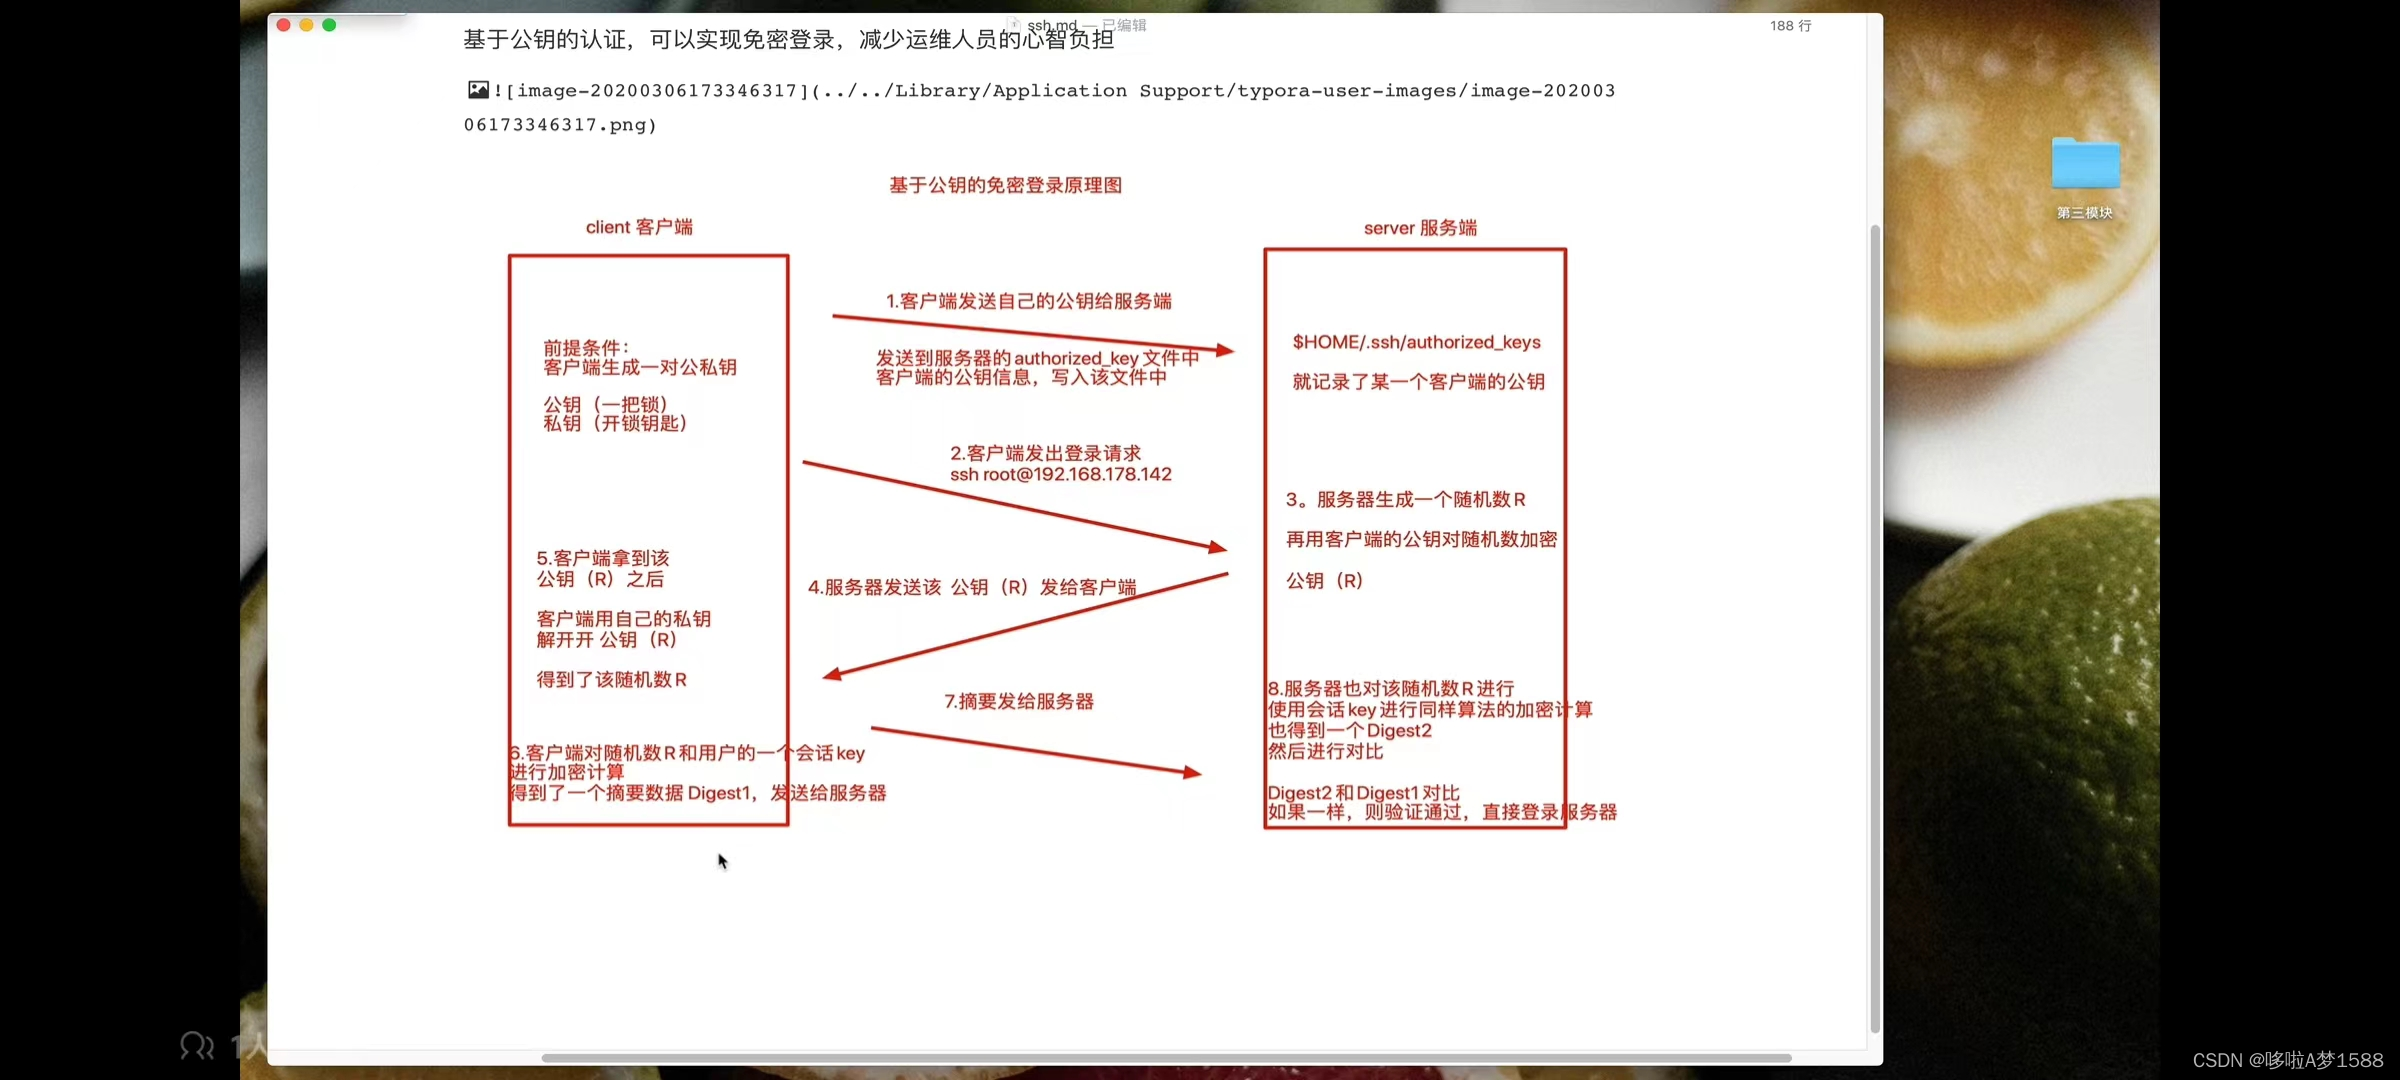
基于公钥的认证,可以实现免密登录,减少运维人员的心智负担。
公钥免密登录的过程如下:
公钥免密登录的过程如下:
1.客户端发送自己的公钥给服务器,写入到服务器的 authorized_keys 文件中,
2.服务器接收到客户端的连接请求后,在自己 authorized_keys 文件中匹配,是否存在该客户端的公钥信息,如果存在就生成一个随机数 R,再用客户端的公钥,针对随机数 R 进行加密,得到了一个加密后的随机数,,公钥 (R),用英文表示就是 pubkey(R)
3.客户端通过自己的私钥,对 pubkey(R) 进行解密,得到了随机数 (R),再针对这个随机数 R 和当前连接会话 sessionkey 采用 MD5 加密方式,生成摘要 Digest1,然后再次发给服务器进行验证。
4.服务器针对这个随机数 R 和 sessionkey 也采用同样的摘要算法计算得出 Digest2
5.服务器比对 Digest1 和 Digest2 是否一致,一致则验证通过,客户端登录服务器。
ssh免密登录实战
1. 客户端本地生成一对公私钥 在 win10 系统 cmd 命令行操作
ssh-keygen -t rsa # 这个命令输入后,默认直接回车即可
C:\Users\Administrator>ssh-keygen -t rsa
Generating public/private rsa key pair.
Enter file in which to save the key (C:\Users\Administrator/.ssh/id_rsa):
代码解释:
'ssh-keygen': 秘钥生成器
'-t': 参数表示 指定什么算法
'rsa': 一种秘钥的算法
C:\Users\Administrator>ssh-keygen -t rsa
Generating public/private rsa key pair.
Enter file in which to save the key (C:\Users\Administrator/.ssh/id_rsa):
Enter passphrase (empty for no passphrase):
Enter same passphrase again:
Your identification has been saved in C:\Users\Administrator/.ssh/id_rsa.
Your public key has been saved in C:\Users\Administrator/.ssh/id_rsa.pub.
The key fingerprint is:
[点击并拖拽以移动]
2. 客户端发送自己的公钥,发给服务器,存储在服务器的 authorized_keys 文件中
ssh-copy-id root@172.18.22.128
3. 此时直接输入登录命令,即可实现免密登录
ssh root@172.18.22.128
4.登录服务器,检查客户端的公钥信息
cat ~/.ssh/authorized_keys
root@ubuntu-master:~# cat ~/.ssh/authorized_keys
ssh-rsa
root@ubuntu-master:~#
# 退出服务器,检查本地的rsa
root@ubuntu-master:~# exit
logout
Connection to 172.18.22.128 closed
# linux
cat ~/.ssh/id_rsa.pub
root@ubuntu-master:~# cat ~/.ssh/id_rsa.pub
ssh-rsa
root@ubuntu-master:~#
# win10
cat C:\Users\Administrator/.ssh/id_rsa.pub
ssh-rsa
----------------------------------------------------------------------
自己的 注意: 每个人的机器环境不一样,可能参数或命令会有差异
1.在 linux 上生成密钥并配置文件权限
a.执行下列命令生成4096位长度的密钥对
root@ubuntu-master:~# ssh-keygen -t rsa -b4096
Generating public/private rsa key pair.
Enter file in which to save the key (/root/.ssh/id_rsa):
Enter passphrase (empty for no passphrase):
Enter same passphrase again:
Your identification has been saved in /root/.ssh/id_rsa
Your public key has been saved in /root/.ssh/id_rsa.pub
The key fingerprint is:
MD5:3bh8N1cmyAGci8HRKxgN2V82Ws8UnINFZ1VNjfBOu1I root@ubuntu-master
The key's randomart image is:
root@ubuntu-master:~#
b. 将公钥放置到 ~/.ssh/authorized_keys
cat ~/.ssh/id_rsa.pub >> ~/.ssh/authorized_keys
root@ubuntu-master:~# ls .ssh/
authorized_keys id_rsa id_rsa.pub
root@ubuntu-master:~# cat ~/.ssh/id_rsa.pub >> ~/.ssh/authorized_keys
c.配置权限
chmod 600 ~/.ssh/authorized_keys
chmod 700 ~/.ssh
root@ubuntu-master:~# chmod 600 ~/.ssh/authorized_keys
chmod 700 ~/.ssh
root@ubuntu-master:~#
2. 下载私钥文件到 win10,配置权限
a.打开CMD执行下列命令下载 linux 私钥文件到 win10 用户目录下(下载命令说明)
scp root@172.18.22.128:~/.ssh/id_rsa C:\Users\%USERNAME%\.ssh
C:\Users\Administrator>scp root@172.18.22.128:~/.ssh/id_rsa C:\Users\%USERNAME%\.ssh
root@172.18.22.128's password:
id_rsa 100% 3381 1.6MB/s 00:00
C:\Users\Administrator>
b.给秘钥文件配置权限,在id_rsa文件上右键选择:
属性->安全->高级->禁用继承->移除所有->添加->选择主体->高级->立即查找->选择当前用户->然后一路猛点[确定]
3. 登录
ssh root@172.18.22.128 -i C:\Users\%USERNAME%\.ssh
C:\Users\Administrator>ssh root@172.18.22.128 -i C:\Users\%USERNAME%\.ssh
Load key "C:\\Users\\Administrator\\.ssh": Operation not supported on socket
root@172.18.22.128's password:
Welcome to Ubuntu 14.04.4 LTS (GNU/Linux 5.15.0-102-generic x86_64)
* Documentation: https://help.ubuntu.com
* Management: https://landscape.canonical.com
* Support: https://ubuntu.com/pro
System information as of Tue Apr 23 06:55:12 AM UTC 2024
System load: 0.13623046875 Processes: 220
Usage of /: 44.2% of 18.53GB Users logged in: 2
Memory usage: 15% IPv4 address for docker0: 172.17.0.1
Swap usage: 0% IPv4 address for ens33: 172.18.22.128
* Strictly confined Kubernetes makes edge and IoT secure. Learn how MicroK8s
just raised the bar for easy, resilient and secure K8s cluster deployment.
https://ubuntu.com/engage/secure-kubernetes-at-the-edge
Expanded Security Maintenance for Applications is not enabled.
19 updates can be applied immediately.
To see these additional updates run: apt list --upgradable
Enable ESM Apps to receive additional future security updates.
See https://ubuntu.com/esm or run: sudo pro status
*** System restart required ***
Last login: Tue Apr 23 05:22:00 2024 from 172.18.22.1
root@ubuntu-master:~#
服务器安全与ssh配置
ssh配置文件
linux 强调一切皆文件,linux系统更改各种软件的配置参数,也就是在修改文件内容而与
sshd服务的配置文件,默认在 /etc/ssh/sshd_config
grep -Ev '^$|^[# ]' /etc/ssh/sshd_config

默认的 sshd 配置文件,如下
root@ubuntu-master:~# grep -Ev '^$|^[# ]' /etc/ssh/sshd_config
Include /etc/ssh/sshd_config.d/*.conf
KbdInteractiveAuthentication no
UsePAM yes
X11Forwarding yes
PrintMotd no
AcceptEnv LANG LC_*
Subsystem       sftp    /usr/lib/openssh/sftp-server
PermitRootLogin yes
PasswordAuthentication yes
root@ubuntu-master:~#

命令解释:
'grep' : 过滤的命令
'-E' : 支持扩展的正则
'-v' : 表示我要找出,除了哪些内容。即排除哪些内容
'' : 代表要写入的正则模式
^$: 代表空行,以空开头
'|' : 竖杠 代表 或 的意思
^[# ] : 代表 # 号开头的行,或者有一个空格开头的行
针对 '/etc/ssh/sshd_config' 文件过滤一下
在生产服务器下,运维人员一般会禁止 root 用户登录服务器,最大程度的保证服务器的安全,被黑客攻击的几率以及修改ssh的远程连接端口。
-
修改 ssh 的端口,Port 23354
-
禁止 root 登录, PermitRootLogin no
-
禁止用密码登录,只能用被信任的机器,用公私钥进行登录 PasswordAuthentcation no
此时,配置一个普通用户的账号,且支持公钥登录的形式
修改 /etc/ssh/sshd_config 文件的如下参数

此时一个安全的 ssh 服务器以及配置完毕,参数如下:
root@ubuntu-master:~# grep -Ev '^$|^[# ]' /etc/ssh/sshd_config
Port 23354
AddressFamily any
ListenAddress 0.0.0.0
HostKey /etc/ssh/ssh_host_rsa_key
HostKey /etc/ssh/ssh_host_ecdsa_key
HostKey /etc/ssh/ssh_host_ed25519_key
SyslogFacility AUTHPRIV
permitRootLogin no
AuthorizedKeysFile .ssh/authorized_keys
PasswordAuthentication no
ChallengeResponseAuthentication no
GSSAPICleanupCredentials no
UsePAM yes
X11Forwarding yes
UseDNS no
AcceptEnv LANG LC_CTYPE LC_NUMERIC LC_TIME LC_COLLATE LC_MONETARY LC_MESSAGES
AcceptEnv LC_PAPER LC_NAME LC_ADDRESS LC_TELEPHONE LC_MEASUREMENT
AcceptEnv LC_IDENTIFICATION LC_ALL LANGUAGE
AcceptEnv XMODIFIERS
Subsystem sftp /usr/libexec/openssh/sftp-server

注意,此时别立即重启服务
注意,此时别立即重启服务
配置一个普通用户的账号,且支持公钥登录的形式
# 退出账号
root@ubuntu-master:~# exit
logout
Connection to 172.18.22.128 closed.

# 查看用户
C:\Users\Administrator>whoami
win-0rbnr6mpv7a\administrator

C:\Users\Administrator>

# 1. 在自己本地机器,生成一个普通用户的公私钥对
# 生成公私钥
ssh-keygen -t rsa -b4096

C:\Users\Administrator>ssh-keygen -t rsa -b4096
Generating public/private rsa key pair.
Enter file in which to save the key (C:\Users\Administrator/.ssh/id_rsa):
C:\Users\Administrator/.ssh/id_rsa already exists.
Overwrite (y/n)? y
Enter passphrase (empty for no passphrase):
Enter same passphrase again:
Your identification has been saved in C:\Users\Administrator/.ssh/id_rsa.
Your public key has been saved in C:\Users\Administrator/.ssh/id_rsa.pub.
The key fingerprint is:
MD5:c9s14v0vvppngYQ44nHRwRpKv0NM+NsTpSB0cm81zmA administrator@WIN-0RBNR6MPV7A
The key's randomart image is:


C:\Users\Administrator>


# 2. 发送公钥给服务器,配置公钥登录
ssh-copy-id longchi@172.18.22.128
3.登录 linux 服务器终端,创建新的普通用户
# yuchao老师的笔记
# 1, 登录 linux 服务器终端,创建新的普通用户  yuchao
root@ubuntu-master:~# useradd yuchao
root@ubuntu-master:~# passwd yuchao
New password:
Retype new password:
passwd: password updated successfully
root@ubuntu-master:~#


# 2. 在自己本地机器,生成一个普通用户的公私钥对
# 生成公私钥
ssh-keygen -t rsa -b4096


# 3. 发送公钥给服务器,配置公钥登录
ssh-copy-id yuchao@192.168.178.142


# 4. 在正确配置了公私钥登录之后,yuchao 这个用户就可以免密登录 linux 服务器
ssh yuchao@192.168.178.142
在 linux 机器上配置yuchao用户支持sudo命令 vim /etc/sudoers
1.使用 root 登录服务器,配置 yuchao 用户支持 sudo 命令  将'vim /etc/sudoers'打开,如下所示,增加yuchao用户的root权限
vim /etc/sudoers

root@ubuntu-master:~# vim /etc/sudoers
root@ubuntu-master:~#

root    ALL=(ALL:ALL) ALL
longchi    ALL=(ALL:ALL) ALL
yuchao    ALL=(ALL:ALL) ALL

2. 此时尝试用 yuchao 用户登录,是否能够使用 sudo 命令
到了最后一步,使用 root 账号,重启 linux 的 sshd 服务器,以后 root 用户就无法使用密码登录了,只能够用 yuchao 这个用户 免密登录了,最大程度保证服务器的安全。
1. 使用 root 用户登录,然后再重启 sshd 服务器
C:\Users\Administrator>ssh root@172.18.22.128
root@172.18.22.128's password:

2. 重启 sshd 服务器
root@ubuntu-master:~# systemctl restart sshd

# 退出服务器
root@ubuntu-master:~# exit
logout
Connection to 172.18.22.128 closed.

# 再次用 root 登录
C:\Users\Administrator>ssh root@172.18.22.128
ssh: connect to host 192.168.178.142 port 22: Connection refused

3.此时机器已经禁止 root 登录,禁止密码登录 且修改了 ssh 端口为 23354

# 只有一条 ssh yuchao@192.168.178.142 -p 23354 可以免密登录,其他用户都不可以登录了。

4. 此时 只能使用配置好的 yuchao 用户进行免密登录了。
ssh yuchao@192.168.178.142 -p 23354
如上的学习配置,要酌情根据自己的机器环境去操作,不要太过于固执,灵活学习,灵活使用。


 2443
2443

 被折叠的 条评论
为什么被折叠?
被折叠的 条评论
为什么被折叠?
 到【灌水乐园】发言


