


黄金架构LAMP
Httpd PHP MySQL 三这如何工作
为什么说LAMP是黄金架构呢?
在互联网刚刚新起时,很多门户网站第一代架构都是采用LAMP,比如新浪,一些电商的互联网公司的站点,他们在网站第一代架构出行,用的都是LAMP架构,基于他就能够很方便,快捷的搭建出一个网站,并且是一个动静态结合的网站。
什么是动静态结合网站,比如说静态请求,用户通过浏览器想要访问服务器某一个网站上面的图片,请求就发给了linux服务器,服务器上安装了一个Apache,这么一个web server 软件,他能够在服务器上直接将文件读出来,然后给用户,浏览器进行渲染,用户就可以看到图片,这就是http事务的整个过程。
如果他想要一个动态的请求呢?
用户进行登录注册,或者提交数据等等,此时Apache这个软件他就没有这个功能了,他就会把请求转发给后面一个动态的应用服务器,叫PHP,或者Python等,编程语言所写的后台程序,他能够读取MySQL这样一个数据软件,把他里面的数据读出来,通过Apache,通过浏览器,通过响应头,再把他返回给用户,用户在浏览器中渲染出Apache发来的数据资料,这是一个单体架构,最典型的LAMP.
LAMP架构介绍
LAMP,全称为 Linux Apache MySQL PHP,Pear,Python
Apache
web 服务器一般是网站服务器,是安装在计算机中的一个程序,可以向浏览器等web客户端发送文档,你可以在 web 服务器上放置数据文件,让全世界的人来浏览。
Web Server(linux+apache/nginx)
Application Server(应用服务器 linux+python/PHP等编程语言写的程序)
对于静态数据,Apache直接去服务器磁盘读取数据,给用户返回; 对于动态数据,做一个动态请求转发,Apache会把他转给 Application 服务器,比如 登录,注册,提交数据,投票等等,Apache没有这种功能,这时候只能依靠后面的应用程序了, PHP解析用户的动态请求。PHP会去数据库读取用户需要的数据,再通过PHP转发给Apache,再转发给用户,在浏览器渲染展示给用户; 这就是一个动态请求转发过程和静态请求转发过程。 我们接下来要做什么事情呢? 准备一个用户 第一步,把Apache web server先安装出来,能够返回服务器上的一些静态资料 第二步,学习动态的,搭建一个能够通过PHP读取数据库中的数据
目前世界主流的 Web 服务有
-
Apache linux
-
跨平台,window,linux
-
不同的机器平台运行
-
阿帕奇
-
-
Nginx linux
-
IIS windows
-
Lighttpd linux
Apache是世界使用排名第一的Web服务器软件,他可以运行在几乎所有广泛使用的计算机平台上,由于其跨平台和安全性被广泛使用,是最流行的WEB服务器端软件之一。他快速,可靠并且可通过简单的API扩充,将Perl/Python等解释器编译到服务器中。同时Apache 音译为阿帕奇,是北美印第安人的一个部落,叫阿帕奇族,在美国的西南部。也是一个基金会的名称,一种武装直升机等等。
Apache HTTP 服务器是一个高度模块化(我们安装什么模块,他就可以使用什么功能,是可插拔是的插件,是非常好用的)的服务器,源于NCSAhttpd服务器,经过多次修改,成为世界使用排名第一的web服务器软件。它可以运行在几乎所有广泛使用的计算机平台上。
Apache是市场占有率很高的一款web服务器,跨平台和安全性被广泛认可,可以运行在windows,linux,mac等计算机操作系统
Apache 还支持多虚拟主机,以及他高度的支持很多模块,还http加密,用户的访问日志功能,反向代理功能,负载均衡,用户认证,等等非常优秀的功能。因此Apache是使用非常广泛的软件之一。
Apache HTTP 服务器是世界上使用最广泛的 Web 服务器。它提供了许多强大的功能,包括动态可加载模块、强大的媒体支持以及与其他流行软件的广泛集成。
Apache功能介绍
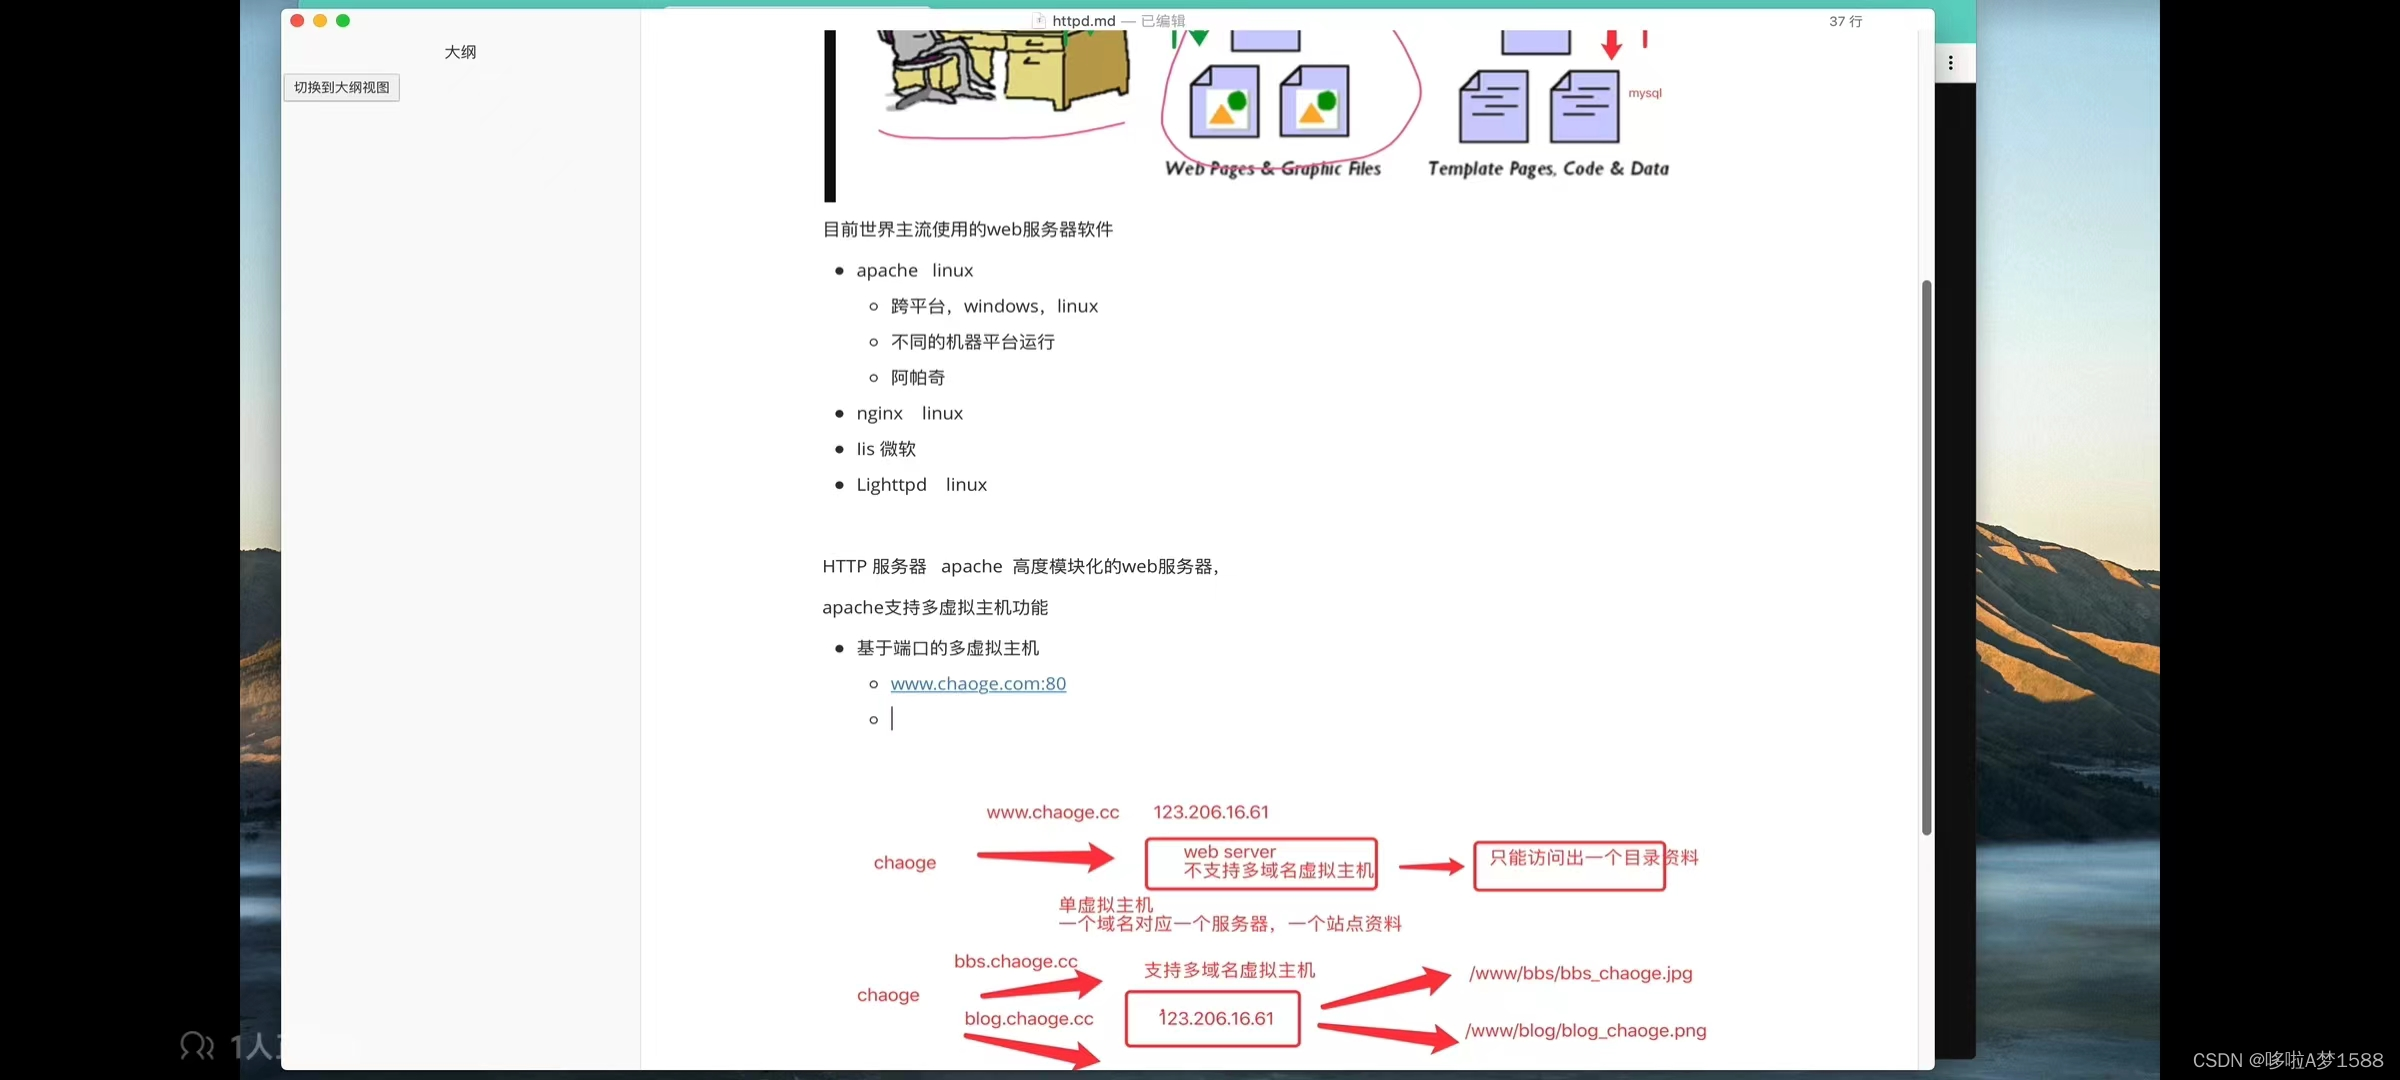
Apache支持多域名虚拟主机功能
-
基于端口的多虚拟主机
-
www.chaoge.com:80
-
www.chaoge.com:81
-
-
基于域名的多虚拟主机
-
bbs.chaoge.com
-
基于 IP 的多虚拟主机
apache 官网
http://httpd.apache.org/ https://dlcdn.apache.org/httpd/httpd-2.4.59.tar.gz
[清华大学开源软件镜像站 ] (清华大学开源软件镜像站 | Tsinghua Open Source Mirror)
https://mirror.tuna.tsinghua.edu.cn/ubuntu/
ubuntu 安装 apache
第 1 步 — 安装 Apache
Apache 在 Ubuntu 的默认软件存储库中可用,因此可以使用传统的包管理工具来安装它。
首先更新本地包索引以反映最新的上游更改:
1. 确保系统软件为最新版本,防止 Apache 安装失败
sudo apt update
sudo apt upgrade

2. 安装 apache2
sudo apt install apache2 -y

3. 验证 apache2.0是否安装成功
systemctl status apache2


4.打开 HTTP 和 HTTPS 端口
Apache 监听了端口 80 (HTTP) 和 443 (HTTPS),你需要在防火墙打开哪些端口,以便网站服务器从互联网上是可以访问的。
假设你正在使用 UFW,你可以通过启用 Apache Full 配置,它包含了这两个端口的规则:
sudo ufw allow 'Apache Full'
验证改变:
sudo ufw status

root@ubuntu-master:~# sudo ufw status
Status: inactive
root@ubuntu-master:~# sudo ufw allow 'Apache Full'
Rules updated
Rules updated (v6)


第 2 步 — 调整防火墙
在测试 Apache 之前,有必要修改防火墙设置以允许外部访问默认 Web 端口。如果我们按照先决条件中的说明进行操作,则应该配置 UFW 防火墙来限制对服务器的访问。
在安装过程中,Apache 会向 UFW 注册,以提供一些应用程序配置文件,可用于启用或禁用通过防火墙对 Apache 的访问。
sudo ufw app list
我们的输出将是应用程序配置文件的列表:
root@ubuntu-master:~# sudo ufw app list
Available applications:
  Apache
  Apache Full
  Apache Secure
  Nginx Full
  Nginx HTTP
  Nginx HTTPS
  OpenSSH
  Samba
root@ubuntu-master:~#
如输出所示,Apache 可以使用三个配置文件:

    Apache:此配置文件仅打开80端口(正常、未加密的网络流量)
    Apache Full:此配置文件打开80端口(正常、未加密的 Web 流量)和443端口(TLS/SSL 加密流量)
    Apache Secure:此配置文件仅打开443端口(TLS/SSL 加密流量)

建议启用限制最严格的配置文件,该配置文件仍将允许配置的流量。由于本文中尚未为服务器配置 SSL,因此我们只需要允许端口80上的流量:
sudo ufw allow 'Apache'
可以通过检查状态来验证更改:
sudo ufw status
输出将提供允许的 HTTP 流量列表:
Output
Status: active

To                         Action      From
--                         ------      ----
OpenSSH                    ALLOW       Anywhere
Apache                     ALLOW       Anywhere
OpenSSH (v6)               ALLOW       Anywhere (v6)
Apache (v6)                ALLOW       Anywhere (v6)

如输出所示,配置文件已被激活以允许访问 Apache Web 服务器。

第 3 步 — 检查我们的 Web 服务器
在安装过程结束时,Ubuntu 22.04 会启动 Apache。Web 服务器已经启动并运行。
通过运行 init 系统命令systemd确保服务处于活动状态:
sudo systemctl status apache2
root@ubuntu-master:~# systemctl status apache2
● apache2.service - The Apache HTTP Server
     Loaded: loaded (/lib/systemd/system/apache2.service; enabled; vendor preset: enabled)
     Active: active (running) since Thu 2024-05-09 23:20:20 UTC; 1h 8min ago
       Docs: https://httpd.apache.org/docs/2.4/
    Process: 1856 ExecStart=/usr/sbin/apachectl start (code=exited, status=0/SUCCESS)
    Process: 2022 ExecReload=/usr/sbin/apachectl graceful (code=exited, status=0/SUCCESS)
   Main PID: 1861 (apache2)
      Tasks: 55 (limit: 4515)
     Memory: 4.9M
        CPU: 223ms
     CGroup: /system.slice/apache2.service
             ├─1861 /usr/sbin/apache2 -k start
             ├─2026 /usr/sbin/apache2 -k start
             └─2027 /usr/sbin/apache2 -k start
经此输出确认,服务已成功启动。然而,测试这一点的最佳方法是从 Apache 请求页面。

我们可以通过我们的IP地址访问默认的Apache登陆页面,确认软件是否正常运行。如果我们不知道服务器的 IP 地址,可以通过命令行通过几种不同的方式获取它。

尝试在服务器的命令提示符下编写以下内容:
root@ubuntu-master:~#
192.168.222.128 172.17.0.1
root@ubuntu-master:~#

我们将收到一些用空格分隔的地址。我们可以在网络浏览器中尝试每种方法以确定它们是否有效。

另一种选择是使用免费的icanhazip.com工具。这是一个网站,访问时会返回从互联网上其他位置读取的计算机的公共 IP 地址:
curl -4 icanhazip.com
当我们获得服务器的 IP 地址后,请将其输入到浏览器的地址栏中:
http://your_server_ip
将看到默认的 Ubuntu 22.04 Apache 网页,如下所示:
在浏览器地址栏内输入 http://localhost/ 或者 http://127.0.0.1
如果出现图片或显示 It works! 那证明已经成功安装了 apache
可以看到已经成功了

第 4 步 — 管理 Apache 进程
现在我们已经启动并运行了 Web 服务器,让我们回顾一下使用systemctl.
要停止我们的网络服务器,请运行:
sudo systemctl stop apache2

要在 Web 服务器停止时启动它,请运行:
sudo systemctl start apache2


要停止然后再次启动该服务,请运行:
sudo systemctl restart apache2


如果只是进行配置更改,Apache 通常可以重新加载而不会断开连接。为此,请使用以下命令:
sudo systemctl reload apache2

默认情况下,Apache 配置为在服务器启动时自动启动。如果这不是想要的,请通过运行以下命令来禁用此行为:
sudo systemctl disable apache2

要重新启用该服务以在引导时启动,请运行
sudo systemctl enable apache2

现在,当服务器再次启动时,Apache 将自动启动。


第 5 步 — 设置虚拟主机(推荐)
使用 Apache Web 服务器时,我们可以使用虚拟主机(类似于 Nginx 中的服务器块)来封装配置详细信息并从一台服务器托管多个域。我们将设置一个名为your_domain的域,并将其替换为自己的域名。
Ubuntu 22.04 上的 Apache 默认启用一个服务器块,该服务器块配置为提供/var/www/html目录中的文档。虽然这对于单个站点来说效果很好,但如果我们托管多个站点,它可能会变得笨拙。所以我们要为your_domain站点创建一个/var/www/html目录结构,如果客户端请求与任何其他站点都不匹配,则将其保留为要提供服务的默认目录。

为your_domain创建目录,如下所示:

sudo mkdir /var/www/your_domain


接下来,使用环境变量将目录的所有权分配给我们当前登录的用户$USER:

sudo chown -R $USER:$USER /var/www/your_domain

如果我们没有修改设置默认文件权限的 umask 值,则我们的 Web 根目录的权限应该是正确的。为了确保我们的权限正确并允许所有者读取、写入和执行文件,同时只授予组和其他人读取和执行权限,我们可以输入以下命令:

sudo chmod -R 755 /var/www/your_domain

接下来,使用我们最喜欢的nano编辑器创建一个示例index.html页面:

sudo nano /var/www/your_domain/index.html

在里面添加以下示例 HTML:

/var/www/your_domain/index.html

<html>
    <head>
        <title>Welcome to Your_domain!</title>
    </head>
    <body>
        <h1>Success!  The your_domain virtual host is working!</h1>
    </body>
</html>

完成后保存并关闭文件。如果使用的是nano,则可以按CTRL + X,然后Y按 和 ENTER来执行此操作。

为了让 Apache 提供此内容,需要使用正确的指令创建虚拟主机文件。不要直接修改位于/etc/apache2/sites-available/000-default.conf 的默认配置文件,而是在/etc/apache2/sites-available/your_domain.conf 处创建一个新配置文件:

sudo nano /etc/apache2/sites-available/your_domain.conf

添加以下配置块,该配置块与默认配置块类似,但针对我们的新目录和域名进行了更新:

/etc/apache2/sites-available/your_domain.conf
<VirtualHost *:80>
    ServerAdmin webmaster@localhost
    ServerName your_domain
    ServerAlias www.your_domain
    DocumentRoot /var/www/your_domain
    ErrorLog ${APACHE_LOG_DIR}/error.log
    CustomLog ${APACHE_LOG_DIR}/access.log combined
</VirtualHost>


完成后保存并关闭文件。

现在使用a2ensite工具启用该文件:

sudo a2ensite your_domain.conf

禁用中定义的默认站点000-default.conf:

sudo a2dissite 000-default.conf

接下来,测试配置错误:

sudo apache2ctl configtest

应该收到以下输出:

Output
. . .
Syntax OK
重新启动 Apache :

sudo systemctl restart apache2

Apache 现在将为我们的域名提供服务。我们可以通过导航到 http://your_domain来测,将在其中看到类似以下内容的内容:

Apache 虚拟主机示例
第 6 步 – 熟悉重要的 Apache 文件和目录

现在我们已经知道如何管理 Apache 服务本身,下来花几分钟来熟悉一些重要的目录和文件。

内容

    /var/www/html:实际的 Web 内容默认情况下仅包含我们之前看到的默认 Apache 页面,是从/var/www/html目录中提供的。这可以通过更改 Apache 配置文件来更改。

服务器配置

    /etc/apache2:Apache 配置目录。所有 Apache 配置文件都驻留在此处。
    /etc/apache2/apache2.conf:主要的 Apache 配置文件。可以修改它以更改 Apache 全局配置。该文件负责加载配置目录中的许多其他文件。
    /etc/apache2/ports.conf:该文件指定 Apache 将侦听的端口。默认情况下,Apache 侦听端口80,在启用提供 SSL 功能的模块时另外侦听443端口。
    /etc/apache2/sites-available/:可以存储每个站点虚拟主机的目录。Apache 将不会使用在此目录中找到的配置文件,除非它们链接到该sites-enabled目录。通常,所有服务器块配置都在此目录中完成,然后通过使用a2ensite命令链接到其他目录来启用。
    /etc/apache2/sites-enabled/:存储已启用的每站点虚拟主机的目录。Apache 在启动或重新加载时读取此目录中的配置文件和链接以编译完整的配置。
    /etc/apache2/conf-available/, :这些目录与和目录/etc/apache2/conf-enabled/具有相同的关系,但用于存储不属于虚拟主机的配置片段。目录中的文件可以使用该命令启用,也可以使用该命令禁用。
    /etc/apache2/mods-available/, /etc/apache2/mods-enabled/:这些目录分别包含可用和启用的模块。以 .load结尾的文件包含加载特定模块的片段,而以.conf 结尾的文件包含这些模块的配置。可以使用a2enmod和a2dismod命令启用和禁用模块。

服务器日志

    /var/log/apache2/access.log:默认情况下,对 Web 服务器的每个请求都会记录在此日志文件中,除非 Apache 配置为其他方式。
    /var/log/apache2/error.log:默认情况下,所有错误都记录在此文件中。Apache 配置中的指令LogLevel指定错误日志将包含多少详细信息。

结论

现在我们已经安装了 Web 服务器,对于可以提供的内容类型以及可以用来创建更丰富体验的技术,我们有多种选择。


root@ubuntu-master:~# ls /etc/apache2/
apache2.conf  conf-available  conf-enabled  envvars  magic  mods-available  mods-enabled  ports.conf  sites-available  sites-enabled
root@ubuntu-master:~#


 all located in the /etc/apache2/ directory:
 18 #
 19 #   /etc/apache2/
 20 #   |-- apache2.conf
 21 #   |   `--  ports.conf
 22 #   |-- mods-enabled
 23 #   |   |-- *.load
 24 #   |   `-- *.conf
 25 #   |-- conf-enabled
 26 #   |   `-- *.conf
 27 #   `-- sites-enabled
 28 #       `-- *.conf

root@ubuntu-master:~# tree /etc/apache2/ | grep .conf
├── apache2.conf
├── conf-available
│   ├── charset.conf
│   ├── javascript-common.conf
│   ├── localized-error-pages.conf
│   ├── other-vhosts-access-log.conf
│   ├── security.conf
│   └── serve-cgi-bin.conf
├── conf-enabled
│   ├── charset.conf -> ../conf-available/charset.conf
│   ├── localized-error-pages.conf -> ../conf-available/localized-error-pages.conf
│   ├── other-vhosts-access-log.conf -> ../conf-available/other-vhosts-access-log.conf
│   ├── security.conf -> ../conf-available/security.conf
│   └── serve-cgi-bin.conf -> ../conf-available/serve-cgi-bin.conf
│   ├── actions.conf
│   ├── alias.conf
│   ├── autoindex.conf
│   ├── cache_disk.conf
│   ├── cgid.conf
│   ├── dav_fs.conf
│   ├── deflate.conf
│   ├── dir.conf
│   ├── http2.conf
│   ├── info.conf
│   ├── ldap.conf
│   ├── mime.conf
│   ├── mime_magic.conf
│   ├── mpm_event.conf
│   ├── mpm_prefork.conf
│   ├── mpm_worker.conf
│   ├── negotiation.conf
│   ├── proxy_balancer.conf
│   ├── proxy.conf
│   ├── proxy_ftp.conf
│   ├── proxy_html.conf
│   ├── reqtimeout.conf
│   ├── setenvif.conf
│   ├── ssl.conf
│   ├── status.conf
│   ├── userdir.conf
│   ├── alias.conf -> ../mods-available/alias.conf
│   ├── autoindex.conf -> ../mods-available/autoindex.conf
│   ├── deflate.conf -> ../mods-available/deflate.conf
│   ├── dir.conf -> ../mods-available/dir.conf
│   ├── mime.conf -> ../mods-available/mime.conf
│   ├── mpm_event.conf -> ../mods-available/mpm_event.conf
│   ├── negotiation.conf -> ../mods-available/negotiation.conf
│   ├── reqtimeout.conf -> ../mods-available/reqtimeout.conf
│   ├── setenvif.conf -> ../mods-available/setenvif.conf
│   ├── status.conf -> ../mods-available/status.conf
├── ports.conf
│   ├── 000-default.conf
│   └── default-ssl.conf
    └── 000-default.conf -> ../sites-available/000-default.conf
root@ubuntu-master:~#
linux 安装 apache(centos)
linux 安装软件的方式:
-
去官网获取软件原代码,自由选择版本,获取源码后,进行源代码编译安装,扩展额外的功能。比如自定义安装路径,以及额外扩展功能 (比如apache不支持https功能,你需要在编译安装时让他和ssl加密模块进行结合,他就可以支持https功能了。这是源代码编译安装) 支持第三方功能,添加额外参数。是定制软件,缺点,你得解决基础的系统编译环境。然后编译时间也很长的,
-
rpm包,手动安装,不好用,需要自行解决软件依赖。
-
配置 yum 源,使用 yum 自动化安装,自动解决依赖关系
安装笔记
1.配置 yum 源 推荐使用阿里的yum 源		mirrors.aliyun.com

cd /etc/yum.repo.d/
ls
Centos-7.repo  epel-7.repo
vim Centos-7.repo
[base]
name=CentOS-$releasever - Base - mirrors.aliyun.com
failovermethod=priority
baseurl=http://mirrors.aliyun.com/centos/$releasever/os/$basearch/
		http://mirrors.aliyuncs.com/centos/$relearsever/os/$basearch/
		http://mirrors.cloud.aliyuncs.com/centos/$releasever/os/$basearch/
gpgcheck=1
gpgkey=http://mirrors.aliyun.com/centos/RAM-GPG-KEY-CentOS-7
如何配置 yum 源
访问	https://developer.aliyun.com/mirror/
简介

CentOS,是基于Red Hat Linux提供的可自由使用源代码的企业级Linux发行版本;是一个稳定,可预测,可管理和可复制的免费企业级计算平台。

下载地址: https://mirrors.aliyun.com/centos/

配置 yum 源过程
找到 centos,点击进去
配置方法
1. 备份
mv /etc/yum.repos.d/CentOS-Base.repo /etc/yum.repos.d/CentOS-Base.repo.backup

2. 通过命令,直接下载新的 CentOS-Base.repo 到 /etc/yum.repos.d/  阿里云的 yum 源文件
找到centos 7 复制
wget -O /etc/yum.repos.d/CentOS-Base.repo https://mirrors.aliyun.com/repo/Centos-7.repo
curl -o /etc/yum.repos.d/CentOS-Base.repo https://mirrors.aliyun.com/repo/Centos-7.repo


3. 运行 yum makecache 生成缓存

4. 其他
sed -i -e '/mirrors.cloud.aliyuncs.com/d' -e '/mirrors.aliyuncs.com/d' /etc/yum.repos.d/CentOS-Base.repo


5.找额外的第三方源  Epel
包含大量的第三方软件 比如 apache,nginx,各种数据库等都会在这里存在
简介

EPEL(Extra Packages for Enterprise Linux), 是由Fedora Special Interest Group维护的Enterprise Linux(RHEL、CentOS)中经常用到的包。

下载地址:https://mirrors.aliyun.com/epel/

相关仓库

    epel过期源(epel-archive):https://developer.aliyun.com/mirror/epel-archive


配置方法
1. 备份(如有配置其他epel源)
mv /etc/yum.repos.d/epel.repo /etc/yum.repos.d/epel.repo.backup
mv /etc/yum.repos.d/epel-testing.repo /etc/yum.repos.d/epel-testing.repo.backup

2. 下载新repo 到/etc/yum.repos.d/
找到epel(RHEL 7)
wget -O /etc/yum.repos.d/epel.repo https://mirrors.aliyun.com/repo/epel-7.repo


3.清空 yum 缓存,针对 阿里云的 yum 源生成新的缓存,用于加速软件下载
yum clean all
yum makecache

4. yum 源配置结束,可以通过命令直接安装 apache(linux的软件包 httpd,即安装httpd,就是在安装 apache 这款软件)
yum install httpd -y


5.
a. 通过浏览器 ip+80 访问 也可以查看 80 端口有没有人在使用该端口
b.检查 linux 是否启动了 80 端口
netstat -tunlp | grep 80	# 查看 80 端口,没有结果则表示没人在用 80 端口

参数解释
'-tunlp': 显示 linux 启动的所有端口
'|' : 表示通过管道符过滤一下 80端口


6. 启动 httpd 服务,即启动 apache,并且配置 apache 开机自启
systemctl start httpd	# 启动
systemctl status httpd	# 查看启动状态
systemctl enable httpd	# 设置开机自启
systemctl disable httpd 	# 设置禁止开机自启
systemctl stop httpd	# 停止 apache 服务

7. 检查 apache 进程是否存在  多进程的 web 服务器
ps -ef | grep httpd
ps -ef | grep httpd | grep -v 'grep'	# 找出跟 httpd 相关的进程

# 参数解释
'-v' 小写字母v 表示将包含 'grep' 的进程过滤掉即排除掉

8. # 在本地访问 80 端口
curl 127.0.0.1
得到了html页面的代码即前端标签文件


------------------yum源配置最简洁如下----------------

1.配置 yum 源 推荐使用阿里的yum 源
配置 yum 源过程
访问	https://developer.aliyun.com/mirror/

2.通过命令,直接下载阿里云的 yum 源文件

wget -O /etc/yum.repos.d/CentOS-Base.repo https://mirrors.aliyun.com/repo/Centos-7.repo

wget -O /etc/yum.repos.d/epel.repo https://mirrors.aliyun.com/repo/epel-7.repo

3.清空 yum 缓存,针对 阿里云的 yum 源生成新的缓存,用于加速软件下载
yum clean all
yum makecache

4. yum 源配置结束,可以通过命令直接安装 apache(linux的软件包 httpd,即安装httpd,就是在安装 apache 这款软件)
yum install httpd -y

5. 检查 linux 是否启动了 80 端口
netstat -tunlp | grep 80

6. 启动 httpd 服务,即启动 apache,并且配置 apache 开机自启
systemctl start httpd
systemctl status httpd
systemctl enable httpd
systemctl disable httpd
systemctl stop httpd

7. 检查 apache 进程是否存在  多进程的 web 服务器
ps -ef | grep httpd
ps -ef | grep httpd | grep -v 'grep'


8.在本地访问 80 端口
curl 127.0.0.1
得到了html页面的代码即前端标签文件

此时启动了一个 web 服务端,可以用客户端访问,注意关闭防火墙
http://192.168.178.185/
apache 配置文件讲解
apache配置文件的作用:
我们 apache 为什么端口是80,我们为什么可以访问网站?就可以看到页面,我们是否可以针对他做修改呢?
你可以在配置文件中定义各种各样的功能,或者修改各种各样的功能
1.检查 apache 安装了哪些文件,通过 yum 安装的软件,如何查看安装信息呢?
rpm -ql httpd | grep ".conf"

'/etc/httpd/conf' 是 apache 主配置文件目录

cd /etc/httpd/
ls
conf conf.d conf.modules.d logs modules run

2. apache 主配置文件在 /etc/httpd/ 目录
vim /etc/httpd/conf/httpd.conf	主配置文件的绝对路径

cd conf
ls
httpd.conf  magic

找到这个 '/etc/httpd/conf/httpd.conf' 就是 apache 的主配置文件
主配置文件:
他所有核心功能都由他定义,他又能够通过包含的方式 我们也可以在 'conf.d'中 写很多 'xxx.conf' 配置文件,然后在主配置文件中通过 通过一句 'include conf.modules.d/*.conf'语法 能够把其他目录的配置文件 也给导入进来。这么一个功能,主配置文件的好处在哪里?如果我们将 n 多个功能都写在主配置文件中,他的代码就会很臃肿,代码就会很多,可能有几千或者几万行,看起来就会非常吃力。而且很难管理,我们可以通过坼开的方式,在其他目录下也定义一下 'xxx.conf' 这样的文件,然后导入即可,比如主配置文件只有几十行,其他的功能写入另外的 (conf.d 目录中) 目录中,每一个功能就写一个配置文件,这样的管理方式就非常棒。

vim /etc/httpd/conf/httpd.conf

3. 查看主配置文件中的有益信息 (排除空白行加注释行)
主配置文件: /etc/httpd/conf/httpd.conf
#  '排除空白行加注释行' 命令如下
# 通过 grep 过滤掉 空白行,以 '#' 开头的行,以空格开头的行,
grep -Ev "^[# ]|^$" /etc/httpd/conf/httpd.conf
# 将所有的以 '#' 或者以空白开头,以及空白行全部删除(即所有的空白行,注释行全部删除)

参数解释
'-E'  扩展正则
'-v'  排除的意思
'^'   代表以什么开头的行
'^[#]'  代表你要过虑的以 "#" 开头的相关信息
'^[# ]' 代表你要过滤以 "#" 或者 以空白 开头的行都弃掉
'|'  或 运算符
'^$' 代表以 空结尾 行也去掉

grep -Ev "^|[# ]|^$" /etc/httpd/conf/httpd.conf
ServerRoot "/etc/httpd"
Listen 80
Include conf.d/*.conf
Include conf.modules.d/*.conf
User apache
Group apache
ServerAdmin root@localhost
<Directory />
</Directory>
DocumentRoot "/var/www/html"
<Directory "/var/www">
</Directory>
<Directory "/var/www/html">
</Directory>
<IfModules>
<Files ".h.*">
</Files>
ErrorLog "logs/error_log"
logLevel warn
<IfModule log_config_module>
</IfModule>
<IfModule alias_module>
</IfModule>
<Directory "/var/www/cgi-bin">
</Directory>
<IfModule mine_module>
</IfModule>
AddDefaultCharset UTF-8
<IfModule mime_magic_module>
</IfModule>
EnableSendfile on
IncludeOptional conf.d/*.conf


------------------------------
主配置文件参数解释
ServerRoot "/etc/httpd"	# httpd 主配置目录定义		全局配置
Listen 80	# 定义 apache 运行的端口	全局配置
Include conf.d/*.conf  # httpd 的子配置文件		全局配置
Include conf.modules.d/*.conf
# 通过 'Include' 语法,把其他目录中的配置文件包含进来,实现配置文件简洁化
User apache		# 定义  httpd  运行的用户名
Group apache	# 定义  httpd  服务运行的用户组
ServerAdmin root@localhost	# 代表定义主机名
# 当用户访问网站的根目录,返回某些资源 http://192.168.178.131/
# 访问某些资源的(即131后面的 "/") '访问结尾的 "/" 匹配下面(Directory)标签中的 "/"'
<Directory />
</Directory>

# 标签语法,是固定写法 <h1></h1> 他俩是开头和结尾闭合的关系
# <p>  定义的内容  </p> 这是前端 html 的相关知识
# 功能就是 定义 httpd 的首页文件,网页跟目录
DocumentRoot "/var/www/html"	# 定义 httpd 的网页根目录
<Directory "/var/www">
</Directory>
<Directory "/var/www/html">
</Directory>
<IfModules>
<Files ".h.*">
</Files>
ErrorLog "logs/error_log"
logLevel warn
<IfModule log_config_module>
</IfModule>
<IfModule alias_module>
</IfModule>
<Directory "/var/www/cgi-bin">
</Directory>
<IfModule mine_module>
</IfModule>
AddDefaultCharset UTF-8
<IfModule mime_magic_module>
</IfModule>
EnableSendfile on
IncludeOptional conf.d/*.conf


cd /var/www/html/
ls
我们发现里面什么都没有,我们可以在这里编辑一个 index.html
vim /var/www/html/index.html
haha
保存退出
刷新一下 apache 的首页
就可以看 haha
http://192.168.178.131:80/index.html( 默认访问的是该文件 )
主配置文件中,主要分为3类
-
全局配置,全局性
-
主服务器配置
-
虚拟主机
httpd.conf配置文件语法
ServerAdmin root@localhost		# 全局配置 global environment
固定指令	  自定义值

# ServerName www.example.com:80		# 号开头为注释行,程序不加载

# 区域配置,局部生效,通过关键词,控制浏览器的访问
# Directory 也是全局配置,他里面定义的参数就是局部配置,仅仅针对这个Directory这个目录生效
<Directory />
	AllowOverride name
	Require all denied
</Directory>
常见参数解析
| 参数 | 解析 |
|---|---|
| ServerRoot "/etc/httpd" | 定义服务工作目录 |
| ServerAdmin root@localhost | 管理员邮箱地址 |
| User apache | 运行服务的用户信息 |
| Group | 允许服务的用户组 |
| ServerName www.example.com:80 | 填写服务器域名 |
| DocumentRoot "/var/www/html" | 定义网站根目录 |
| 定义网站数据目录的权限 | |
| Listen | 监听的IP地址和端口号 |
| DirectoryIndex index.html | 默认的首页页面文件 |
| ErrorLog "logs/error_log" | 定义错误日志位置 |
| CustomLog "logs/access_log" combined | 定义服访问日志路径 |
apache常见配置
【修改首页内容】
# 创建文件夹
mkdir /www/html
systemctl restart httpd
touch /www/html/index.html
vim /www/html/index.html
<meta charset=utf-8>
休息一会儿,待会再来看 apache 用法
访问 http://192.168.178.131/ 发现他没有任何变化,为什么呢,下一小节再来介绍


vim /var/www/html/index.html
curl 127.0.0.1
apache 配置文件
linux学习软件使用,以及针对软件定制各种功能,其实就是在修改配置文件,因此我们得知道各配置文件的位置
rpm -ql httpd | grep .conf
# 找出跟配置文件相关的信息
| 文件路径 | 作用 |
|---|---|
| /etc/httpd/conf/httpd.conf | apache 主配置文件 |
| /etc/httpd | apache 主配置文件工作目录 |
| /etc/httpd/conf.d/*.conf | apache 子配置文件 |
| /usr/sbin/httpd | 二进制脚本 apache 启动命令 |
| /var/log/httpd/ | 日志路径 access_log error_log |
| /var/www/html | 站点资源目录 |
| /usr/lib/systemd/system/httpd.service | httpd 服务脚本文件 |
| /usr/lib64/httpd/modules/ | httpd 模块文件路径 |
# 用户访问的日志记录 ls /var/log/httpd/ access_log error_log # tail -f /var/log/httpd/access_log 宿主机的IP地址 192.168.178.1
【http 主配置文件学习】
/etc/httpd/conf/httpd.conf
Apache多通道工作模式
apache常用功能
修改apache网页根目录,需要修改两个参数
1. 修改 httpd.conf
DocumentRoot	代表网页根目录
Directory		定义该目录的属性


# 修改两个参数如下
vim /etc/httpd/conf/httpg.conf

DocumentRoot	"/www/html"

<Directory "/www">
	AllowOverride None		# 不允许其他配置文件,覆盖现有配置
	# Allow open access:
	Require all granted		# 允许所有请求
</Directory>


2.创建新的站点目录
mkdir -p /www/html


3.创建新的首页文件, index.html
vim /www/html/index.html
写入如下内容:
<meta charset=utf-8>
我是修改httpd首页之后的新站点内容


4.确保关闭服务器防火墙,以免影响实验
iptables -F 	# 清空防火墙规则
systemctl stop firewalld	# 停止防火墙服务
systemctl disable firewalld		# 禁止防火墙开机自启

获取 linux 的 selinux 内置的防火墙 查看他的状态
关闭自带的 selinux防火墙	disabled 说明防火墙关闭了
getenforce		# 命令
Disabled		# 返回


5  参数修改完毕以后要重启 apache 服务
systemctl restart httpd
修改 apache 默认运行端口
1. 修改 httpd.conf, 修改如下参数:
将 'Listen 80' 修改为 'Listen 85'

2. 牢记:只要修改了配置文件,该服务一定要重启,修改的配置文件才会生效
systemctl restart httpd

3. 找出文件中的某个参数
grep -i 'listen 85' /etc/httpd/conf/httpd.conf

参数解释
'-i' 表示忽略大小写
apache的工作模式 默认的工作模式有3种
(多进程工作模式:就是因为apache有多进程工作模式,才能让 apache 支持不同的工作环境,让他支持更好的处理效率)
银行需要开门营业,银行需要有工作人员,去处理客户的问题,银行还得打开处理业务的窗口
1 号窗口
	窗口内的工作人员,是干活的,解决客户问题
2 号窗口
	窗口内的工作人员,是干活的,解决客户问题


银行( linux 操作系统 运行在linux上的 apache 主程序)
客户的问题( linux 接收到的用户请求,用户通过浏览器发来的访问请求 )

     linux系统打开一个进程去处理用户的请求(开通一个窗口)
	 apache主程序再打开一个进程去处理用户的请求(开通一个窗口)
	 干活的其实是该进程,创建的线程 (线程就好比干活的工作人员)


prefork
  是 apache, httpd 服务刚启动的时候,就预先 fork 一些进程,并且这些进程等待用户的请求 (银行的窗口,等待客户来办业务) 这么做是为了减少进程频繁创建和销毁进程带来的额外系统开销
  该 prefork 模式是一个进程,只有一个线程,一个时间内,只能处理一个请求。(一个窗口只有一个业务,只能办理一个客户的问题)
  优点:成熟稳定,兼容所有的 apache 模块,并且不用担心线程冲突的问题 来一个请求,他就会去再开一个进程 进程比线程占用的资源多。
  缺点:多个进程占用了较多的系统资源,消耗了较多的内存,并且该模式不适合并发场景
  (银行无论生意好坏,都得预先开通很多个窗口,造成了人员,场地的浪费,无法处理业务高峰期)

worker
  使用多进程 + 多线程的混合模式,也是预先打开了多个进程,(数量较少一点),每个子进程,都会创建一些子进程,同时还会有一个监听线程。每个请求来了之后,会分配给一个线程去处理。 线程单位比起进程单位,是消耗较少的内存的,在高并发场景下, worker 模式,更合适。
  (银行有多个窗口,且窗口后面,还有多个工作人员)
优点:worker 模式,占用更少的内存,来一个请求,该进程会创建一个子线程去处理请求,进程比线程占用的资源多。
缺点:需要考虑多线程的 ,资源抢夺问题


event
  用得很少,但是效率还是很高的,和 worker 模式还是比较相似,他也是使用多进程 + 多线程的混合模式,和 worker 的区别是解决了 TCP keep-alive 长连接的问题 在同一个连接之下,可以发送多个 http 请求,
  event 模式有一个专门监听 长连接请求,当他检测到有真实的请求,才会把请求交给线程去处理,当线程处理完毕之后,该监听连接能够把该线程释放了,能够减少系统开销,提升高并发处理能力。这是 event 工作模式

  event 解决了 TCP 的 keep-alived 长连接的问题,当请求来了之后,交给一个子线程去处理,如果该 TCP 长链接,长时间占用线程资源,对系统开销较大,event 模式会默认开启一个监听线程,检测到当子线程处理完毕请求之后,会释放该线程,减轻服务器的压力。
检查 apache 默认的工作模式
httpd -V | grep -i "server mpm"

'-V' 大写 V 字母表示 展示 apache 的详细信息
'-i' 忽略大小写
Apache功能之Userdir模块
userdir功能
userdir 模块可以很方便的和他人共享服务器的目录资料
该功能需要修改此配置文件
/etc/apache2/mods-available/userdir.conf  (ubuntu)
/etc/httpd/conf.d/userdir.conf		(centos)
/etc/httpd/passwd		(centos)
Include conf.modules.d/*.conf  # 该目录的在主配置文件中的写法

root@ubuntu-master:/etc/apache2# vim /etc/httpd/conf.d/userdir.conf
root@ubuntu-master:/etc/apache2# cat /etc/httpd/conf.d/userdir.conf
<IfModule mod_userdir.c>
        UserDir public_html
        # UserDir disabled root			开启该模块的功能

        <Directory /home/*/public_html>
                # AllowOverride FileInfo AuthConfig Limit Indexes  注释掉,自己写一些功能参数
                AllowOverride all  # 允许所有其他文件都能修改它配置
                # 添加一些认证的配置,使得用户可以用账号,密码访问该目录
                authuserfile "/etc/httpd/passwd"
                authname "input your accout"
                authtype basic
                require user chao
                # Options MultiViews Indexes SymLinksIfOwnerMatch IncludesNoExec
                # Require method GET POST OPTIONS
        </Directory>
</IfModule>

# vim: syntax=apache ts=4 sw=4 sts=4 sr noet
root@ubuntu-master:/etc/apache2#

# 解释说明
'AllowOverride': 是apache自带的关键词参数,自定义一个参数,all 允许所有其他配置文件都能修改它配置

'authuserfile': 该关键词定义一个文件里面定义一定账号密码,能够登录apache 的


1. 通过 userdir 模块,共享目录资料,配置步骤如下

2.编辑 userdir 配置文件,修改如下参数

vim /etc/apache2/mods-available/userdir.conf

  # UserDir disabled root	注释掉该参数,即开启 userdir 模块功能


# 共享目录的权限设置如下
 		<Directory /home/*/public_html>
                # AllowOverride FileInfo AuthConfig Limit Indexes  注释掉,自己写一些功能参数
                AllowOverride all  # 允许所有其他文件都能修改它配置
                # 添加一些认证的配置,使得用户可以用账号,密码访问该目录
                authuserfile "/etc/httpd/passwd"
                authname "input your accout"
                authtype basic
                require user chao
                # Options MultiViews Indexes SymLinksIfOwnerMatch IncludesNoExec
                # Require method GET POST OPTIONS
  		</Directory>


  		<Directory /home/*/public_html>
                AllowOverride all
                authuserfile "/etc/apache2/passwd"
                authname "input your accout"
                authtype basic
                require user longchi
  		</Directory>


# ubuntu
longchi@ubuntu-master:~$ sudo vim /etc/apache2/mods-available/userdir.conf
[sudo] password for longchi:
longchi@ubuntu-master:~$ sudo cat /etc/apache2/mods-available/userdir.conf
<IfModule mod_userdir.c>
        UserDir public_html
        # UserDir disabled root

        <Directory /home/*/public_html>
                AllowOverride all
        authuserfile "/etc/apache2/passwd"
        authname "input your accout"
        authtype basic
        require user longchi
                # AllowOverride FileInfo AuthConfig Limit Indexes
                # Options MultiViews Indexes SymLinksIfOwnerMatch IncludesNoExec
                # Require method GET POST OPTIONS
        </Directory>
</IfModule>

# vim: syntax=apache ts=4 sw=4 sts=4 sr noet

longchi@ubuntu-master:~$


3. 创建网站资料,注意权限的问题
使用普通用户,创建共享目录
useradd httpuser
su - longchi
root@ubuntu-master:~# su - longchi
longchi@ubuntu-master:~$ pwd
/home/longchi
longchi@ubuntu-master:~$ mkdir public_html	# 创建共享目录
longchi@ubuntu-master:~$ pwd
/home/longchi
longchi@ubuntu-master:~$ ls /home/longchi/
public_html
longchi@ubuntu-master:~$

4 创建共享目录首页文件 创建共享网页文件,内容如下
longchi@ubuntu-master:~$ vim public_html/index.html
longchi@ubuntu-master:~$ cat public_html/index.html
<meta charset=utf-8>
欢迎大家来和超哥学 apache,感谢大家!
longchi@ubuntu-master:~$

5. 设置该目录权限	7( user 4+2+1 rwx )5( group 4+1 r-x )5( other 4+1 r-x )
chmod -Rf 755 public_html/
chmod -Rf 755 /home/longchi/

longchi@ubuntu-master:~$ chmod -Rf 755 public_html/
longchi@ubuntu-master:~$ chmod -Rf 755 /home/longchi/
longchi@ubuntu-master:~$


'-Rf' 针对该目录及其子目录设置权限


6.创建 apache 的用户认证文件  htpasswd  注意要退出,回到 root 用户
htpasswd -c /etc/httpd/passwd	(centos)
htpasswd -c /etc/apache2/passwd longchi	(ubuntu)

参数解释
'-c' 指定一个文件


longchi@ubuntu-master:~$ exit
logout
root@ubuntu-master:~# htpasswd -c /etc/apache2/passwd longchi
New password:
Re-type new password:
Adding password for user longchi
root@ubuntu-master:~#


7.重启 apache, 可以访问该共享目录
systemctl restart httpd  (centos)
systemctl restart apache2	(ubuntu)


8.此时使用客户端访问该共享目录,访问方式必须如下
ip/~longchi
http://ip:80/~用户家目录名、

账号:longchi
密码:xxxxxxxx
apache 多虚拟主机功能
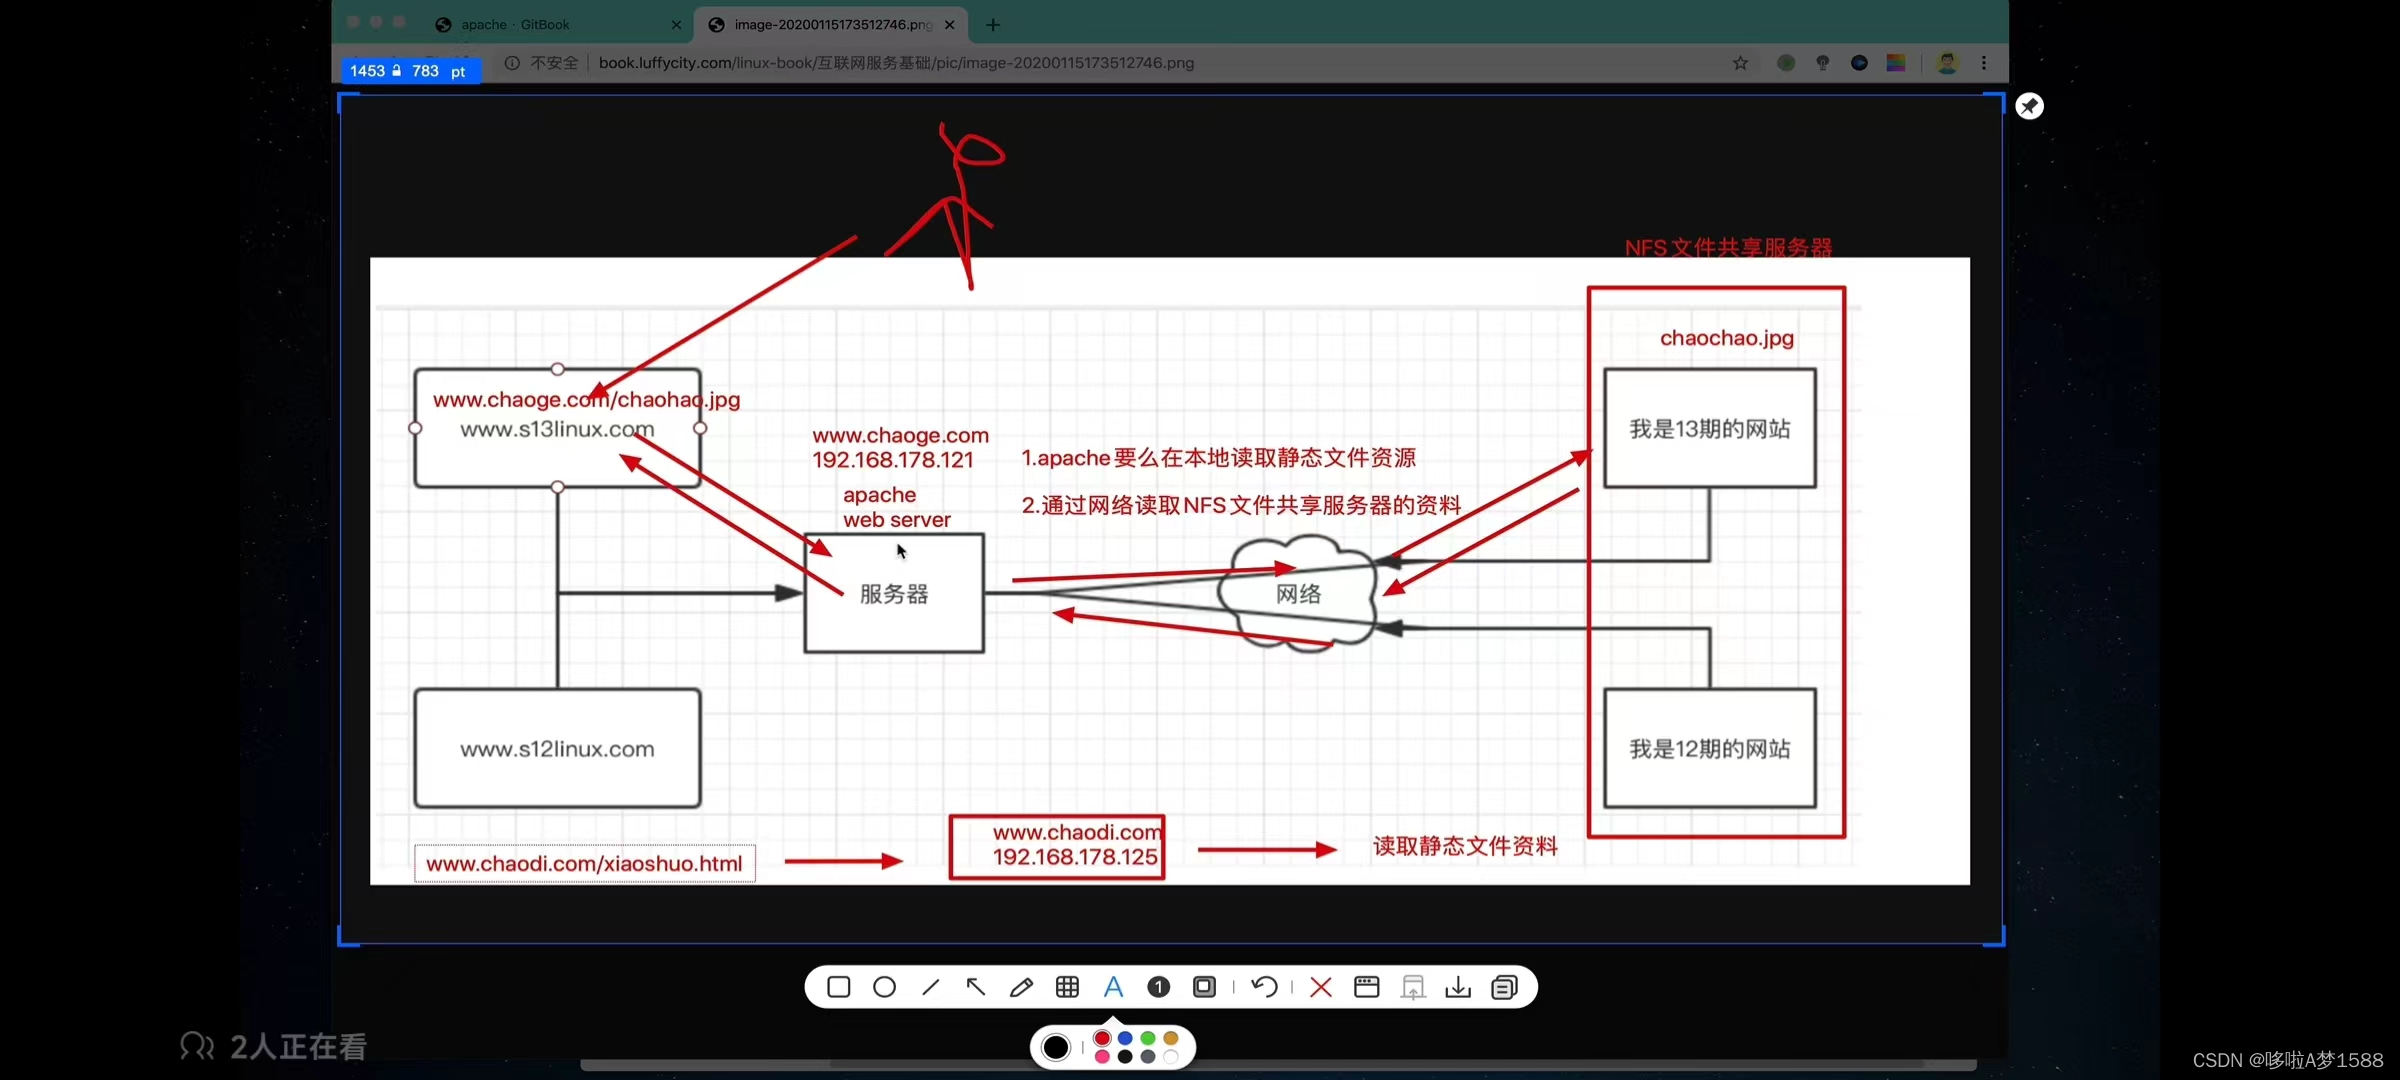
客户端访问服务,一定会进行域名解析,然后定位到一台服务器(可以在 NDS服务器 找到 域名与IP的映射共享)(本地 /etc/hosts  www.chaoge.com 192.168.178.121  域名与IP对应关系),服务器是安装的是 apache web server 其实就是一款软件,解析到服务器,在服务器站点上寻求图片,视频,资料等动静态资源 有2种方式读取静态资源:
1.apache要么在本地磁盘上读取静态资源
2.通过网络读取 nfs 文件共享服务器资源


www.chaodi.com/xiaoshuo.html(做一个小说的网址)
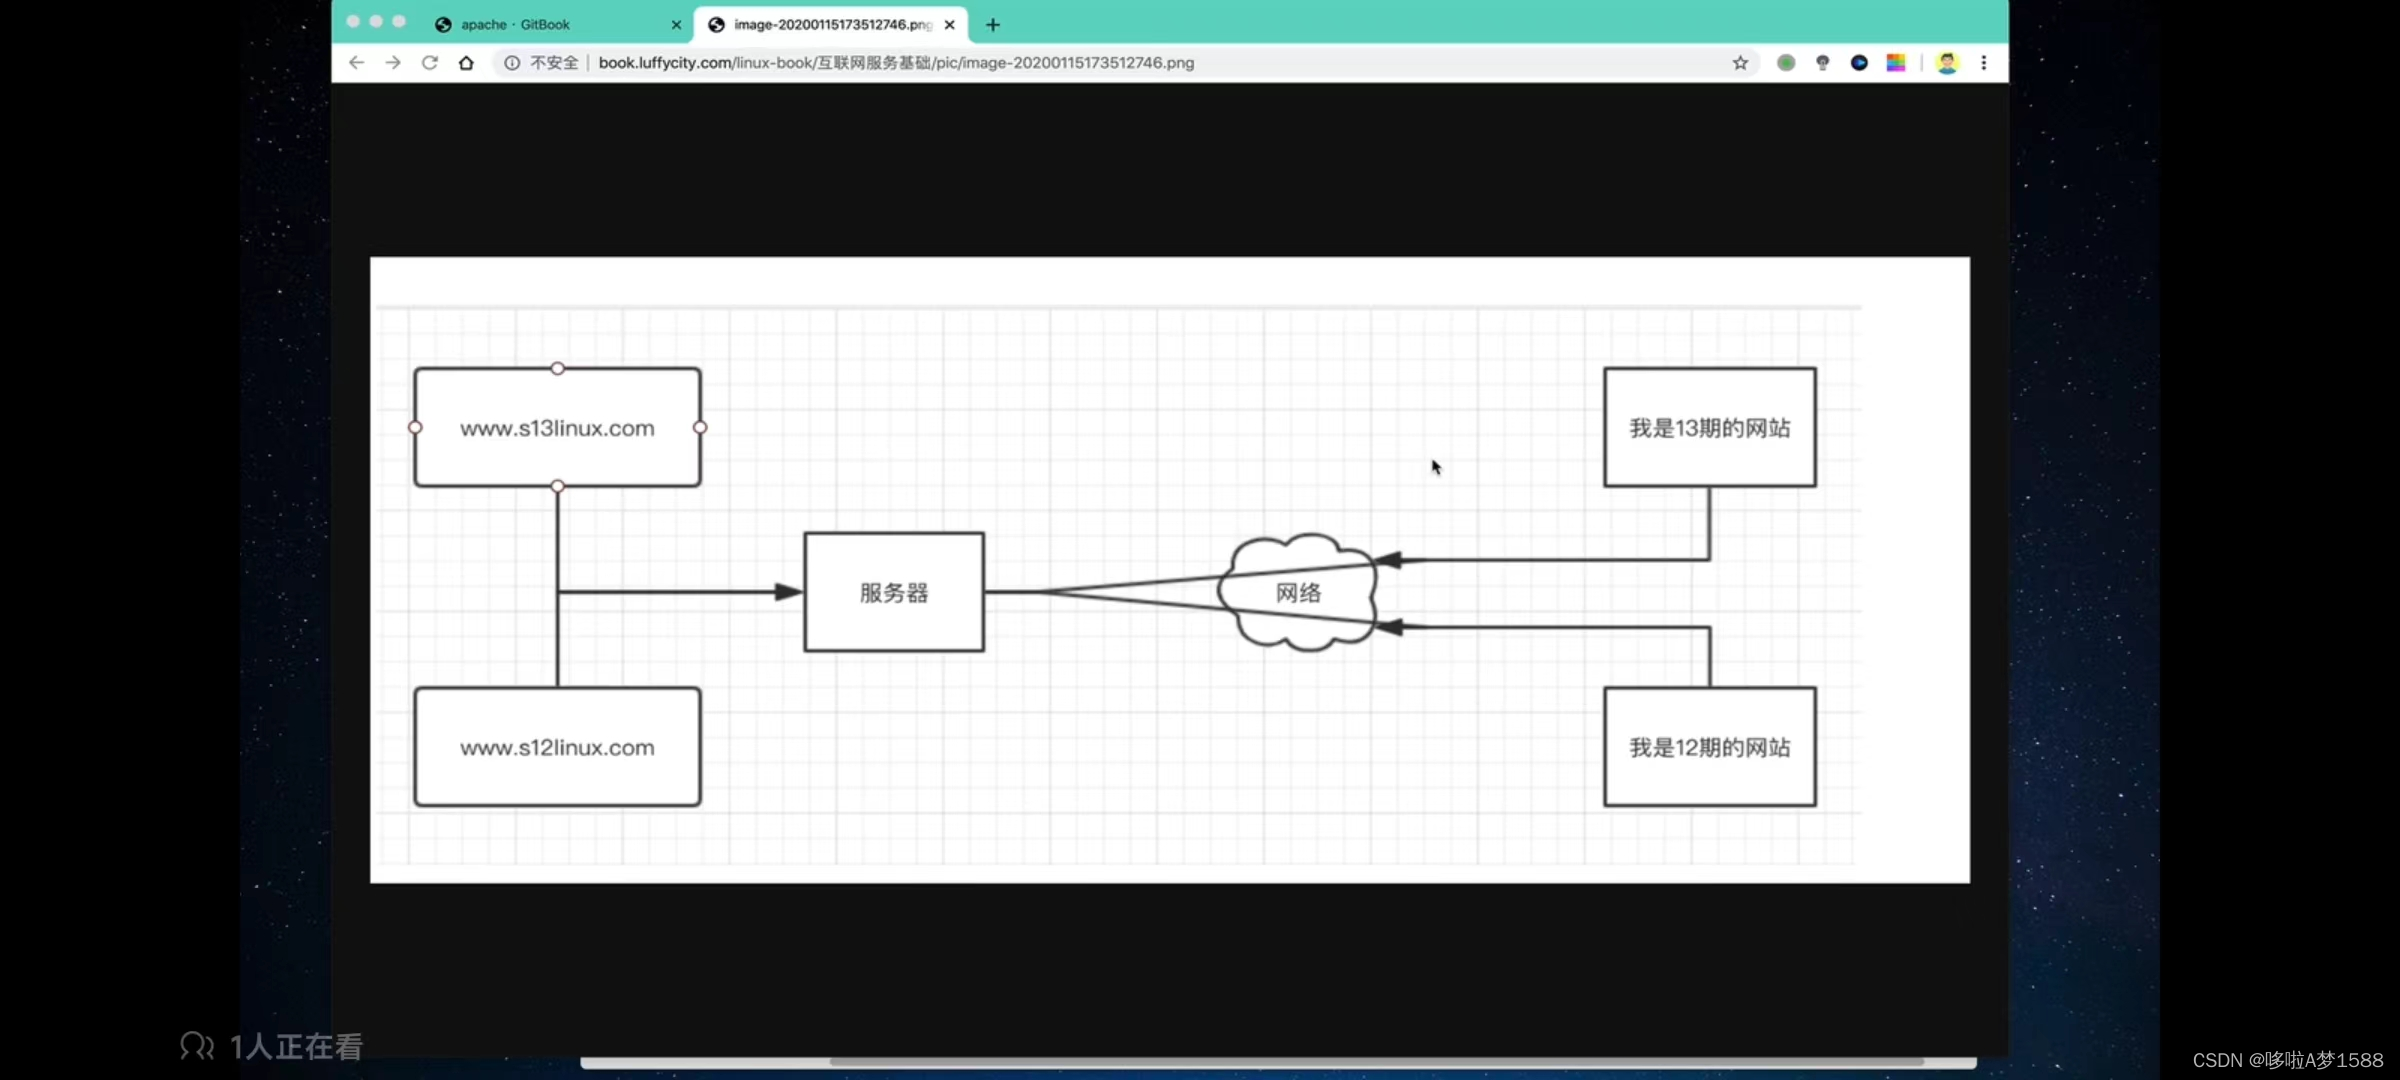
虚拟主机:
也称之为,网站空间,其实就是一台运行在互联网中的服务器,
被划分为多个 "虚拟" 服务器 ,其实就是在一个 linux 机器上,通过不同的文件夹,管理不同的站点内容,比如
# 通过虚拟主机的功能,只需要在一台服务器上,配置3个目录即可 # 让下面的三个不同的域名分别访问下面三个不同的文件夹就可以实现一台服务器可以访问多个网站站点 # 虚拟主机的功能极大第促进了网络的发展,使得一些草根站长在很大程度上节省了成本,这个东西是非常好用的 /www/hanju/ www.cchanju.com /www/dnf/ www.ccdnf.com /www/lol/ www.cclol.com
如果说每台 linux 服务器,只能运行一个网站,那么对于一些只有简单业务的网站,比如,个人博客,小型论坛,一些图片展示的网址,一些小说网地址,这样的网址,他们的业务都非常简单,流量也是很小的,对于这些站长,如果我们存在多个域名,我们是不是要购买多个硬件服务器,造成很大的资源浪费。且需要支付昂贵的服务器租赁费用。那么出现了多虚拟主机后,就让小型站长,更方便的使用互联网搭建技术,以及成本把控。
如果web server 不支持多虚拟主机
用户有多少业务网站就得购买多少台服务器,造成资源浪费,成本较高
apache是支持虚拟主机功能,能够根据用户不同的IP地址,不同的域名,不同的端口,实现多个站点内容的响应。
Apache 多域名 & 多 IP 虚拟主机实战
多虚拟主机是如何访问的呢?
我们会准备一台 linux 服务器,他的IP是 192.168.178.121
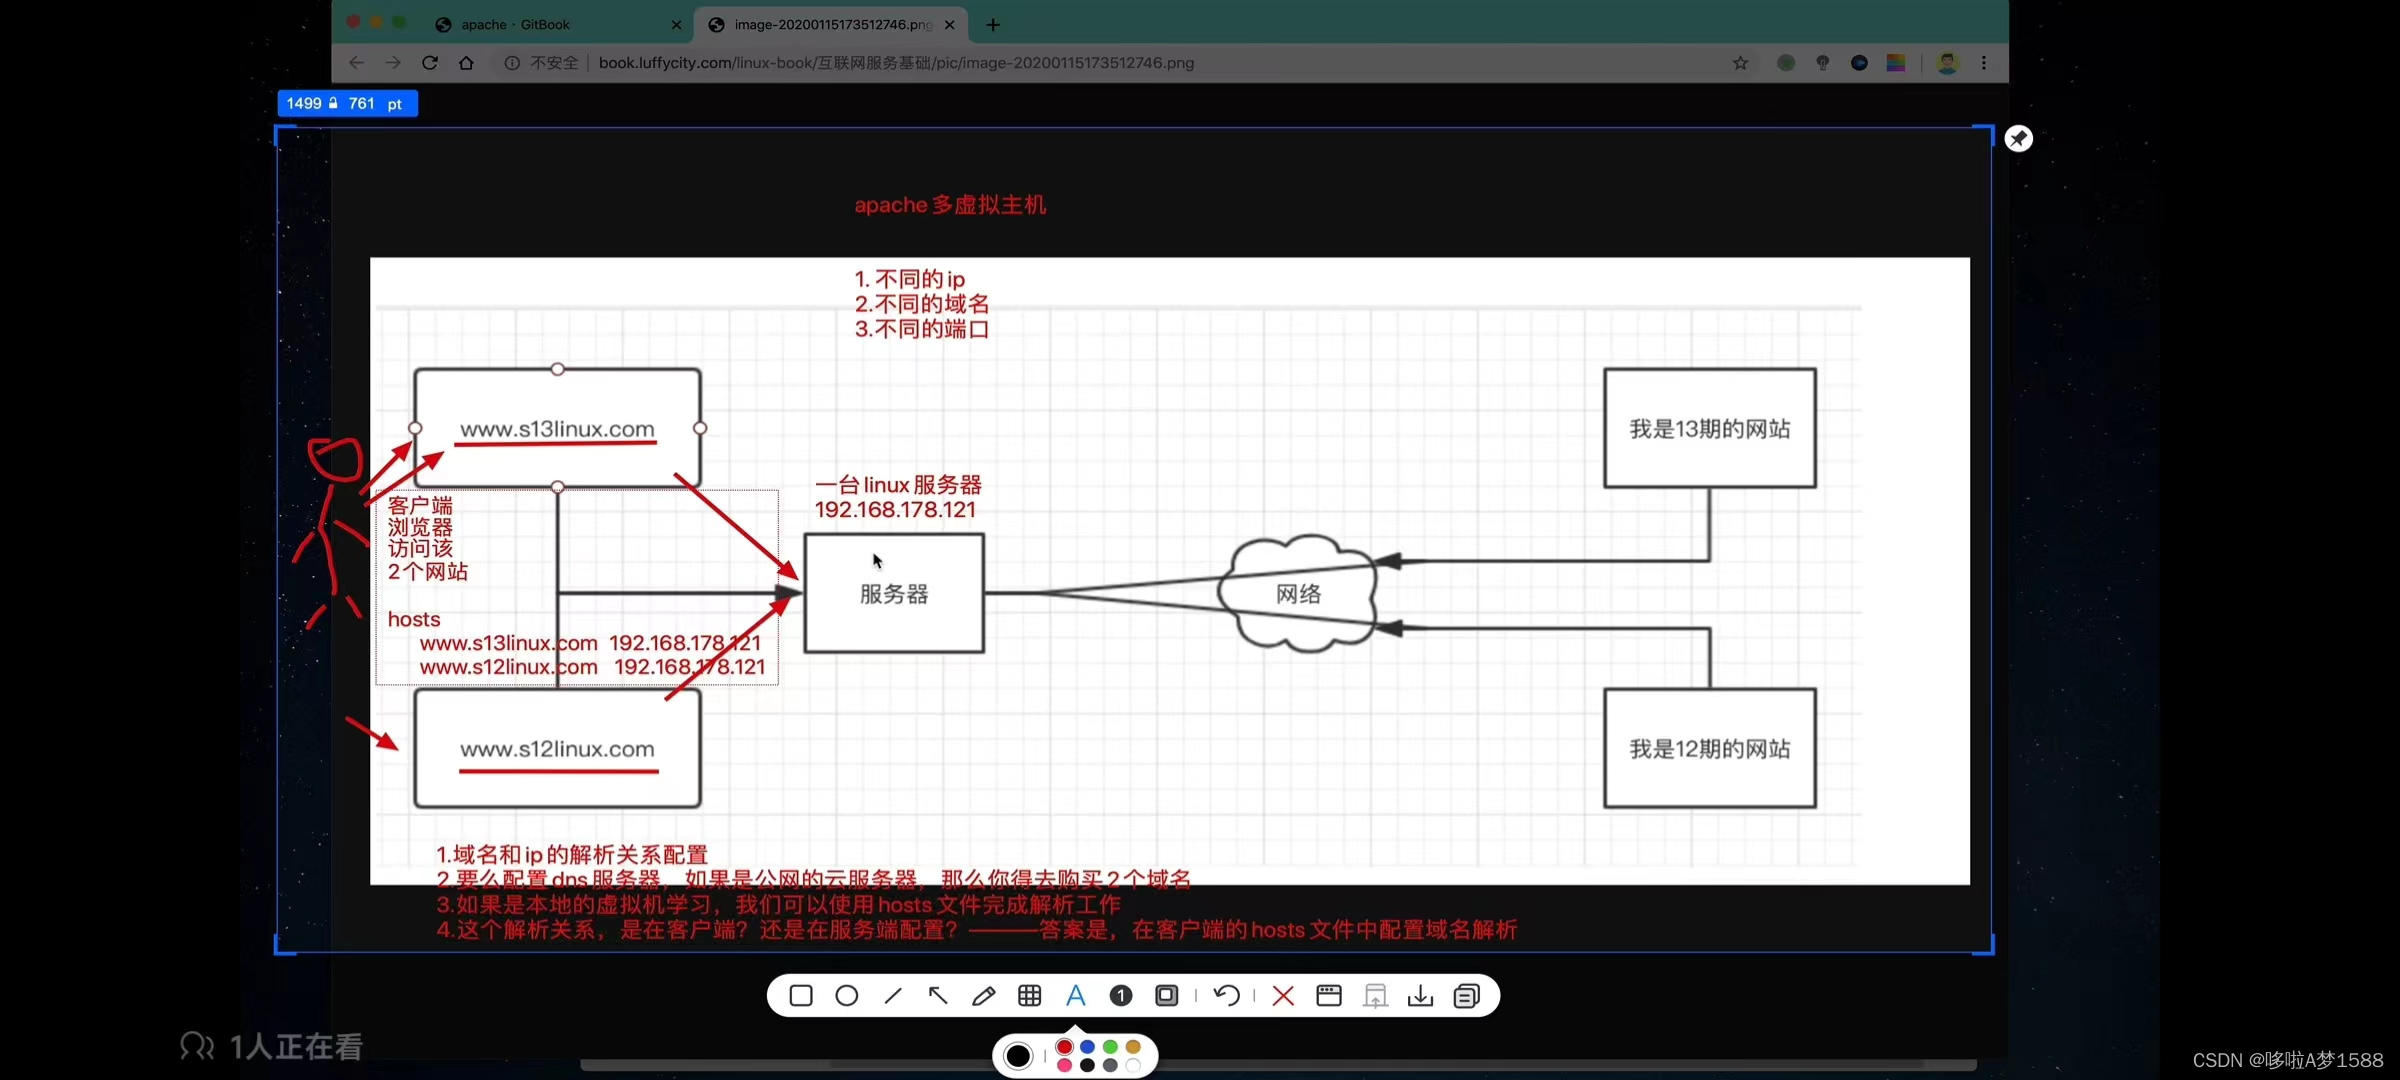
apache多虚拟主机
1. 不同的IP
2. 不同的域名
3. 不同的端口
第一步 域名和 IP 对应的解析关系是如何设置
1. 域名和 IP 的解析关系配置
2. 要么配置 dns 服务器,如果是公网的云服务器,那么你得去购买两个域名
3. 如果是本地的虚拟机学习,我们可以使用hosts文件完成解析工作
4. 这个解析关系是在客户端配置还是在服务端配置? ---客户端
客户端自己本地的浏览器中去访问这2个网站,我们怎么让域名都解析到这个IP,是不是要在客户端 hosts文件中配置
因为 hosts 是本地的域名解析文件,
假设我们没有做任何解析
我们在本地浏览器中访问这2个站点,他们就会去 dns 公网中找,域名不存在,访问一定会被拒绝,因为没法把域名解析成 IP 地址,
hosts
www.s13linux.com 192.168.178.121
www.s12linux.com 192.168.178.121
这是基于域名的多虚拟主机
我们在本地浏览器中访问这2个站点的域名时,在 hosts 文件中找到解析关系,那么这个请求就把域名解析成立 192.168.178.121 这台主机,然后我们就把请求发给这台服务器。这是基于域名的多虚拟主机
这是基于域名的多虚拟主机
我们在本地浏览器中访问这2个站点的域名时,在 hosts 文件中找到解析关系,那么这个请求就把域名解析成立 192.168.178.121 这台主机,然后我们就把请求发给这台服务器。
当服务器仅允许有一个 IP 地址的时候,就无法实现多虚拟主机了,Apache
还支持基于不同的域名,返回不同的站点资源。
这种配置方式,需要配置多个域名,可以使用本地 hosts 文件,也可以配置 NDS 记录。
1. 配置 hosts 文件解析
vim /etc/hosts
基于 IP 的多虚拟主机
在一台服务器上,绑定多个 IP 地址,每个 IP 地址部署一个网址,当用户请求不同的 IP 地址的时候,apache 根据用户的请求信息,来响应不同的网站内容。
当用户访问 192.168.178.121/songhuiqiao.jpg
当用户访问 192.168.178.123/demaxiya.jpg

服务器要求:
1.有多个网卡
2.绑定了多个 IP	192.168.178.121		192.168.178.123

linux 服务器安装了 apache
apache 根据检测用户请求的 IP 不同,返回不同的站点资料,

apache 的大致配置功能:
192.168.178.121		/www/hanju/songhuiqiao.jpg
192.168.178.123		/www/lol/demaxiya.jpg

# # 查看 centos 内核版本信息
cat /etc/redhat-release


# 查看 ubuntu 版本信息
root@ubuntu-master:~# cat /etc/issue
Ubuntu 14.04.4 LTS \n \l

# 查看 ubuntu 内核版本信息
root@ubuntu-master:~# uname -r
5.15.0-106-generic

# 查看 ubuntu 详细的版本信息
root@ubuntu-master:~# lsb_release -a
No LSB modules are available.
Distributor ID: Ubuntu
Description:    Ubuntu 14.04.4 LTS
Release:        14.04
Codename:       asamm
root@ubuntu-master:~#

# 查看 IP 地址
ifconfig
root@ubuntu-master:~# ifconfig
docker0: flags=4099<UP,BROADCAST,MULTICAST>  mtu 1500
        inet 172.17.0.1  netmask 255.255.0.0  broadcast 172.17.255.255
        ether 02:42:71:4d:b7:3b  txqueuelen 0  (Ethernet)
        RX packets 0  bytes 0 (0.0 B)
        RX errors 0  dropped 0  overruns 0  frame 0
        TX packets 0  bytes 0 (0.0 B)
        TX errors 0  dropped 0 overruns 0  carrier 0  collisions 0

ens33: flags=4163<UP,BROADCAST,RUNNING,MULTICAST>  mtu 1500
        inet 192.168.178.128  netmask 255.255.255.0  broadcast 192.168.178.255
        inet6 fe80::20c:29ff:fe7e:376c  prefixlen 64  scopeid 0x20<link>
        ether 00:0c:29:7e:37:6c  txqueuelen 1000  (Ethernet)
        RX packets 2810  bytes 442446 (442.4 KB)
        RX errors 0  dropped 0  overruns 0  frame 0
        TX packets 482  bytes 72889 (72.8 KB)
        TX errors 0  dropped 0 overruns 0  carrier 0  collisions 0

lo: flags=73<UP,LOOPBACK,RUNNING>  mtu 65536
        inet 127.0.0.1  netmask 255.0.0.0
        inet6 ::1  prefixlen 128  scopeid 0x10<host>
        loop  txqueuelen 1000  (Local Loopback)
        RX packets 170  bytes 12096 (12.0 KB)
        RX errors 0  dropped 0  overruns 0  frame 0
        TX packets 170  bytes 12096 (12.0 KB)
        TX errors 0  dropped 0 overruns 0  carrier 0  collisions 0

root@ubuntu-master:~#


root@ubuntu-master:~# ifconfig | grep inet
        inet 172.17.0.1  netmask 255.255.0.0  broadcast 172.17.255.255
        inet 192.168.178.128  netmask 255.255.255.0  broadcast 192.168.178.255
        inet6 fe80::20c:29ff:fe7e:376c  prefixlen 64  scopeid 0x20<link>
        inet 127.0.0.1  netmask 255.0.0.0
        inet6 ::1  prefixlen 128  scopeid 0x10<host>
root@ubuntu-master:~#
root@ubuntu-master:~# ifconfig | grep "inet 192"
        inet 192.168.178.128  netmask 255.255.255.0  broadcast 192.168.178.255
root@ubuntu-master:~#


通过 'inet' 参数解释:
'lo'  本地回环地址	127.0.0.1
'ens33'  虚拟机的网卡 IP 地址	192.168.178.128
'docker0'	docker 网卡地址    172.17.0.1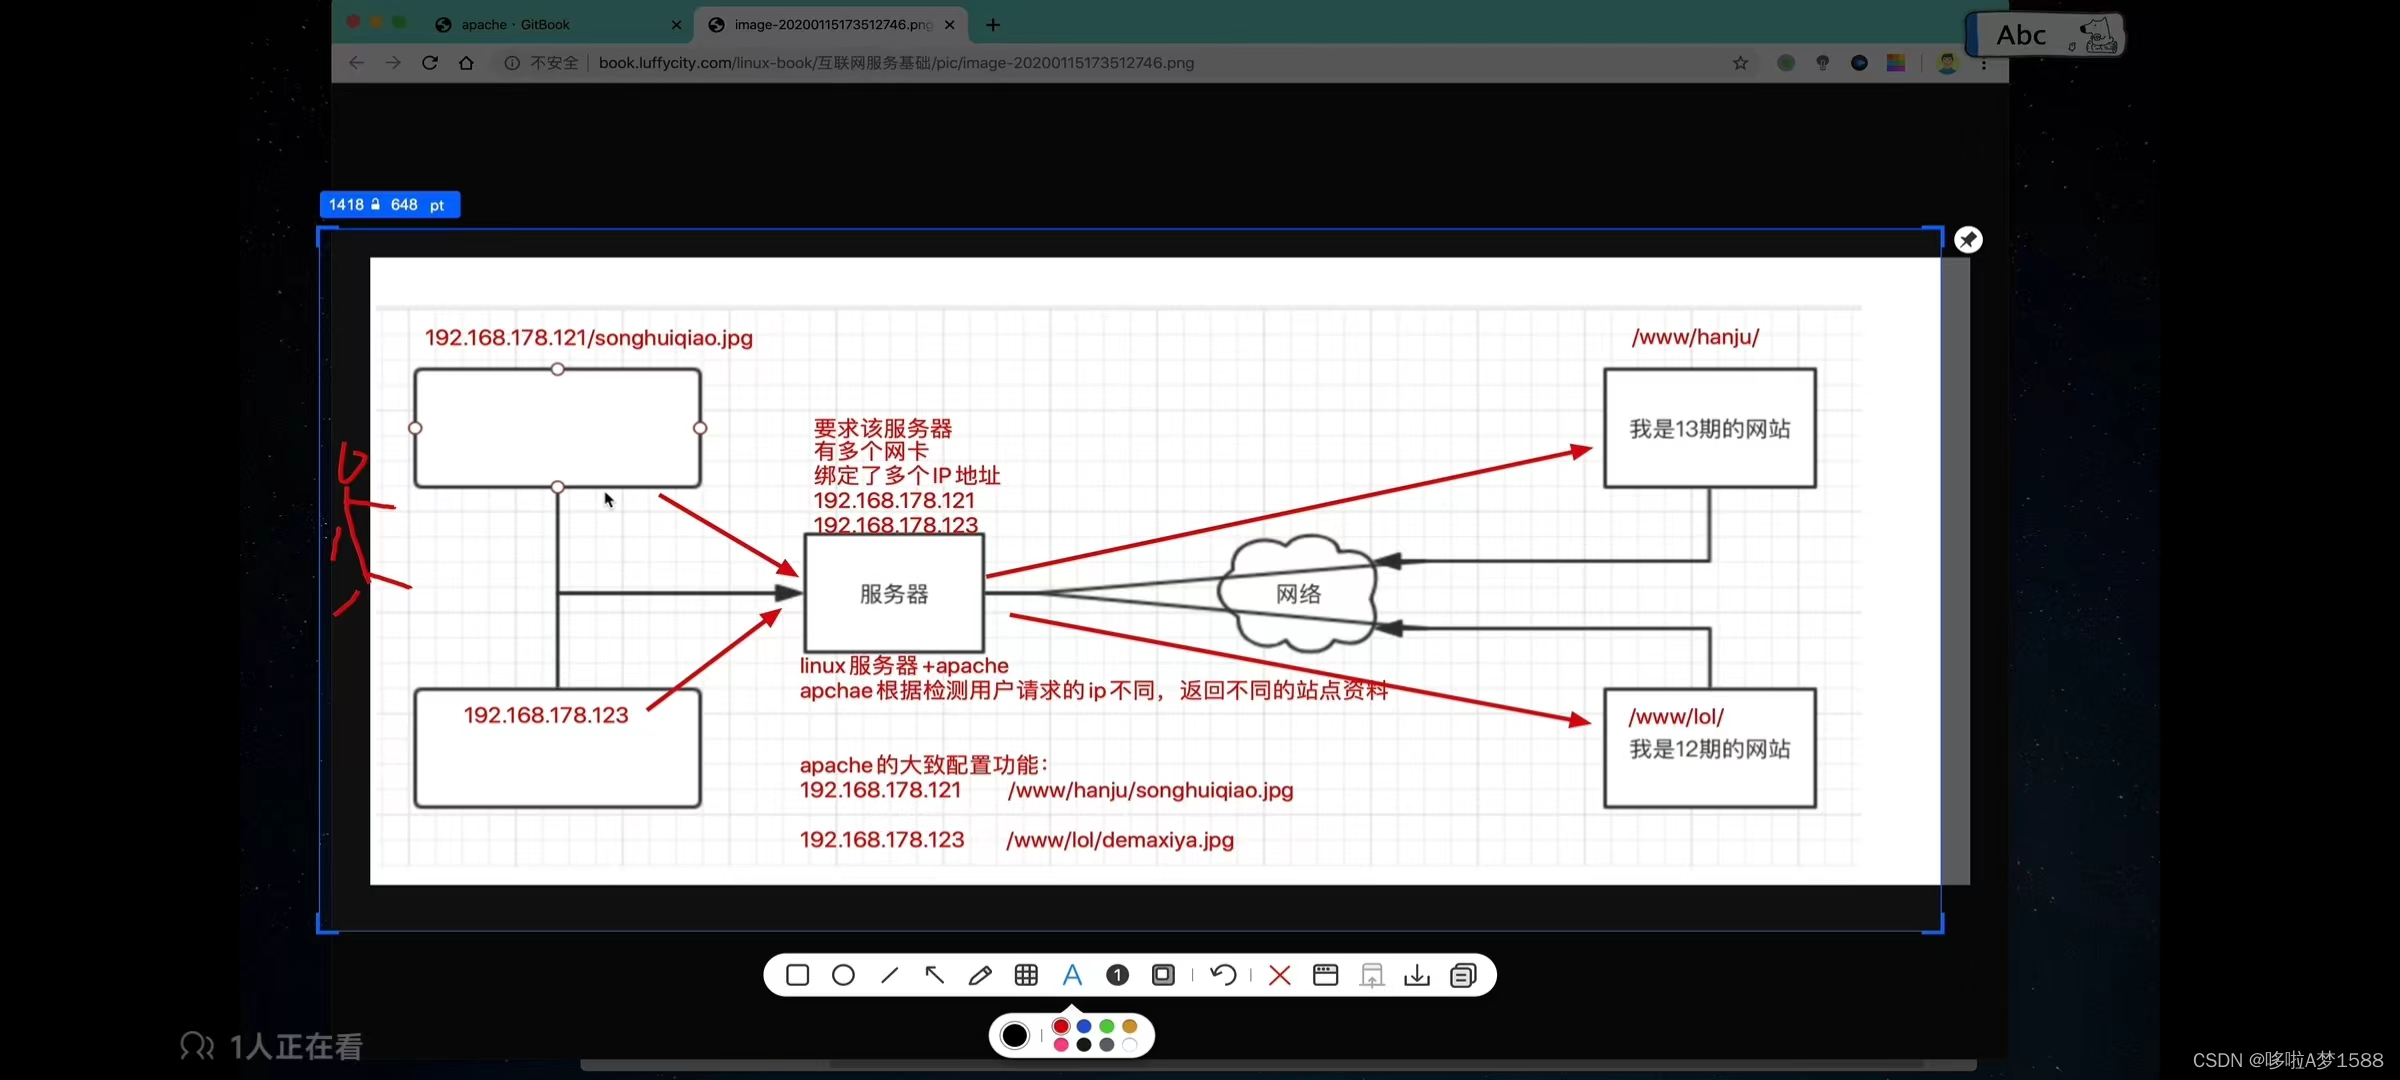
1.给 linux 服务器绑定多个 IP
root@ubuntu-master:~# ifconfig | grep "inet 192"
        inet 192.168.178.128  netmask 255.255.255.0  broadcast 192.168.178.255
root@ubuntu-master:~#

 # 给服务器添加两个 ip 地址
 ip address add 192.168.178.150/24 dev ens33
 ip add 192.168.178.151

'/24' 代表24位的子网掩码
'dev' 代表指定哪个设备

# 临时添加 IP 地址命令如下,要想永久生效,得修改网卡配置文件
root@ubuntu-master:~# ip address add 192.168.178.150/24 dev ens33
root@ubuntu-master:~# ip address add 192.168.178.151/24 dev ens33
root@ubuntu-master:~#

# 再次查看服务器的 ip 信息
ip address | grep "inet 192"
root@ubuntu-master:~# ip address | grep "inet 192"
    inet 192.168.178.128/24 metric 100 brd 192.168.178.255 scope global dynamic ens33
    inet 192.168.178.150/24 scope global secondary ens33
    inet 192.168.178.151/24 scope global secondary ens33
root@ubuntu-master:~#


# 测试 IP 是否绑定成功
C:\Users\Administrator>ping 192.168.178.128

正在 Ping 192.168.178.128 具有 32 字节的数据:
来自 192.168.178.128 的回复: 字节=32 时间<1ms TTL=64
来自 192.168.178.128 的回复: 字节=32 时间=1ms TTL=64
来自 192.168.178.128 的回复: 字节=32 时间<1ms TTL=64
来自 192.168.178.128 的回复: 字节=32 时间<1ms TTL=64

192.168.178.128 的 Ping 统计信息:
    数据包: 已发送 = 4,已接收 = 4,丢失 = 0 (0% 丢失),
往返行程的估计时间(以毫秒为单位):
    最短 = 0ms,最长 = 1ms,平均 = 0ms

C:\Users\Administrator>ping 192.168.178.150

正在 Ping 192.168.178.150 具有 32 字节的数据:
来自 192.168.178.150 的回复: 字节=32 时间<1ms TTL=64
来自 192.168.178.150 的回复: 字节=32 时间<1ms TTL=64
来自 192.168.178.150 的回复: 字节=32 时间<1ms TTL=64
来自 192.168.178.150 的回复: 字节=32 时间<1ms TTL=64

192.168.178.150 的 Ping 统计信息:
    数据包: 已发送 = 4,已接收 = 4,丢失 = 0 (0% 丢失),
往返行程的估计时间(以毫秒为单位):
    最短 = 0ms,最长 = 0ms,平均 = 0ms

C:\Users\Administrator>ping 192.168.178.151

正在 Ping 192.168.178.151 具有 32 字节的数据:
来自 192.168.178.151 的回复: 字节=32 时间<1ms TTL=64
来自 192.168.178.151 的回复: 字节=32 时间<1ms TTL=64
来自 192.168.178.151 的回复: 字节=32 时间<1ms TTL=64
来自 192.168.178.151 的回复: 字节=32 时间=1ms TTL=64

192.168.178.151 的 Ping 统计信息:
    数据包: 已发送 = 4,已接收 = 4,丢失 = 0 (0% 丢失),
往返行程的估计时间(以毫秒为单位):
    最短 = 0ms,最长 = 1ms,平均 = 0ms

C:\Users\Administrator>

 以上表示已经成功绑定 192.168.178.150 192.168.178.151 这两个IP


# 针对三个不同的 ip 地址,做一个域名的解析关系
# 在 hosts 文件中,添加如下对应的解析关系(注意是在客户端添加)
1. # linux 平台
vim /etc/hosts		(这是 linux 客户端)

2. # 如果是 windows 平台,自行搜索 hosts 文件绝对路径
C:\Windows\System32\drivers\etc\hosts 	(这是 windows 客户端)
用记事本或者其他编辑器打开,把下面三行添加到 hosts 文件末尾

3. # macos 平台
vim /etc/hosts		(macos 平台,直接编辑 /etc/hosts 文件即可)


# 超哥的讲课电脑,是 macos,因此修改 hosts 文件配置如下:
vim /etc/hosts
tail -4 /etc/hosts
192.168.178.150		www.cchanju.com
192.168.178.151		www.cclol.com
192.168.178.128		www.ccdnf.com


# 在客户端本地的 hosts 文件中,添加如下对应 域名-IP 的对应共享
在 linux 服务器上添加多个站点资料
192.168.178.150		/www/hanju/
192.168.178.151		/www/lol/
192.168.178.128		/www/dnf/

当用户访问 192.168.178.150 ,我们就让他看到 /www/hanju/ 站点内容
当用户访问 192.168.178.151 ,我们就让他看到 /www/lol/ 站点内容
当用户访问 192.168.178.128 ,我们就让他看到 /www/dnf/ 站点内容


# 创建三个站点的目录
mkdir -p /www/{hanju,lol,dnf}

root@ubuntu-master:~# mkdir -p /www/{hanju,lol,dnf}
root@ubuntu-master:~#

# 查看站点目录
root@ubuntu-master:~# tree /www
/www
├── dnf
├── hanju
└── lol

3 directories, 0 files
root@ubuntu-master:~#


# 分别创建三个站点的首页文件, index.html
vim /www/dnf/index.html
vim /www/lol/index.html
vim /www/hanju/index.html


root@ubuntu-master:~# vim /www/hanju/index.html
root@ubuntu-master:~# cat /www/hanju/index.html
<meta charset=utf-8>
我是来自于 192.168.178.150 的 hanju 站点,您好,兄弟
root@ubuntu-master:~#


root@ubuntu-master:~# vim /www/lol/index.html
root@ubuntu-master:~# cat /www/lol/index.html
<meta charset=utf-8>
我是来自于 192.168.178.151 的 lol 站点,您好,兄弟
root@ubuntu-master:~#


root@ubuntu-master:~# vim /www/dnf/index.html
root@ubuntu-master:~# cat /www/dnf/index.html
<meta charset=utf-8>
我是来自于 192.168.178.128 的 dnf 站点,您好,兄弟
root@ubuntu-master:~#

apache 配置中默认找的首页文件是 index.html
配置 apache 的主配置文件,定义多个虚拟主机(关键点来了)
1. 编辑 vim /etc/httpd/conf/http.conf		(centos)
	    vim /etc/apache2/apache2.conf		(ubuntu)
# 在 最底行添加如下的配置


root@ubuntu-master:~# vim /etc/httpd/conf/http.conf
<VirtualHost 192.168.178.150>
DocumentRoot "/www/hanju/"
ServerName "www.cchanju.com"
<Directory "/www/hanju/" >
AllowOverride None
Require all granted
</Directory>
</VirtualHost>

<VirtualHost 192.168.178.151>
DocumentRoot "/www/lol/"
ServerName "www.cclol.com"
<Directory "/www/lol/" >
AllowOverride None
Require all granted
</Directory>
</VirtualHost>


<VirtualHost 192.168.178.128>
DocumentRoot "/www/dnf/"
ServerName "www.ccdnf.com"
<Directory "/www/dnf/" >
AllowOverride None
Require all granted
</Directory>
</VirtualHost>


192.168.178.150		www.cchanju.com
192.168.178.151		www.cclol.com
192.168.178.128		www.ccdnf.com

192.168.178.150		/www/hanju/
192.168.178.151		/www/lol/
192.168.178.128		/www/dnf/
-------------------------------

# 配置解释说明
<VirtualHost 192.168.178.150>	# 标签 含义
# VirtualHost 定义虚拟主机的配置参数
# <VirtualHost></VirtualHost>  此标签内表示第一个虚你主机的配置
DocumentRoot "/www/hanju/"	# 定义虚拟主机访问站点的根目录	定义网页根目录
ServerName "www.cchanju.com"
# 'ServerName' 定义虚拟主机匹配的域名
<Directory "/www/hanju/" >
# 设置目录属性 访问 '/www/hanju/'
AllowOverride None		# 允许任何人访问
Require all granted		# 允许任何人访问
Order allow,deny		# 拒绝所有人访问
Allow from 192.168.178.0/24 # 只允许该局域网的人可以访问
</Directory>
</VirtualHost>


root@ubuntu-master:~# cat /etc/sysctl.conf
重启 apache 服务 httpd 或者 apache2 加载配置
# 重启没有任何提示表示 apache 配置正确

# centos  apache 服务为 httpd
systemctl restart httpd

# ubuntu  apache 服务为 apache2
systemctl restart apache2
此时模拟用户访问,使用客户端去访问 apache 服务器
第一个虚拟主机
请求 URL: http://www.cclol.cn:80/index.html
域名: www.cclol.cn	(是因为在本地 hosts 文件做了解析)
IP : 192.168.178.160


linux 服务器
安装 apache
配置了多虚拟主机

虚拟主机1: IP : 192.168.178.160
/www/lol/index.html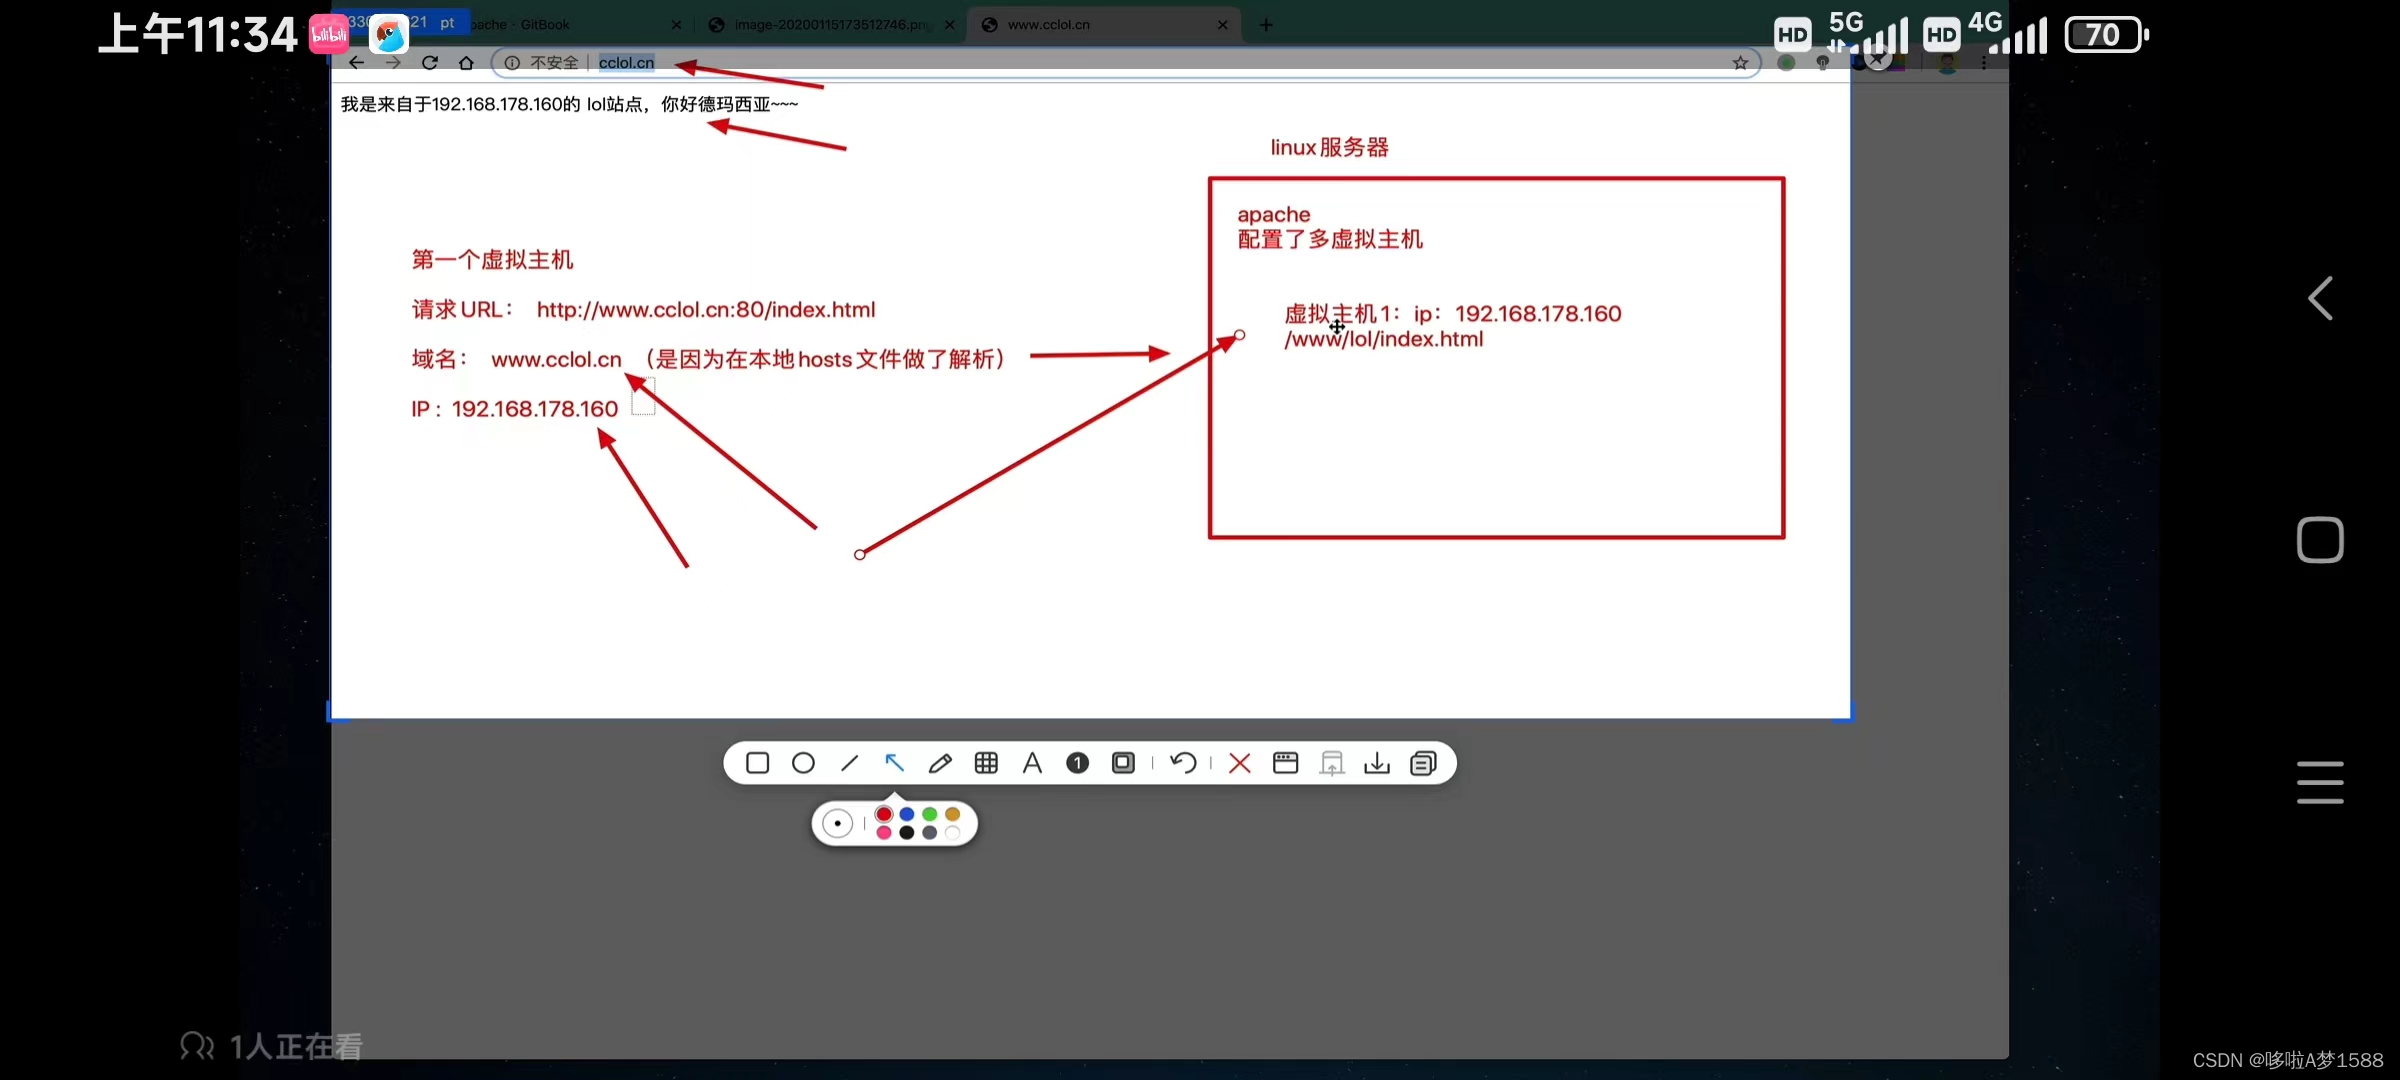
访问第二个虚拟主机
www.ccgnf.com
总结:
我们配置了 apache 的多虚拟主机功能 在 httpd.conf 中定义了2个虚拟主机 基于多域名+多IP的虚拟主机访问 一个是返回 /www/lol/index.html 访问方式是 www.cclol.cn 访问 IP 地址也可以 一个是返回 /www/dnf/index.html 访问方式是 www.ccdnf.cn 访问 IP 地址也可以
Apache 限制访问与 access 日志
资源限制访问
当我们有部分资源部希望被别人访问的时候,可以通过参数拒绝资源目录被访问
[案例]
拒绝其他人访问站点资源
http://192.168.178.189:90/
Apache 设置站点访问权限
1.直接修改 apache 配置文件,针对一个虚拟主机去修改访问的权限
编辑 vim /etc/httpd/conf/http.conf		(centos)
	    vim /etc/apache2/apache2.conf		(ubuntu)

root@ubuntu-master:~# vim /etc/apache2/apache2.conf
root@ubuntu-master:~# tail -13 /etc/apache2/apache2.conf

<VirtualHost 192.168.178.128>
DocumentRoot "/www/dnf/"
ServerName "www.ccdnf.com"
<Directory "/www/dnf/" >
AllowOverride None		# 允许所有人访问
Require all granted		# 允许所有人访问
# 针对虚拟主机站点,进行访问控制,可以控制单个 ip 地址,也可以控制整个网段的访问
# Order allow,deny		# 拒绝所有人访问
# Allow from 192.168.178.0/24	# 允许该局域网段的机器访问
</Directory>
</VirtualHost>


root@ubuntu-master:~#
定义访客日志格式
有时候我们需要定制 apache 默认显示的日志格式,增加或减少日志记录的内容,更好的让运维人员掌握用户访问信息。
并且日志可能会给系统造成大量的 IO 操作,造成较多的负担,如果关闭日志功能,甚至可能提高40%的性能,那当然是不能关闭,而是调整日志级别
查看 httpd 配置文件
ErrorLog "logs/error_log" # 错误日志存放位置
日志级别
# LogLevel: Control the number of messages logged to the error_log,
# Possible Values include: debug,info,notice,warn,error,crit,alert,emerg.
logLevel warn

# 解释
emerg 紧急-系统无法使用。"Child cannot open lock file,Exiting"
alert 必须立即采取措施。"getpwuid: couldn't determine user name from uid"
crit  致命情况	"socket: Failed to get a socket,exiting child"
error 错误情况 "Premature end of script headers"
warn 警告情况	"child process 1234 did not exit,sending anther"
notice 一般重要情况 "httpd: caught SIGBUS,attempting to dump core in,"
info 普通信息	"Server seems busy,(you may need to increase StarServer)"
debug 出错级别信息 "Opening config file ..."
日志格式
root@ubuntu-master:/var/log/apache2# pwd
/var/log/apache2


root@ubuntu-master:/var/log/apache2# tail -f access.log

192.168.178.1 --[10/Apr/2020:16:00:56 +0800] "GET / HTTP/1.1" 304 - "-" "Mozilla/5.0(Macintosh;Intel Mac os x 1-_15_3) AppleWebKit/537.36 (KHTML,like Gecko) Chrome/80.0.3987.163 Safari/537.36"

192.168.178.1 --[10/Apr/2020:16:01:21 +0800] "GET / HTTP/1.1" 200 89 "-" "curl/7.64.1"

# 日志解释
'192.168.178.1' 客户端的 IP 地址(公网IP)
'--' 远程用户名
'[10/Apr/2020:16:00:56 +0800]'  用户访问的标准时间
'GET / HTTP/1.1'  用户请求首行头信息
'304'  重定向状态码
' - "-" "Mozilla/5.0(Macintosh;Intel Mac os x 1-_15_3) AppleWebKit/537.36 (KHTML,like Gecko) Chrome/80.0.3987.163 Safari/537.36" '   客户端请求信息


'200' 	请求成功状态码
'89'    请求体大小
'curl/7.64.1' 客户端发来的信息
Apache状态页与ab命令
对于运维人员来说,需要实时监控 httpd 实时运行情况,负载情况,连接数等,能够更好的掌握服务器情况,需要在编译安装 apache 的时候,开启 mod_status 模块
apache 状态监测功能
1.修改配置文件
	编辑 vim /etc/httpd/conf/http.conf		(centos)
	    vim /etc/apache2/apache2.conf		(ubuntu)


2. 添加状态参数如下:
/etc/httpd/conf/httpd.conf 配置文件中添加状态参数
<Location /server-status>
SetHandler server-status
<RequireAll>
Require ip 192.168.178.0/24
</RequireAll>
</Location>


状态参数解释:
# 设置状态页的功能,当用户访问 192.168.178.121/server-status 就可以看到 apache 的状态页
<Location /server-status>
SetHandler server-status
<RequireAll>
Require ip 192.168.178.0/24		# 局域网的用户可以查看状态页面
</RequireAll>
</Location>

3.访问 apache 状态页面
192.168.178.121/server-status 就可以看到 apache 的状态页

重启 httpd
访问状态页路径
http://192.168.178.191/server-status
http://192.168.178.128:85/server-status


root@ubuntu-master:~# tail -6 /etc/apache2/apache2.conf
<Location /server-status>
SetHandler server-status
<RequireAll>
Require ip 192.168.178.0/24
</RequireAll>
</Location>
root@ubuntu-master:~#


http://192.168.178.128:85/server-status
Apache Server Status for 192.168.178.128 (via 192.168.178.128)
Server Version: Apache/2.4.52 (Ubuntu)		# apache 服务器版本
Server MPM: event						# mpm 工作模式
Server Built: 2024-04-10T17:45:18		# 服务器安装时间
Current Time: Sunday, 12-May-2024 12:09:33 UTC		# 目前系统时间
Restart Time: Sunday, 12-May-2024 12:08:47 UTC		# apache 重启时间
Parent Server Config. Generation: 1		# Apache 父进程 接收到 SIGHUP 重启的次数
Parent Server MPM Generation: 0
Server uptime: 45 seconds		# Apache 启动运行的时间
Server load: 0.20 0.22 0.25		# 系统平均负载
Total accesses: 0 - Total Traffic: 0 kB - Total Duration: 0	# Apache 总共传输的数据量
CPU Usage: u0 s0 cu0 cs0		# CPU 使用情况
0 requests/sec - 0 B/second
1 requests currently being processed, 49 idle workers	# 状态解释
Slot	PID	Stopping	Connections	Threads	Async connections
total	accepting	busy	idle	writing	keep-alive	closing
0	1799	no	0	yes	0	25	0	0	0
1	1800	no	0	yes	1	24	0	0	0
Sum	2	0	0	 	1	49	0	0	0
_______________________________________W__________..............
................................................................
......................
Scoreboard Key:
"_" Waiting for Connection, 	# 等待连接
"S" Starting up,		# 启动中
"R" Reading Request,	# 重读请求
"W" Sending Reply, 		# 发出回应
"K" Keepalive (read), 	# 保持连接
"D" DNS Lookup,			# 查找 DNS 中
"C" Closing connection, 	# 关闭连接
"L" Logging, 	#
"G" Gracefully finishing,	# 正常进程结束
"I" Idle cleanup of worker,	# 清理进程
"." Open slot with no current process	# 没有进程
Srv	PID	Acc	M	CPU	SS	Req	Dur	Conn	Child	Slot	Client	Protocol	VHost	Request
1-0	1800	1/0/0	W	0.00	0	0	0	0.0	0.00	0.00	192.168.178.1	http/1.1	www.ccdnf.com:85	GET /server-status HTTP/1.1
Srv	Child Server number - generation	# 子进程编号
PID	OS process ID		# 本进程ID
Acc	Number of accesses this connection / this child / this slot	# 连接次数
M	Mode of operation		# 目前进程状态
CPU	CPU usage, number of seconds	# CPU 消耗
SS	Seconds since beginning of most recent request	# SS距离上次请求需要的时间
Req	Milliseconds required to process most recent request	# 最后一次请求的耗时
Dur	Sum of milliseconds required to process all requests	#
Conn	Kilobytes transferred this connection		# Conn本次连接传送的数据量
Child	Megabytes transferred this child		# Child 子进程传送的数据量
Slot	Total megabytes transferred this slot	# Slot 传送的数据量
Apache/2.4.52 (Ubuntu) Server at 192.168.178.128 Port 85
[针对 apache 进行压力测试]
使用 Apache 自带的压力测试工具,给服务器发送大量的请求
1.使用 ab 命令


2.可能需要单独安装软件包
yum install httpd-tools -y		(centos)
apt install apache2-utils -y	(ubuntu)


3. 使用 ab 命令,给服务器并发的发送大量请求
# 给服务器发送100000个请求,100个并发数
ab -c 100 -n 100000 http://192.168.178.128:85/
http://192.168.178.128:85/index.html

'-c' 表示并发数量
'-n' 表示总共发送的次数
'-c 100 -n 100000' 表示100个人同时请求,一共发出100000个请求
root@ubuntu-master:~# ab -c 100 -n 100000 http://192.168.178.128:85/
This is ApacheBench, Version 2.3 <$Revision: 1879490 $>
Copyright 1996 Adam Twiss, Zeus Technology Ltd, http://www.zeustech.net/
Licensed to The Apache Software Foundation, http://www.apache.org/

Benchmarking 192.168.178.128 (be patient)
Completed 10000 requests
Completed 20000 requests
Completed 30000 requests
Completed 40000 requests
Completed 50000 requests
Completed 60000 requests
Completed 70000 requests
Completed 80000 requests
Completed 90000 requests
Completed 100000 requests
Finished 100000 requests


Server Software:        Apache/2.4.52
Server Hostname:        192.168.178.128
Server Port:            85

Document Path:          /
Document Length:        84 bytes

Concurrency Level:      100
Time taken for tests:   13.578 seconds
Complete requests:      100000
Failed requests:        0
Total transferred:      36800000 bytes
HTML transferred:       8400000 bytes
Requests per second:    7365.03 [#/sec] (mean)
Time per request:       13.578 [ms] (mean)
Time per request:       0.136 [ms] (mean, across all concurrent requests)
Transfer rate:          2646.81 [Kbytes/sec] received

Connection Times (ms)
              min  mean[+/-sd] median   max
Connect:        0    0   0.2      0       9
Processing:     4   13   2.3     13      80
Waiting:        2   13   2.1     13      50
Total:          7   14   2.4     13      80

Percentage of the requests served within a certain time (ms)
  50%     13
  66%     14
  75%     14
  80%     15
  90%     15
  95%     16
  98%     18
  99%     20
 100%     80 (longest request)
root@ubuntu-master:~#

# 统计发送几次
root@ubuntu-master:~# ps -ef | grep apache2 | wc -l
5


root@ubuntu-master:~# ab -c 100 -n 10000 http://192.168.178.128:85/
ab: wrong number of arguments
Usage: ab [options] [http[s]://]hostname[:port]/path
Options are:
    -n requests     Number of requests to perform
    -c concurrency  Number of multiple requests to make at a time
    -t timelimit    Seconds to max. to spend on benchmarking
                    This implies -n 50000
    -s timeout      Seconds to max. wait for each response
                    Default is 30 seconds
    -b windowsize   Size of TCP send/receive buffer, in bytes
    -B address      Address to bind to when making outgoing connections
    -p postfile     File containing data to POST. Remember also to set -T
    -u putfile      File containing data to PUT. Remember also to set -T
    -T content-type Content-type header to use for POST/PUT data, eg.
                    'application/x-www-form-urlencoded'
                    Default is 'text/plain'
    -v verbosity    How much troubleshooting info to print
    -w              Print out results in HTML tables
    -i              Use HEAD instead of GET
    -x attributes   String to insert as table attributes
    -y attributes   String to insert as tr attributes
    -z attributes   String to insert as td or th attributes
    -C attribute    Add cookie, eg. 'Apache=1234'. (repeatable)
    -H attribute    Add Arbitrary header line, eg. 'Accept-Encoding: gzip'
                    Inserted after all normal header lines. (repeatable)
    -A attribute    Add Basic WWW Authentication, the attributes
                    are a colon separated username and password.
    -P attribute    Add Basic Proxy Authentication, the attributes
                    are a colon separated username and password.
    -X proxy:port   Proxyserver and port number to use
    -V              Print version number and exit
    -k              Use HTTP KeepAlive feature
    -d              Do not show percentiles served table.
    -S              Do not show confidence estimators and warnings.
    -q              Do not show progress when doing more than 150 requests
    -l              Accept variable document length (use this for dynamic pages)
    -g filename     Output collected data to gnuplot format file.
    -e filename     Output CSV file with percentages served
    -r              Don't exit on socket receive errors.
    -m method       Method name
    -h              Display usage information (this message)
    -I              Disable TLS Server Name Indication (SNI) extension
    -Z ciphersuite  Specify SSL/TLS cipher suite (See openssl ciphers)
    -f protocol     Specify SSL/TLS protocol
                    (SSL2, TLS1, TLS1.1, TLS1.2 or ALL)
    -E certfile     Specify optional client certificate chain and private key
root@ubuntu-master:~#
ab 命令常用参数
此外,我们再根据上面的用法介绍界面来详细了解每个参数选项的作用。

-n	即 requests ,用于指定压力测试总共的执行次数。
-c	即 concurrency,用于指定的并发数。
-t	即 timelimit, 等待响应的最大时间(单位:秒)
-b	即 windowssize, TCP发送/接收的缓存大小(单位:字节)。
-p	即 postfile, 发送 POST 请求时需要上传的文件,此外还必须设置 -T 参数.
-u	即 putfile, 发送 PUT 请求时需要上传的文件,此外还必须设置-T参数。
-T	即 content-type, 用于设置 Content-Type 请求头信息,例如:application/x-www-form-urlencoded,默认...
-v	即 verbosity, 指定打印帮助信息的冗余级别。
-w  以 HTML 表格形式打印结果。
-i  使用 HEAD 请求代替GET请求
-x  插入字符串作为 table 标签的属性。
-y  插入字符串作为 tr 标签的属性。
-z  插入字符串作为标签的属性。
-C  添加 cookie 信息,例如: "Apache=1234"(可以重复该参数选项以添加多个)。
-H  添加任意的请求头,例如:"Accept-Encoding: gzip",请求头将会添加在现有的多个请求头之后(可以重复该参数)
-A  添加一个基本的网络认证信息,用户名和密码之间用英文冒号隔开。
-P  添加一个基本的代理认证信息,用户名和密码之间用英文冒号隔开。
-X  指定使用的和端口号,例如:"126.10.10.3:88".
-V  打印版本号并退出。
-k  使用 HTTP 的 KeepAlive特性。
-d  不显示百分比。
-S  不显示预估和警告信息。
-g  输出结果信息到 gnuplot格式的文件中。
-e  输出结果信息到 CSV 格式的文件中。
-r  指定接收到错误信息时不退出程序。
-h  显示用法信息,其实就是 ab -help.
案例
root@ubuntu-master:~# ab -c 100 -n 100000 http://192.168.178.128:85/
This is ApacheBench, Version 2.3 <$Revision: 1879490 $>
Copyright 1996 Adam Twiss, Zeus Technology Ltd, http://www.zeustech.net/
Licensed to The Apache Software Foundation, http://www.apache.org/

Benchmarking 192.168.178.128 (be patient)
Completed 10000 requests
Completed 20000 requests
Completed 30000 requests
Completed 40000 requests
Completed 50000 requests
Completed 60000 requests
Completed 70000 requests
Completed 80000 requests
Completed 90000 requests
Completed 100000 requests
Finished 100000 requests


Server Software:        Apache/2.4.52
Server Hostname:        192.168.178.128
Server Port:            85

Document Path:          /
Document Length:        84 bytes

Concurrency Level:      100
Time taken for tests:   13.578 seconds
Complete requests:      100000
Failed requests:        0
Total transferred:      36800000 bytes
HTML transferred:       8400000 bytes
Requests per second:    7365.03 [#/sec] (mean)
Time per request:       13.578 [ms] (mean)
Time per request:       0.136 [ms] (mean, across all concurrent requests)
Transfer rate:          2646.81 [Kbytes/sec] received

Connection Times (ms)
              min  mean[+/-sd] median   max
Connect:        0    0   0.2      0       9
Processing:     4   13   2.3     13      80
Waiting:        2   13   2.1     13      50
Total:          7   14   2.4     13      80

Percentage of the requests served within a certain time (ms)
  50%     13
  66%     14
  75%     14
  80%     15
  90%     15
  95%     16
  98%     18
  99%     20
 100%     80 (longest request)
root@ubuntu-master:~#

root@ubuntu-master:~# ps -ef | grep apache2 | wc -l
5
root@ubuntu-master:~#
curl命令实践
curl命令
对于运维人员来说,这是一个非常好用的命令,可以用它发送各种各样的 http 指令以及还可以携带证书等等。高级功能,我们说的 curl 命令是基于 URL 语法,在命令行下工作的传输工具。可以把它当作浏览器去使用,支持多种协议,比如 FTP,HTTP,HTTPS(支持证书的https)等等,支持的参数也有很多。
-A/--user-agent <string>  # 设置用户代理发送给服务器
-b/--cookie <name=string/file>  cookie 字符串或文件读取位置
-c/--cookie-jar <file>  操作结束后把 cookie 写入到这个文件中
-C/--continue-at <offset>  断点续传
-D/--dump-header <file>  把 header 信息写入到该文件中
-e/--referer     来源网址
-f/--fail       连接失败时不显示 http 错误
-o/--output     把输出写到该文件中
-O/--remote-name  把输出写到该文件中,保留远程文件的文件名
-r/--range <range>  检索来自HTTP/1.1 或 FTP 服务器字节范围
-s/--silent     静音模式。不输出任何东西
-T/--upload-file <file>  上传文件
-u/--user <user[:password]>  设置服务器的用户和密码
-w/--write-out [format]  指定输出内容
-x/--proxy <host[:port]>  在给定的端口上使用 HTTP 代理
-#/--progress-bar     进度条显示当前的传送状态
1.curl命令保存网页 html 元素
root@ubuntu-master:~# curl 192.168.178.128:85
<meta charset=utf-8>
我是来自于 192.168.178.128 的 dnf 站点,您好,兄弟
root@ubuntu-master:~#


root@ubuntu-master:~# curl pythonav.cn > pythonav.html
  % Total    % Received % Xferd  Average Speed   Time    Time     Time  Current
                                 Dload  Upload   Total   Spent    Left  Speed
  0     0    0     0    0     0      0      0 --:--:-- --:--:-- --:--:--     0
root@ubuntu-master:~#

# 获取网页 html 元素

root@ubuntu-master:~# curl www.ccdnf.com > /tmp/index.html
  % Total    % Received % Xferd  Average Speed   Time    Time     Time  Current
                                 Dload  Upload   Total   Spent    Left  Speed
100 10671  100 10671    0     0   257k      0 --:--:-- --:--:-- --:--:--  254k
root@ubuntu-master:~# cat /tmp/index.html
2. 利用参数,直接保存网页
同于第一条命令,-o 参数,指定保存文件的名字
curl -o /tmp/test.html www.taobao.com
root@ubuntu-master:~# curl -o /tmp/test.html www.taobao.com
% Total % Received % Xferd Average Speed Time Time Time Current
Dload Upload Total Spent Left Speed
100 262 100 262 0 0 4193 0 --:--:-- --:--:-- --:--:-- 4225
root@ubuntu-master:~# cat /tmp/test.html
<!DOCTYPE HTML PUBLIC "-//IETF//DTD HTML 2.0//EN">
<html>
<head><title>301 Moved Permanently</title></head>
<body>
<h1>301 Moved Permanently</h1>
<p>The requested resource has been assigned a new permanent URI.</p>
<hr/>Powered by Tengine</body>
</html>
root@ubuntu-master:~#
root@ubuntu-master:~# curl -o /tmp/luffy.ntml www.ccdnf.com
% Total % Received % Xferd Average Speed Time Time Time Current
Dload Upload Total Spent Left Speed
100 10671 100 10671 0 0 7719k 0 --:--:-- --:--:-- --:--:-- 10.1M
root@ubuntu-master:~#
curl -o /tmp/test.html www.pythonav.cn
root@ubuntu-master:~# curl -o /tmp/test.html www.pythonav.cn
% Total % Received % Xferd Average Speed Time Time Time Current
Dload Upload Total Spent Left Speed
100 803 100 803 0 0 3396 0 --:--:-- --:--:-- --:--:-- 3388
vim /tmp/test.html
root@ubuntu-master:~# vim /tmp/test.html
root@ubuntu-master:~# cat /tmp/test.html
<html xmlns="http://www.w3.org/1999/xhtml">
<head>
<script>document.title='▒▒▒▒˻Ե▒▒▒▒▒▒▒˾';</script>
<meta http-equiv="Content-Type" content="text/html; charset=gb2312" />
<script>
(function(){
var bp = document.createElement('script');
var curProtocol = window.location.protocol.split(':')[0];
if (curProtocol === 'https') {
bp.src = 'https://zz.bdstatic.com/linksubmit/push.js';
}
else {
bp.src = 'http://push.zhanzhang.baidu.com/push.js';
}
var s = document.getElementsByTagName("script")[0];
s.parentNode.insertBefore(bp, s);
})();
</script>
</head>
<script language="javascript" type="text/javascript" src="/common.js"></script>
<script language="javascript" type="text/javascript" src="/tj.js"></script>
</body>
</html>
root@ubuntu-master:~#
--------------------
<meta charset=utf-8>
<script src="https://cdnjs.cloudflare.com/ajax/libs/p5.js/0.5.11/p5.min.js"></script>
<script src="https://cdnjs.cloudflare.com/ajax/libs/matter-js/0.12.0/matter.min.js"></script>
<h3>小键盘方向控制</h3>
<h3>博客园地址 <a href="https://cnblogs.com/pyyu"> https://cnblogs.com/pyyu<</a></h3>
<h3>博客园地址 <a href="https://www.bilibili.com/video/av91733741/">b站教你7天快速掌握 linux 部署 https://www.bilibili.com/video/av91733741/ </a></h3>
<a href="https://cnblogs.com/pyyu<"></a>
<style>
html {
backgroup: #ccc;
}
canvas {
position: absolute;
top: 350;
bottom: 0;
left: 0;
right: 0;
}3. 测试页面返回值 测试网页是否存活
-o 把网页内容输出到指定的文件中
-s 不输出页面内容 静默输出
-w 指定 curl 结束后输出的内容
'http_code' 网页状态码
'%' 取值
curl -o /dev/null -s -w %{http_code} www.pythonav.cn

# 成功 返回 200
root@ubuntu-master:~# curl -o /dev/null -s -w %{http_code} www.pythonav.cn
200
root@ubuntu-master:~#

# 不存在 返回 000
root@ubuntu-master:~# curl -o /dev/null -s -w %{http_code} www.pythonav.cnww
000
root@ubuntu-master:~#

root@ubuntu-master:~# curl -o /dev/null -s -w %{http_code} 192.168.222.128:85
200
root@ubuntu-master:~#

root@ubuntu-master:~# echo $?  # 取出上次命令执行的结果 '0' 成功执行  '2 或者 随机数' 执行失败
0

root@ubuntu-master:~# echo $?
0
root@ubuntu-master:~# ls /
bin  boot  cdrom  dev  etc  home  lib  lib32  lib64  libx32  lost+found  media  mnt  opt  proc  root  run  sbin  snap  srv  swap.img  sys  tmp  usr  var  www
root@ubuntu-master:~# echo $?
0
root@ubuntu-master:~# ls /kop
ls: cannot access '/kop': No such file or directory
root@ubuntu-master:~# echo $?
2
root@ubuntu-master:~#


curl -o /dev/null -s -w %{http_code} www.ccdnf.com

root@ubuntu-master:~# curl -o /dev/null -s -w %{http_code} www.ccdnf.com
echo $? 查看上一条命令是否正确执行 为0 表示正确执行,也就是该网站是正常运行的;随机数 表示执行失败。
4. 利用curl, 保存站点 cookie,也就是客户端的身份验证
# 给网站发送 http 请求,并且获取 cookie 信息
root@ubuntu-master:~# curl -o /dev/null -s -c ./mycookie.txt www.jd.com
root@ubuntu-master:~# ls
1.7.5.tar.gz ftpusers index.html istio-1.21.1-linux-amd64.tar.gz linkerd-1.7.5 pythonav.html v0.8.0.tar.gz yueyang-cloud-main.tar.gz
cookiec.txt ftpusers.list istio-1.21.1 jd.html mycookie.txt snap yueyang-cloud-main
root@ubuntu-master:~# cat mycookie.txt
# Netscape HTTP Cookie File
# https://curl.se/docs/http-cookies.html
# This file was generated by libcurl! Edit at your own risk.
root@ubuntu-master:~#
curl -c ./mycookie.txt www.jd.com/
root@ubuntu-master:~# curl -c ./mycookie.txt www.jd.com/
<html>
<head><title>302 Found</title></head>
<body>
<center><h1>302 Found</h1></center>
<hr><center>nginx</center>
</body>
</html>
root@ubuntu-master:~# ls
1.7.5.tar.gz ftpusers index.html istio-1.21.1-linux-amd64.tar.gz linkerd-1.7.5 pythonav.html v0.8.0.tar.gz yueyang-cloud-main.tar.gz
cookiec.txt ftpusers.list istio-1.21.1 jd.html mycookie.txt snap yueyang-cloud-main
root@ubuntu-master:~# cat mycookie.txt
# Netscape HTTP Cookie File
# https://curl.se/docs/http-cookies.html
# This file was generated by libcurl! Edit at your own risk.
root@ubuntu-master:~#
curl -c cookiec.txt www.baidu.com
200root@ubuntu-master:curl -c cookiec.txt www.baidu.com
<!DOCTYPE html>
<!--STATUS OK--><html> <head><meta http-equiv=content-type content=text/html;charset=utf-8><meta http-equiv=X-UA-Compatible content=IE=Edge><meta content=always name=referrer><link rel=stylesheet type=text/css href=http://s1.bdstatic.com/r/www/cache/bdorz/baidu.min.css><title>百度一下,你就知道</title></head> <body link=#0000cc> <div id=wrapper> <div id=head> <div class=head_wrapper> <div class=s_form> <div class=s_form_wrapper> <div id=lg> <img hidefocus=true src=//www.baidu.com/img/bd_logo1.png width=270 height=129> </div> <form id=form name=f action=//www.baidu.com/s class=fm> <input type=hidden name=bdorz_come value=1> <input type=hidden name=ie value=utf-8> <input type=hidden name=f value=8> <input type=hidden name=rsv_bp value=1> <input type=hidden name=rsv_idx value=1> <input type=hidden name=tn value=baidu><span class="bg s_ipt_wr"><input id=kw name=wd class=s_ipt value maxlength=255 autocomplete=off autofocus></span><span class="bg s_btn_wr"><input type=submit id=su value=百度一下 class="bg s_btn"></span> </form> </div> </div> <div id=u1> <a href=http://news.baidu.com name=tj_trnews class=mnav>新闻</a> <a href=http://www.hao123.com name=tj_trhao123 class=mnav>hao123</a> <a href=http://map.baidu.com name=tj_trmap class=mnav>地图</a> <a href=http://v.baidu.com name=tj_trvideo class=mnav>视频</a> <a href=http://tieba.baidu.com name=tj_trtieba class=mnav>贴吧</a> <noscript> <a href=http://www.baidu.com/bdorz/login.gif?login&tpl=mn&u=http%3A%2F%2Fwww.baidu.com%2f%3fbdorz_come%3d1 name=tj_login class=lb>登录</a> </noscript> <script>document.write('<a href="http://www.baidu.com/bdorz/login.gif?login&tpl=mn&u='+ encodeURIComponent(window.location.href+ (window.location.search === "" ? "?" : "&")+ "bdorz_come=1")+ '" name="tj_login" class="lb">登录</a>');</script> <a href=//www.baidu.com/more/ name=tj_briicon class=bri style="display: block;">更多产品</a> </div> </div> </div> <div id=ftCon> <div id=ftConw> <p id=lh> <a href=http://home.baidu.com>关于百度</a> <a href=http://ir.baidu.com>About Baidu</a> </p> <p id=cp>©2017 Baidu <a href=http://www.baidu.com/duty/>使用百度前必读</a> <a href=http://jianyi.baidu.com/ class=cp-feedback>意见反馈</a> 京ICP证030173号 <img src=//www.baidu.com/img/gs.gif> </p> </div> </div> </div> </body> </html>
root@ubuntu-master:~#
root@ubuntu-master:~# cat cookiec.txt
# Netscape HTTP Cookie File
# https://curl.se/docs/http-cookies.html
# This file was generated by libcurl! Edit at your own risk.
.baidu.com TRUE / FALSE 1715645710 BDORZ 27315
root@ubuntu-master:~#
5.模拟客户端 利用 curl 命令,进行身份伪装,分别获取路飞的移动端页面和 pc 端页面。
伪装 user-agent
# 准备一个 pc端 伪装 user-agent 信息
Mozilla/5.0 (Windows NT 10.0; Win64; x64) AppleWebKit/537.36 (KHTML, like Gecko) Chrome/126.0.0.0 Safari/537.36

# 准备一个移动的客户端信息
Mozilla/5.0 (Linux; Android 6.0; Nexus 5 Build/MRA58N) AppleWebKit/537.36 (KHTML, like Gecko) Chrome/126.0.0.0 Mobile Safari/537.36

# 针对移动端伪装发出一个请求  (伪装)模拟移动端发请求
curl -A "Mozilla/5.0 (Linux; Android 6.0; Nexus 5 Build/MRA58N) AppleWebKit/537.36 (KHTML, like Gecko) Chrome/126.0.0.0 Mobile Safari/537.36"  www.luffycity.com

# 针对 PC 端伪装发出一个请求	(伪装)模拟PC端发请求
curl -A "Mozilla/5.0 (Windows NT 10.0; Win64; x64) AppleWebKit/537.36 (KHTML, like Gecko) Chrome/126.0.0.0 Safari/537.36"  www.luffycity.com


----------------------------

# 原本客户端地址
# 移动信息
Mozilla/5.0 (Linux; Android 6.0; Nexus 5 Build/MRA58N) AppleWebKit/537.36 (KHTML, like Gecko) Chrome/126.0.0.0 Mobile Safari/537.36

# PC端信息
Mozilla/5.0 (Windows NT 10.0; Win64; x64) AppleWebKit/537.36 (KHTML, like Gecko) Chrome/126.0.0.0 Safari/537.36

root@ubuntu-master:/var/log/apache2# tail -f access.log

192.168.178.1 --[10/Apr/2020:16:00:56 +0800] "GET / HTTP/1.1" 304 - "-" "Mozilla/5.0(Macintosh;Intel Mac os x 1-_15_3) AppleWebKit/537.36 (KHTML,like Gecko) Chrome/80.0.3987.163 Safari/537.36"

192.168.178.1 --[10/Apr/2020:16:01:21 +0800] "GET / HTTP/1.1" 200 89 "-" "curl/7.64.1"


root@ubuntu-master:~# ls /var/log/apache2/
access.log  error.log.1     error.log.3.gz  other_vhosts_access.log    other_vhosts_access.log.2.gz
error.log   error.log.2.gz  error.log.4.gz  other_vhosts_access.log.1
root@ubuntu-master:~# cat /var/log/apache2/access.log
root@ubuntu-master:~# cat /var/log/apache2/error.log
[Mon May 13 00:00:05.316204 2024] [mpm_event:notice] [pid 1544:tid 140338798749568] AH00489: Apache/2.4.52 (Ubuntu) configured -- resuming normal operations
[Mon May 13 00:00:05.316226 2024] [core:notice] [pid 1544:tid 140338798749568] AH00094: Command line: '/usr/sbin/apache2'
root@ubuntu-master:~#


tail -f /var/log/apache2/access.log
tail -f /var/log/apache2/error.log

See "systemctl status apache2.service" and "journalctl -xeu apache2.service" for details.
6. 下载资源 利用 curl 命令下载资源
-O 大写字母O参数,直接保存资源到本地,用源文件名
curl -O http://hcdn1.luffycity.com/static/frontend/public_class/PY1@2x_1566529821.1110113.png
7.断点续传
curl -O -C http://hcdn1.luffycity.com/static/frontend/public_class/PY1@2x_1566529821.1110113.png什么是LAMP
LAMP是公认的最常见,最古老的黄金Web技术栈
其实就是
Linux 操作系统
Apache/Nginx    Web服务器
MySQL/Mariadb
Perl/Php/Python
Linux
Linux 到底好在哪?用 Linux 本人的话说就是,普通老百姓用户,压根别说你是在 使用 操作系统,你需要的只是应用程序,而不是操作系统。
操作系统主要是提供给程序员 API,用于构建和运行应用的一个平台。
如果来说,你常用的应用在 linux 下运行的更好,更方便,那没问题。
但是如果你平时用的软件,都和 Linux 没什么关系,那你嘛必要选择 Linux
那当然作为运维人员,你可以一手使用 windows,一手使用 Linux,毕竟你的服务器运维工作,几乎都是 Linux 环境了。
Linux 系统主要是以开发者为中心,Windows 主要以消费者为中心这是本质的区别。
Linux 的特点是几乎所有的开发任务相关工具,都是很完善的支持,从底层的编译器,make 编译工具,到bash脚本,git代码管理,vim 编辑器,依赖管理工具等等都很齐全。
然而 Windows/Mac 的操作系统很少能完善这些开发工具的,Linux则是默认预装的开发环境。
LAMP介绍
如何去搭建一个网站? L 稳定的操作系统: linux A web 服务器: Apache 在最外层接收用户的请求,对用户的请求进行解析和响应。 M 数据库软件: MySQL 用户注册网站,可以上传自己的头像,发自己的帖子,或者说给别人评论等我产生的这些数据存在哪里?或者说如何存储产生的数据?我们在磁盘上以文件形式存储也是可以的,但是,他是不方便管理的,比如:学校去管理学生的档案信息,我们用一个文本文件去存储吗?那肯定不是,容易观看的数据我们会用表级数据,比如Excel等表去查看,MySQL就是一个表级数据结构, P 就是PHP,Perl,Python等编程语言,他用来做什么事情呢?Apache 在最外层,接收到用户的请求后,他能够判断用户想要做什么:比如:用户登录论坛,我只想上传一个头像,或者说我只想查看一张图片等,Apache 作为web服务器,他功能解析用户只想要一张图片,他直接从磁盘上读出来,你拿去吧。如果用户想上传一张图片,并且在上传图片之后,还得对他做备注,注释等,分辨率设置啦等,这样一个动态的功能,Apache 它就做不了啦?他就会把他转发给PHP,或者说 Python等编程语言去处理。编程语言都是程序员通过代码,对数据文件进行管控,进行各种协调,比如用户上传的图片,通过PHP或者说Python等编程语言处理完毕之后,他最终选择入库进行存储,PHP就能连接MySQL,数据最终存入 MySQL 里面。
LAMP架构介绍
Httpd PHP MySQL 三者如何工作
描述如下:LAMP工作流程
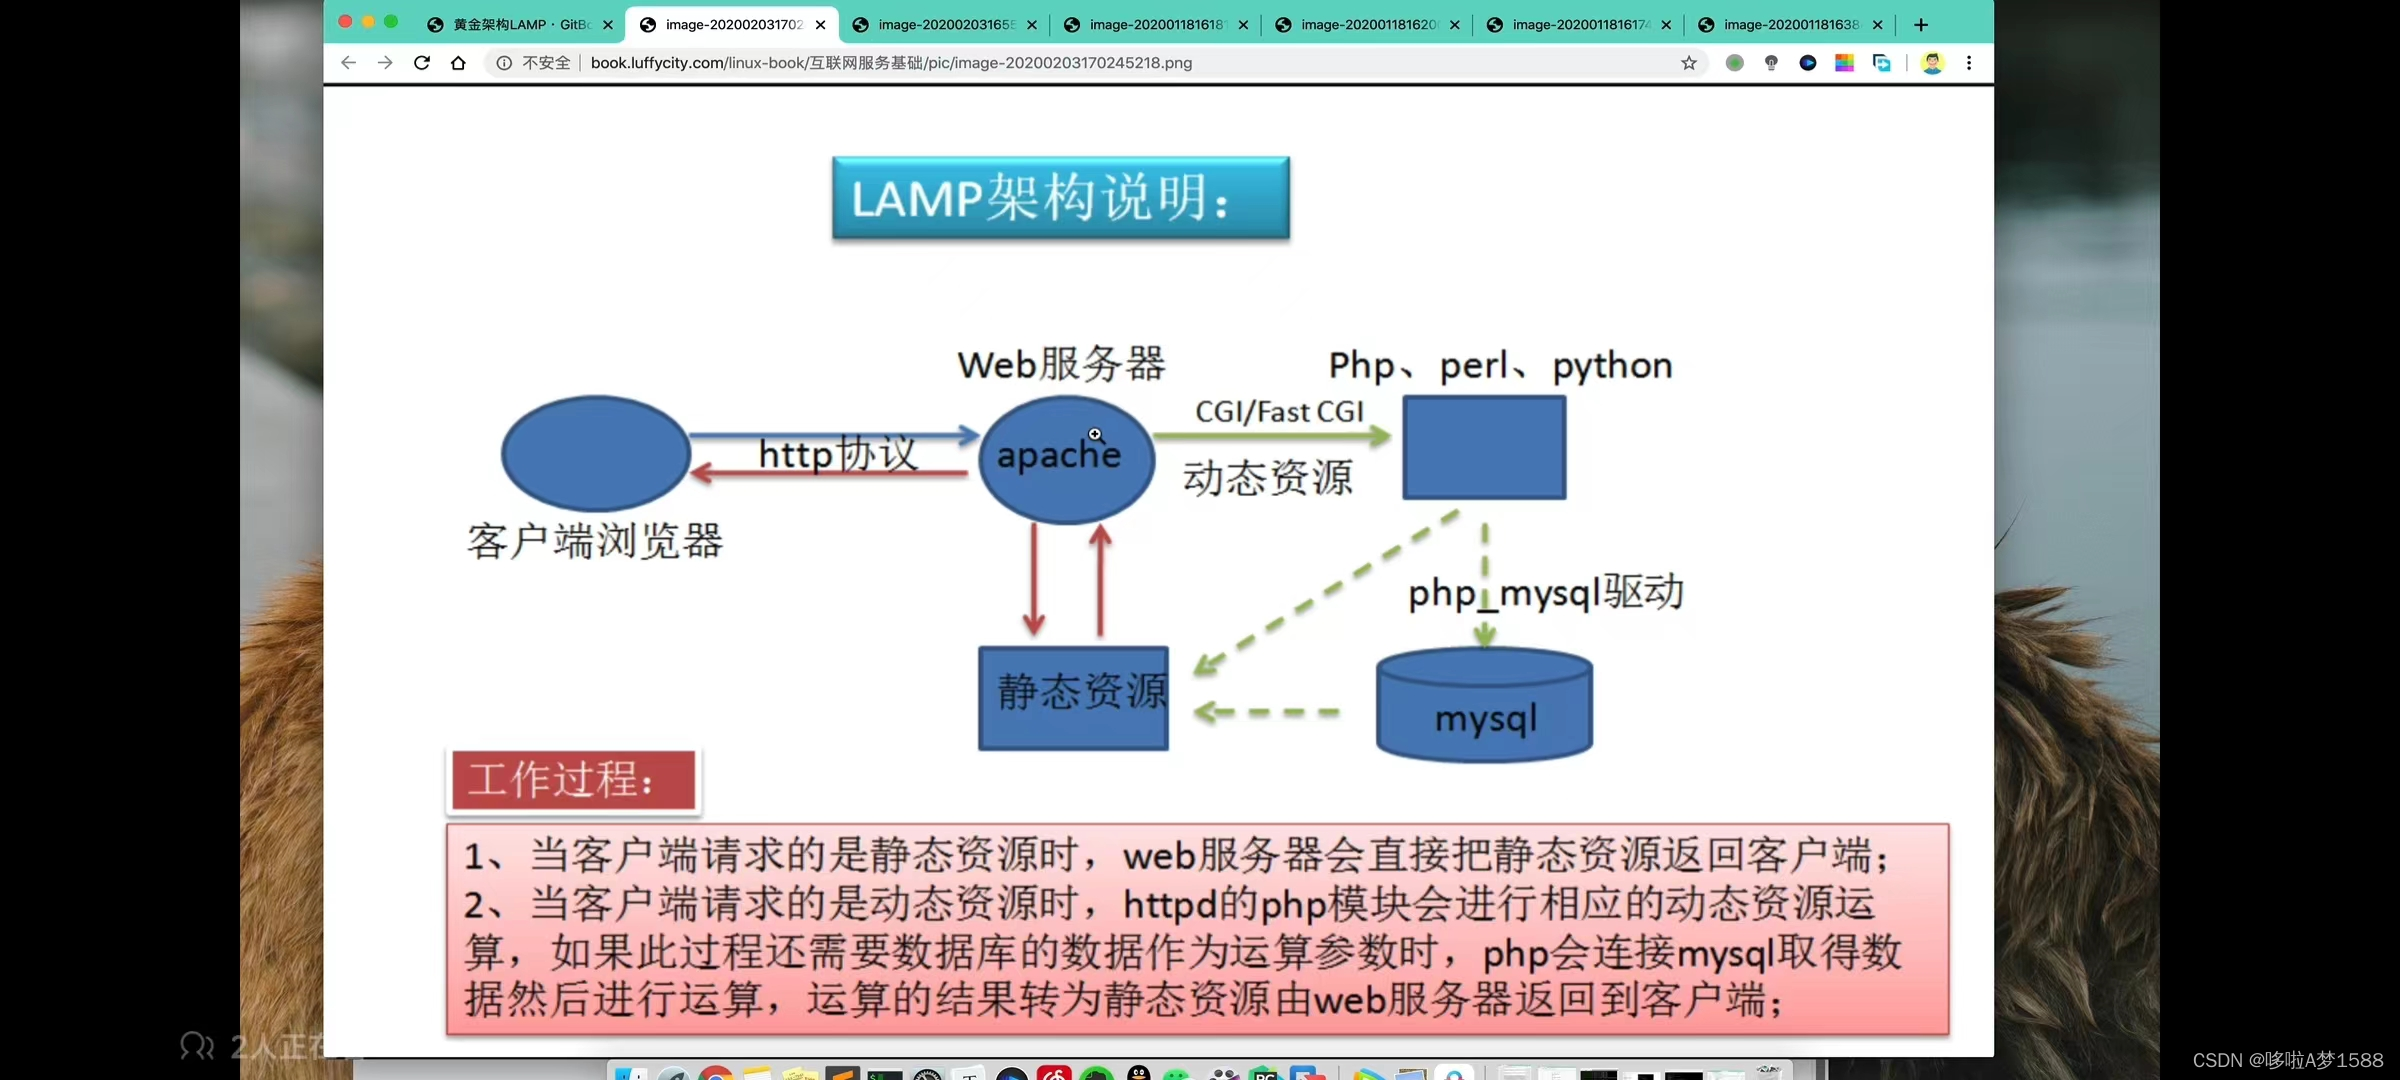
用户( 用户client 大部分情况下是浏览器 )浏览网站的时候,发出一个URL(www.pythonav.cn),首先进行DNS域名解析,将前面的域名解析为公网IP(123.206.16.61),最终定位到一台服务器(单体应用架构,程序都跑在一台机器上 linux机器:123.206.16.61), 返回如下两种形式中的一种:
1)123.206.16.61:80/guoda.jpg  apache 会判断,所有用户是以 .jpg .png .gif .txt 等等类型,就判断为静态文件,因此 apache 直接从本地进行返回;
2)如果 apache 判断,用户发来的是动态请求,此时 apache 发现用户发来的请求是以 .php .php5这种形式的,apache 会判断该请求是动态类型请求,他会转发,交给后面的 PHP 后端程序去处理,
apache 把请求交给php去处理,PHP开始处理,如果说不需要进行数据库读取,PHP处理完毕之后,直接给apache返回,大部分情况下,是有数据操作的,
用户请求数据库中信息,那么PHP他会再连接MySQL,然后读取数据后,返回给apache,最终 apache 交回给用户。发出响应体,

linux + Apache + mysql + php(perl,python) = LAMP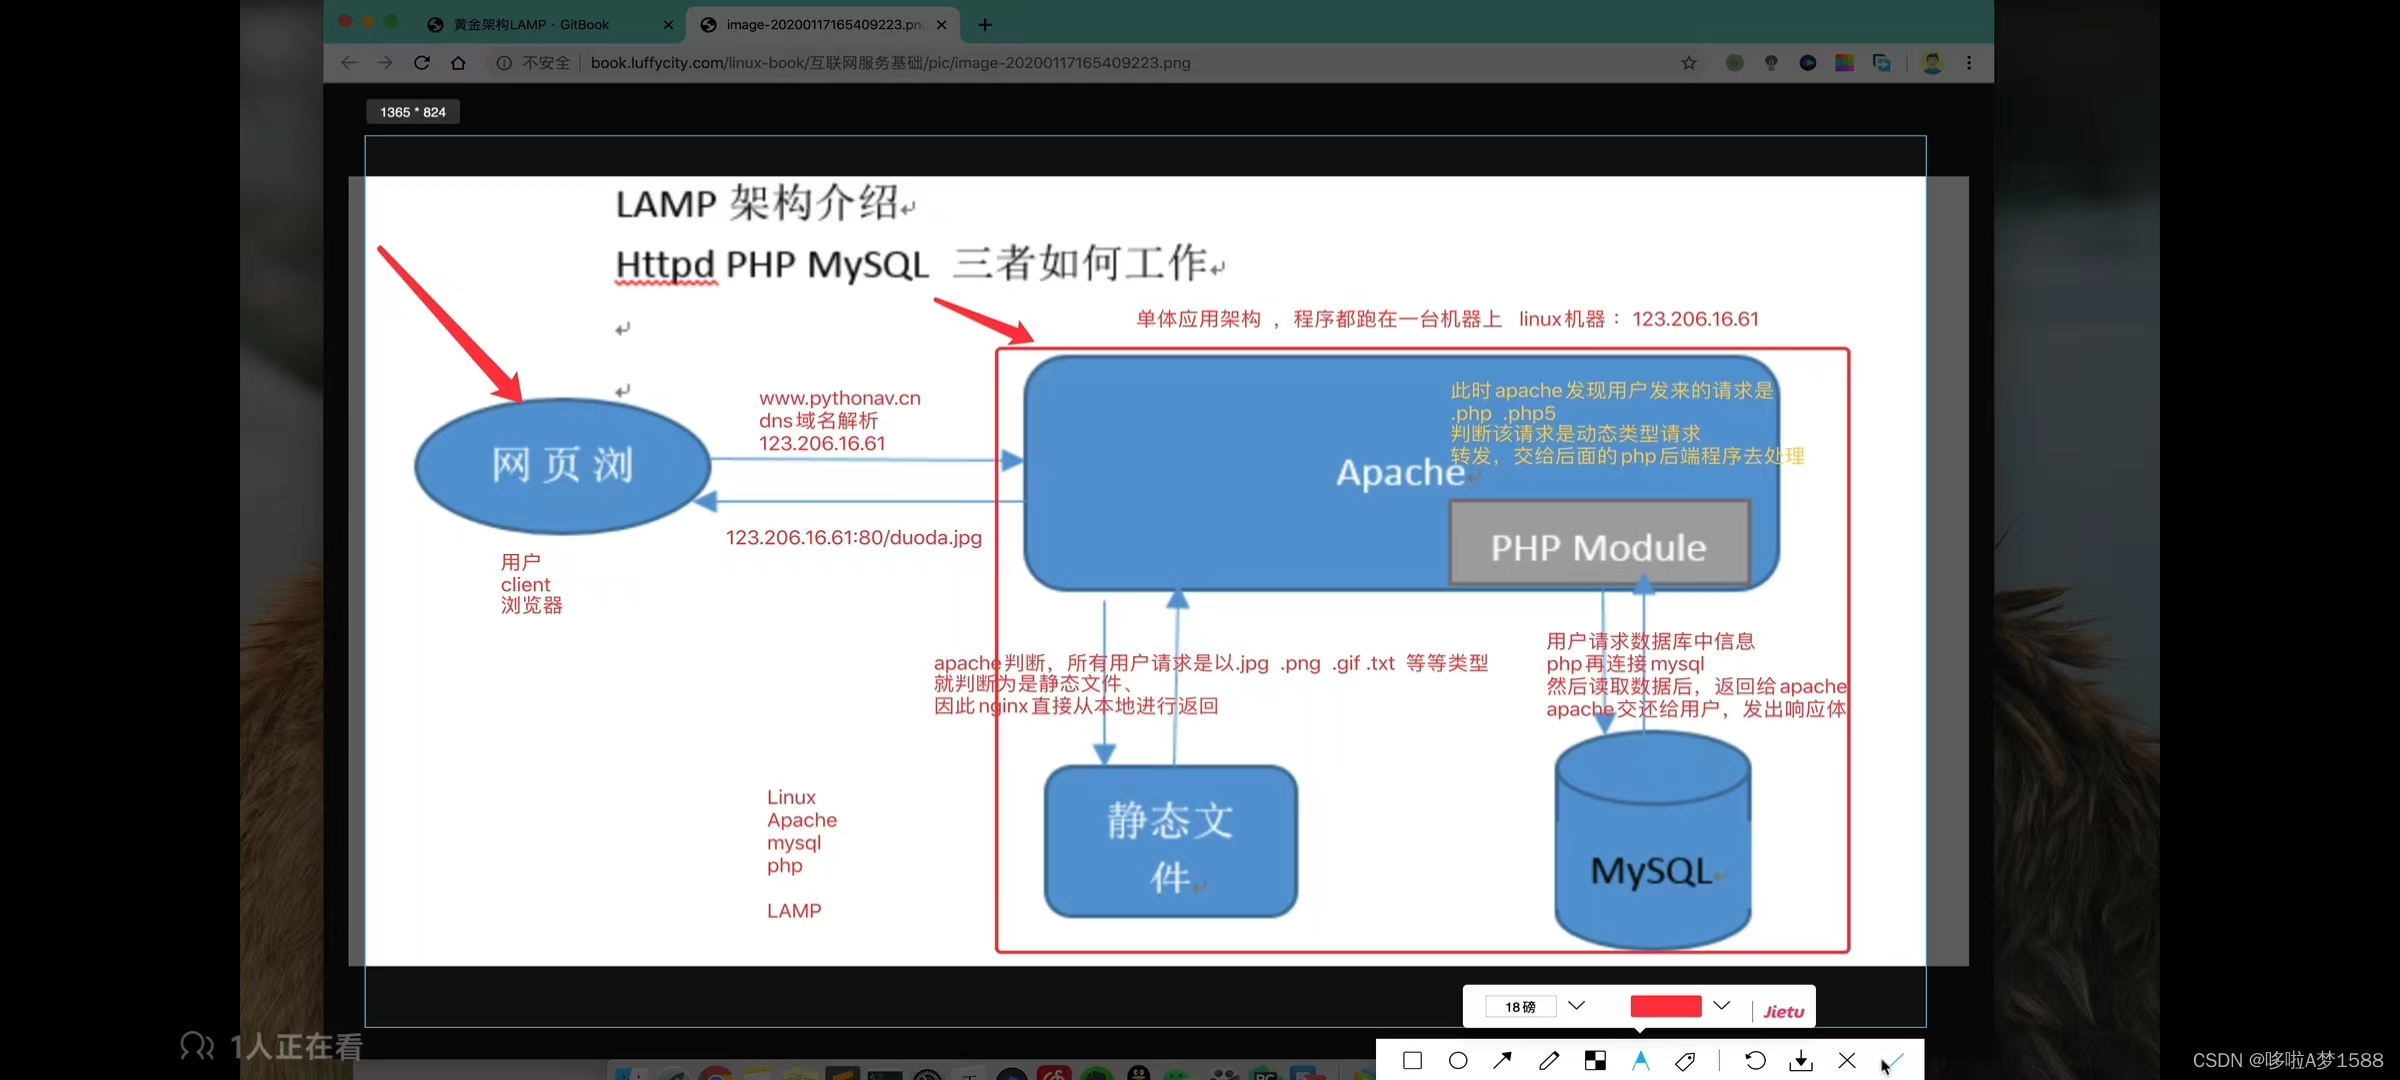
LAMP
linux
操作系统的概念:主要是提供给程序员的 API,什么叫 API呢?程序员编写代码,对系统磁盘数据的 读,写,删除,修改,打开等等,
操作系统提供了 ,比如
read
open
write
close
这样的接口,程序员就能够通过,这些对文件进行操作的系统接口,程序员可以通过编程语言,直接调用操作系统的api,进行对文件进行读写修改删除等操作。
linux 操作系统主要面对 开发者 用户
windows 主要面对 消费者 用户

linux 的特点
 几乎所有的编程,开发,运维相关的工具,都有非常完善的支持 比如
web服务器软件: apache nginx
数据库软件:mysql sqllite oracle
缓存数据库: redis memcache
消息队列软件:rabbitmq kafaka

底层的编辑器 gcc编译器
bash 脚本
git 代码管理
vim 文本编辑器
yum 软件包自动化管理
apt 软件包

linux 专门为程序员而诞生的
apache
apache web server 虽然称之为 web 服务器,但是不是意味着他是一个 物理服务器,他只是电脑软件中的一个软件而已,web 服务器的作用是将HTTP 请求从前端转发到后端应用上。
apache 被称之为 web server "服务器" ,这里的服务器,不是说他是一个物理的硬件机器,他只是程序员开发的一款软件而已,用于搭建网站的一个程序,
web 服务器的作用:主要是接收请求,响应请求,转发动态请求。
mysql
在 cenos7 平台,称之为 MariaDB,我们可以自由选择安装 mysql 还是 mariadb , mysql 是一个数据库管理工具,用于可以自由的对数据库中的内容,进行增删改查。他是一款非常优秀的数据库管理软件 腾讯 注册用户 8亿用户,在线人数9000万,腾讯有上万台服务器,搭建数据库高可用集群。使得腾讯 QQ 在线人数达到9000万,这证明了 mysql 大容量,快速响应,等特点。 支持高可用,防止机器故障,数据库担当故障。 mysql 是一个关系型数据库,特别适合万亿人使用,特别是电商,客户管理系统等领域都使用 mysql mysql 在各个行业皆有广泛应用。
php
php是一门服务端脚本编程语言,主要用于 web 开发,常用 php 脚本嵌入 HTML 源码中执行。
php是全球知名的编程语言之一,程序员可以免费使用,php支持多种操作系统,开发效率高,支持多种数据库操作。
国内众多网站,百度,雅虎,新浪都在大量使用 php 语言进行开发,知名的论坛软件 Discuz 也是由 php 开发且占据了 80% 的论坛软件市场。
<?php
    if($age > 19) {
        echo "Adult";
    } else {
        echo "Teenager";
    }
?>
PHP是一个服务端的脚本编程语言,后端编程语言,编写 php 脚本嵌入 HTML 网页文件中执行 python 同上 perl 同上 ----------- golang 服务端静态类型编程语言 java 服务端静态类型编程语言 JavaScript 是 一个浏览器编程语言,前端编程语言
LAMP 架构描述
LAMP是一个 c/s 架构平台,最初是web客户端基于 TCP/IP协议,发出 http 请求,服务端进行响应,用户的请求可能是动态的,也可能是静态的,

web 服务器就通过用户发出请求的 URL后缀,来进行动静态请求判断,
静态请求 web server直接处理
动态请求,web server 转发给后台应用服务器去处理(cgi模块),php运行的后台程序。 此时php就与apache建立了连接关系。
如果是动态请求,web server把请求转发交给php,php就会以模块的形式和 apache 做一个联系,

apache 和 php 所处的环境。
如果是apache和php安装在同一台服务器,就默认使用进程,系统共享内存进行通信,
如果是安装在两台服务器(各自在一台服务器),他们之间得通过网络,进行 socket 网络套接字通信,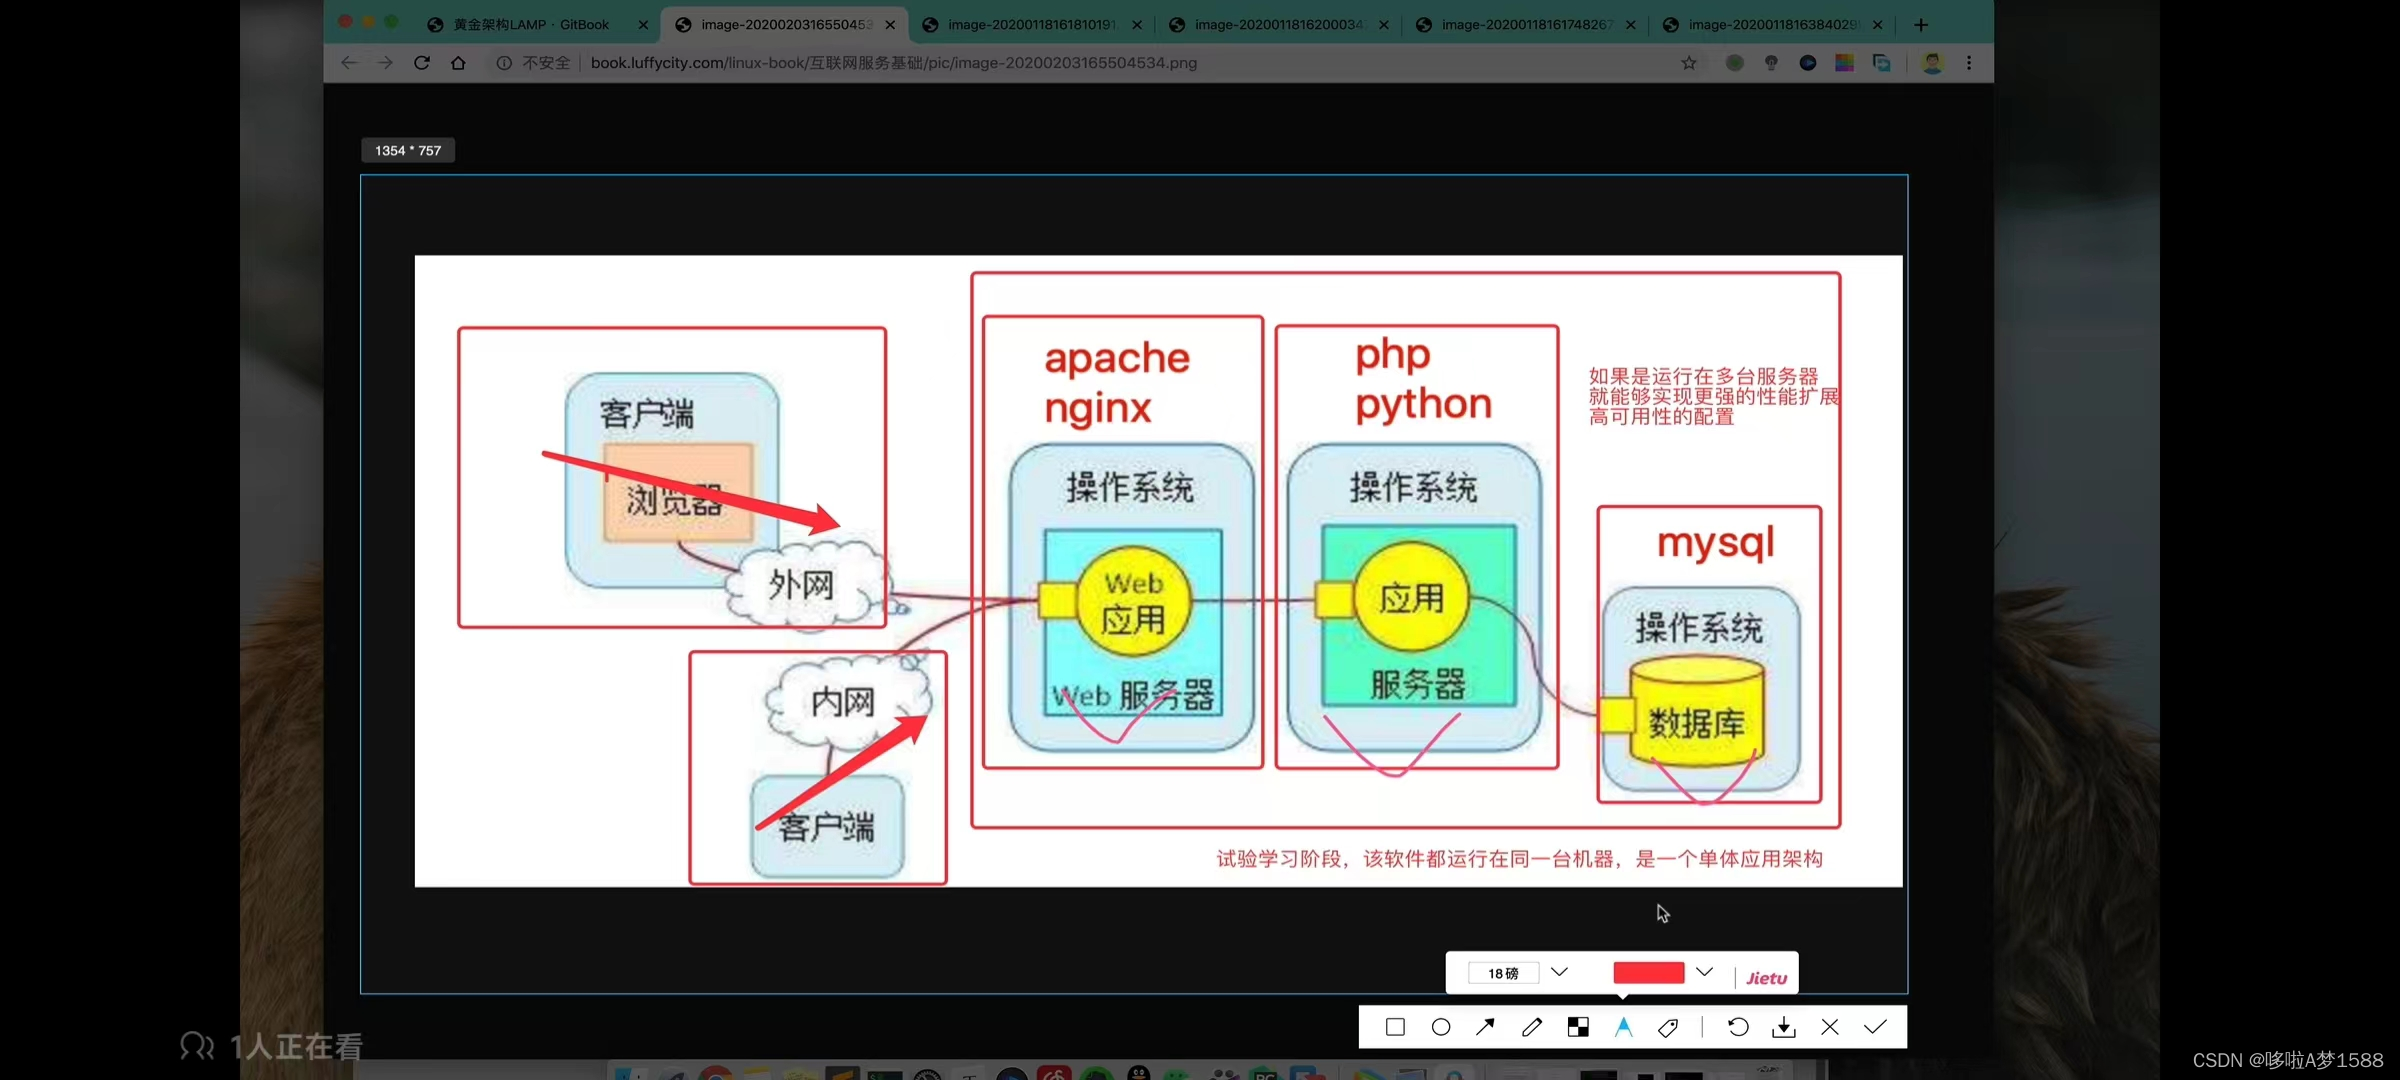
LAMP环境配置之Apache&Maridb
搭建 LAMP
部署 linux 系统环境
linux环境搭建
# 安装一些基础软件
apt install net-tools  #ifconfig、netstat等命令的工具组件
apt install lrzsz      #文件上传和下载
apt install unzip zip  #安装解压


注意关闭防火墙,selinux

iptables -F
systemctl stop firewalld
systemctl disable firewalld
getenforce
Disable(返回)

1.清空所有防火墙规则
root@ubuntu-master:~# iptables -F

2.# 检查 selinux 状态
# 安装 ' getenforce '命令
root@ubuntu-master:~# apt install selinux-utils -y
root@ubuntu-master:~# getenforce
Disabled

3.停止防火墙服务
systemctl stop firewalld

4.禁止开机自启
systemctl disable firewalld
部署 apache
1.yum install httpd -y 2.systemctl status httpd 3.systemctl start http
测试 apache 访问
ifconfig
部署 mariadb (mysql)
1.通过 yum 直接安装即可 这里安装的是 mariadb ,并不是 mysql 软件包
yum install mariadb-server mariadb -y

2.启动数据库
systemctl start mariadb

3. 检查数据库的启动状态
# 查看端口号
netstat -tunlp | grep mysql

# 查看进程
ps -ef | grep mysql

4. 检查 mariadb 服务状态
systemctl status mariadb

5.用数据库客户端命令,登录数据库,查看数据库信息
# mysql 客户端命令, -u用户名  -p 是密码,
mysql -uroot -p		# 直接回车即可,默认没有密码

6.登录 mysql 后,简单的 sql 使用 以下命令是进入 mysql 交互式终端输入的
show databases; # 查看数据库
use mysql;	# 切换进 mysql 数据库
show tables;	# 查看所有数据表
desc user;	# 显示 user 表的结构
select user,host,password from user;	# 从指定的user表中读取指定的字段信息。
部署PHP
1.解决 php 安装的依赖开发环境 yum工具是最适合的包管理工具,自动解决搜索依赖关系。
# 配置好阿里云的 yum 源
yum install -y zlib-devel libxml2-devel libjpeg-devel libjpeg-turbo-devel libiconv-devel freetype-devel libpng-devel gd-devel libcurl-devel libxslt-devel libtool-ltdl-devel pcre pcre-devel apr apr-devel zlib-devel gcc make


2.安装 php ,以及 php 连接 mysql 数据库的驱动
yum install php php-mysql -y

3.php解释器
bash 解释器 翻译官 ------ 把人类输入的命令-----翻译成机器需要执行的机器码。
php 编程语言,需要安装解释器(软件)才能在linux上使用(翻译官)。---把php程序员编程的代码----------翻译成机器码去执行


4.不需要额外修改,但是需要修改 apache 配置文件,支持 php
编辑 apache 主配置文件 /etc/httpd/conf/httpd.conf  # 修改如下内容
DocumentRoot "/var/www/html"	# 定义 apache 的网页根目录,网站资料放在这里,以及首页文件
TypesConfig /etc/mime.types
AddType application/x-httpd-php .php	# 让 apache 识别 php 程序,以 .php .phps结尾的请求
AddType application/x-httpd-php-source .phps	#
DirectoryIndex index.php index.html		# 返回默认的页面文件 index.php(手动编写 php 代码)


cat /etc/httpd/conf/httpd.conf   # 添加如下相关配置
vim /etc/apache2/apache2.conf


	DocumentRoot "/var/www/html"
	TypesConfig /etc/mime.types
	AddType application/x-httpd-php .php
	AddType application/x-httpd-php-source .phps
	DirectoryIndex index.php index.html


5.修改完了 apache 支持 php 的配置,手动编写 php 的代码文件
vim /var/www/html/index.php
<meta charset=utf-8>
我是新的首页,您好,兄弟们
<?php
	phpinfo();	# 此处表示调用该函数
?>

'phpinfo()' php 显示健康信息的函数,


6.重启 apache
systemctl restart httpd


7.访问浏览器 http://localhost:80
访问 lamp 页面,出现 php 的信息内容,即正常了
http://192.168.178.122/
php连接mysql
1.准备好php的代码文件,放入 apache 的站点目录
vim /var/www/html/conn_mysql.php
<?php
	$conn=mysql_connect('localhost','root','chaoge666');
	if ($conn)
		echo "php已经成功连接上了 mysql ,恭喜你,小兄弟,你真棒";
	else
		echo "你怎么回事小兄弟,这个 php 都连接不上 mysql,去检查一下 lamp 的配置,以及代码是否写错了,数据库是否启动了,等等";
	mysql_close();
?>

# 以上代码表示 先连接数据库,然后判断,用完之后,再把数据库给关闭了
 # php 连接 mysql 的一个函数 mysql_concect()  然后()中依次写入连接地址;用户名;密码,';'代表结束命令
在 php 里面 $+变量名  表示定义一个变量


2. 编写 php 连接 mysql 的代码
<?php
	$conn=mysql_connect('localhost','root','chaoge666');
	if ($conn)
		echo "php已经成功连接上了 mysql ,恭喜你,小兄弟,你真棒";
	else
		echo "你怎么回事小兄弟,这个 php 都连接不上 mysql,去检查一下 lamp 的配置,以及代码是否写错了,数据库是否启动了,等等";
	mysql_close();
?>


3.http://192.168.178.122/conn_mysql.php
访问浏览器,就可以看到结果了

systemctl stop mariadb

netstat -tunlp | grep mysql
ps -ef | grep mysql | grep -v "grep"

'grep -v "grep"' 表示去掉 'grep' 相关的进程

systemctl restart mariadb
ubuntu下apache配置https或者http重要配置文件
配置文件

官方发布的 Apache 的主配置文件是 httpd.conf, 服务器还会读取一个包含 MIME 文件类型的文件,其文件名由 TypesConfig 指令确定,默认值是mime.types 。

Ubuntu/Debian 下的 Apache 的主配置文件是 /etc/apache2/apache2.conf, 包含 MIME 文件类型的文件是 /etc/mime.types 。

此外,为了按逻辑分割配置,还可以用 Include 指令和通配符附加许多其他配置文件。Ubuntu 下附加了如下的配置文件:

# 包含动态模块的配置:

Include /etc/apache2/mods-enabled/*.load

Include /etc/apache2/mods-enabled/*.conf

# 包含用户自己的配置:

Include /etc/apache2/httpd.conf

# 包含端口监听的配置:

Include /etc/apache2/ports.conf

# 包含一般性的配置语句片断:

Include /etc/apache2/conf.d/[^.#]*

……

# 包含虚拟主机的配置指令:

Include /etc/apache2/sites-enabled/[^.#]*

配置文件的语法

*每一行包含一个指令,在行尾使用反斜杠”\”可以表示续行

*配置文件中的指令不区分大小写,但是指令的参数 (argument) 通常区分大小写

*以 ”#” 开头的行被视为注解并在读取时被忽略。注解不能出现在指令的后边

*空白行和指令前的空白字符将在读取时被忽略,因此可以采用缩进以保持配置层次的清晰


关于ubuntu下apache配置https或者http重要配置文件
/var/www/html :实际的Web内容(默认情况下只包含您之前看到的默认Apache页面)由/var/www/html目录提供。 这可以通过更改Apache配置文件来更改。
服务器配置
/etc/apache2/apache2.conf的主配置文件。 这可以修改为对Apache全局配置进行更改。 该文件负责在配置目录中加载许多其他文件。
/etc/apache2/ports.conf :该文件指定Apache将监听的端口。 默认情况下,当启用提供SSL功能的模块时,Apache会监听端口80,并在端口443上进行监听。
/etc/apache2/sites-available/ :可以存储每个站点“虚拟主机”的目录。 Apache不会使用此目录中找到的配置文件,除非它们链接到sites-enabled了sites-enabled目录(见下文)。 通常,所有服务器块配置都在此目录中完成,然后通过使用a2ensite命令链接到另一个目录来启用。
/etc/apache2/sites-enabled/ :存储启用了每个站点“虚拟主机”的目录。 通常,这些是通过链接到具有a2ensite的sites-available目录中找到的配置文件创建的。 Apache在启动或重新加载以编译完整配置时读取此目录中找到的配置文件和链接。
/etc/apache2 :Apache配置目录。 所有Apache配置文件驻留在此处。
/etc/apache2/conf-available/ , /etc/apache2/conf-enabled/ :这些目录与sites-available和sites-enabled目录具有相同的关系,但用于存储不属于虚拟主机 conf-available目录中的文件可以使用a2enconf命令启用,并使用a2enconf命令禁用。
/etc/apache2/mods-available/ ,/etc/apache2/mods-enabled/:这些目录分别包含可用和启用的模块。 以.load结尾的文件包含加载特定模块的片段,而以.conf结尾的文件包含这些模块的配置。 可以使用a2enmod和a2dismod命令启用和禁用模块。
ubuntu搭建LAMP环境
LAMP 是一个常用于构建动态网站和Web应用程序的开发堆栈,它由以下四个主要组件组成:

    Linux(操作系统):LAMP 中的 "L" 代表 Linux,它是操作系统的一种选择。Linux 是一个开源的、免费的操作系统,广泛用于Web服务器环境,因为它稳定、安全且可扩展。在 LAMP 堆栈中,Linux 提供了服务器的基本操作系统框架。

    Apache(Web服务器):LAMP 中的 "A" 代表 Apache,它是一个流行的开源Web服务器软件。Apache 提供了处理HTTP请求和响应的能力,它是 Web 应用程序的后端服务器,能够将请求发送给应用程序和处理应用程序生成的响应。

    MySQL(数据库管理系统):LAMP 中的 "M" 代表 MySQL,它是一个开源的关系型数据库管理系统(RDBMS)。MySQL 用于存储和管理Web应用程序中的数据,例如用户信息、文章内容、产品信息等。它提供了高性能、可靠性和扩展性,适用于各种规模的Web应用程序。

    PHP(服务器端脚本语言):LAMP 中的 "P" 代表 PHP,它是一种流行的服务器端脚本语言。PHP 用于编写服务器端的Web应用程序代码,它可以嵌入到HTML中,动态生成Web页面内容。PHP 具有丰富的功能和库,使开发人员能够创建动态和交互性的Web应用程序。

LAMP 堆栈提供了一个完整的Web开发环境,包括操作系统、Web服务器、数据库和服务器端脚本语言。这个堆栈被广泛用于开发各种类型的Web应用程序,从简单的个人博客到复杂的电子商务平台。


# 安装一些基础软件
apt install net-tools  #ifconfig、netstat等命令的工具组件
apt install lrzsz      #文件上传和下载
apt install unzip zip  #安装解压


第一步:安装Apache

Apache是一款强大的开源Web服务器软件,许多网站和Web应用程序都依赖于Apache作为其服务器基础,因此我们需要首先安装Apache。
sudo apt update && sudo apt install apache2 --yes && sudo ufw allow in "Apache"
上面的命令完成了三件事情:

    更新Linux系统软件包索引
    安装Apache
    设置系统防火墙,允许进入的流量通过Apache


http://20.243.21.117
如果你能打开,表明你已经配置成功了。


第二步:安装MySQL

MySQL是一种广受欢迎的关系型数据库,我们WordPress网站的各种数据都存储在MySQL中。
sudo apt install mysql-server -y && sudo mysql


进入MySQL数据库

接下来我们需要设置MySQL数据库的密码,在MySQL中输入以下代码,其中PASSWORD必须替换成你自己的密码。请牢记这个密码,后面会用到。
ALTER USER 'root'@'localhost' IDENTIFIED WITH mysql_native_password by 'PASSWORD';
ALTER USER 'root'@'localhost' IDENTIFIED WITH mysql_native_password by '@Zg147258369';

然后输入exit退出MySQL数据库。

执行成功后,你将返回到原来的VPS终端界面

接下来初始化MySQL,输入以下命令:
sudo mysql_secure_installation

在运行该命令后,会要求你输入密码,直接输入上面设置的密码即可。然后,按照以下提示进行选择:

    是否启用密码强度检查:选择Y。

    VALIDATE PASSWORD COMPONENT can be used to test passwords
    and improve security. It checks the strength of password
    and allows the users to set only those passwords which are
    secure enough. Would you like to setup VALIDATE PASSWORD component?

    Press y|Y for Yes, any other key for No: Y

    密码强度要求:选择 0(代表最低强度,适合初学者;如果你有经验,可以选择 1 或 2)。

    There are three levels of password validation policy:

    LOW    Length >= 8
    MEDIUM Length >= 8, numeric, mixed case, and special characters
    STRONG Length >= 8, numeric, mixed case, special characters and dictionary                  file

    Please enter 0 = LOW, 1 = MEDIUM and 2 = STRONG: 0

是否要重新设置root用户密码:选择N。

    Estimated strength of the password: 100
    Change the password for root ? ((Press y|Y for Yes, any other key for No) : N

    是否删除匿名用户:选择Y。

    By default, a MySQL installation has an anonymous user,
    allowing anyone to log into MySQL without having to have
    a user account created for them. This is intended only for
    testing, and to make the installation go a bit smoother.
    You should remove them before moving into a production
    environment.

    Remove anonymous users? (Press y|Y for Yes, any other key for No) : Y

    是否禁止root用户远程登录:选择Y。

    Normally, root should only be allowed to connect from
    'localhost'. This ensures that someone cannot guess at
    the root password from the network.

    Disallow root login remotely? (Press y|Y for Yes, any other key for No) : Y

    是否删除测试数据库:选择Y。

    By default, MySQL comes with a database named 'test' that
    anyone can access. This is also intended only for testing,
    and should be removed before moving into a production
    environment.


    Remove test database and access to it? (Press y|Y for Yes, any other key for No) : Y

    是否刷新权限表:选择Y。

    Reloading the privilege tables will ensure that all changes
    made so far will take effect immediately.

    Reload privilege tables now? (Press y|Y for Yes, any other key for No) : Y

这些步骤完成后,MySQL就安装并进行了基本配置。你将看到屏幕上显示 “All done” 字样。


第三步:安装PHP

首先,运行以下命令来安装PHP及相关模块:
sudo apt install php libapache2-mod-php php-mysql -y

安装完成后,你可以使用以下命令检查PHP版本:
php -v
你应该会看到类似于下面的输出,显示你的PHP版本(例如8.1.2)。


第四步 php连接 mysql 数据库
准备好php的代码文件,放入 apache 的站点目录

root@ubuntu-node:~# vim /var/www/html/conn_mysql.php
root@ubuntu-node:~# cat /var/www/html/conn_mysql.php
<?php
        $conn=mysql_connect('localhost','root','chaoge666');
        if ($conn)
                echo "php已经成功连接上了 mysql ,恭喜你,小兄弟,你真棒";
        else
                echo "你怎么回事小兄弟,这个 php 都连接不上 mysql,去检查一下 lamp 的配置,以及代码是否写错了,数据库是否启动了,等等";
        mysql_close();
?>
root@ubuntu-node:~#


http://192.168.222.129/conn_mysql.php
访问浏览器,就可以看到结果了

systemctl stop mysql

netstat -tunlp | grep mysql
ps -ef | grep mysql | grep -v "grep"

'grep -v "grep"' 表示去掉 'grep' 相关的进程

systemctl restart mysql

root@ubuntu-node:~# netstat -tunlp | grep mysql
tcp        0      0 127.0.0.1:3306          0.0.0.0:*               LISTEN      2454/mysqld
tcp        0      0 127.0.0.1:33060         0.0.0.0:*               LISTEN      2454/mysqld
root@ubuntu-node:~#


# 修改apache配置文件,支持php   明天干
lamp搭建论坛DISCUZ
1.首先得下载该论坛的源代码
wget http://download.comsenz.com/DiscuzX/3.2/Discuz_X3.2_SC_UTF8.zip
https://www.discuz.vip/
https://www.comsenz-service.com/portal.php
wget http://www.comsenz-service.com/DiscuzX/3.2/Discuz_X3.2_sc_UTF8.zip
https://gitee.com/Discuz/DiscuzX/attach_files/1621557/download   最新版本代码下载地址


2.安装解压缩命令,解压缩zip格式的代码包
yum install unzip -y


3. 创建论坛站点的目录,并解压缩源代码
mkdir -p /opt/Discuz
mv Discuz_X3.5_SC_UTF8_20231221.zip /opt/Discuz/
cd /opt/Discuz
ls
Discuz_X3.5_SC_UTF8_20231221.zip
unzip Discuz_X3.5_SC_UTF8_20231221.zip
ls


root@ubuntu-node:/opt/Discuz# ls
Discuz_X3.5_SC_UTF8_20231221.zip  LICENSE  qqqun.png  readme  readme.html  upload  utility.html
root@ubuntu-node:/opt/Discuz#


4.给论坛源码授权,给予大权限
chmod -R 777 /opt/Discuz/*

root@ubuntu-node:/opt/Discuz# chmod -R 777 /opt/Discuz/*
root@ubuntu-node:/opt/Discuz# ll
total 11460
drwxr-xr-x  4 root root     4096 May 15 23:42 ./
drwxr-xr-x  4 root root     4096 May 15 23:42 ../
-rwxr-xr-x  1 root root 11593050 May 15 06:35 Discuz_X3.5_SC_UTF8_20231221.zip*
-rwxr-xr-x  1 root root     8181 Dec 21 16:24 LICENSE*
-rwxr-xr-x  1 root root    33294 Dec 21  2022 qqqun.png*
drwxr-xr-x  2 root root     4096 Dec 21 19:28 readme/
-rwxr-xr-x  1 root root    70226 Mar 16  2023 readme.html*
drwxr-xr-x 12 root root     4096 Dec 21 19:29 upload/
-rwxr-xr-x  1 root root      140 Feb 12  2023 utility.html*
root@ubuntu-node:/opt/Discuz#


5.移动该论坛代码,放入到 apache 的站点目录(/var/www/html/)下
因为我们想通过访问 apache,来直接访问论坛站点

mv upload/* /var/www/html/

root@ubuntu-node:/opt/Discuz# mv upload/* /var/www/html/
root@ubuntu-node:/opt/Discuz# ls /var/www/html/
admin.php  archiver     conn_mysql.php   favicon.ico  home.php    install     plugin.php  search.php  template
api        config       crossdomain.xml  forum.php    index.html  member.php  portal.php  source      uc_client
api.php    connect.php  data             group.php    index.php   misc.php    robots.txt  static      uc_server
root@ubuntu-node:/opt/Discuz#


6.访问 apache 首页,就能够访问到 discuz 论坛的首页文件 index.php
vim /var/www/html/index.php

chmod -R 777 /var/www/html/*
root@ubuntu-node:/opt/Discuz# chmod -R 777 /var/www/html/*
root@ubuntu-node:/opt/Discuz# ll /var/www/html/
total 132
drwxr-xr-x 12 root root  4096 May 16 00:01 ./
drwxr-xr-x  3 root root  4096 May 14 01:18 ../
-rwxrwxrwx  1 root root  2869 Dec 21 19:29 admin.php*
drwxrwxrwx 10 root root  4096 Dec 21 19:28 api/
-rwxrwxrwx  1 root root   727 Dec 21 19:29 api.php*
drwxrwxrwx  2 root root  4096 Dec 21 19:28 archiver/
drwxrwxrwx  2 root root  4096 Dec 21 19:28 config/
-rwxrwxrwx  1 root root  1040 Dec 21 19:29 connect.php*
-rwxrwxrwx  1 root root   346 May 15 01:41 conn_mysql.php*
-rwxrwxrwx  1 root root   106 Dec 21 19:29 crossdomain.xml*
drwxrwxrwx 12 root root  4096 Dec 21 19:28 data/
-rwxrwxrwx  1 root root  5558 Dec 21 16:24 favicon.ico*
-rwxrwxrwx  1 root root  2357 Dec 21 19:29 forum.php*
-rwxrwxrwx  1 root root   906 Dec 21 19:29 group.php*
-rwxrwxrwx  1 root root  1325 Dec 21 19:29 home.php*
-rwxrwxrwx  1 root root 10671 May 14 01:49 index.html*
-rwxrwxrwx  1 root root  6920 Dec 21 19:29 index.php*
drwxrwxrwx  5 root root  4096 Dec 21 19:28 install/
-rwxrwxrwx  1 root root   998 Dec 21 19:29 member.php*
-rwxrwxrwx  1 root root  2410 Dec 21 19:29 misc.php*
-rwxrwxrwx  1 root root  1790 Dec 21 19:29 plugin.php*
-rwxrwxrwx  1 root root  1086 Dec 21 19:29 portal.php*
-rwxrwxrwx  1 root root   639 Dec 21 19:29 robots.txt*
-rwxrwxrwx  1 root root  1755 Dec 21 19:29 search.php*
drwxrwxrwx 10 root root  4096 Dec 21 19:28 source/
drwxrwxrwx  7 root root  4096 Dec 21 19:29 static/
drwxrwxrwx  3 root root  4096 Dec 21 19:29 template/
drwxrwxrwx  8 root root  4096 Dec 21 19:29 uc_client/
drwxrwxrwx 13 root root  4096 Dec 21 19:29 uc_server/
root@ubuntu-node:/opt/Discuz#

直接访问 linux 机器的 ip 地址即可,也就是 lamp 服务器的地址就可以了。
Web 服务器介绍
LNMP黄金架构
之前学习Apache了解过LAMP(Linux,Apache,Mysql,Perl/PHP/Python)
由于上述架构,已然是一个商业版软件的代名词,后来自由软件趋势兴起,如何用开源软件替代商业软件,这是人们追求的,所有的Unux发行版几乎都会内置这样的软件。
但是由于Nginx的兴起,卓越的性能,更简单的配置,更强大的功能,更低的资源消耗,LAMP已经渐渐被LNMP取代。
LNMP 是网站架构初期最适合的单体架构,因为初创型技术团队对于技术的选型,需要考虑如下因素:
1. 在创业初期,研发资源有限,研发人力有限,技术储备有限,需要选择一个易维护,简单的技术架构;
2. 产品需要快速研发上线,并能够满足快速迭代要求,现实情况决定了一开始没有时间和精力来选择一个过于复杂的分布式架构系统,研发速度必须要快;
3. 创业初期,业务复杂度比较低,业务量也比较小,如果选择过于复杂的架构,反而会增加研发难度以及运维难度;
4. 遵从选择合适的技术而不是最好的技术原则,并权衡研发效率和产品目标,同时创业初期贝聊只有一个PHP研发人员,过于复杂的技术架构必然会带来比较高昂的学习成本。
网络服务都是一种被动的服务程序,只有在接收到互联网中,其他主机发出的请求后,才会响应,好比,我如果不再浏览器访问 taobao.com ,taobao网站他会主动把页面发给我看吗?那肯定不行,我们通过浏览器,通过域名向淘宝的首页发送请求,淘宝才会响应,把淘宝的页面给我们看的。用户通过http请求,发出去之后,web服务器才会通过http超文本传输协议,或者是 https 安全的超文本协议,给我们响应,展示给我们看,浏览器去对淘宝发来的响应体,做一个渲染,最终把页面呈现在用户目前。C/S 架构 (即客户端浏览器与淘宝网server服务器 架构模式)
nginx作用
-
web server
-
反向代理
-
负载均衡
优秀的web 服务器软件
b/s(browser/server) c/s (client/server) 描述
client/server 客户端/服务端 特点:当服务器更新以后,本地客户端软件也必须更新,才可以继续使用服务器提供的功能(接收最新的代码包,最新的数据包)
qq 客户端 /qq 服务器
微信 客户端/ 微信 服务器
游戏 lol客户端/lol 服务器
王者荣耀 客户端/王者荣耀 游戏服务器
浏览器/网站(b/s) 主要用于web服务,该模型的好处是电脑端不需要做任何更新,不要额外安装各种软件,可以直接使用,每一个操作系统都自带浏览器功能,我们只需要输入网站的站点,就可以查看网页相关的内容了。比如淘宝,新浪,等,
这种B/S架构的特点是:淘宝pc服务器更新了,或者上新功能了,你需要在电脑PC端下载更新吗?浏览器要更新升级吗?不需要,我们只要重新发一个请求直接访问就OK了。最新的页面就展示出来了。本地不需要做任何的变动,只需要通过网络做一个新的页面接收,重新访问就OK了。
nginx是什么
nginx是一款优秀的,高性能的web服务器,反向代理服务器,以及负载均衡服务器,它支持的功能非常多。
常见的Web Server介绍
web服务器主要就是提供网上信息浏览,我们大部分人使用电脑都是通过浏览器访问互联网上的各种资源。web服务器他是一种被动的服务程序,只有在接收到互联网中其他主机发来请求的时候,才会返回HTTP相应响应体给用户展示。
在 linux 和 windows 平台,常见的 web 服务器有哪些:
-
Apache (国企性质,要求技术栈不需要那么先进,像银行,国企,没有大量的流量,他们只需要系统架构稳定即可)
-
Nginx (主流的互联网公司都选择 nginx,比如淘宝,京东,美团,斗鱼,网易等)
-
Lighttpd(性能非常接近nginx的一款web server,主要是老外在用)
-
Tomcat (属于应用服务器,主要是和java做程序解析的)
-
IBM (websphere)
-
在windows 平台下的IIS(Inter Information server)
-
Tengine(The Tengine Web Server)
获取站点响应体信息
curl -i pythonav.cn
curl -i baidu.com

root@ubuntu-node:/opt/Discuz# curl -i baidu.com
HTTP/1.1 200 OK
Date: Thu, 16 May 2024 01:58:35 GMT
Server: Apache
Last-Modified: Tue, 12 Jan 2010 13:48:00 GMT
ETag: "51-47cf7e6ee8400"
Accept-Ranges: bytes
Content-Length: 81
Cache-Control: max-age=86400
Expires: Fri, 17 May 2024 01:58:35 GMT
Connection: Keep-Alive
Content-Type: text/html

<html>
<meta http-equiv="refresh" content="0;url=http://www.baidu.com/">
</html>
root@ubuntu-node:/opt/Discuz#


root@ubuntu-node:/opt/Discuz# curl -i jd.com
HTTP/1.1 301 Moved Permanently
Date: Thu, 16 May 2024 02:00:23 GMT
Content-Type: text/html
Content-Length: 178
Connection: keep-alive
Location: https://www.jd.com
Server: jfe
Cache-Control: no-cache

<html>
<head><title>301 Moved Permanently</title></head>
<body bgcolor="white">
<center><h1>301 Moved Permanently</h1></center>
<hr><center>nginx</center>
</body>
</html>
root@ubuntu-node:/opt/Discuz#


root@ubuntu-node:/opt/Discuz# curl -i taobao.com
HTTP/1.1 301 Moved Permanently
Server: Tengine/AServer-Ingress/3.0.16
Date: Thu, 16 May 2024 02:01:36 GMT
Content-Type: text/html
Content-Length: 270
Connection: keep-alive
Location: https://taobao.com/
X-protocol: HTTP/1.1
EagleEye-TraceId: 21663a9817158248968946037e1451

<!DOCTYPE HTML PUBLIC "-//IETF//DTD HTML 2.0//EN">
<html>
<head><title>301 Moved Permanently</title></head>
<body>
<center><h1>301 Moved Permanently</h1></center>
<hr/>Powered by Tengine/AServer-Ingress/3.0.16<hr><center>tengine ingress</center>
</body>
</html>
root@ubuntu-node:/opt/Discuz#


nginx+ uwsgi (python后台,做负载均衡)
apache
apache 是世界主流的web 服务器。大部分网站都是 apache 搭建的,优势是开放源代码,开发维护的团队很强大,有好几十年的历史。非常悠久,apache 支持跨平台应用,支持在 linux unix,windows等平台是运行,移植性很强大的。但是 apache 属于重量级的产品,功能都是以模块化定制,且他的工作模式,占用的内存资源过多。对系统消耗很大。性能稍弱于 nginx
错误解决
为了解决这个问题,请按照以下步骤操作:
检查Apache的配置文件是否正确无误。可以使用命令sudo apachectl configtest来测试配置文件。

查看Apache的日志文件,通常在/var/log/apache2/目录下的error.log文件中。这将提供关于为什么服务启动失败的详细信息。

确认所需的端口没有被其他服务占用。Apache默认使用80端口,可以使用sudo netstat -tulnp | grep :80来检查端口使用情况。

如果是权限问题,确保Apache进程有权访问其配置文件和日志文件。

如果是模块相关的问题,确保所需的Apache模块已正确安装并在Apache配置中加载。

确保系统的服务管理器(systemd)和Apache都是最新版本,如果不是,请更新它们。

如果问题仍然存在,尝试重新安装Apache。
实战
root@ubuntu-master:~# sudo apachectl configtest
AH00558: apache2: Could not reliably determine the server's fully qualified domain name, using 192.168.178.128. Set the 'ServerName' directive globally to suppress this message
Syntax OK
root@ubuntu-master:~# sudo netstat -tulnp | grep :80
tcp        0      0 0.0.0.0:80              0.0.0.0:*               LISTEN      1192/nginx: master
tcp6       0      0 :::80                   :::*                    LISTEN      1192/nginx: master
root@ubuntu-master:~# vim /etc/apache2/ports.conf
root@ubuntu-master:~# cat /etc/apache2/ports.conf

# If you just change the port or add more ports here, you will likely also

# have to change the VirtualHost statement in

# /etc/apache2/sites-enabled/000-default.conf

Listen 85

<IfModule ssl_module>
        Listen 443
</IfModule>

<IfModule mod_gnutls.c>
        Listen 443
</IfModule>

# vim: syntax=apache ts=4 sw=4 sts=4 sr noet

root@ubuntu-master:~#

root@ubuntu-master:~# ls /usr/sbin/ | grep apa
apache2
apache2ctl
apachectl


root@ubuntu-master:~# systemctl restart apache2
root@ubuntu-master:~# systemctl status apache2
● apache2.service - The Apache HTTP Server
     Loaded: loaded (/lib/systemd/system/apache2.service; enabled; vendor preset: enabled)
     Active: active (running) since Thu 2024-05-09 23:20:20 UTC; 21s ago
       Docs: https://httpd.apache.org/docs/2.4/
    Process: 1856 ExecStart=/usr/sbin/apachectl start (code=exited, status=0/SUCCESS)
   Main PID: 1861 (apache2)
      Tasks: 55 (limit: 4515)
     Memory: 4.9M
        CPU: 25ms
     CGroup: /system.slice/apache2.service
             ├─1861 /usr/sbin/apache2 -k start
             ├─1862 /usr/sbin/apache2 -k start
             └─1863 /usr/sbin/apache2 -k start

May 09 23:20:19 ubuntu-master systemd[1]: Starting The Apache HTTP Server...
May 09 23:20:19 ubuntu-master apachectl[1860]: AH00558: apache2: Could not reliably determine the server's fully qualified domain name, using 192.168.178.128>
May 09 23:20:20 ubuntu-master systemd[1]: Started The Apache HTTP Server.
root@ubuntu-master:~# cat /var/log/apache2/error.log
访问apache
http://192.168.178.129/
Apache2 Default Page
It works!
This is the default welcome page used to test the correct operation of the Apache2 server after installation on Ubuntu systems. It is based on the equivalent page on Debian, from which the Ubuntu Apache packaging is derived. If you can read this page, it means that the Apache HTTP server installed at this site is working properly. You should replace this file (located at /var/www/html/index.html) before continuing to operate your HTTP server.

If you are a normal user of this web site and don't know what this page is about, this probably means that the site is currently unavailable due to maintenance. If the problem persists, please contact the site's administrator.

Configuration Overview
Ubuntu's Apache2 default configuration is different from the upstream default configuration, and split into several files optimized for interaction with Ubuntu tools. The configuration system is fully documented in /usr/share/doc/apache2/README.Debian.gz. Refer to this for the full documentation. Documentation for the web server itself can be found by accessing the manual if the apache2-doc package was installed on this server.

The configuration layout for an Apache2 web server installation on Ubuntu systems is as follows:

/etc/apache2/
|-- apache2.conf
|       `--  ports.conf
|-- mods-enabled
|       |-- *.load
|       `-- *.conf
|-- conf-enabled
|       `-- *.conf
|-- sites-enabled
|       `-- *.conf

apache2.conf is the main configuration file. It puts the pieces together by including all remaining configuration files when starting up the web server.
ports.conf is always included from the main configuration file. It is used to determine the listening ports for incoming connections, and this file can be customized anytime.
Configuration files in the mods-enabled/, conf-enabled/ and sites-enabled/ directories contain particular configuration snippets which manage modules, global configuration fragments, or virtual host configurations, respectively.
They are activated by symlinking available configuration files from their respective *-available/ counterparts. These should be managed by using our helpers a2enmod, a2dismod, a2ensite, a2dissite, and a2enconf, a2disconf . See their respective man pages for detailed information.
The binary is called apache2 and is managed using systemd, so to start/stop the service use systemctl start apache2 and systemctl stop apache2, and use systemctl status apache2 and journalctl -u apache2 to check status. system and apache2ctl can also be used for service management if desired. Calling /usr/bin/apache2 directly will not work with the default configuration.
Document Roots
By default, Ubuntu does not allow access through the web browser to any file outside of those located in /var/www, public_html directories (when enabled) and /usr/share (for web applications). If your site is using a web document root located elsewhere (such as in /srv) you may need to whitelist your document root directory in /etc/apache2/apache2.conf.

The default Ubuntu document root is /var/www/html. You can make your own virtual hosts under /var/www.

Reporting Problems
Please use the ubuntu-bug tool to report bugs in the Apache2 package with Ubuntu. However, check existing bug reports before reporting a new bug.

Please report bugs specific to modules (such as PHP and others) to their respective packages, not to the web server itself.


 267
267

 被折叠的 条评论
为什么被折叠?
被折叠的 条评论
为什么被折叠?
 到【灌水乐园】发言


