


目录
Shiro的简介和基本使用这里就不介绍了
快速入门请跳转到:Shiro快速入门
一、搭建项目
1、创建SpringBoot项目
- 新建SpringBoot项目时,勾选web、thymeleaf、lombok

导入相关依赖
        <!--shiro-->
        <dependency>
            <groupId>org.apache.shiro</groupId>
            <artifactId>shiro-spring</artifactId>
            <version>1.4.1</version>
        </dependency>
2、创建配置类
自定义UserRealm
public class UerRealm extends AuthorizingRealm {

    //授权
    @Override
    protected AuthorizationInfo doGetAuthorizationInfo(PrincipalCollection principalCollection) {
        System.out.println("执行了授权");

        return null;
    }

    //认证
    @Override
    protected AuthenticationInfo doGetAuthenticationInfo(AuthenticationToken authenticationToken) throws AuthenticationException {
        System.out.println("执行了认证");

        return null;

    }

}
ShiroConfig
这个类是Shiro的核心配置类,里面继承了ShiroFilter、SecurityManager和上面的自定义的Realm
@Configuration
public class ShiroConfig {

    //1.创建shiroFilter  //负责拦截所有请求
    @Bean
    public ShiroFilterFactoryBean getShiroFilterFactoryBean(@Qualifier("getDefaultWebSecurityManager") DefaultWebSecurityManager defaultWebSecurityManager){
        ShiroFilterFactoryBean bean=new ShiroFilterFactoryBean();
        //设置安全管理器
        bean.setSecurityManager(defaultWebSecurityManager);

        return bean;

    }

    //DefaultWebSecurityManager
    @Bean
    public DefaultWebSecurityManager getDefaultWebSecurityManager(@Qualifier("userRealm") UserRealm uerRealm){
        DefaultWebSecurityManager securityManager=new DefaultWebSecurityManager();

        //关联CustomerRealm
        securityManager.setRealm(uerRealm);

        return securityManager;
    }


    //创建realm对象
    @Bean
    public UserRealm getRealm(){
        return new UserRealm();
    }
}
Shiro中常见过滤器
| 配置缩写 | 对应的过滤器 | 功能 |
|---|---|---|
| anon | AnonymousFilter | 指定url可以匿名访问 |
| authc | FormAuthenticationFilter | 指定url需要form表单登录,默认会从请求中获取username、password,rememberMe等参数并尝试登录,如果登录不了就会跳转到loginUrl配置的路径。我们也可以用这个过滤器做默认的登录逻辑,但是一般都是我们自己在控制器写登录逻辑的,自己写的话出错返回的信息都可以定制嘛。 |
| authcBasic | BasicHttpAuthenticationFilter | 指定url需要basic登录 |
| logout | LogoutFilter | 登出过滤器,配置指定url就可以实现退出功能,非常方便 |
| noSessionCreation | NoSessionCreationFilter | 禁止创建会话 |
| perms | PermissionsAuthorizationFilter | 需要指定权限才能访问 |
| port | PortFilter | 需要指定端口才能访问 |
| rest | HttpMethodPermissionFilter | 将http请求方法转化成相应的动词来构造一个权限字符串,这个感觉意义不大,有兴趣自己看源码的注释 |
| roles | RolesAuthorizationFilter | 需要指定角色才能访问 |
| ssl | SslFilter | 需要https请求才能访问 |
| user | UserFilter | 需要已登录或“记住我”的用户才能访问 |
3、index和login页面编写
<!DOCTYPE html>
<html lang="en"
      xmlns:th="https://www.thymeleaf.org">
<head>
    <meta charset="UTF-8">
    <title>Title</title>
</head>
<body>

<h1>系统主页</h1>

<ul>
    <li><a href="">用户管理</a></li>
    <li><a href="">订单管理</a></li>
</ul>

</body>
</html>
<!DOCTYPE html>
<html lang="en"
      xmlns:th="https://www.thymeleaf.org">
<head>
    <meta charset="UTF-8">
    <title>Title</title>
</head>
<body>

<h1>用户登录</h1>

<form th:action="${/login}" method="post">
        用户名:<input type="text" name="username"> <br/>
        密码: <input type="text" name="password"> <br>
        <input type="submit" value="登录">
</form>

</body>
</html>
4、controller层编写
@Controller
public class MyController {

    @RequestMapping("/toLogin")
    public String toLogin(){
        return "login";
    }

    @RequestMapping("/toIndex")
    public String toLogin(){
        return "index";
    }


    @RequestMapping("/login")
    public String login(String username,String password){
        // 获取当前登录用户
        Subject subject = SecurityUtils.getSubject();

        try {
            // 执行登录操作
            subject.login(new UsernamePasswordToken(username,password));
            // 认证通过后直接跳转到index.html
            return "redirect:/toIndex";
        } catch (UnknownAccountException e) {
            e.printStackTrace();
            System.out.println("用户名错误~");
        } catch (IncorrectCredentialsException e) {
            e.printStackTrace();
            System.out.println("密码错误~");
        } catch (Exception e) {
            e.printStackTrace();
        }
        // 如果认证失败仍然回到登录页面
        return "redirect:/toLogin";
    }
}
5、在UserRealm中实现认证
public class UserRealm extends AuthorizingRealm {
    // 授权
    @Override
    protected AuthorizationInfo doGetAuthorizationInfo(PrincipalCollection principals) {
        return null;
    }

    // 认证
    @Override
    protected AuthenticationInfo doGetAuthenticationInfo(AuthenticationToken token) throws AuthenticationException {
        // 获取当前登录的主题
        String principal = (String) token.getPrincipal();
        // 模拟数据库返回的数据
        if("admin".equals(principal)){
            return new SimpleAuthenticationInfo(principal,"123456",this.getName());
        }
        return null;
    }
}
上面的认证中只要我们输入的用户名是admin,密码123456就可以认证通过进入到主页
在ShiroConfig编写资源访问限制
@Configuration
public class ShiroConfig {

    //1.创建shiroFilter  //负责拦截所有请求
    @Bean
    public ShiroFilterFactoryBean getShiroFilterFactoryBean(@Qualifier("getDefaultWebSecurityManager") DefaultWebSecurityManager defaultWebSecurityManager){
        ShiroFilterFactoryBean bean=new ShiroFilterFactoryBean();
        //设置安全管理器
        bean.setSecurityManager(defaultWebSecurityManager);

        //配置系统受限资源
        //配置系统公共资源
        Map<String,String> map = new HashMap<String,String>();
        map.put("/toIndex","anon");
        map.put("/toLogin","anon");  // anon 设置为公共资源,放行要注意anon和authc的顺序
        map.put("/","authc");       //authc 请求这个资源需要认证和授权
        map.put("/index","authc");  //authc 请求这个资源需要认证和授权

        //默认认证界面路径
        shiroFilterFactoryBean.setLoginUrl("/toLogin");
        shiroFilterFactoryBean.setFilterChainDefinitionMap(map);


        return bean;

    }

    //DefaultWebSecurityManager
    @Bean
    public DefaultWebSecurityManager getDefaultWebSecurityManager(@Qualifier("userRealm") UserRealm uerRealm){...}


    //创建realm对象
    @Bean
    public UserRealm userRealm(){...}
}
测试:可以发现在未登录的前提下直接访问/和/index是无法访问的,会跳转到登录界面
二、MD5、Salt的注册
1、新建register.html
<!DOCTYPE html>
<html lang="en"
      xmlns:th="https://www.thymeleaf.org">
<head>
    <meta charset="UTF-8">
    <title>Title</title>
</head>
<body>

<h1>用户注册</h1>

<form th:action="${/register}" method="post">
        用户名:<input type="text" name="username"> <br/>
        密码: <input type="text" name="password"> <br>
        <input type="submit" value="立即注册">
</form>

</body>
</html>
2、新建表t_user
DROP TABLE IF EXISTS `t_user`;
create table `t_user` (
	`id` int (11),
	`username` varchar (32),
	`password` varchar (32),
	`salt` varchar (32),
);
        <dependency>
            <groupId>com.alibaba</groupId>
            <artifactId>druid</artifactId>
            <version>1.1.12</version>
        </dependency>
    <!-- mybatis plus -->
        <dependency>
            <groupId>com.baomidou</groupId>
            <artifactId>mybatis-plus-boot-starter</artifactId>
            <version>3.4.1</version>
        </dependency>
3、application.yml
spring:
  datasource:
    type: com.alibaba.druid.pool.DruidDataSource
    druid:
      driver-class-name: com.mysql.jdbc.Driver
      url: jdbc:mysql://localhost:3306/shiro?useUnicode=true&characterEncoding=UTF-8&allowMultiQueries=true&serverTimezone=UTC
      username: root
      password: 123456
      # 监控统计拦截的filters
      filters: stat,wall,log4j,config
      # 配置初始化大小/最小/最大
      initial-size: 5
      min-idle: 5
      max-active: 20
      # 获取连接等待超时时间
      max-wait: 60000
      # 间隔多久进行一次检测,检测需要关闭的空闲连接
      time-between-eviction-runs-millis: 60000
      # 一个连接在池中最小生存的时间
      min-evictable-idle-time-millis: 300000
      validation-query: SELECT 'x'
      test-while-idle: true
      test-on-borrow: false
      test-on-return: false
      # 打开PSCache,并指定每个连接上PSCache的大小。oracle设为true,mysql设为false。分库分表较多推荐设置为false
      pool-prepared-statements: false
      max-pool-prepared-statement-per-connection-size: 20

mybatis-plus:
  type-aliases-package: com.christy.shiro.entity
  configuration:
    map-underscore-to-camel-case: true
4、新建实体类
@Data
@NoArgsConstructor
@AllArgsConstructor
public class User implements Serializable {
    /** 数据库中设置该字段自增时该注解不能少 **/
    @TableId(type = IdType.AUTO)
    private Integer id;

    private String username;

    private String password;

    private String salt;
}
5、新建UserMapper
@Mapper
public interface UserMapper extends BaseMapper<User> {

}
6、新建service层和SaltUtil
(1)UserService
public interface UserService {

    void register(User user);
}
(2)UserServiceImpl
@Service
public class UserServiceImpl implements UserService {
    @Autowired
    private UserMapper userMapper;

    @Override
    public void register(User user) {
        // 生成随机盐
        String salt = SaltUtil.getSalt(ShiroConstant.SALT_LENGTH);
        // 保存随机盐
        user.setSalt(salt);
        // 生成密码
        Md5Hash password = new Md5Hash(user.getPassword(), salt, ShiroConstant.HASH_ITERATORS);
        // 保存密码
        user.setPassword(password.toHex());
        userMapper.insert(user);
    }
}
(3)SaltUtil
/**
 * 用户随机盐生成工具类
 */
public class SaltUtil {

    public static String getSalt(int n){
        char[] chars = "ABCDEFGHIJKLMNOPQRSTUVWXYZabcdefghijklmnopqrstuvwxyz01234567890!@#$%^&*()".toCharArray();
        StringBuilder sb = new StringBuilder();
        for (int i = 0; i < n; i++) {
            char aChar = chars[new Random().nextInt(chars.length)];
            sb.append(aChar);
        }
        return sb.toString();
    }
}
(4)ShiroConstant
public class ShiroConstant {
    /** 随机盐的位数 **/
    public static final int SALT_LENGTH = 8;
    /** hash的散列次数 **/
    public static final int HASH_ITERATORS = 1024;
    /** 加密方式 **/
    public interface HASH_ALGORITHM_NAME {
        String MD5 = "MD5";
    }

}
7、编写Controller
@Controller
public class MyController {

    @Autowired
    private UserService userService;

    @RequestMapping("/toLogin")
    public String toLogin(){...}

    @RequestMapping("/toRegister")
    public String toRegister(){...}

    @RequestMapping("/toIndex")
    public String toLogin(){...}

    @RequestMapping("/login")
    public String login(String username,String password){...}

    @RequestMapping("/register")
    public String register(User user){
        try {
            userService.register(user);
            return "redirect:/login.jsp";
        } catch (Exception e) {
            e.printStackTrace();
        }
        return "redirect:/register.jsp";
    }
}
8、编写ShiroConfig
@Configuration
public class ShiroConfig {

    //1.创建shiroFilter  //负责拦截所有请求
    @Bean
    public ShiroFilterFactoryBean getShiroFilterFactoryBean(@Qualifier("getDefaultWebSecurityManager") DefaultWebSecurityManager defaultWebSecurityManager){
        ShiroFilterFactoryBean bean=new ShiroFilterFactoryBean();
        //设置安全管理器
        bean.setSecurityManager(defaultWebSecurityManager);

        //配置系统受限资源
        //配置系统公共资源
        Map<String,String> map = new HashMap<String,String>();
        // anon 设置为公共资源,放行要注意anon和authc的顺序
        map.put("/toIndex","anon");
        map.put("/toLogin","anon");
        map.put("/register","anon");
        map.put("/toRegister","anon");

        map.put("/","authc");
        map.put("/index","authc");  //authc 请求这个资源需要认证和授权

        //默认认证界面路径
        shiroFilterFactoryBean.setLoginUrl("/toLogin");
        shiroFilterFactoryBean.setFilterChainDefinitionMap(map);


        return bean;

    }

    //DefaultWebSecurityManager
    @Bean
    public DefaultWebSecurityManager getDefaultWebSecurityManager(@Qualifier("userRealm") UserRealm uerRealm){...}


    //创建realm对象
    @Bean
    public UserRealm userRealm(){...}
}
重启项目测试:可以看到注册的系用户保存到数据库的密码是经过加密的
三、MD5、Salt的认证
1、编写Service层
public interface UserService {
    ……省略其他方法……

    User findUserByUserName(String userName);
}
@Service("userService")
public class UserServiceImpl implements UserService {
    ……省略其他方法……

    @Override
    public User findUserByUserName(String userName) {
        return userMapper.findUserByUsername(userName);
    }
}
2、编写UserRealm
public class UserRealm extends AuthorizingRealm {
    // 授权
    @Override
    protected AuthorizationInfo doGetAuthorizationInfo(PrincipalCollection principals) {
        return null;
    }

    // 认证
    @Override
    protected AuthenticationInfo doGetAuthenticationInfo(AuthenticationToken token) throws AuthenticationException {
        // 获取当前登录的用户名
        String principal = (String) token.getPrincipal();
        // 由于CustomerRealm并没有交由工厂管理,故不能诸如UserService
        UserService userService = (UserService) ApplicationContextUtil.getBean("userService");
        User user = userService.findUserByUserName(principal);
        if(!ObjectUtils.isEmpty(user)){
            return new SimpleAuthenticationInfo(user.getUsername(),user.getPassword(), new CustomerByteSource(user.getSalt()),this.getName());
        }
        return null;
    }
}
3、编写ApplicationContextUtil
@Component
public class ApplicationContextUtil implements ApplicationContextAware {
    public static ApplicationContext context;

    @Override
    public void setApplicationContext(ApplicationContext applicationContext) throws BeansException {
        this.context = applicationContext;
    }

    /**
     * 根据工厂中的类名获取类实例
     */
    public static Object getBean(String beanName){
        return context.getBean(beanName);
    }
}
4、编写ShiroConfig
@Configuration
public class ShiroConfiguration {

    ……省略其他方法……
    @Bean
    public UserRealm getRealm(){
        UserRealm userRealm = new UserRealm();
        // 设置密码匹配器
        HashedCredentialsMatcher credentialsMatcher = new HashedCredentialsMatcher();
        // 设置加密方式
        credentialsMatcher.setHashAlgorithmName(ShiroConstant.HASH_ALGORITHM_NAME.MD5);
        // 设置散列次数
        credentialsMatcher.setHashIterations(ShiroConstant.HASH_ITERATORS);
        customerRealm.setCredentialsMatcher(credentialsMatcher);
        return uerRealm;
    }
}
重启项目测试:可以看到账号都能登录
四、Shiro基于角色授权
1、创建表
# 之前已经创建过用户表了,这里就不创建了:t_user

DROP TABLE IF EXISTS `t_role`;
CREATE TABLE `t_role` (
  `id` int(11) NOT NULL AUTO_INCREMENT,
  `name` varchar(64) DEFAULT NULL,
  PRIMARY KEY (`id`)
) ENGINE=InnoDB AUTO_INCREMENT=4 DEFAULT CHARSET=utf8;


/*Table structure for table `t_user_role` */

DROP TABLE IF EXISTS `t_user_role`;
CREATE TABLE `t_user_role` (
  `id` int(11) NOT NULL AUTO_INCREMENT,
  `user_id` int(8) DEFAULT NULL,
  `role_id` int(8) DEFAULT NULL,
  PRIMARY KEY (`id`)
) ENGINE=InnoDB AUTO_INCREMENT=7 DEFAULT CHARSET=utf8;
t_user

t_role

t_user_role

2、编写User和Role的实体类
@Data
@NoArgsConstructor
@AllArgsConstructor
public class User{
    /** 其他属性省略 **/
    private List<Role> roles = new ArrayList<>();
}
@Data
@NoArgsConstructor
@AllArgsConstructor
public class Role{
    /** 数据库中设置该字段自增时该注解不能少 **/
    @TableId(type = IdType.AUTO)
    private Integer id;

    private String name;
}
3、编写Mapper层
@Mapper
public interface UserMapper extends BaseMapper<User> {

    @Select("SELECT u.id,u.username,u.password,u.salt FROM t_user u WHERE u.username = #{username}")
    User findUserByUsername(String username);
}
@Mapper
public interface RoleMapper extends BaseMapper<Role> {
    @Select("select r.id,r.name from t_role r left join t_user_role ur on ur.role_id = r.id where ur.user_id = #{userId}")
    List<Role> getRolesByUserId(Integer userId);
}
4、编写Service层
新建RoleService和RoleServiceImpl
public interface RoleService {

    List<Role> getRolesByUserId(Integer userId);
}
@Service("roleService")
public class RoleServiceImpl implements RoleService {
    @Autowired
    private RoleMapper roleMapper;

    @Override
    public List<Role> getRolesByUserId(Integer userId) {
        return roleMapper.getRolesByUserId(userId);
    }
}
5、Realm中实现授权
public class UserRealm extends AuthorizingRealm {
    // 授权
    @Override
    protected AuthorizationInfo doGetAuthorizationInfo(PrincipalCollection principals) {
        // 获取主身份信息
        String principal = (String) principals.getPrimaryPrincipal();

        // 根据用户信息
        UserService userService = (UserService) ApplicationContextUtil.getBean("userService");
        User user = userService.findUserByUserName(principal);

        //根据用户id获取角色信息
        RoleService roleService = (RoleService) ApplicationContextUtil.getBean("roleService");
        List<Role> roles = roleService.getRolesByUserId(user.getId());

        //如果角色信息不为空则添加角色信息
        if(!CollectionUtils.isEmpty(roles)){
            SimpleAuthorizationInfo simpleAuthorizationInfo = new SimpleAuthorizationInfo();
            roles.forEach(role -> {
                simpleAuthorizationInfo.addRole(role.getName());
            });
            return simpleAuthorizationInfo;
        }
        return null;
    }

    /** 认证代码省略 **/
}
6、编写Index页面
编写页面前请导入如下的依赖
        <!--thymeleaf模板-->
        <dependency>
            <groupId>com.github.theborakompanioni</groupId>
            <artifactId>thymeleaf-extras-shiro</artifactId>
            <version>2.0.0</version>
        </dependency>
<!DOCTYPE html>
<html lang="en"
xmlns:th="https://www.thymeleaf.org"
xmlns:shiro="https://www.thymeleaf.org/thymeleaf-extras-shiro">
<head>
<meta charset="UTF-8">
<title>Title</title>
</head>
<body>
<h1>系统主页</h1>
<%--需要引入:xmlns:shiro="https://www.thymeleaf.org/thymeleaf-extras-shiro"--%>
<%-- admin角色的用户能同时拥有用户管理和订单管理的权限,user角色的用户只拥有订单管理的权限 --%>
<ul>
<li shiro:hasAnyRole="admin,user"><a href="">订单管理</a></li>
<li shiro:hasRole="admin"><a href="">用户管理</a></li>
</ul>
</body>
</html>重启项目测试
五、Shiro基于权限的授权
1、新建表新增t_perm和t_role_permn表
DROP TABLE IF EXISTS `t_perms`;
CREATE TABLE `t_perms` (
  `id` int(11) NOT NULL AUTO_INCREMENT,
  `name` varchar(128) DEFAULT NULL,
  `url` varchar(255) DEFAULT NULL,
  PRIMARY KEY (`id`)
) ENGINE=InnoDB AUTO_INCREMENT=4 DEFAULT CHARSET=utf8;


DROP TABLE IF EXISTS `t_role_perms`;
CREATE TABLE `t_role_perms` (
  `id` int(11) NOT NULL AUTO_INCREMENT,
  `role_id` int(11) DEFAULT NULL,
  `perms_id` int(11) DEFAULT NULL,
  PRIMARY KEY (`id`)
) ENGINE=InnoDB AUTO_INCREMENT=6 DEFAULT CHARSET=utf8;
t_perms

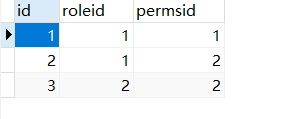
t_role_perms
2、编写Role和Perms实体类
@Data
@NoArgsConstructor
@AllArgsConstructor
public class Role {
    /** 其他属性字段省略 **/

    private List<Permission> permissions = new ArrayList<>();
}
@Data
@NoArgsConstructor
@AllArgsConstructor
public class Perms{
    /** 数据库中设置该字段自增时该注解不能少 **/
    @TableId(type = IdType.AUTO)
    private Integer id;
    private String name;
    private String url;
}
3、编写Mapper层
@Mapper
public interface PermsMapper extends BaseMapper<Perms> {

    @Select("select p.id,p.name,p.url from t_perms p left join t_role_perms rp on rp.perms_id = p.id where rp.role_id = #{roleId}")
    List<Perms> getPermssByRoleId(Integer roleId);

}
4、编写Service层
public interface PermsService {

    List<Perms> getPermsByRoleId(Integer roleId);

}
@Service("permissionService")
public class PermsServiceImpl implements PermsService {
    @Autowired
    private PermsMapper permsMapper;

    @Override
    public List<Perms> getPermssByRoleId(Integer roleId) {
        return permsMapper.getPermssByRoleId(roleId);
    }
}
5、编写userRealm
public class UserRealm extends AuthorizingRealm {
    // 授权
    @Override
    protected AuthorizationInfo doGetAuthorizationInfo(PrincipalCollection principals) {
        // 获取主身份信息
        String principal = (String) principals.getPrimaryPrincipal();
        // 根据主身份信息获取角色信息
        UserService userService = (UserService) ApplicationContextUtil.getBean("userService");
        User user = userService.findUserByUserName(principal);

        RoleService roleService = (RoleService) ApplicationContextUtil.getBean("roleService");
        List<Role> roles = roleService.getRolesByUserId(user.getId());
        if(!CollectionUtils.isEmpty(roles)){
            SimpleAuthorizationInfo simpleAuthorizationInfo = new SimpleAuthorizationInfo();
            roles.forEach(role -> {
                simpleAuthorizationInfo.addRole(role.getName());
                PermissionService permissionService = (PermissionService) ApplicationContextUtil.getBean("permissionService");
                List<Permission> permissions = permissionService.getPermissionsByRoleId(role.getId());
                if(!CollectionUtils.isEmpty(permissions)){
                    permissions.forEach(permission -> {
                        simpleAuthorizationInfo.addStringPermission(permission.getName());
                    });
                }
            });
            return simpleAuthorizationInfo;
        }
        return null;
    }

    /** 认证代码省略 **/
}
6、编写Index页面
<!DOCTYPE html>
<html lang="en"
      xmlns:th="https://www.thymeleaf.org"
      xmlns:shiro="https://www.thymeleaf.org/thymeleaf-extras-shiro">
<head>
    <meta charset="UTF-8">
    <title>Title</title>
</head>
<body>

<h1>系统主页</h1>

<%--需要引入:xmlns:shiro="https://www.thymeleaf.org/thymeleaf-extras-shiro"--%>
 <%-- admin角色的用户能同时拥有用户管理和订单管理的权限,user角色的用户只拥有订单管理的权限 --%>

<ul>
    <li shiro:hasAnyRole="admin,user"><a href="">订单管理</a></li>
    <li shiro:hasRole="admin"><a href="">用户管理</a></li>
</ul>

    <div shiro:hasPermission="user:add:*">
        <a th:href="@{/user/add}">增加</a>
    </div>

    <div shiro:hasPermission="admin:update:*">
        <a th:href="@{/user/update}">修改</a>
    </div>

    <div shiro:hasPermission="admin:delete:*">
        <a th:href="@{/user/update}">删除</a>
    </div>

    <div shiro:hasPermission="user:select:*">
        <a th:href="@{/user/update}">查询</a>
    </div>

</body>
</html>
重启项目测试
六、EhCache实现缓存
目前还在学习中...
如果哪里有错误还望有大佬指明一下,轻点喷


 1万+
1万+


 被折叠的 条评论
为什么被折叠?
被折叠的 条评论
为什么被折叠?
 到【灌水乐园】发言


