


目录
上一篇的写文章-CSDN创作中心实例代码做了一点点小改动可以直接下载代码烧录:阿里云盘分享。
实现内网穿透的前提的拥有一台云服务器,这里博主是学生白嫖了阿里云七个月的云服务器,就教大家怎么使用自己的云服务器实现内网穿透。
也可以借助其他平台免费实现,简单好用参考如下:
ESP32-CAM——内网穿透教程_esp32cam_嵌入式创客工坊的博客-CSDN博客
ESP32-S3搭建外网可访问的网络摄像头(内网穿透)_esp32 网络摄像头-CSDN博客
这里就举例两篇啦,博主使用过都能成功。但是作为一个学习者,还是想自己动手实现一下,最后也成功的添加进了homeasstant中,折腾几天的结果如下。
第一步:修改代码(可点击上面的阿里云盘分享直接下载)
代码修改如下:
/*
  Board: AI-Thinker ESP32-CAM or ESP-EYE
  Compile as:
   ESP32 Dev Module
   CPU Freq: 240
   Flash Freq: 80
   Flash mode: QIO
   Flash Size: 4Mb
   Patrition: Minimal SPIFFS
   PSRAM: Enabled
*/

// ESP32 has two cores: APPlication core and PROcess core (the one that runs ESP32 SDK stack)
#define APP_CPU 1
#define PRO_CPU 0

#include "OV2640.h"
#include <WiFi.h>
#include <WebServer.h>
#include <WiFiClient.h>

#include <esp_bt.h>
#include <esp_wifi.h>
#include <esp_sleep.h>
#include <driver/rtc_io.h>

// Select camera model
//#define CAMERA_MODEL_WROVER_KIT
//#define CAMERA_MODEL_ESP_EYE
//#define CAMERA_MODEL_M5STACK_PSRAM
//#define CAMERA_MODEL_M5STACK_WIDE
#define CAMERA_MODEL_AI_THINKER

#include "camera_pins.h"

/*
  Next one is an include with wifi credentials.
  This is what you need to do:

  1. Create a file called "home_wifi_multi.h" in the same folder   OR   under a separate subfolder of the "libraries" folder of Arduino IDE. (You are creating a "fake" library really - I called it "MySettings").
  2. Place the following text in the file:
  #define SSID1 "replace with your wifi ssid"
  #define PWD1 "replace your wifi password"
  3. Save.

  Should work then
*/
#include "home_wifi_multi.h"

OV2640 cam;

WebServer server(80);

// ===== rtos task handles =========================
// Streaming is implemented with 3 tasks:
TaskHandle_t tMjpeg;   // handles client connections to the webserver
TaskHandle_t tCam;     // handles getting picture frames from the camera and storing them locally
TaskHandle_t tStream;  // actually streaming frames to all connected clients

// frameSync semaphore is used to prevent streaming buffer as it is replaced with the next frame
SemaphoreHandle_t frameSync = NULL;

// Queue stores currently connected clients to whom we are streaming
QueueHandle_t streamingClients;

// We will try to achieve 25 FPS frame rate
const int FPS = 15;

// We will handle web client requests every 50 ms (20 Hz)
const int WSINTERVAL = 100;


// ======== Server Connection Handler Task ==========================
void mjpegCB(void* pvParameters) {
  TickType_t xLastWakeTime;
  const TickType_t xFrequency = pdMS_TO_TICKS(WSINTERVAL);

  // Creating frame synchronization semaphore and initializing it
  frameSync = xSemaphoreCreateBinary();
  xSemaphoreGive( frameSync );

  // Creating a queue to track all connected clients
  streamingClients = xQueueCreate( 10, sizeof(WiFiClient*) );

  //=== setup section  ==================

  //  Creating RTOS task for grabbing frames from the camera
  xTaskCreatePinnedToCore(
    camCB,        // callback
    "cam",        // name
    4096,         // stacj size
    NULL,         // parameters
    2,            // priority
    &tCam,        // RTOS task handle
    APP_CPU);     // core

  //  Creating task to push the stream to all connected clients
  xTaskCreatePinnedToCore(
    streamCB,
    "strmCB",
    4 * 1024,
    NULL, //(void*) handler,
    2,
    &tStream,
    APP_CPU);

  //  Registering webserver handling routines
  server.on("/mjpeg/1", HTTP_GET, handleJPGSstream);
  server.on("/jpg", HTTP_GET, handleJPG);
  server.onNotFound(handleNotFound);

  //  Starting webserver
  server.begin();

  //=== loop() section  ===================
  xLastWakeTime = xTaskGetTickCount();
  for (;;) {
    server.handleClient();

    //  After every server client handling request, we let other tasks run and then pause
    taskYIELD();
    vTaskDelayUntil(&xLastWakeTime, xFrequency);
  }
}


// Commonly used variables:
volatile size_t camSize;    // size of the current frame, byte
volatile char* camBuf;      // pointer to the current frame


// ==== RTOS task to grab frames from the camera =========================
void camCB(void* pvParameters) {

  TickType_t xLastWakeTime;

  //  A running interval associated with currently desired frame rate
  const TickType_t xFrequency = pdMS_TO_TICKS(1000 / FPS);

  // Mutex for the critical section of swithing the active frames around
  portMUX_TYPE xSemaphore = portMUX_INITIALIZER_UNLOCKED;

  //  Pointers to the 2 frames, their respective sizes and index of the current frame
  char* fbs[2] = { NULL, NULL };
  size_t fSize[2] = { 0, 0 };
  int ifb = 0;

  //=== loop() section  ===================
  xLastWakeTime = xTaskGetTickCount();

  for (;;) {

    //  Grab a frame from the camera and query its size
    cam.run();
    size_t s = cam.getSize();

    //  If frame size is more that we have previously allocated - request  125% of the current frame space
    if (s > fSize[ifb]) {
      fSize[ifb] = s * 4 / 3;
      fbs[ifb] = allocateMemory(fbs[ifb], fSize[ifb]);
    }

    //  Copy current frame into local buffer
    char* b = (char*) cam.getfb();
    memcpy(fbs[ifb], b, s);

    //  Let other tasks run and wait until the end of the current frame rate interval (if any time left)
    taskYIELD();
    vTaskDelayUntil(&xLastWakeTime, xFrequency);

    //  Only switch frames around if no frame is currently being streamed to a client
    //  Wait on a semaphore until client operation completes
    xSemaphoreTake( frameSync, portMAX_DELAY );

    //  Do not allow interrupts while switching the current frame
    portENTER_CRITICAL(&xSemaphore);
    camBuf = fbs[ifb];
    camSize = s;
    ifb++;
    ifb &= 1;  // this should produce 1, 0, 1, 0, 1 ... sequence
    portEXIT_CRITICAL(&xSemaphore);

    //  Let anyone waiting for a frame know that the frame is ready
    xSemaphoreGive( frameSync );

    //  Technically only needed once: let the streaming task know that we have at least one frame
    //  and it could start sending frames to the clients, if any
    xTaskNotifyGive( tStream );

    //  Immediately let other (streaming) tasks run
    taskYIELD();

    //  If streaming task has suspended itself (no active clients to stream to)
    //  there is no need to grab frames from the camera. We can save some juice
    //  by suspedning the tasks
    if ( eTaskGetState( tStream ) == eSuspended ) {
      vTaskSuspend(NULL);  // passing NULL means "suspend yourself"
    }
  }
}


// ==== Memory allocator that takes advantage of PSRAM if present =======================
char* allocateMemory(char* aPtr, size_t aSize) {

  //  Since current buffer is too smal, free it
  if (aPtr != NULL) free(aPtr);


  size_t freeHeap = ESP.getFreeHeap();
  char* ptr = NULL;

  // If memory requested is more than 2/3 of the currently free heap, try PSRAM immediately
  if ( aSize > freeHeap * 2 / 3 ) {
    if ( psramFound() && ESP.getFreePsram() > aSize ) {
      ptr = (char*) ps_malloc(aSize);
    }
  }
  else {
    //  Enough free heap - let's try allocating fast RAM as a buffer
    ptr = (char*) malloc(aSize);

    //  If allocation on the heap failed, let's give PSRAM one more chance:
    if ( ptr == NULL && psramFound() && ESP.getFreePsram() > aSize) {
      ptr = (char*) ps_malloc(aSize);
    }
  }

  // Finally, if the memory pointer is NULL, we were not able to allocate any memory, and that is a terminal condition.
  if (ptr == NULL) {
    ESP.restart();
  }
  return ptr;
}


// ==== STREAMING ======================================================
const char HEADER[] = "HTTP/1.1 200 OK\r\n" \
                      "Access-Control-Allow-Origin: *\r\n" \
                      "Content-Type: multipart/x-mixed-replace; boundary=123456789000000000000987654321\r\n";
const char BOUNDARY[] = "\r\n--123456789000000000000987654321\r\n";
const char CTNTTYPE[] = "Content-Type: image/jpeg\r\nContent-Length: ";
const int hdrLen = strlen(HEADER);
const int bdrLen = strlen(BOUNDARY);
const int cntLen = strlen(CTNTTYPE);


// ==== Handle connection request from clients ===============================
void handleJPGSstream(void)
{
  //  Can only acommodate 10 clients. The limit is a default for WiFi connections
  if ( !uxQueueSpacesAvailable(streamingClients) ) return;


  //  Create a new WiFi Client object to keep track of this one
  WiFiClient* client = new WiFiClient();
  *client = server.client();

  //  Immediately send this client a header
  client->write(HEADER, hdrLen);
  client->write(BOUNDARY, bdrLen);

  // Push the client to the streaming queue
  xQueueSend(streamingClients, (void *) &client, 0);

  // Wake up streaming tasks, if they were previously suspended:
  if ( eTaskGetState( tCam ) == eSuspended ) vTaskResume( tCam );
  if ( eTaskGetState( tStream ) == eSuspended ) vTaskResume( tStream );
}


// ==== Actually stream content to all connected clients ========================
void streamCB(void * pvParameters) {
  char buf[16];
  TickType_t xLastWakeTime;
  TickType_t xFrequency;

  //  Wait until the first frame is captured and there is something to send
  //  to clients
  ulTaskNotifyTake( pdTRUE,          /* Clear the notification value before exiting. */
                    portMAX_DELAY ); /* Block indefinitely. */

  xLastWakeTime = xTaskGetTickCount();
  for (;;) {
    // Default assumption we are running according to the FPS
    xFrequency = pdMS_TO_TICKS(1000 / FPS);

    //  Only bother to send anything if there is someone watching
    UBaseType_t activeClients = uxQueueMessagesWaiting(streamingClients);
    if ( activeClients ) {
      // Adjust the period to the number of connected clients
      xFrequency /= activeClients;

      //  Since we are sending the same frame to everyone,
      //  pop a client from the the front of the queue
      WiFiClient *client;
      xQueueReceive (streamingClients, (void*) &client, 0);

      //  Check if this client is still connected.

      if (!client->connected()) {
        //  delete this client reference if s/he has disconnected
        //  and don't put it back on the queue anymore. Bye!
        delete client;
      }
      else {

        //  Ok. This is an actively connected client.
        //  Let's grab a semaphore to prevent frame changes while we
        //  are serving this frame
        xSemaphoreTake( frameSync, portMAX_DELAY );

        client->write(CTNTTYPE, cntLen);
        sprintf(buf, "%d\r\n\r\n", camSize);
        client->write(buf, strlen(buf));
        client->write((char*) camBuf, (size_t)camSize);
        client->write(BOUNDARY, bdrLen);

        // Since this client is still connected, push it to the end
        // of the queue for further processing
        xQueueSend(streamingClients, (void *) &client, 0);

        //  The frame has been served. Release the semaphore and let other tasks run.
        //  If there is a frame switch ready, it will happen now in between frames
        xSemaphoreGive( frameSync );
        taskYIELD();
      }
    }
    else {
      //  Since there are no connected clients, there is no reason to waste battery running
      vTaskSuspend(NULL);
    }
    //  Let other tasks run after serving every client
    taskYIELD();
    vTaskDelayUntil(&xLastWakeTime, xFrequency);
  }
}


const char JHEADER[] = "HTTP/1.1 200 OK\r\n" \
                       "Content-disposition: inline; filename=capture.jpg\r\n" \
                       "Content-type: image/jpeg\r\n\r\n";
const int jhdLen = strlen(JHEADER);

// ==== Serve up one JPEG frame =============================================
void handleJPG(void)
{
  WiFiClient client = server.client();

  if (!client.connected()) return;
  cam.run();
  client.write(JHEADER, jhdLen);
  client.write((char*)cam.getfb(), cam.getSize());
}


// ==== Handle invalid URL requests ============================================
void handleNotFound()
{
  String message = "Server is running!\n\n";
  message += "URI: ";
  message += server.uri();
  message += "\nMethod: ";
  message += (server.method() == HTTP_GET) ? "GET" : "POST";
  message += "\nArguments: ";
  message += server.args();
  message += "\n";
  server.send(200, "text / plain", message);
}


// ==== SETUP method ==================================================================
void setup()
{

  // Setup Serial connection:
  Serial.begin(115200);
  delay(1000); // wait for a second to let Serial connect


  // Configure the camera
  camera_config_t config;
  config.ledc_channel = LEDC_CHANNEL_0;
  config.ledc_timer = LEDC_TIMER_0;
  config.pin_d0 = Y2_GPIO_NUM;
  config.pin_d1 = Y3_GPIO_NUM;
  config.pin_d2 = Y4_GPIO_NUM;
  config.pin_d3 = Y5_GPIO_NUM;
  config.pin_d4 = Y6_GPIO_NUM;
  config.pin_d5 = Y7_GPIO_NUM;
  config.pin_d6 = Y8_GPIO_NUM;
  config.pin_d7 = Y9_GPIO_NUM;
  config.pin_xclk = XCLK_GPIO_NUM;
  config.pin_pclk = PCLK_GPIO_NUM;
  config.pin_vsync = VSYNC_GPIO_NUM;
  config.pin_href = HREF_GPIO_NUM;
  config.pin_sscb_sda = SIOD_GPIO_NUM;
  config.pin_sscb_scl = SIOC_GPIO_NUM;
  config.pin_pwdn = PWDN_GPIO_NUM;
  config.pin_reset = RESET_GPIO_NUM;
  config.xclk_freq_hz = 20000000;
  config.pixel_format = PIXFORMAT_JPEG;

  // Frame parameters: pick one
  //  config.frame_size = FRAMESIZE_UXGA;
  //  config.frame_size = FRAMESIZE_SVGA;
  //  config.frame_size = FRAMESIZE_QVGA;
  config.frame_size = FRAMESIZE_VGA;
  config.jpeg_quality = 12;
  config.fb_count = 2;

#if defined(CAMERA_MODEL_ESP_EYE)
  pinMode(13, INPUT_PULLUP);
  pinMode(14, INPUT_PULLUP);
#endif

  if (cam.init(config) != ESP_OK) {
    Serial.println("Error initializing the camera");
    delay(10000);
    ESP.restart();
  }


  //  Configure and connect to WiFi
  IPAddress ip;

  WiFi.mode(WIFI_STA);
  WiFi.begin("w123", "gk12345678");//WIFI名称和密码
//  WiFi.begin("OPPOA93", "12345678");//WIFI名称和密码
  Serial.print("Connecting to WiFi");
  while (WiFi.status() != WL_CONNECTED)
  {
    delay(500);
    Serial.print(F("."));
  }
  ip = WiFi.localIP();
  Serial.println(F("WiFi connected"));
  Serial.println("");
  Serial.print("Stream Link: http://");
  Serial.print(ip);
  Serial.println("/mjpeg/1");


  // Start mainstreaming RTOS task
  xTaskCreatePinnedToCore(
    mjpegCB,
    "mjpeg",
    4 * 1024,
    NULL,
    2,
    &tMjpeg,
    APP_CPU);
}


void loop() {
  vTaskDelay(1000);
}
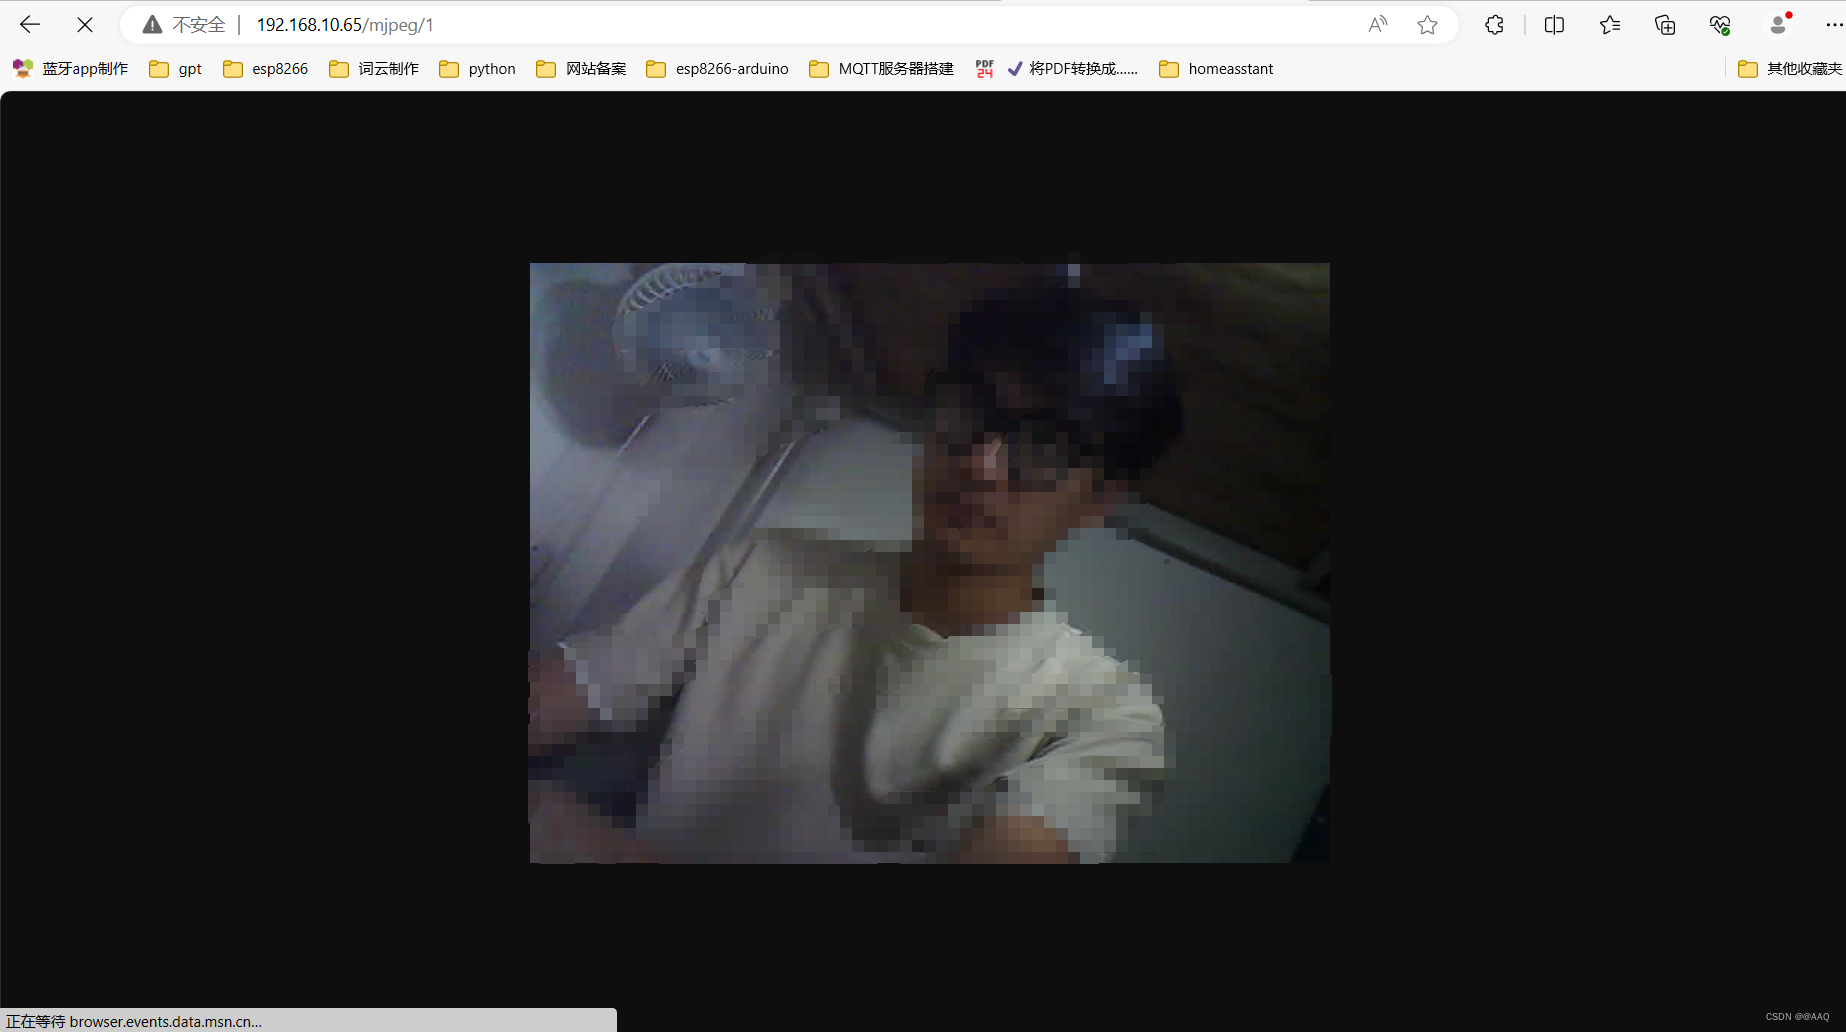
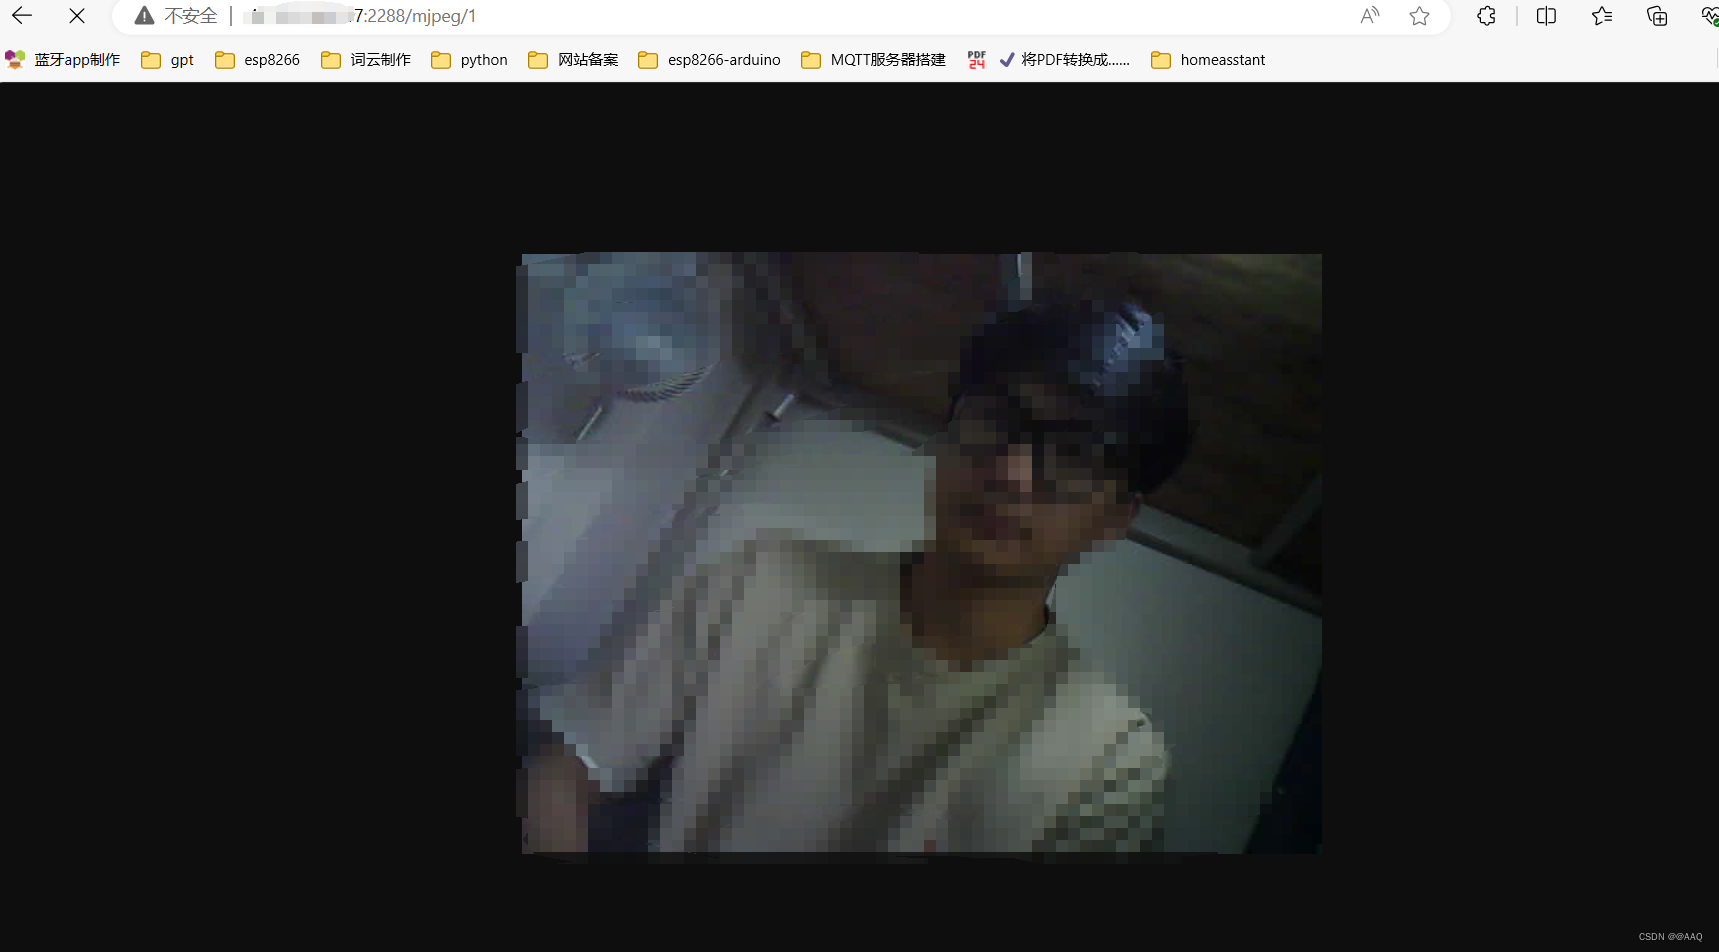
烧录完成后点击窗口访问,可看到一个单独的窗口。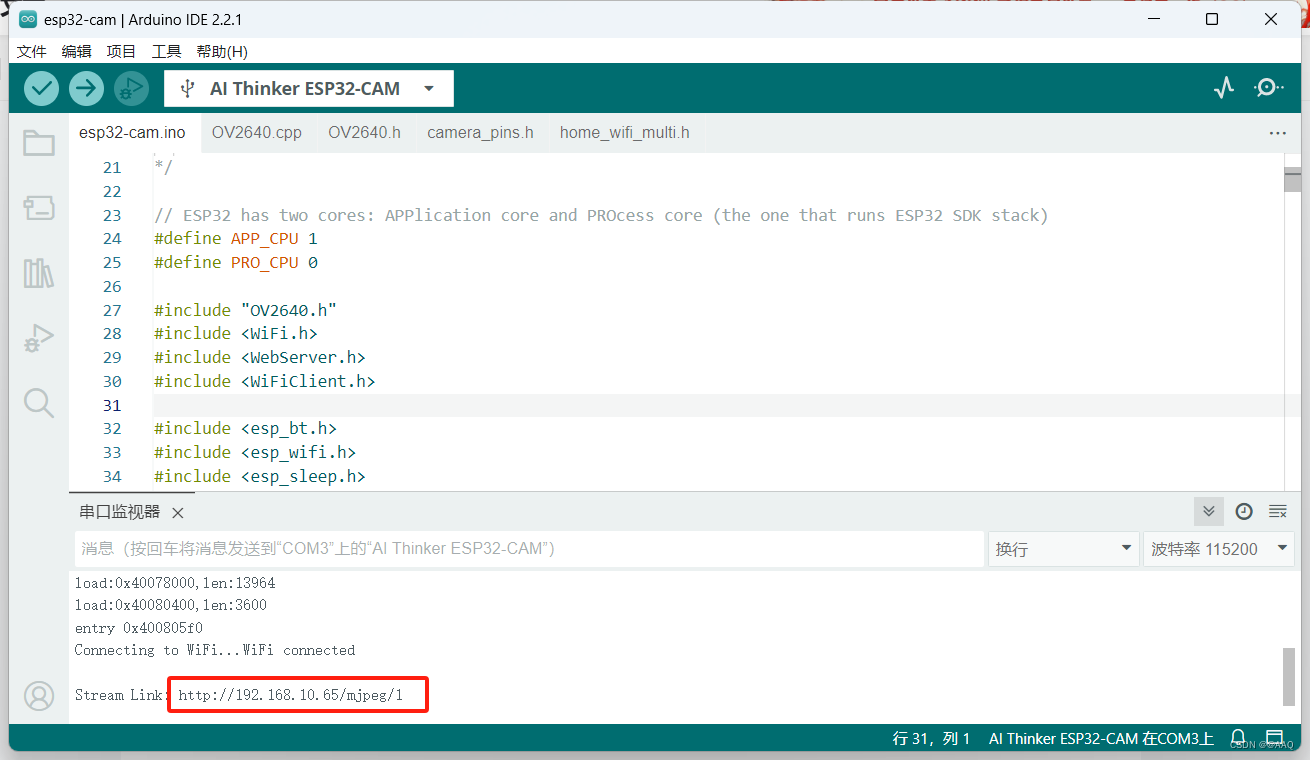
第二步:配置云服务s
使用frp技术,这里有不了解这个技术的可以去百度看一下,博主就不多介绍了。
还在在我之前使用的阿里云云服务器上的ubuntu系统中实现内网穿透,需要和自己的电脑搭配。
首先进入自己的云服务器终端
-
# 创建存放目录 sudo mkdir /frp (在当前目录创建文件夹)
-
# 创建frps.ini文件并编辑: sudo nano /frp/frps.ini
复制以下内容:[common] # 监听端口 bind_port = 7000 # 面板端口 dashboard_port = 7500 # 登录面板账号设置 dashboard_user = admin dashboard_pwd = spoto1234 # 设置http及https协议下代理端口(非重要) vhost_http_port = 7080 vhost_https_port = 7081 # 身份验证 token = 12345678输入完成后按CTRL+X后按Y回车保存退出
-
创建frp容器
sudo docker run --restart=always --network host -d -v /frp/frps.ini:/frp/frps.ini --name frps snowdreamtech/frps -
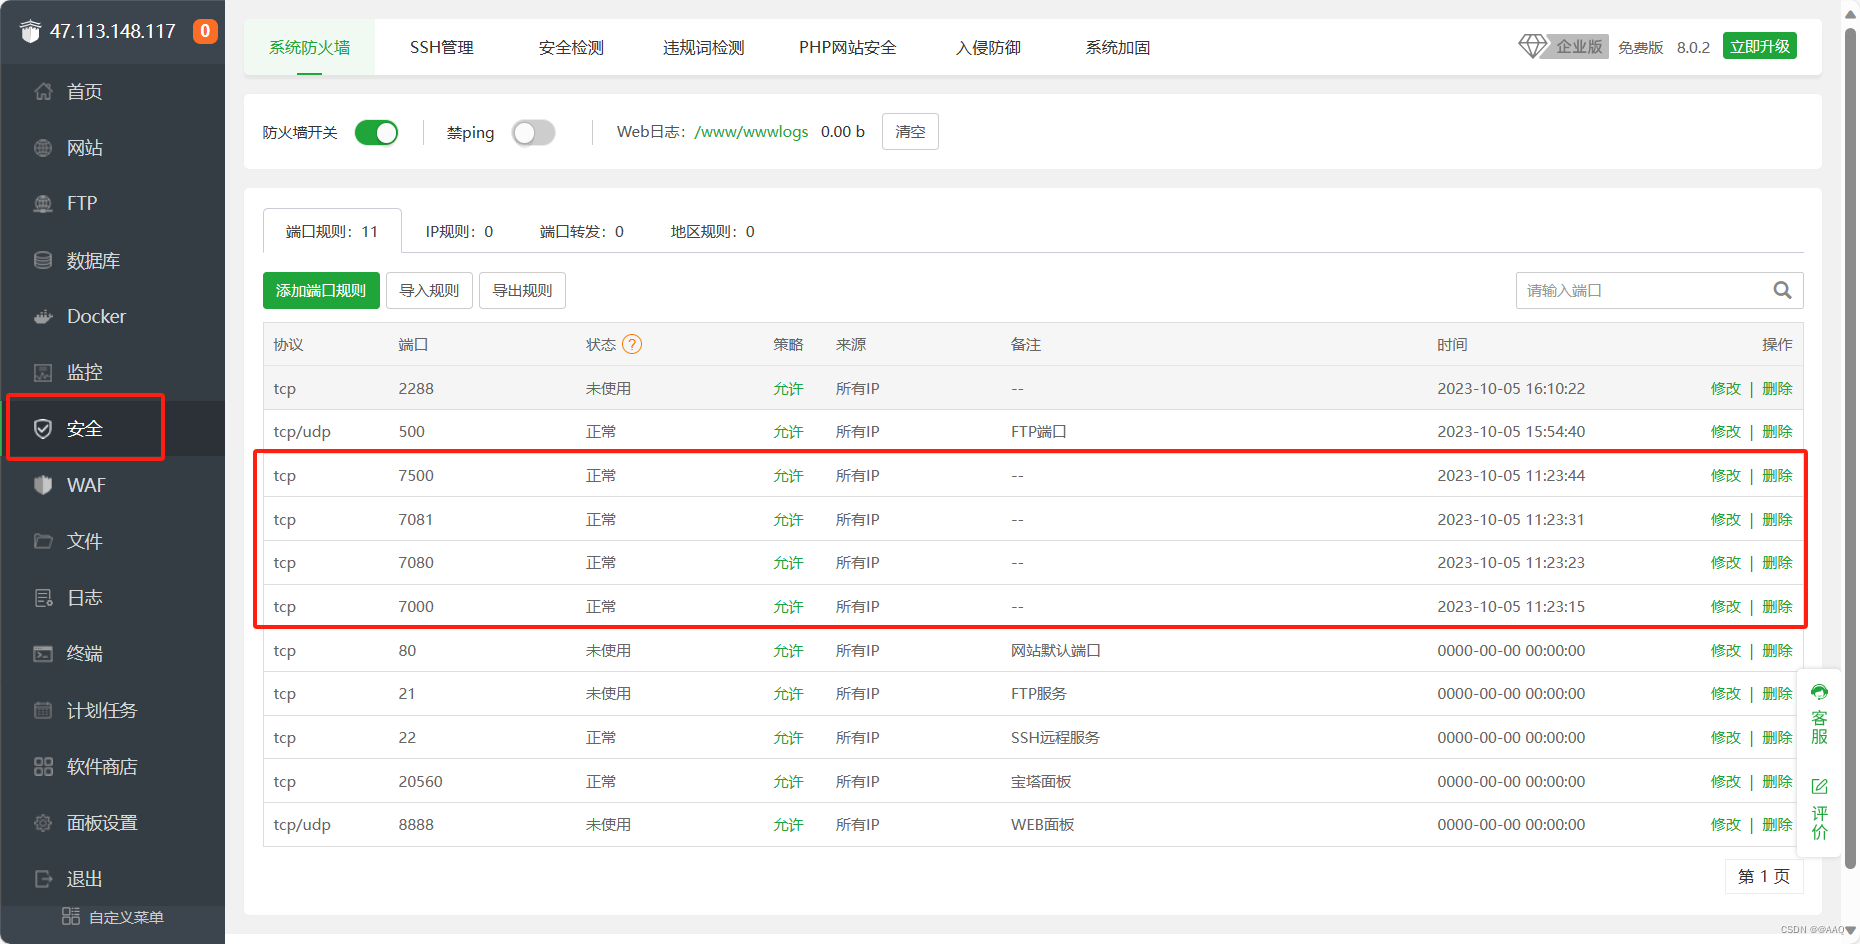
打开云服务器的7000,7080,7081,7500端口,如果安装了宝塔面板也要在宝塔面板带开这些端口

到这里如果宝塔docker显示frp正常启动就证明配置成功了,如果没有启动就点击启动一下或者看一是否是配置步骤有问题,可以重新配置一下。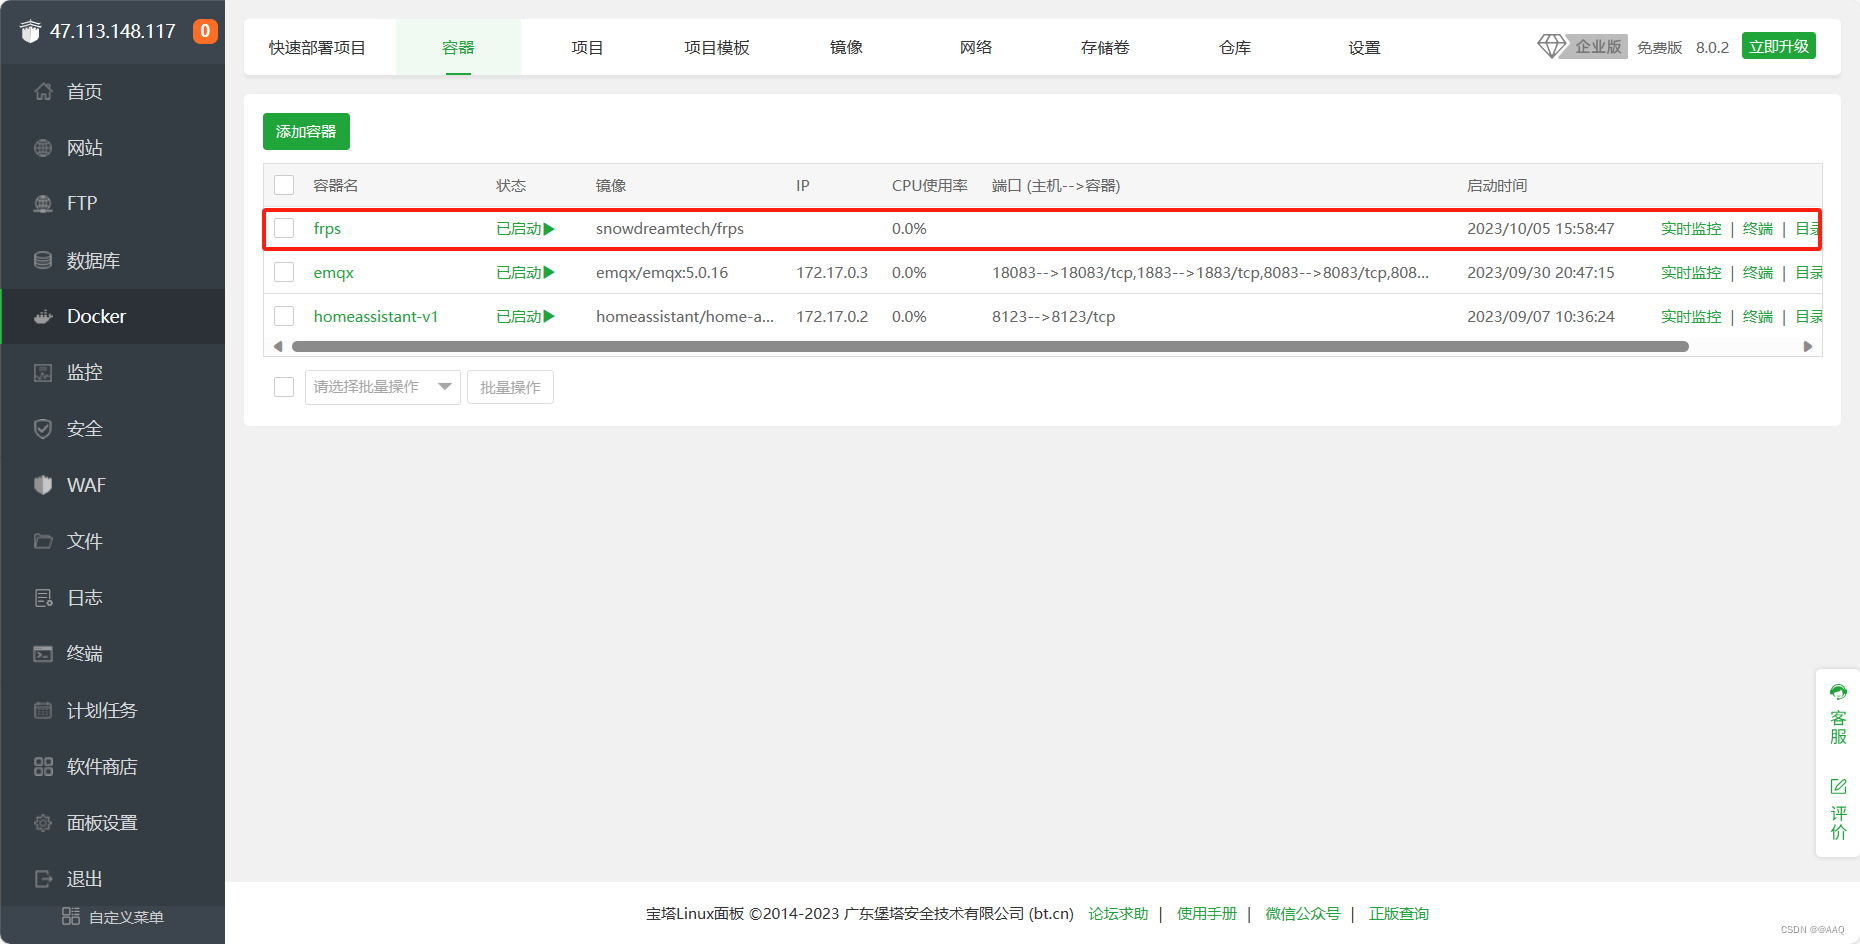
到这里服务器的frps就配置完成了,我们再配置一下window段
第三步:配置window frpc
-
打开网页Release v0.37.1 · fatedier/frp · GitHub下载frp压缩包,文明上网,网络速度慢可以点击我这里阿里云盘分享。
 阿里云盘分享。
 -
下载后解压到目录,注意解压的目录要好找!!

-
打开frpc.ini重新编写内容
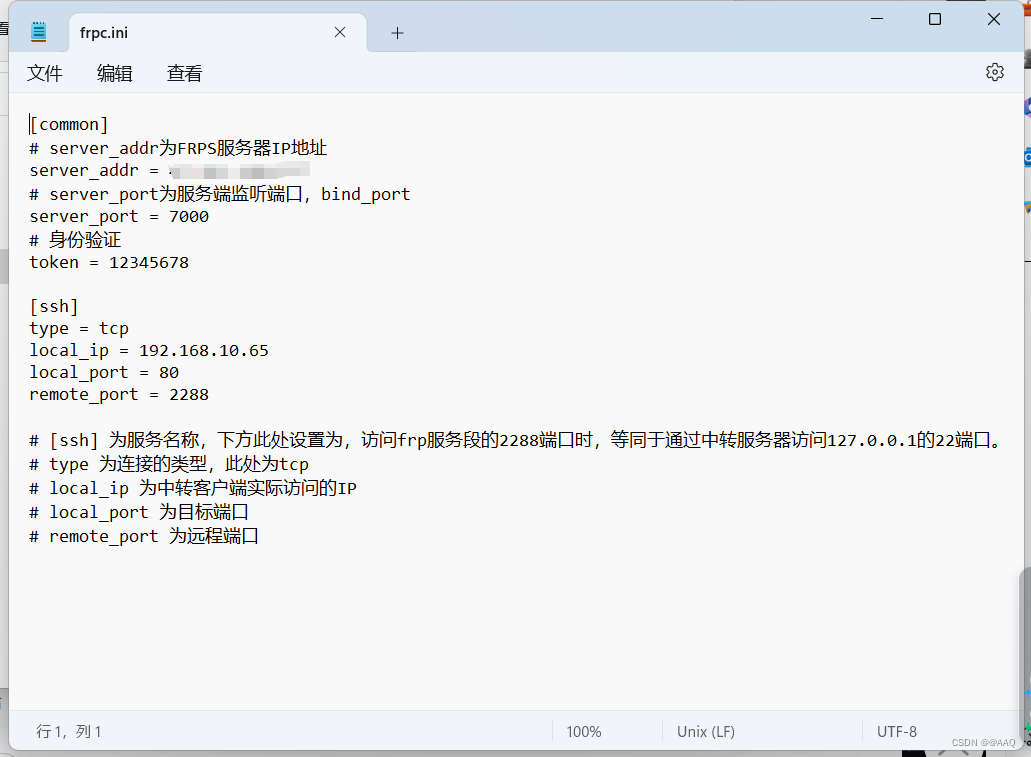
# [ssh] 为服务名称,下方此处设置为,访问frp服务段的2288端口时,等同于通过中转服务器访问127.0.0.1的22端口。
# type 为连接的类型,此处为tcp
# local_ip 为中转客户端实际访问的IP
# local_port 为目标端口
# remote_port 为远程端口

[common]
# server_addr为FRPS服务器IP地址
server_addr = xxx.xxx.xxx
# server_port为服务端监听端口,bind_port
server_port = 7000
# 身份验证
token = 12345678

[ssh]
type = tcp
local_ip = 192.168.10.65
local_port = 80
remote_port = 2288
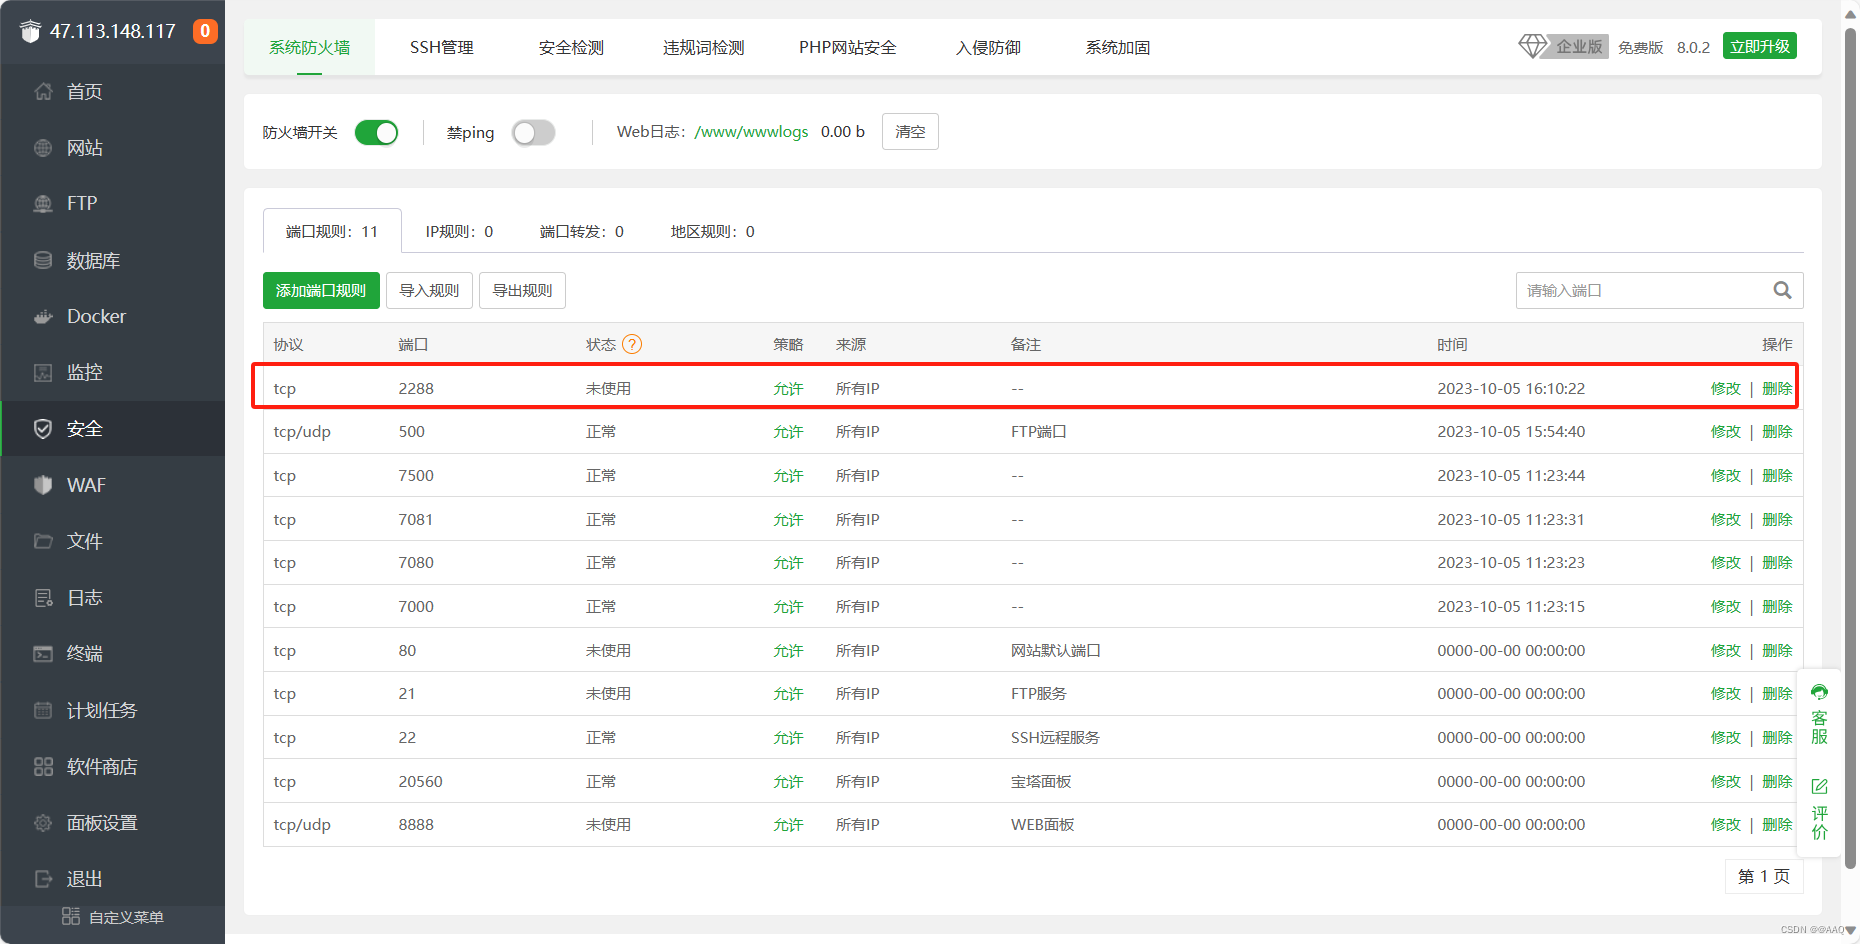
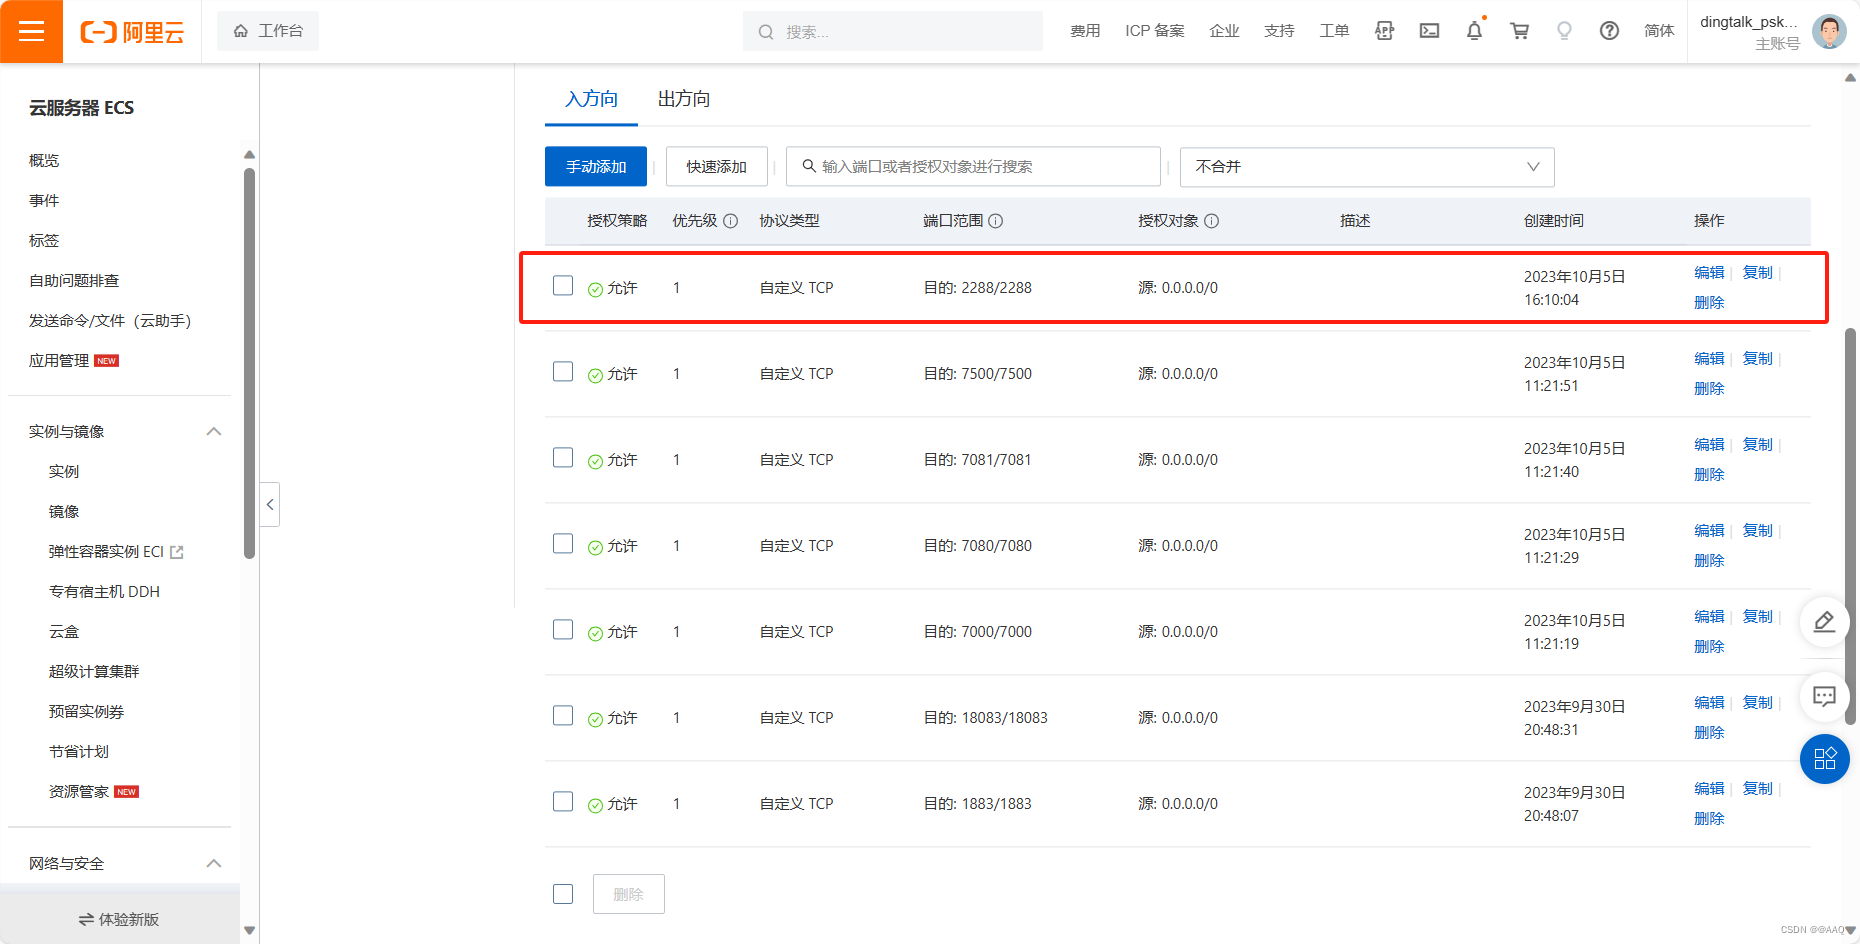
4.把阿里云和宝塔2288端口打开
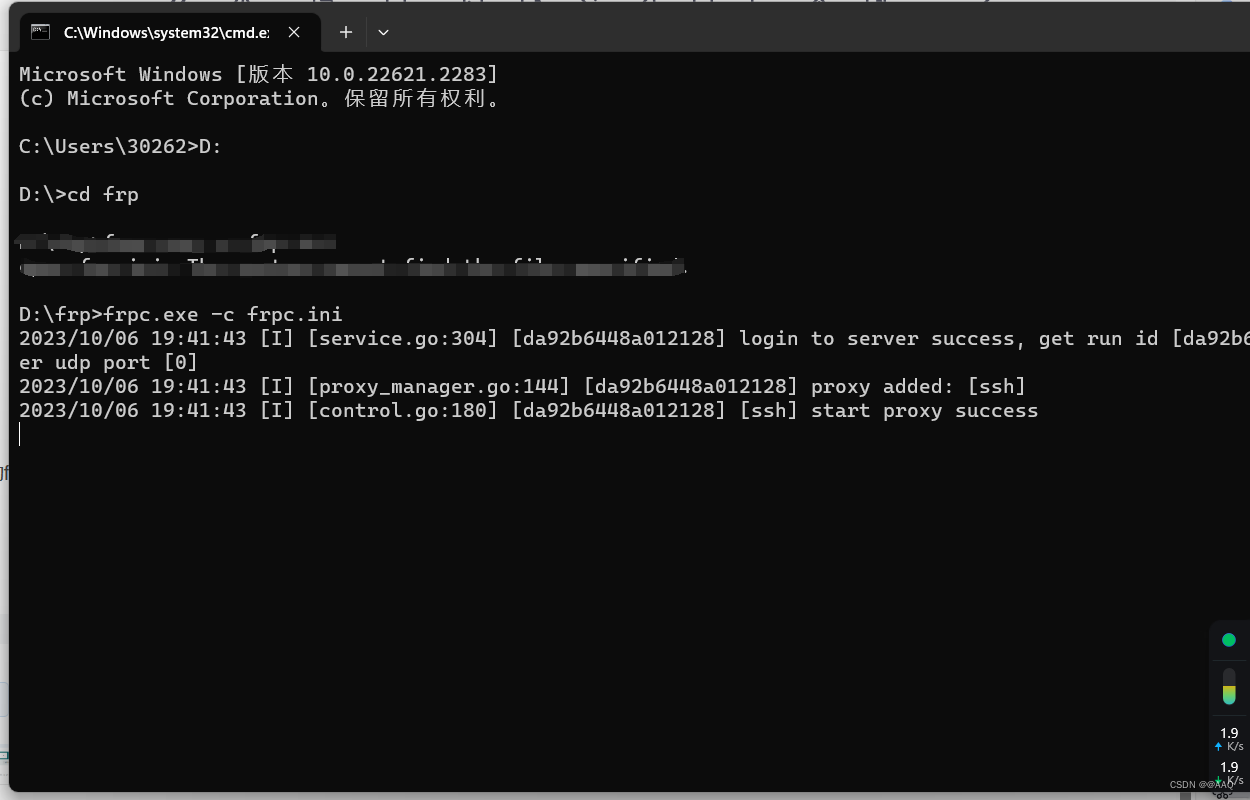
5.在打开cmd,启动frpc.exe客户端如果安装目录跟我一样可以按照我的步骤,使用D:切换到D盘——>cd frp切换到frp文件夹——>frpc.exe -c frpc.ini运行程序。也可以直接在安装frp目录下打开cmd运行frpc.exe -c frpc.ini。
6.这时候就可以直接用 [服务器]:2288端口远程访问你的ESP32-CAM啦。
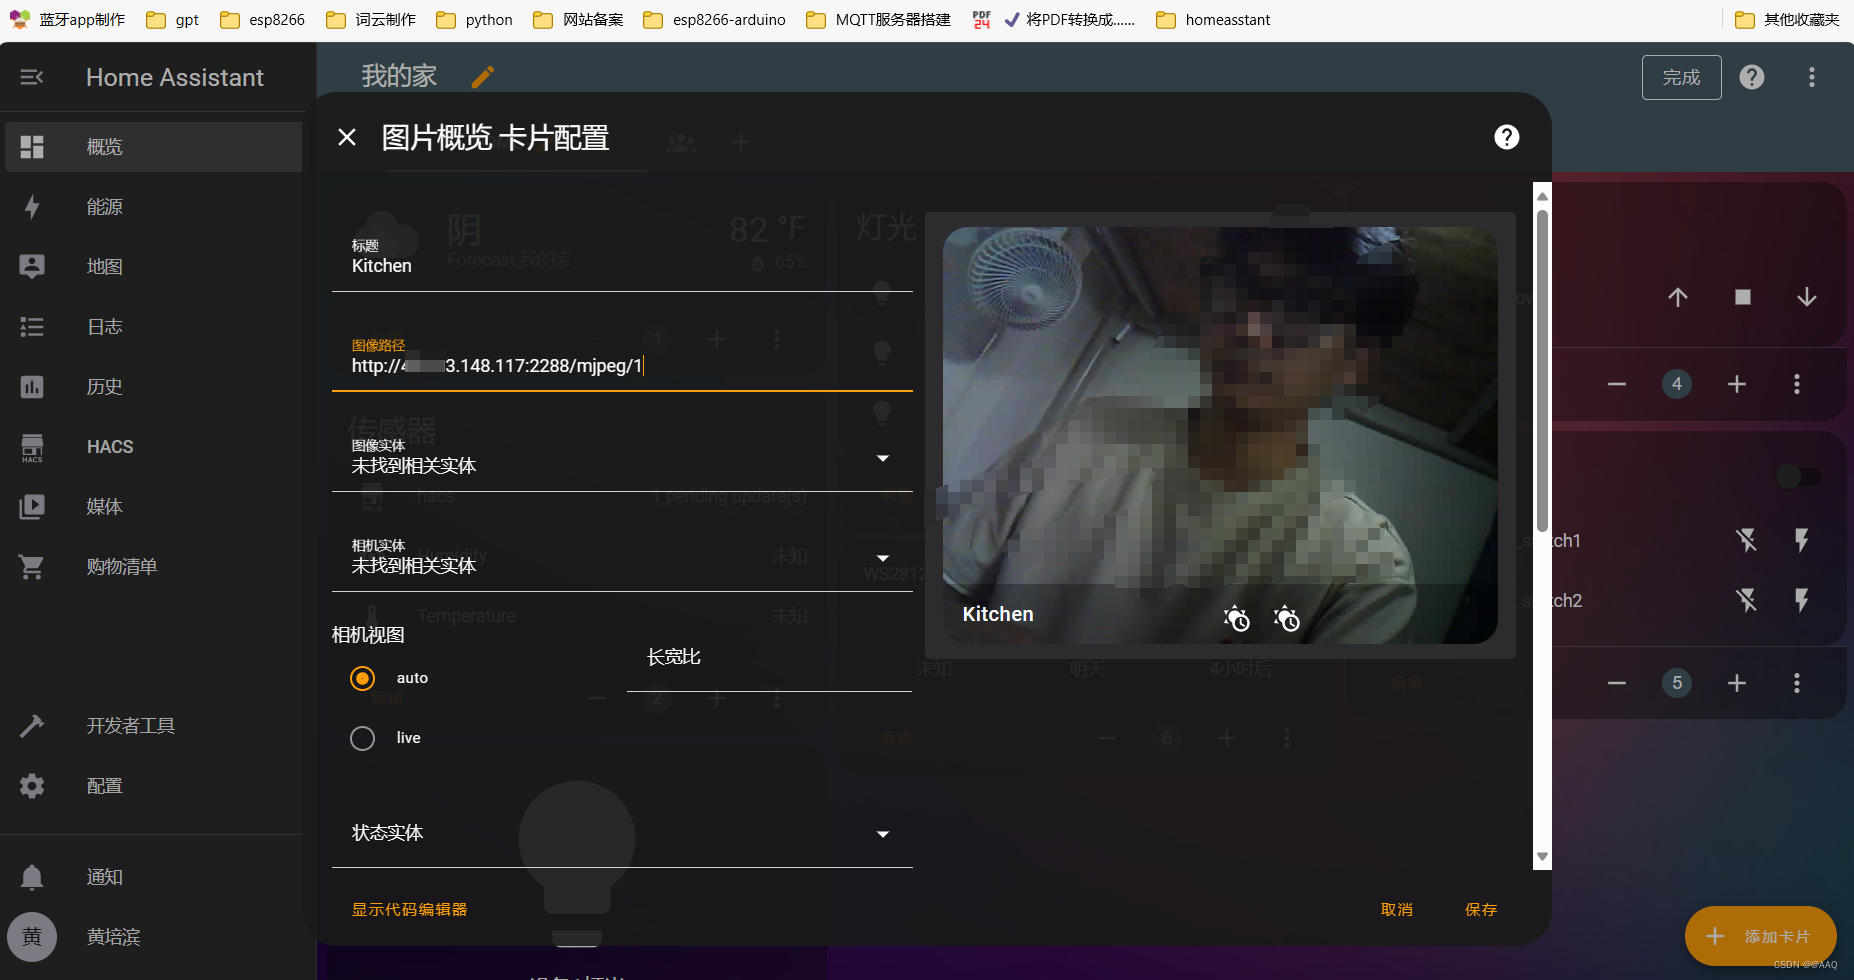
最后就可以加入homeasstant啦
参考:ubantu云服务器与win10下的frp内网穿透部署,并远程控制esp32_启明师兄不会呀!的博客-CSDN博客


 1万+
1万+


 被折叠的 条评论
为什么被折叠?
被折叠的 条评论
为什么被折叠?
 到【灌水乐园】发言


