


 本文围绕深度学习展开,介绍了实验与代码管理方法。配置文件管理推荐用Yaml文件,结合Click+OmegaConf加载参数;注册器机制利用装饰器从配置文件解析模块信息并实例化;钩子函数可在特定代码点插入自定义代码,还介绍了Pytorch相关hook及自定义register_hook函数修改模型层。
文章目录
1. 配置文件管理 Config
1.1 早期配置参数加载
早期深度学习项目的代码大多使用parse_args,在代码启动入口加载大量参数,不利于维护。
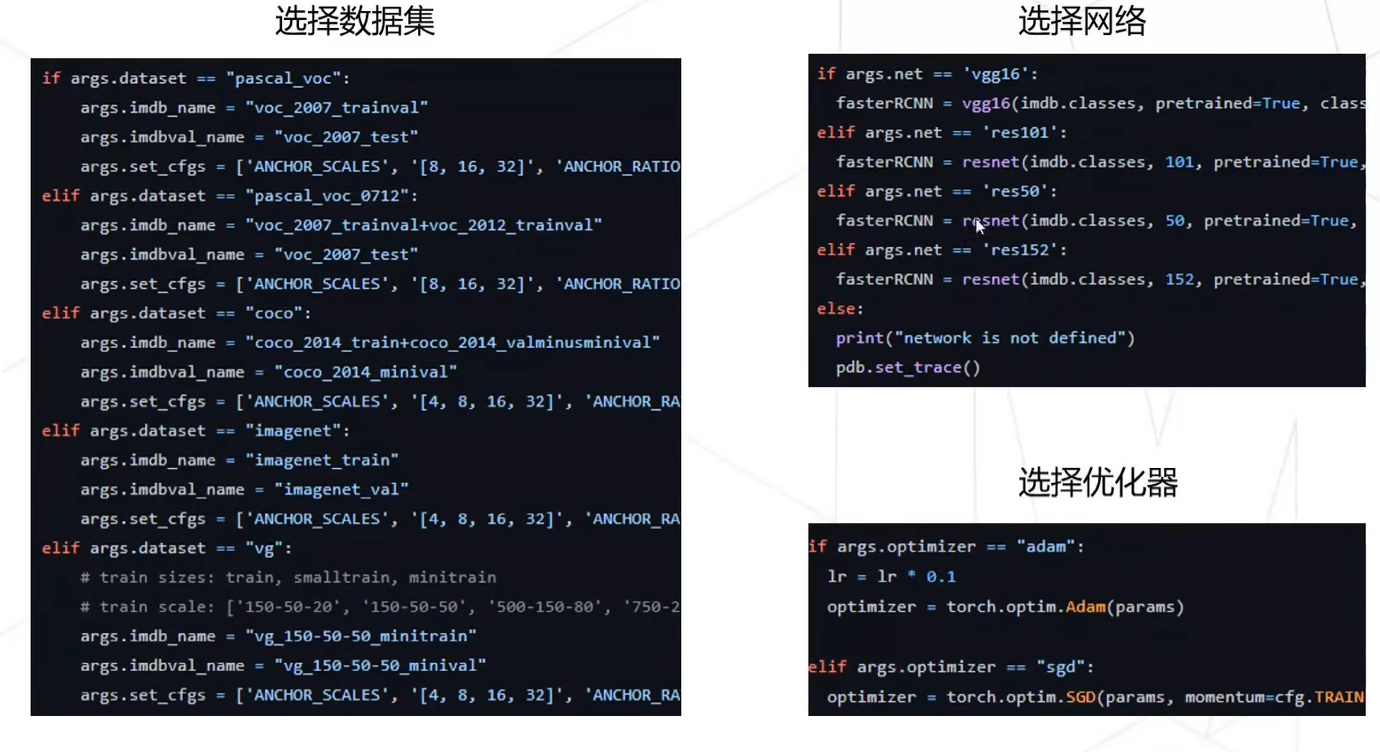
常见的配置文件有3中格式:python、json、yaml 格式的配置文件,推荐使用Yaml文件来配置训练参数。
基本所有能影响你模型的因素,都被涵括在了这个文件里,而在代码中,你只需要用一个简单的 yaml.load()就能把这些参数全部读到一个dict里。更关键的是,这个配置文件可以随着你的checkpoint一起被存到相同的文件夹,方便你直接拿来做断点训练、finetune或者直接做测试,用来做测试时你也可以很方便把结果和对应的参数对上。
1.2 方案:Click+OmegaConf
效果和hydra类似,把所有的参数都写在 YAML 文件中。用click读取命令行中的config文件路径(也可以不传入,使用代码中默认的config文件路径),然后用Omegaconf根据传入的路径读取配置文件,因此只需要在命令行指定配置文件路径,而不是用argparse控制所有的参数,参数一多命令行参数在shell文件中就会特别长,看起来很乱。
pretrained_model_path: "./ckpt/stable-diffusion-v1-5"
pretrained_controlnet_model_path: "./ckpt/sd-controlnet-canny"
control_type: 'canny'

dataset_config:
    video_path: "videos/hat.mp4"
    prompt: "A woman with a white hat"
    n_sample_frame: 1
    # n_sample_frame: 22
    sampling_rate: 1
    stride: 80
    offset:
        left: 0
        right: 0
        top: 0
        bottom: 0

editing_config:
    use_invertion_latents: True
    use_inversion_attention: True
    guidance_scale: 12
    editing_type: "attribute"
    dilation_kernel: 3
    editing_phrase: "hat"  # P_obj
    use_interpolater: True  # frame interpolater

    editing_prompts: "A woman with a pink hat"  # P_tgt
        # source prompt
    clip_length: "${..dataset_config.n_sample_frame}"
    num_inference_steps: 50
    prompt2prompt_edit: True


model_config:
    lora: 160
    # temporal_downsample_time: 4
    SparseCausalAttention_index: ['first','second','last']
    least_sc_channel: 640
    # least_sc_channel: 100000

test_pipeline_config:
    target: video_diffusion.pipelines.p2p_ddim_spatial_temporal_controlnet.P2pDDIMSpatioTemporalControlnetPipeline
    num_inference_steps: "${..validation_sample_logger.num_inference_steps}"

seed: 0
yaml文件全部放在configs路径下:
├── configs
│   ├── LOVECon.yaml
│   ├── TokenFlow.yaml
│   ├── Tune-A-Video.yaml
└── main.py
我们就可以对启动函数 run() 使用装饰器@click传入config.yaml路径,然后用OmegaConf像属性一样读写,处理好参数之后,再加载主函数main()。
import click
from typing import Optional,Dict
from omegaconf import DictConfig, OmegaConf
from rich import print  # colorful print

def main(
    config: str,
    **kwargs):
    print("Training...")

@click.command()
@click.option("--config", type=str, default="Project_Manage\configs\data.yaml")
def run(config):
    # load config
    omega_dict = OmegaConf.load(config)
    print(omega_dict)
    # read config
    print(omega_dict.data_setting.data_path)
    # write config
    omega_dict.seed = 2
    # add config
    omega_dict.update({"num": 2})
    # merge config
    merge_dict = OmegaConf.merge(omega_dict, OmegaConf.load("Project_Manage\configs\model.yaml"))
    print(merge_dict)
	# save config
	OmegaConf.save(merge_dict, "Project_Manage\configs\merge.yaml")

    main(config=config, **omega_dict)

if __name__ == "__main__":
    run()
2. 注册器机制 Registry
2.1 预备知识:python装饰器
-
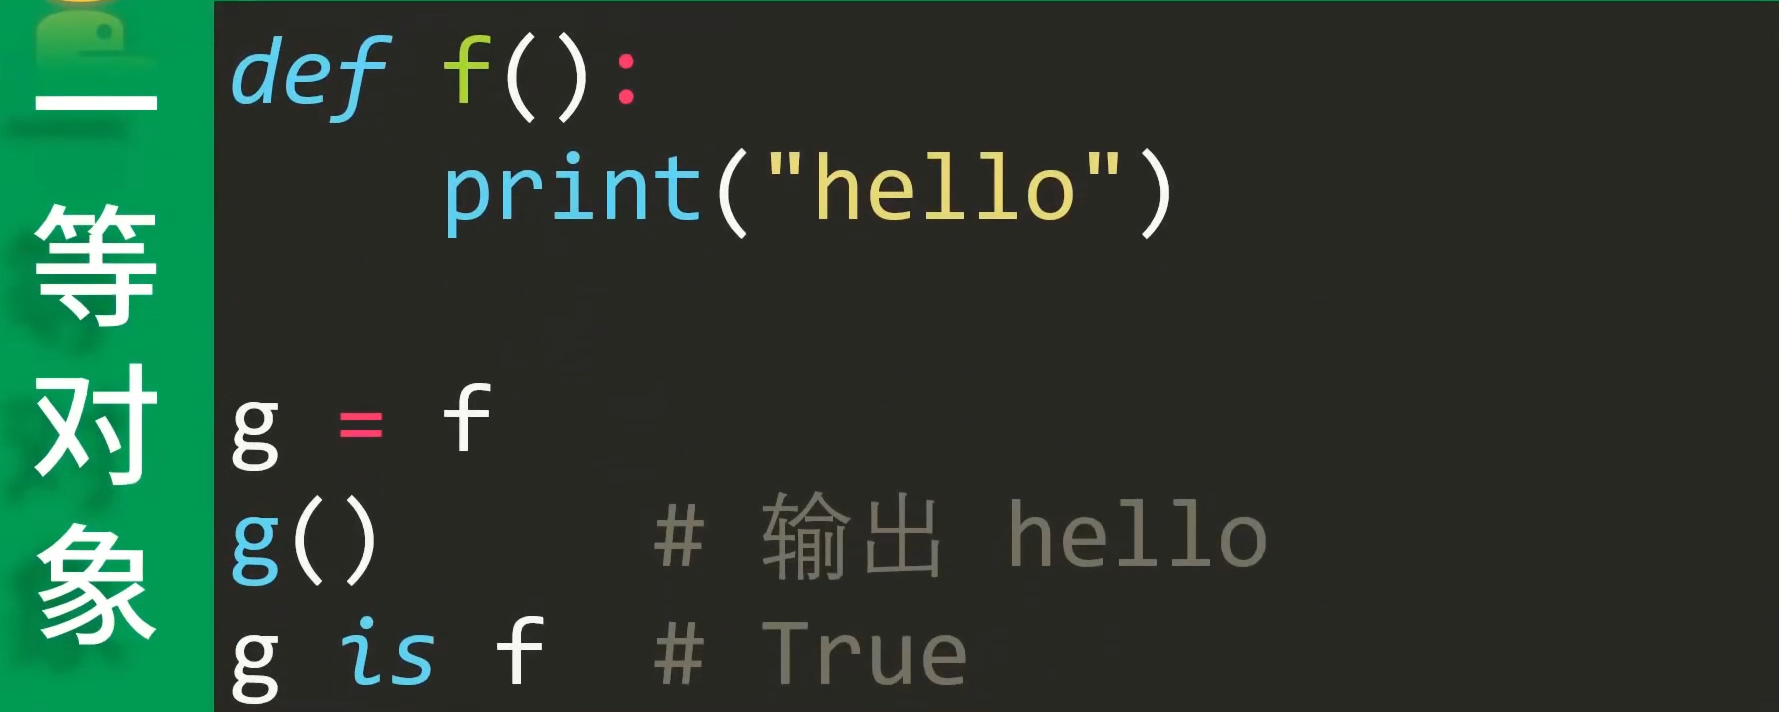
一等对象first class:python中一切皆对象,
函数不例外。first class是指可以运行时创建、可以赋值给变量、可以当参数传递、可以做函数返回值的东西。
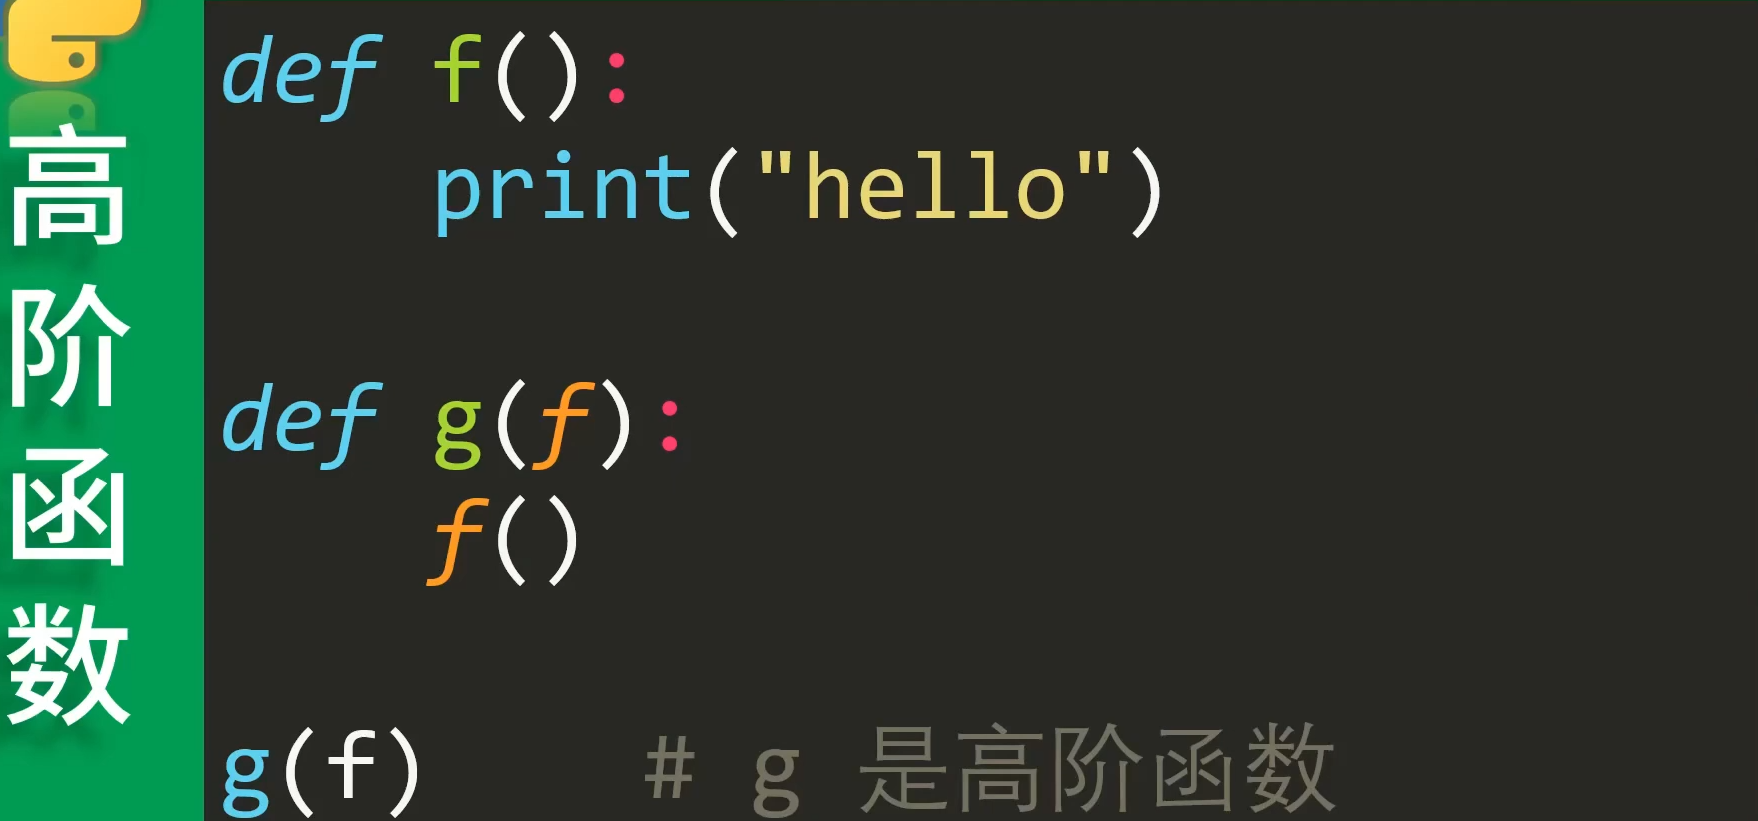
-
高阶函数high order function:拿其他函数作为
参数或返回值的函数。
-
内层函数、外层函数:当函数嵌套定义的时候,
外层函数的变量作用域 会扩展到 内层函数(说人话就是:inner函数可以使用outer函数的变量)。outer()作为高阶函数,返回一等对象inner()。
def outer(a):
    def inner():
        return a
    return inner  # outer函数返回:inner函数(一等对象)
outer(1)()  # 最后的()调用inner函数
> 1
# 等价于 #
def outer(a):
    def inner():
        return a
    return inner()  # outer函数返回:inner函数调用结果
outer(1)
> 1
- 闭包:当一个函数返回另一个函数时,内部函数访问外部函数的
变量和参数时,内部函数可见的外部对象们(变量或函数)就构成一个闭包环境__closure__。在下面例子中,inner函数形成了一个闭包,包含2个int对象,分别对应outer函数的参数a和b(闭包环境__closure__中可能有多个变量,是一个list)。当outer函数被调用时,它会返回inner函数的引用,同时实例化inner闭包环境中的int对象,inner函数仍然可以访问outer函数传递的参数a和b完成调用。
def outer(a, b):
    def inner():
        return a + b
    return inner

inner = outer(1, 2)  # outer函数返回:inner函数(一等对象)
inner.__closure__  # inner的闭包环境:(<cell : int object>, <cell : int object>)
inner.__closure__[0].cell_contents  # 1
inner.__closure__[1].cell_contents  # 2
inner()  # 3
- 万能形参:
*是对序列进行解包和打包,*args就是对传入的多个value参数(也叫positional arguments)进行打包成元组,**kwargs就是对传入的多个key=value参数(也叫keyword arguments)进行打包成字典(*args必须写在**kwargs之前)。 使用了万能形参,管你多少个参数,管你什么类型,我都可以扔到这两个里面。这就减少了重复写同名函数(避免函数重载)。
def foo(*number):  # 对1, 2, 3, 4, 5打包
    print(type(number), number)
foo(1, 2, 3, 4, 5)

def f(a, b, c):  # 对[1,2,3]解包
    print(a, b, c)
f(*[1, 2, 3])
def foo(*args, **kwargs):
    print ('args = ', args)
    print ('kwargs = ', kwargs)
    print ("-"*40)
if __name__ == '__main__':
    foo(1 ,2 ,3 ,4)  # 对 value 参数进行打包
    foo(a=1 ,b=2 ,c=3)  # 对 key=value 参数进行打包
    foo(1 ,2 ,3 ,4, a=1 ,b=2 ,c=3)
    foo('a', 1, None, a=1, b='2', c=3)
args =  (1, 2, 3, 4)
kwargs =  {}
----------------------------------------
args =  ()
kwargs =  {'a': 1, 'b': 2, 'c': 3}
----------------------------------------
args =  (1, 2, 3, 4)
kwargs =  {'a': 1, 'b': 2, 'c': 3}
----------------------------------------
args =  ('a', 1, None)
kwargs =  {'a': 1, 'b': '2', 'c': 3}
----------------------------------------
- 装饰器:用
@语法糖来定义和应用装饰器。装饰器是一种高阶函数,可以修改其他函数的行为或添加额外的功能。my_decorator是一个装饰器函数,它接受一个函数func作为参数,在原始函数执行前后添加了一些额外的操作,并返回一个新的函数wrapper。具体来说有4种类型:(真正的装饰器接受func,可能会加上外层函数接受装饰器的配置参数)
(1)装饰器不需要配置,原函数不需要包装。
def decorator(func):  # 外层装饰器接受func
    print('do something')
    return func  # 不包装直接返回func

# 使用 @ 语法糖应用装饰器
@decorator
def my_function():
    print("excute my func")

# 调用被装饰后的函数
my_function()
do something
excute my func
(2)装饰器是需要配置,原函数不需要包装。返回的wrapper是真正的装饰器函数。
def decorator(num):  # 外层函数接受配置参数num
    def wrapper(func):  # 内层wrapper才是真正的装饰器
        print('do something', num)
        return func  # 不包装直接返回func
    return wrapper

# 使用 @ 语法糖应用装饰器
@decorator(123)
def my_function():
    print("excute my func")

# 调用被装饰后的函数
my_function()
(3)装饰器不需要配置,原函数是需要包装。最经典应用的就是pre_process和post_process使用time.time(),计算func的执行时间。
def decorator(func):  # 外层装饰器接受func
    print('do something')
    def wrapper(*args, **kwargs):  # 包装函数func为wrapper
        print('pre_process')
        result = func(*args, **kwargs)
        print('post_process')
        return result  # 返回包装函数wrapper执行结果
    return wrapper

# 使用 @ 语法糖应用装饰器
@decorator
def my_function():
    print("excute my func")

# 调用被装饰后的函数
my_function()
(4)装饰器是需要配置,原函数是需要包装。
def decorator(x):  # 外层函数接受配置参数num
    def inner_dec(func):  # 内层装饰器接受func
        print("do something", x)
        def wrapper(*args, **kwargs):  # 包装函数func为wrapper
            print('pre_process')
            result = func(*args, **kwargs)
            print('post_process')
            return result
        return wrapper
    return inner_dec

# 使用 @ 语法糖应用装饰器
@decorator(123)
def my_function():
    print("excute my func")

# 调用被装饰后的函数
my_function()
- 类装饰器:装饰器也不一定只能用函数来写,也可以使用类装饰器,用法与函数装饰器并没有太大区别,实质是使用了类方法中的
__call__魔法方法来实现类的直接调用。
class logging(object):
    def __init__(self, func):
        self.func = func

    def __call__(self, *args, **kwargs):
        print("[DEBUG]: enter {}()".format(self.func.__name__))
        return self.func(*args, **kwargs)

@logging
def hello(a, b, c):
    print(a, b, c)

hello("hello,","good","morning")
-----------------------------
>>>[DEBUG]: enter hello()
>>>hello, good morning
类装饰器也是可以带参数的,如下实现
class logging(object):
    def __init__(self, level):
        self.level = level

    def __call__(self, func):
        def wrapper(*args, **kwargs):
            print("[{0}]: enter {1}()".format(self.level, func.__name__))
            return func(*args, **kwargs)
        return wrapper

@logging(level="TEST")
def hello(a, b, c):
    print(a, b, c)

hello("hello,","good","morning")
-----------------------------
>>>[TEST]: enter hello()
>>>hello, good morning
2.2 Registry机制
前面我们读取到的Config实际上是一个大型的字典,仅实现了对参数的模块化解析:包含dataset的config、model的config、lr的config、optmizer的config、train的config等。
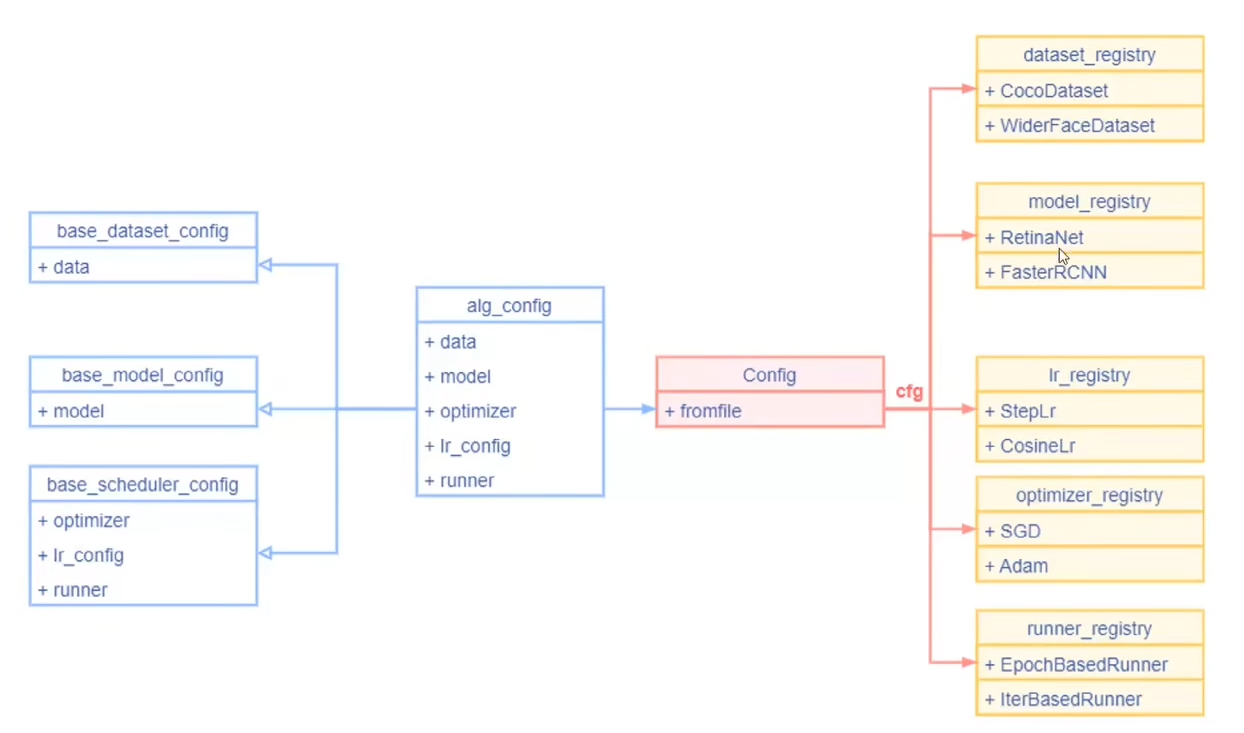
但是这些都是字典参数,并没有对各个模块进行实例化,Registry要做的就是,从配置文件Config中直接解析出对应模块的信息,用Registry把模型结构与训练策略给实例化出来。
在众多深度学习开源库的代码中经常出现Registry代码块,例如OpenMMlab,facebookresearch、BasicSR中都使用了注册器机制。下面以BasicSR为例,解释一下Registry:
class Registry():
    """
    The registry that provides name -> object mapping, to support third-party
    users' custom modules.
    To create a registry (e.g. a backbone registry):
    .. code-block:: python
        BACKBONE_REGISTRY = Registry('BACKBONE')
    To register an object:
    .. code-block:: python
        @BACKBONE_REGISTRY.register()
        class MyBackbone():
            ...
    Or:
    .. code-block:: python
        BACKBONE_REGISTRY.register(MyBackbone)
    """

    def __init__(self, name):
        """
        Args:
            name (str): the name of this registry
        """
        self._name = name
        self._obj_map = {}

    def _do_register(self, name, obj, suffix=None):
        if isinstance(suffix, str):
            name = name + '_' + suffix

        assert (name not in self._obj_map), (f"An object named '{name}' was already registered "
                                             f"in '{self._name}' registry!")
        self._obj_map[name] = obj

    def register(self, obj=None, suffix=None):
        """
        Register the given object under the the name `obj.__name__`.
        Can be used as either a decorator or not.
        See docstring of this class for usage.
        """
        if obj is None:
            # used as a decorator
            def deco(func_or_class):
                name = func_or_class.__name__
                self._do_register(name, func_or_class, suffix)
                return func_or_class

            return deco

        # used as a function call
        name = obj.__name__
        self._do_register(name, obj, suffix)

    def get(self, name, suffix='basicsr'):
        ret = self._obj_map.get(name)
        if ret is None:
            ret = self._obj_map.get(name + '_' + suffix)
            print(f'Name {name} is not found, use name: {name}_{suffix}!')
        if ret is None:
            raise KeyError(f"No object named '{name}' found in '{self._name}' registry!")
        return ret

    def __contains__(self, name):
        return name in self._obj_map

    def __iter__(self):
        return iter(self._obj_map.items())

    def keys(self):
        return self._obj_map.keys()


DATASET_REGISTRY = Registry('dataset')
ARCH_REGISTRY = Registry('arch')
MODEL_REGISTRY = Registry('model')
LOSS_REGISTRY = Registry('loss')
METRIC_REGISTRY = Registry('metric')
上面的代码为数据集,架构,网络,损失以及度量方式都创建了一个注册器对象。核心代码在register函数里,register函数使用了装饰器的设计,也就是只要在功能模块前进行@xx.register()进行装饰,就会对原有功能模块进行注册,并且最终返回原始的功能模块,不修改其原有功能。
在更下层的_do_register()中可以看到,这里使用的是一个字典来执行注册操作,记录的键值对分别是模块的名称以及模块本身。这样一来,读取配置文件中的模块字符串后,我们就能够直接通过函数名或者类名找到其具体实现。
使用方法如下所示,只需要在此类前加上装饰,后期则直接能够从字符串L1Loss找到其对应的实现。
@LOSS_REGISTRY.register()
class L1Loss(nn.Module):
    """L1 (mean absolute error, MAE) loss.
    Args:
        loss_weight (float): Loss weight for L1 loss. Default: 1.0.
        reduction (str): Specifies the reduction to apply to the output.
            Supported choices are 'none' | 'mean' | 'sum'. Default: 'mean'.
    """

    def __init__(self, loss_weight=1.0, reduction='mean'):
        super(L1Loss, self).__init__()
        if reduction not in ['none', 'mean', 'sum']:
            raise ValueError(f'Unsupported reduction mode: {reduction}. Supported ones are: {_reduction_modes}')

        self.loss_weight = loss_weight
        self.reduction = reduction

    def forward(self, pred, target, weight=None, **kwargs):
        """
        Args:
            pred (Tensor): of shape (N, C, H, W). Predicted tensor.
            target (Tensor): of shape (N, C, H, W). Ground truth tensor.
            weight (Tensor, optional): of shape (N, C, H, W). Element-wise weights. Default: None.
        """
        return self.loss_weight * l1_loss(pred, target, weight, reduction=self.reduction)
3. 钩子函数 Hook
推荐Pytorch_linghtning,对于训练的封装。(mmcv的Runner也类似)
3.1 钩子编程
hook允许你在特定的代码点插入自定义的代码。通过使用钩子(hooks),你可以在程序执行到特定的位置时注入自己的代码,以便进行额外的处理或修改程序的行为:
如下面的例子,正常的git commit添加pre-commit-hook后,就会在git commit前执行一些检查操作(文件大小是否合格等):
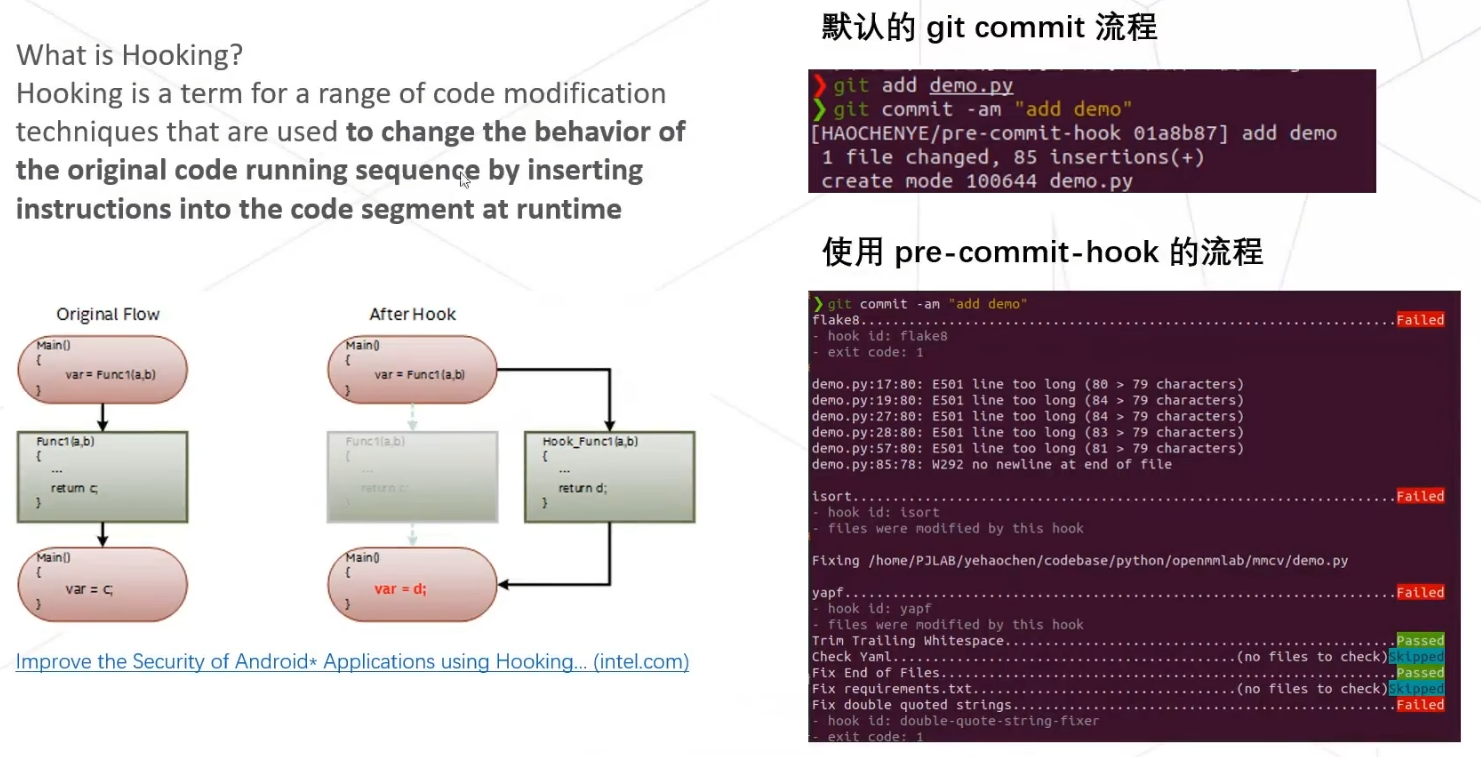
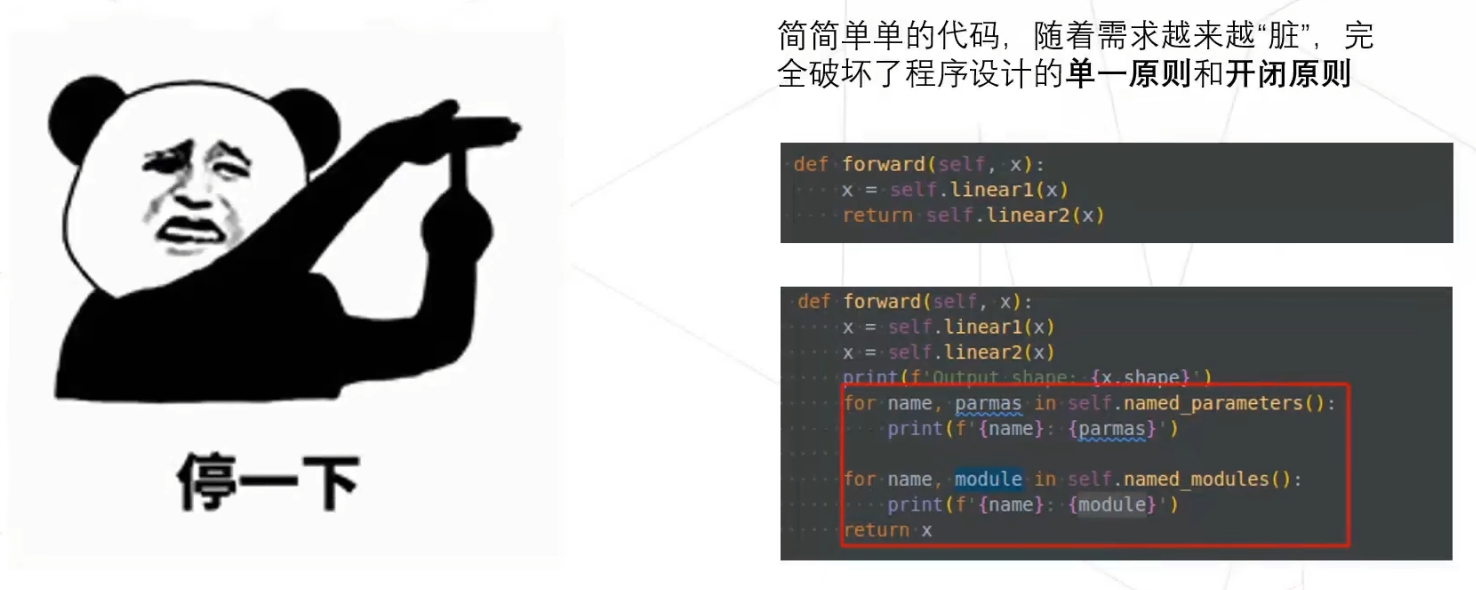
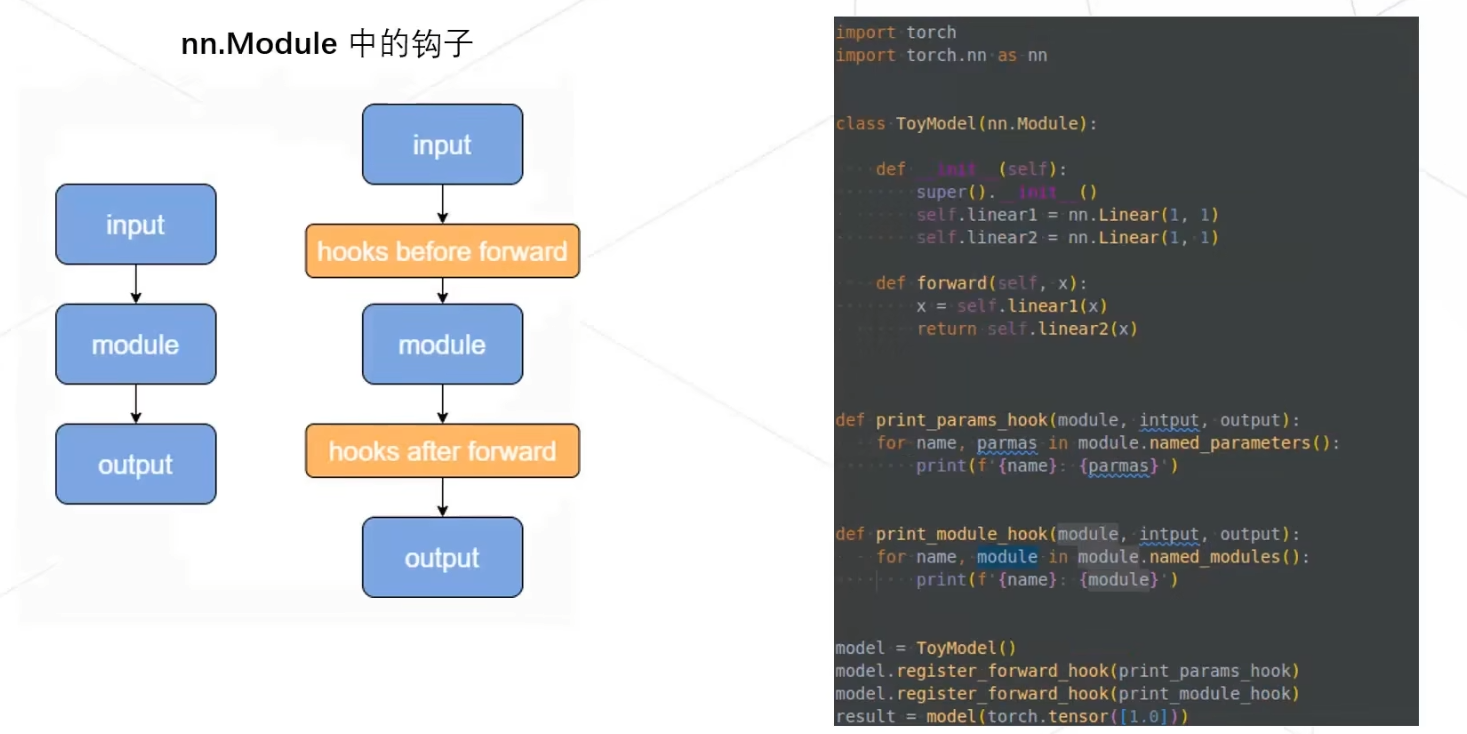
但是随着需求不断增加,插入的代码也越来越乱,相比于直接修改原始代码这种侵入式的修改,我们需要一种非侵入式的修改,使得hook加入的更加清晰直观。如下,直接在forward中添加打印模型结构和参数的代码。
在实际操作中,我们常常在函数执行的前后注册hook函数,实现非侵入式的修改。如pytorch的nn.Module的forward底层是__call__方法,它在执行forward之前会执行_forward_pre_hooks,在执行forward之后会执行_forward_hooks。
3.2 Pytorch_Lightning hook介绍
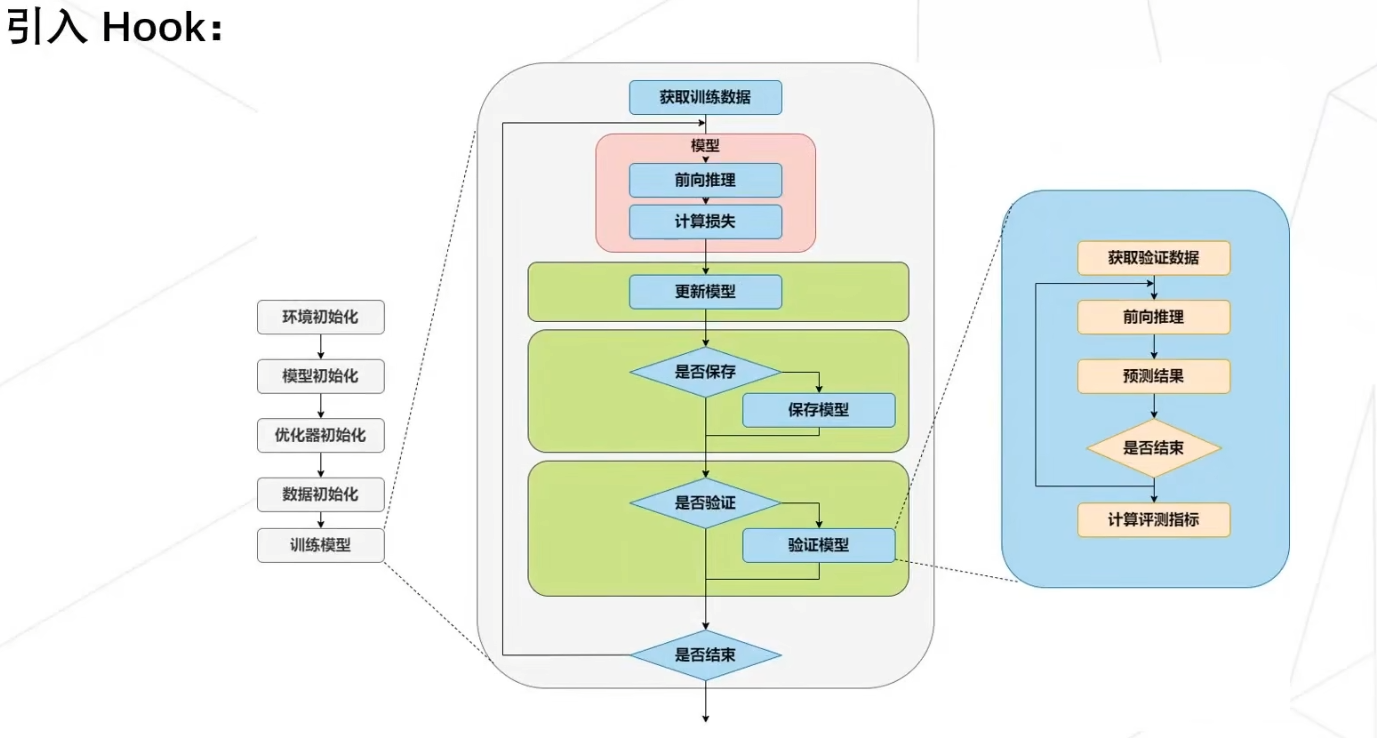
下面PL模型的实现可以在fit(train + validate), validate, test, predict的每个epoch或每个batch前后添加hook函数:如setup、on_xxx_epoch_end、on_xxx_batch_end等(end函数一般用来作为loss和acc的log hook)。
class LitModel(pl.LightningModule):
    def __init__(...):
    # init: 初始化,包括模型和系统的定义。
    def prepare_data(...):
    # 准备数据,包括下载数据、预处理等等
    def setup(...):
    # 执行fit(train + validate), validate, test, or predict前的hook function,进行数据划分等操作
    def configure_optimizers(...)
	# configure_optimizers: 优化器定义,返回一个优化器,或数个优化器,或两个List(优化器,Scheduler)

    def forward(...):
    # forward: 前向传播,和正常的Ptorch的forward一样

    def train_dataloader(...)
    # 加载train data
    def training_step(...)
	# training_step(self, batch, batch_idx): 即每个batch的处理函数, z=self(x)等价于z=forward(x)
    def on_train_epoch_end(...)
	# training epoch end hook function

	def validation_dataloader(...)
    # 加载validationdata
    def validation_step(...)
	# validation_step(self, batch, batch_idx): 即每个batch的处理函数
    def on_validation_epoch_end(...)
	# validation epoch end hook function

    def test_dataloader(...)
    # 加载testdata
    def test_step(...)
	# test_step(self, batch, batch_idx): 即每个batch的处理函数
    def on_test_epoch_end(...)
	# test epoch end hook function

    def any_extra_hook(...)
上面介绍的PL的hook函数只是比较常用的,更多更全的PL hook介绍可以在官网中查看:https://lightning.ai/docs/pytorch/stable/_modules/lightning/pytorch/core/hooks.html
4. 注册钩子函数register_hook实现对Model各个层操作
- 核心思想:在我们已经
加载了Pretrain好的Model时,可以写一些register_hook函数对模型的层进行遍历,修改我们想修改的Layers。 例如TokenFlow的代码中,def 了一堆 register 函数,没有了解过这个机制的新手肯定看的晕头转向,因此本片博客就诞生了。
4.1 Pytorch 的 register_forward_hook
Pytorch 中 Module类的register_forward_hook() 是一种 Module级别 的 hook,在网络执行forward()之后,执行hook()函数。hook可以修改input和output,但是不会影响forward的结果!!(结合下面的例子,重点理解这句话)
最常用的场景是:需要提取模型的某一层(不是最后一层)的输出特征,但又不希望修改其原有的模型定义文件,这时就可以利用forward_hook函数。
为Module添加一个register_forward_hook的通用范式:
def hook(module, input, output) -> None or modified output
	...
Module.register_forward_hook(hook)
下面我们先定义一个LeNet Model:
import torch
import torch.nn as nn
import torch.nn.functional as F

class LeNet(nn.Module):
    def __init__(self):
        super(LeNet, self).__init__()
        self.conv1 = nn.Conv2d(3, 6, 5)
        self.conv2 = nn.Conv2d(6, 16, 5)
        self.fc1 = nn.Linear(16*5*5, 120)
        self.fc2 = nn.Linear(120, 84)
        self.fc3 = nn.Linear(84, 10)

    def forward(self, x):
        out = F.relu(self.conv1(x))     #1
        out = F.max_pool2d(out, 2)      #2
        out = F.relu(self.conv2(out))   #3
        out = F.max_pool2d(out, 2)
        out = out.view(out.size(0), -1)
        out = F.relu(self.fc1(out))
        out = F.relu(self.fc2(out))
        out = self.fc3(out)
        return out
- 目标:获取 LeNet 中每个 Conv 层输出的 feature。
- 实现:定义 hook() 可以保存 module 的输出,然后为 LeNet 中每个Conv Layer注册 hook(),forward 的过程中会执行 hook,保存Conv Layer的output features; 同时在注册hook()的同时,保留hook()的句柄handle,方便在使用完的时候及时及时删除,以避免每次都运行钩子增加运行负载。
model = LeNet()
features = []  # save conv layer output list
handles = []  # hook handle list
def hook(module, input, output):
    # module: model.conv2
    # input :in forward function  [#2]
    # output:is  [#3 self.conv2(out)]
    features.append(output.clone().detach())
    # output is saved  in a list

net = LeNet() ## 模型实例化

# 遍历LeNet的每层,寻找Conv2d,为其注册hook函数
for m in model.modules():
	if isinstance(m, nn.Conv2d):
		h = m.register_forward_hook(hook)
		handles.append(h)

x = torch.randn(2, 3, 32, 32) ## input
# forward 的过程中会执行 hook
y = net(x)  # y 是 关于 input x 的 forward 结果

print(features[0].size()) # 即 [#3 self.conv2(out)]
for h in handles:
	h.remove() # hook删除
register_forward_hook(hook) 最大的作用也就是当已经训练好某个model,想要展示某一层对最终目标的影响效果。
4.2 自定义register_hook函数
假如我们需要对 Stable Diffusion 的某些模块做出改进,我们可以自定义一些 register_hook 函数,来修改模型对应的Layer。
例如我们已经拿到加载好预训练权重的stable diffusion pipeline:
model.unet # 是UNet
下面,我们希望对UNet中每个 Transformer 模块(继承自父类BasicTransformerBlock的实例)的第1个attention layer的forward()方法进行修改,替换为我们自定义的sa_forward()
# Replace model.unet.BasicTransformerBlock.attn1.forward() To sa_forward()
def register_extended_attention(model):
    def sa_forward(self):
        to_out = self.to_out
        if type(to_out) is torch.nn.modules.container.ModuleList:
            to_out = self.to_out[0]
        else:
            to_out = self.to_out

        def forward(x, encoder_hidden_states=None, attention_mask=None):
            batch_size, sequence_length, dim = x.shape
            h = self.heads
            n_frames = batch_size // 3
            is_cross = encoder_hidden_states is not None
            encoder_hidden_states = encoder_hidden_states if is_cross else x
            q = self.to_q(x)
            k = self.to_k(encoder_hidden_states)
            v = self.to_v(encoder_hidden_states)

            k_source = k[:n_frames]
            k_uncond = k[n_frames: 2*n_frames].reshape(1, n_frames * sequence_length, -1).repeat(n_frames, 1, 1)
            k_cond = k[2*n_frames:].reshape(1, n_frames * sequence_length, -1).repeat(n_frames, 1, 1)
            v_source = v[:n_frames]
            v_uncond = v[n_frames:2*n_frames].reshape(1, n_frames * sequence_length, -1).repeat(n_frames, 1, 1)
            v_cond = v[2*n_frames:].reshape(1, n_frames * sequence_length, -1).repeat(n_frames, 1, 1)

            q_source = self.head_to_batch_dim(q[:n_frames])
            q_uncond = self.head_to_batch_dim(q[n_frames: 2*n_frames])
            q_cond = self.head_to_batch_dim(q[2 * n_frames:])
            k_source = self.head_to_batch_dim(k_source)
            k_uncond = self.head_to_batch_dim(k_uncond)
            k_cond = self.head_to_batch_dim(k_cond)
            v_source = self.head_to_batch_dim(v_source)
            v_uncond = self.head_to_batch_dim(v_uncond)
            v_cond = self.head_to_batch_dim(v_cond)

            out_source = []
            out_uncond = []
            out_cond = []

            q_src = q_source.view(n_frames, h, sequence_length, dim // h)
            k_src = k_source.view(n_frames, h, sequence_length, dim // h)
            v_src = v_source.view(n_frames, h, sequence_length, dim // h)
            q_uncond = q_uncond.view(n_frames, h, sequence_length, dim // h)
            k_uncond = k_uncond.view(n_frames, h, sequence_length * n_frames, dim // h)
            v_uncond = v_uncond.view(n_frames, h, sequence_length * n_frames, dim // h)
            q_cond = q_cond.view(n_frames, h, sequence_length, dim // h)
            k_cond = k_cond.view(n_frames, h, sequence_length * n_frames, dim // h)
            v_cond = v_cond.view(n_frames, h, sequence_length * n_frames, dim // h)

            for j in range(h):
                sim_source_b = torch.bmm(q_src[:, j], k_src[:, j].transpose(-1, -2)) * self.scale
                sim_uncond_b = torch.bmm(q_uncond[:, j], k_uncond[:, j].transpose(-1, -2)) * self.scale
                sim_cond = torch.bmm(q_cond[:, j], k_cond[:, j].transpose(-1, -2)) * self.scale

                out_source.append(torch.bmm(sim_source_b.softmax(dim=-1), v_src[:, j]))
                out_uncond.append(torch.bmm(sim_uncond_b.softmax(dim=-1), v_uncond[:, j]))
                out_cond.append(torch.bmm(sim_cond.softmax(dim=-1), v_cond[:, j]))

            out_source = torch.cat(out_source, dim=0).view(h, n_frames,sequence_length, dim // h).permute(1, 0, 2, 3).reshape(h * n_frames, sequence_length, -1)
            out_uncond = torch.cat(out_uncond, dim=0).view(h, n_frames,sequence_length, dim // h).permute(1, 0, 2, 3).reshape(h * n_frames, sequence_length, -1)
            out_cond = torch.cat(out_cond, dim=0).view(h, n_frames,sequence_length, dim // h).permute(1, 0, 2, 3).reshape(h * n_frames, sequence_length, -1)

            out = torch.cat([out_source, out_uncond, out_cond], dim=0)
            out = self.batch_to_head_dim(out)

            return to_out(out)

        return forward

    for _, module in model.unet.named_modules():
        if isinstance_str(module, "BasicTransformerBlock"):
            module.attn1.forward = sa_forward(module.attn1)

    res_dict = {1: [1, 2], 2: [0, 1, 2], 3: [0, 1, 2]}
    # we are injecting attention in blocks 4 - 11 of the decoder, so not in the first block of the lowest resolution
    for res in res_dict:
        for block in res_dict[res]:
            module = model.unet.up_blocks[res].attentions[block].transformer_blocks[0].attn1
            module.forward = sa_forward(module)
对上面的register_extended_attention代码进行分析:
- 首先传入
stable diffusion model,然后定义attention模块的新的sa_forward方法。 - 接下来将遍历
model.unet的每一层,判断该层module的父类的class_name是否为BasicTransformerBlock - 如果是则对其第1个
attention layer(module.attn1)的forward进行替换
其中,判断module的父类的class_name的函数实现如下:
def isinstance_str(x: object, cls_name: str):
    """
    Checks whether x has any class *named* cls_name in its ancestry.
    Doesn't require access to the class's implementation.

    Useful for patching!
    """
    for _cls in x.__class__.__mro__:
        if _cls.__name__ == cls_name:
            return True
    return False
x.__class__是对象x的type实例,x.__class__.__mro__获得对象x的type实例的父类list(因为父类可能不止一个),如BasicTransformerBlock的父类list就包含 3 个class:(<class 'diffusers.models.attention.BasicTransformerBlock'>, <class 'torch.nn.modules.module.Module'>, <class 'object'>)
每个BasicTransformerBlock结构如下:
BasicTransformerBlock(
  (attn1): CrossAttention(
    (to_q): Linear(in_features=320, out_features=320, bias=False)
    (to_k): Linear(in_features=320, out_features=320, bias=False)
    (to_v): Linear(in_features=320, out_features=320, bias=False)
    (to_out): ModuleList(
      (0): Linear(in_features=320, out_features=320, bias=True)
      (1): Dropout(p=0.0, inplace=False)
    )
  )
  (ff): FeedForward(
    (net): ModuleList(
      (0): GEGLU(
        (proj): Linear(in_features=320, out_features=2560, bias=True)
      )
      (1): Dropout(p=0.0, inplace=False)
      (2): Linear(in_features=1280, out_features=320, bias=True)
    )
  )
  (attn2): CrossAttention(
    (to_q): Linear(in_features=320, out_features=320, bias=False)
    (to_k): Linear(in_features=768, out_features=320, bias=False)
    (to_v): Linear(in_features=768, out_features=320, bias=False)
    (to_out): ModuleList(
      (0): Linear(in_features=320, out_features=320, bias=True)
      (1): Dropout(p=0.0, inplace=False)
    )
  )
  (norm1): LayerNorm((320,), eps=1e-05, elementwise_affine=True)
  (norm2): LayerNorm((320,), eps=1e-05, elementwise_affine=True)
  (norm3): LayerNorm((320,), eps=1e-05, elementwise_affine=True)
)
总结:如果想实现自定义的register_hook,首先需要对原始Model结构很熟悉,然后要想好怎么修改原始Model的Layer的方法,注意:无论怎么修改原始Layer的forward方法,模型的weight是不能改变的。


 1049
1049

 被折叠的 条评论
为什么被折叠?
被折叠的 条评论
为什么被折叠?
 到【灌水乐园】发言


