


图像阈值处理
标准范式
标准范式:res,dst = cv2.threshold(src, thresh, maxval, type)
参数说明
cv2.threshold()是OpenCV库中的一个图像阈值化函数,用于将输入图像二值化(将图像分离为两个灰度级别)。该函数采用以下参数:
- src:输入图像,灰度图像(单通道图像)。
- thresh:阈值,用于将图像分成两个灰度级别的像素值。
- maxval:最大像素值,如果某个像素大于阈值,则设置为该值,可以是0或255。
type:阈值化类型,指定要应用的阈值化方法。以下是一些常见的类型:
- cv2.THRESH_BINARY:二值化阈值类型,超过阈值的像素设置为maxval,低于阈值的像素设置为0。
- cv2.THRESH_BINARY_INV:反二进制阈值类型,超过阈值的像素设置为0,低于阈值的像素设置为maxval。
- cv2.THRESH_TRUNC:截断阈值类型,超过阈值的像素设置为阈值,低于阈值的像素保持不变。
- cv2.THRESH_TOZERO:阈值化为零阈值类型,超过阈值的像素保持不变,低于阈值的像素设置为0
- cv2.THRESH_TOZERO_INV:反零阈值类型,超过阈值的像素设置为0,低于阈值的像素保持不变。
返回两个值:阈值化的结果(dst)和使用的阈值(ret)。
代码
def BGR2RGB(img):
    """

    :param img:
    :return:
    """
    return cv2.cvtColor(img, cv2.COLOR_BGR2RGB)

if __name__ == '__main__':
    img_path_1 = 'sister.jpg'
    img_path_2 = 'baixue.png'
    ## 默认读取BGR
    image_1 = read_img(img_path_1, mode=cv2.IMREAD_GRAYSCALE)
    image_2 = read_img(img_path_2, mode=cv2.IMREAD_GRAYSCALE)
    img_1 = cv2.resize(image_1, (512, 512))
    img_2 = cv2.resize(image_2, (512, 512))
    ## 返回阈值和阈值处理后的图片
    ret, thresh1 = cv2.threshold(img_1, 127, 255, cv2.THRESH_BINARY)
    ret, thresh2 = cv2.threshold(img_1, 127, 255, cv2.THRESH_BINARY_INV)
    ret, thresh3 = cv2.threshold(img_1, 127, 255, cv2.THRESH_TRUNC)
    ret, thresh4 = cv2.threshold(img_1, 127, 255, cv2.THRESH_TOZERO)
    ret, thresh5 = cv2.threshold(img_1, 127, 255, cv2.THRESH_TOZERO)
    titles = ['Rti_imh',
              'THRESH_BINARY',
              'THRESH_BINARY_INV',
              'THRESH_TRUNC',
              'THRESH_TOZERO',
              'THRESH_TOZERO']
    images = [img_1, thresh1, thresh2, thresh3, thresh4, thresh5]
    plt.figure(figsize=(18, 12))
    for i in range(6):
        plt.subplot(f'23{i + 1}')
        plt.title(titles[i])
        plt.imshow(BGR2RGB(images[i]))
    plt.show()
可视化结果

图像平滑处理
图像加噪
if __name__ == '__main__':
    img_path_1 = 'sister.jpg'
    img_path_2 = 'baixue.png'
    ## 默认读取BGR
    image_1 = read_img(img_path_1, mode=cv2.IMREAD_GRAYSCALE)
    image_2 = read_img(img_path_2, mode=cv2.IMREAD_GRAYSCALE)
    img_1 = cv2.resize(image_1, (512, 512))
    img_2 = cv2.resize(image_2, (512, 512))
    ## 随机生成噪声数据
    noise = np.random.normal(0, 1, img_1.shape).astype(np.uint8)
    ## 往图片添加噪声
    reslut = noise + img_1
    img_show('==', reslut)
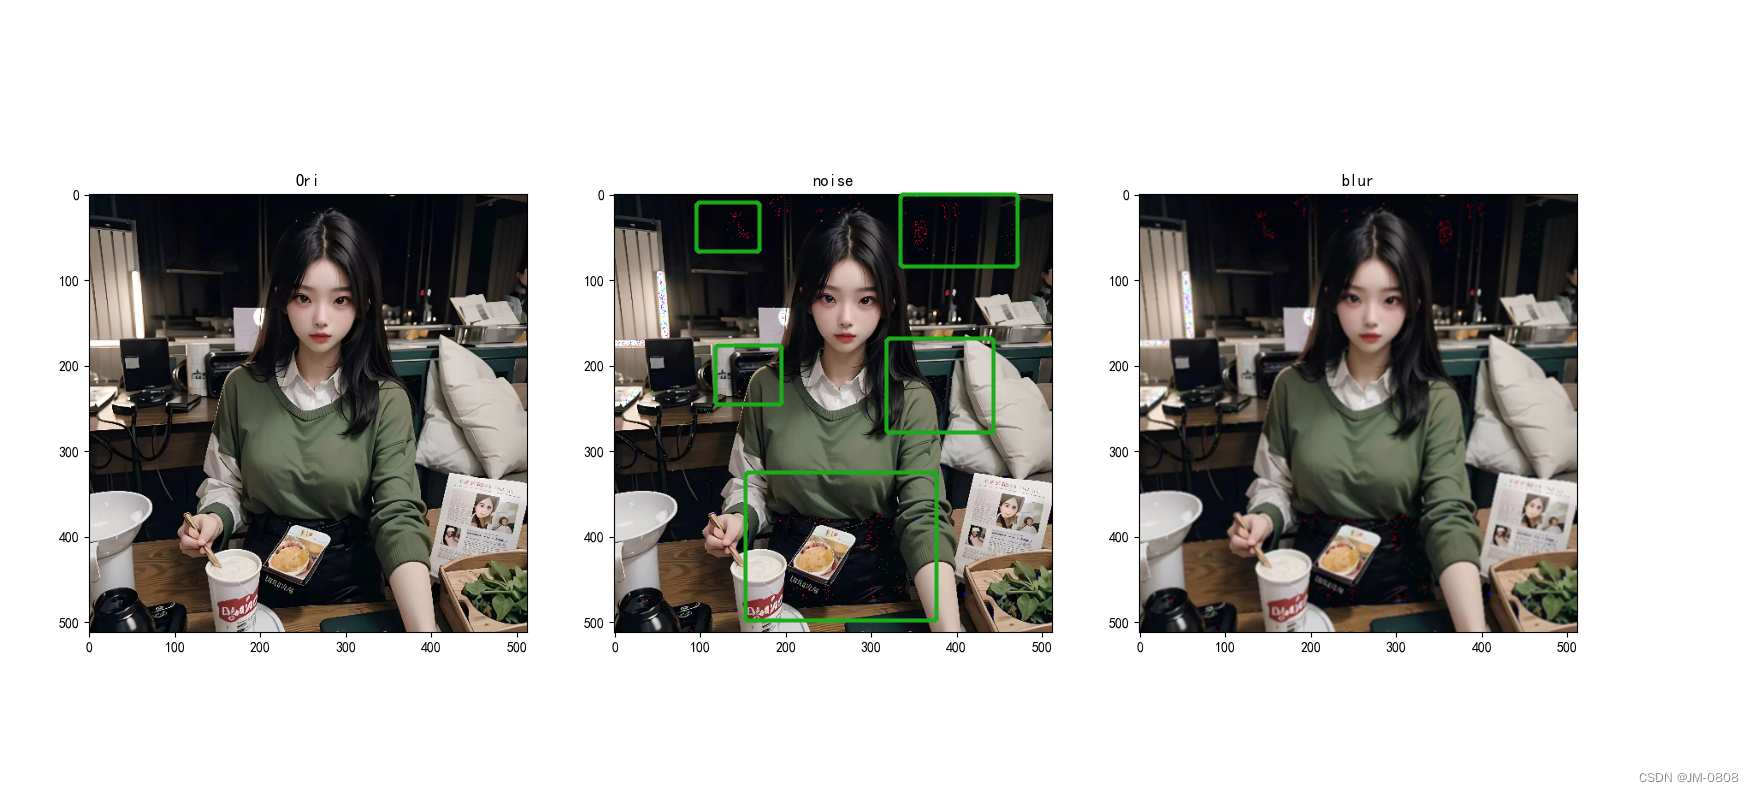
图像加噪结果
均值滤波
范式: blur = cv2.blur(reslut, (3, 3))
def BGR2RGB(img):
    """

    :param img:
    :return:
    """
    return cv2.cvtColor(img, cv2.COLOR_BGR2RGB)

if __name__ == '__main__':
    img_path_1 = 'sister.jpg'
    img_path_2 = 'baixue.png'
    ## 默认读取BGR
    image_1 = read_img(img_path_1)
    image_2 = read_img(img_path_2, mode=cv2.IMREAD_GRAYSCALE)
    img_1 = cv2.resize(image_1, (512, 512))
    img_2 = cv2.resize(image_2, (512, 512))
    ## 随机生成噪声数据
    noise = np.random.normal(0, 1, img_1.shape).astype(np.uint8)
    ## 往图片添加噪声
    reslut = noise + img_1
    blur = cv2.blur(reslut, (3, 3))
    plt.figure(figsize=(18, 12))
    plt.subplot(131), plt.imshow(BGR2RGB(img_1)), plt.title('Ori')
    plt.subplot(132), plt.imshow(BGR2RGB(reslut)), plt.title('noise')
    plt.subplot(133), plt.imshow(BGR2RGB(blur)), plt.title('blur')
    plt.show()
在上述示例代码中,我们使用cv2.blur()函数对图像进行均值滤波。第一个参数是输入图像,第二个参数是滤波器的大小。本例中使用(3, 3)作为滤波器的大小,表示在3x3的邻域内取像素均值,并将该均值作为输出图像中对应像素的值。最后,使用cv2.imshow()函数显示原始图像和滤波后的图像。
经过均值滤波之后,大部分噪声点都消失了
方框滤波
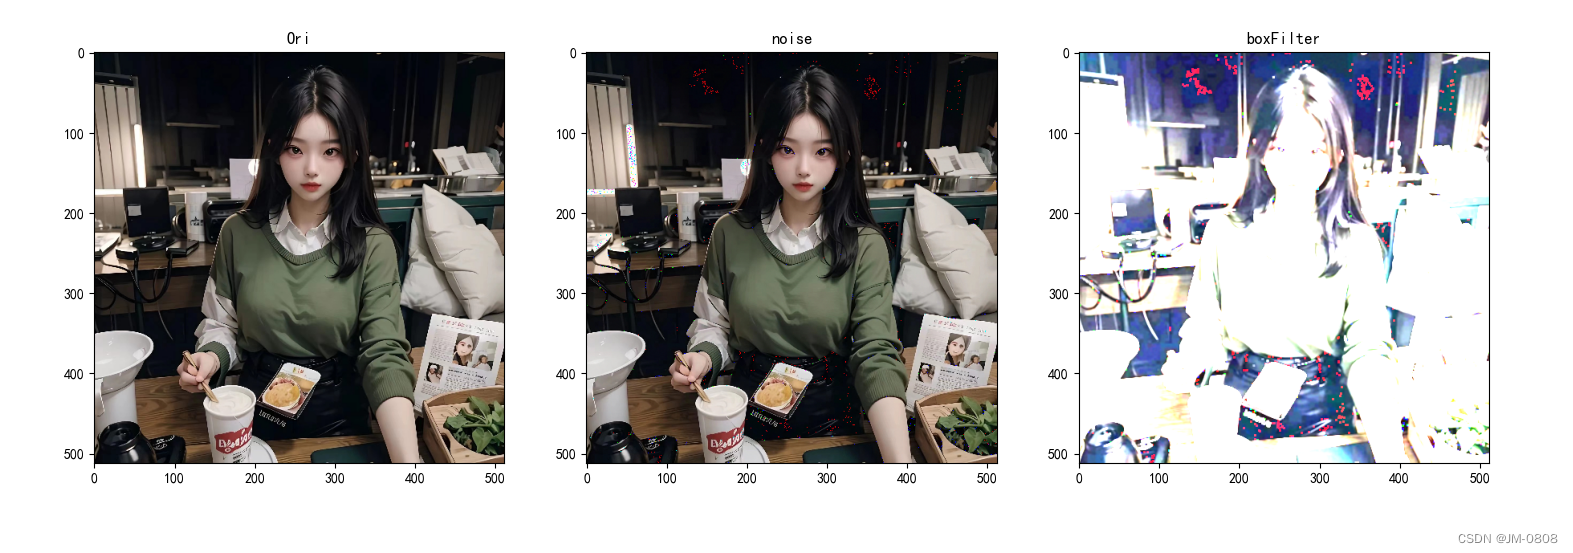
范式: blur = cv2.boxFilter(reslut, -1, (3, 3), normalize=True)
- src: 输入图像
- ddepth: 输出图像的深度,如果设置为-1,则输出图像与输入图像具有相同的深度
- ksize: 滤波窗口的大小,指定为 (width, height)
- normalize: 是否归一化滤波结果,默认为True,True时与均值滤波一样
def BGR2RGB(img):
    """

    :param img:
    :return:
    """
    return cv2.cvtColor(img, cv2.COLOR_BGR2RGB)

if __name__ == '__main__':
    img_path_1 = 'sister.jpg'
    img_path_2 = 'baixue.png'
    ## 默认读取BGR
    image_1 = read_img(img_path_1)
    image_2 = read_img(img_path_2, mode=cv2.IMREAD_GRAYSCALE)
    img_1 = cv2.resize(image_1, (512, 512))
    img_2 = cv2.resize(image_2, (512, 512))
    ## 随机生成噪声数据
    noise = np.random.normal(0, 1, img_1.shape).astype(np.uint8)
    ## 往图片添加噪声
    reslut = noise + img_1
    blur = cv2.boxFilter(reslut, -1, (3, 3), normalize=False)
    plt.figure(figsize=(18, 12))
    plt.subplot(131), plt.imshow(BGR2RGB(img_1)), plt.title('Ori')
    plt.subplot(132), plt.imshow(BGR2RGB(reslut)), plt.title('noise')
    plt.subplot(133), plt.imshow(BGR2RGB(blur)), plt.title('blur')
    plt.show()
高斯滤波
标准范式: blur = cv2.GaussianBlur(reslut, (5, 5), 1)
使用cv2.GaussianBlur()函数对图像进行高斯滤波。第一个参数是输入图像,第二个参数是滤波窗口的大小,指定为(5, 5)。第三个参数是高斯核的标准差,这里设置为1。较大的标准差会产生更大的模糊效果。
def BGR2RGB(img):
    """

    :param img:
    :return:
    """
    return cv2.cvtColor(img, cv2.COLOR_BGR2RGB)

if __name__ == '__main__':
    img_path_1 = 'sister.jpg'
    img_path_2 = 'baixue.png'
    ## 默认读取BGR
    image_1 = read_img(img_path_1)
    image_2 = read_img(img_path_2, mode=cv2.IMREAD_GRAYSCALE)
    img_1 = cv2.resize(image_1, (512, 512))
    img_2 = cv2.resize(image_2, (512, 512))
    ## 随机生成噪声数据
    noise = np.random.normal(0, 1, img_1.shape).astype(np.uint8)
    ## 往图片添加噪声
    reslut = noise + img_1
    blur = cv2.GaussianBlur(reslut, (5, 5), 1)
    plt.figure(figsize=(18, 12))
    plt.subplot(131), plt.imshow(BGR2RGB(img_1)), plt.title('Ori')
    plt.subplot(132), plt.imshow(BGR2RGB(reslut)), plt.title('noise')
    plt.subplot(133), plt.imshow(BGR2RGB(blur)), plt.title('GaussianBlur')
    plt.show()

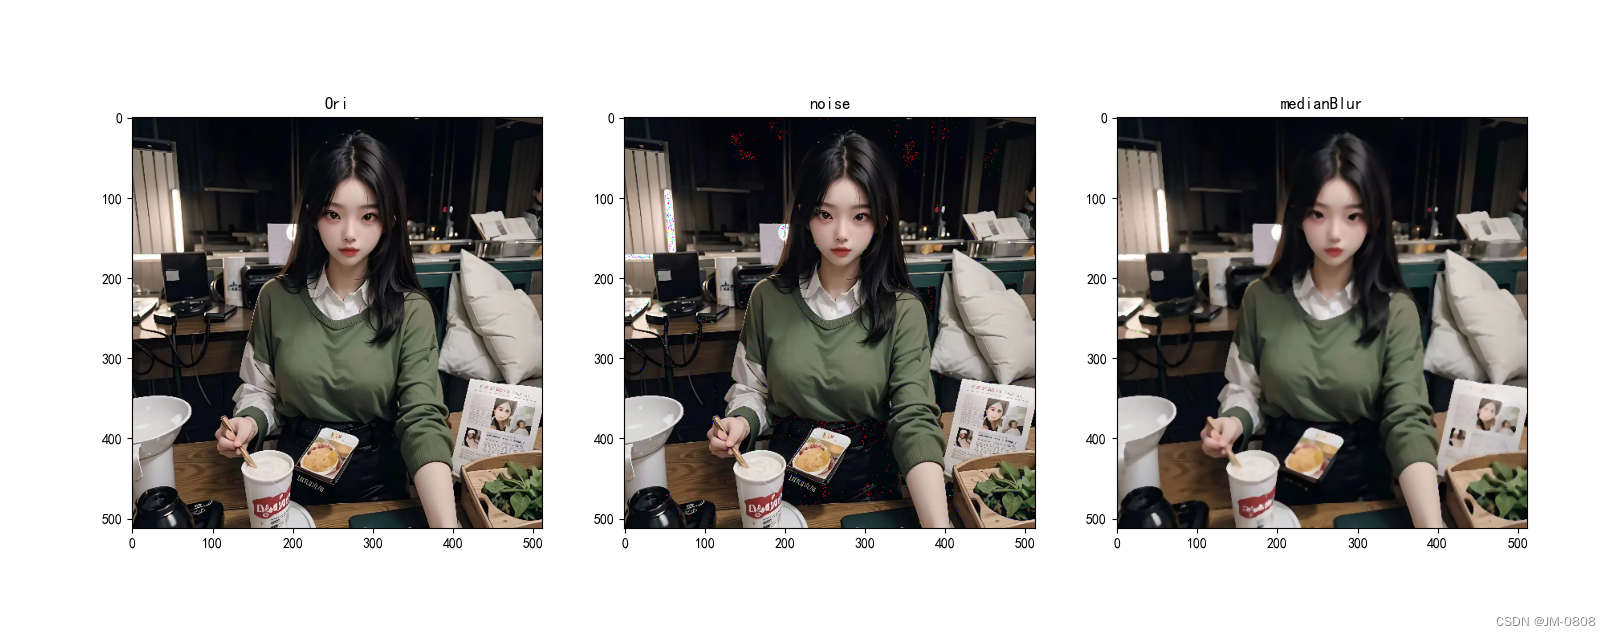
中值滤波
cv2.medianBlur(img, size) 函数对图像进行中值滤波,而不是添加噪声或其他滤波操作。中值滤波是一种常用的图像去噪方法,它使用滤波窗口中所有像素的中值来替代中心像素的值,size为窗口大小。
if __name__ == '__main__':
    img_path_1 = 'sister.jpg'
    img_path_2 = 'baixue.png'
    ## 默认读取BGR
    image_1 = read_img(img_path_1)
    image_2 = read_img(img_path_2, mode=cv2.IMREAD_GRAYSCALE)
    img_1 = cv2.resize(image_1, (512, 512))
    img_2 = cv2.resize(image_2, (512, 512))
    ## 随机生成噪声数据
    noise = np.random.normal(0, 1, img_1.shape).astype(np.uint8)
    ## 往图片添加噪声
    reslut = noise + img_1
    blur = cv2.medianBlur(reslut, 5)
    plt.figure(figsize=(18, 12))
    plt.subplot(131), plt.imshow(BGR2RGB(img_1)), plt.title('Ori')
    plt.subplot(132), plt.imshow(BGR2RGB(reslut)), plt.title('noise')
    plt.subplot(133), plt.imshow(BGR2RGB(blur)), plt.title('medianBlur')
    plt.show()
针对这张图片,均值滤波的效果是最好的,所有噪声点都消失了,但是图像变得过于平滑了
不同滤波结果对比
if __name__ == '__main__':
    img_path_1 = 'sister.jpg'
    img_path_2 = 'baixue.png'
    ## 默认读取BGR
    image_1 = read_img(img_path_1)
    image_2 = read_img(img_path_2, mode=cv2.IMREAD_GRAYSCALE)
    img_1 = cv2.resize(image_1, (512, 512))
    img_2 = cv2.resize(image_2, (512, 512))
    ## 随机生成噪声数据
    noise = np.random.normal(0, 1, img_1.shape).astype(np.uint8)
    ## 往图片添加噪声
    reslut = noise + img_1
    blur = cv2.blur(reslut, (3, 3))
    boxFilter = cv2.boxFilter(reslut, -1, (3, 3), normalize=False)
    GaussianBlur = cv2.GaussianBlur(reslut, (5, 5), 1)
    medianBlur = cv2.medianBlur(reslut, 5)
    res = np.hstack((blur, boxFilter, GaussianBlur, medianBlur))
    img_show('All', res)
所使用图片为模型生成,将图片路径替换为您的本地路径后可以直接运行,欢迎大家一起学习交流


 373
373


 被折叠的 条评论
为什么被折叠?
被折叠的 条评论
为什么被折叠?
 到【灌水乐园】发言


