


1.安装
yum install epel-release -y # 安装yum的扩展包
yum install nginx -y
systemctl start nginx.service #启动nginx
systemctl enable nginx.service
# netstat -lntup # 查看端口占用情况
# 可以看到nginx默认占用了80端口
2.nginx配置
# 注意配置文件的语法格式,每行结尾必须是英文的分号。
worker_processes 1; #启动nginx时工作进程的数量,可以加大这个数字来提高nginx的处理请求的效率,但是这个数字也不能太大,因为进程是消耗系统内存资源的。调整一下这个数字,然后通过free指令可以查看一下内存容量的变化。建议和CPU核数一致就行
# worker_processes 2; # 改完配置文件都需要重启nginx才生效,systemctl restartnginx.service
events {
worker_connections 1024; #连接数量,每个进程可以处理1024连接
}
http {                            #http模块
   include       mime.types;     #include是包含的意思,这行的意思是,nginx启动的时候加载nginx.conf主配置文件的时候,加载到这一行的时候,先包含加载一下mime.types文件里面的配置,这个文件主要是用来标识支持哪些多媒体格式,这个文件在nginx.conf所在目录 default_type application/octet-stream;
#如果不能识别的文件,那么默认以八进制数据流的方式来打开文件
    # sendfile       on;
    # keepalive_timeout 65;
   charset utf-8;                          #设置字符集,默认没有,
   server {                          #一个网站,一个nginx可以运行多个网站,添加这个配置项即可
       listen       80;                    #监听端口,可以修改,比如改个81看看效果,再启动看看80效果
       server_name localhost;         #网站的域名,现在没有配置域名,默认就是localhost,比如后面可以配置www.wulaoban.top
       location / {                    #目录,必须要有个location


           root   html;                #root是站点根目录的意思,值为html表示一个相对路径,绝对路径是/usr/share/nginx/html,也可以改昂,比如改成绝对路径root /usr/share/nginx/html,或者改为其他路径root /web
         #root /web # 改为这个试一下,别忘了去根目录下创建一个web目录,给web目录一些文件看看效果

           index index.html index.htm;    #默认首页,访问网址根路径的时候,自动访问站点根目录下面的index或者index.html或者index.htm文件,如果没有这几个名字的文件呢?访问的时候就会提示403,需要在网址上手动指定文件名称,这几个文件名称也是可以改的,比如改为jaden.html。
       }
   }
//最小化配置文件,
grep -Ev '#|^$' nginx.conf.default > nginx.conf
修改完后
nginx -t  //检测语法是否正确
systenctl restart nginx //重启生效
nginx进程
[root@web01 nginx]# ps -ef | grep nginx
root       1725      1  0 20:16 ?        00:00:00 nginx: master process
/usr/sbin/nginx # master process是主进程的意思,也叫做管理进程,它是用来管理nginx整个运行的,nginx的其他子进程如果死掉了,它会自动在启动其他的子进程,比如尝试kill 下面的子进程,你会发现另外一个进程又自动启动了。真正干活的进程是下面的worker process进程,叫做工作进程,有请求来了都是它处理的
nginx      1727   1725  0 20:16 ?        00:00:00 nginx: worker process # 可以看到
nginx是以nginx用户身份启动的
root       1869   1552  0 20:35 pts/0    00:00:00 vim nginx.conf
root       1898   1872  0 20:35 pts/1    00:00:00 grep --color=auto nginx
3.多站点部署
1.多端口
server即服务,多写一个server即可。
worker_processes  2;
events {
   worker_connections  1024;
}
http {
   include       mime.types;
   default_type application/octet-stream;
   charset utf-8;
    # 8yy复制8行,小p黏贴
   server {
listen       80;
server_name localhost;
location / {
root   /html/one;
index index.html index.htm;
}
   }
   server {
listen       81;
server_name localhost;
location / {
root   /html/two;
index index.html index.htm;
}
   }
   server {
listen       82;
server_name localhost;
location / {
root   /html/three;
index index.html index.htm;
}
   }
}
2.多ip
在虚拟机上可以采用多块网卡达到效果
worker_processes  1;
events {
    worker_connections  1024;
}
http {
    include       mime.types;
    default_type  application/octet-stream;
    server {
        listen       192.168.2.110:80;
        server_name   localhost;
        location / {
            root   /root/wz;
            index  index.html index.htm;
        }
    }

 server {
        listen       192.168.2.111:80;
        server_name  localhost;
        location / {
            root   html;
            index  index.html index.htm;
        }
    }


}
3.多域名
需要在本机 hosts文件设置一下域名。
worker_processes  1;
events {
    worker_connections  1024;
}
http {
    include       mime.types;
    default_type  application/octet-stream;
    server {
        listen     80;
        server_name   a.zsj.com;
        location / {
            root   /root/wz;
            index  index.html index.htm;
        }
    }

 server {
        listen      80;
        server_name b.zsj.com;
        location / {
            root   html;
            index  index.html index.htm;
        }
    }


}

#修改完配置文件之后,重启nginx
4.include
如果每来一个需求,我们就在nginx主配置文件中添加一个server记录,那么nginx配置文 件会变得很大,很难管理,所以要换一种方式来管理配置文件,将每个人的配置都单独拆分出来即可。
worker_processes  2;
events {
   worker_connections  1024;
}
http {
   include       mime.types;
   default_type application/octet-stream;
   charset utf-8;
   include /etc/nginx/conf.d/*.conf;
# 加载外部以.conf结尾的配置文件,如果你的路径下没有conf.d就自行创建一个-- mkdir conf.d
}
//conf.d目录
[root@bogon nginx]# ls conf.d/
home.conf yiliao.conf
[root@bogon nginx]#
5.nginx日志
现在web服务器都必须要开启日志记录功能,而且记录必须超过半年,这是网络安全法规定的。
日志存放路径
/var/log/
nginx 日志路径/var/log/nginx
1.access日志
cat /var/log/nginx/access.log 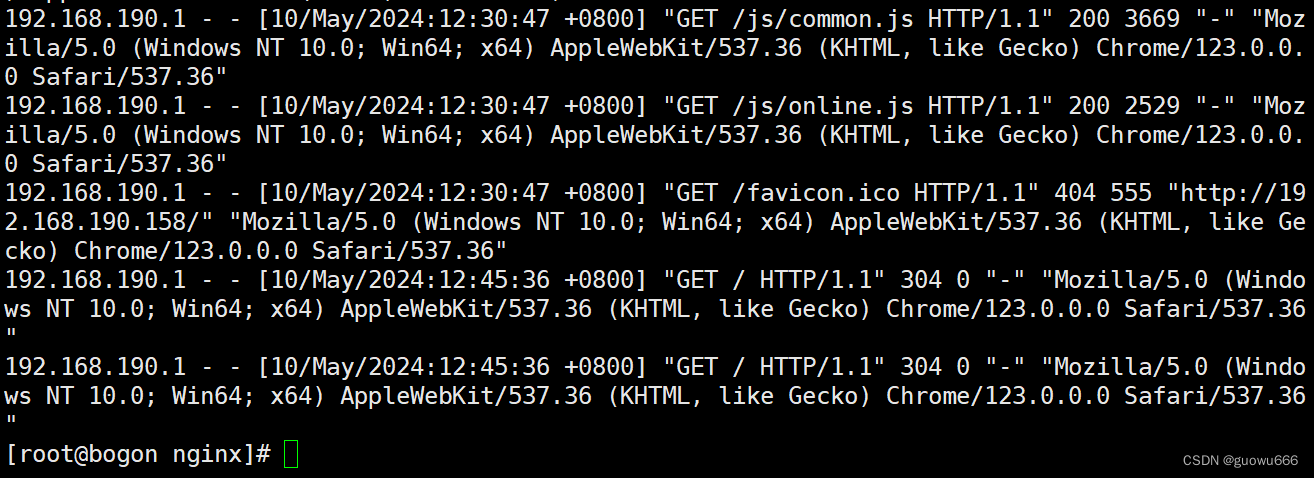
2.erorr日志

3.定义日志格式
# 定制日志记录格式:这个必须配置在在server配置外面昂
log_format compression '$remote_addr - $remote_user [$time_local] '
                       '"$request" $status $bytes_sent '
                       '"$http_referer" "$http_user_agent" "$gzip_ratio"';

# compression可以理解为是这个格式的名字,谁想用这个格式,谁就用这个名字来指定格式
192.168.61.1 - - [12/Apr/2023:14:19:59 +0800] "GET / HTTP/1.1" 304 0 "-"
"Mozilla/5.0 (Windows NT 10.0; Win64; x64) AppleWebKit/537.36 (KHTML, like Gecko)
Chrome/111.0.0.0 Safari/537.36"
# $remote_addr 客户端的ip地址
# $remote_user 客户端的用户名
# $time_local 当前时间
# $request     请求起始行
# $status     http状态码
# $bytes_sent 响应资源的大小
# $http_referer 记录资源的跳转地址
# $http_user_agent 用户的终端信息
# $gzip_ratio     gzip的压缩级别
# 比如我们想让日志记录一下请求时间、客户端ip、请求uri、状态码、文件大小
# vim /etc/nginx/nginx.conf
#需要现在nginx.conf文件中配置 log格式,单独的log文件才能用
6.Base认证
有些网站会开启一个叫做basic认证的东西,basic认证叫做http基本认证,就是给我们的网站多一把锁,防止恶意访问,比如访问一些敏感后台路径等操作。
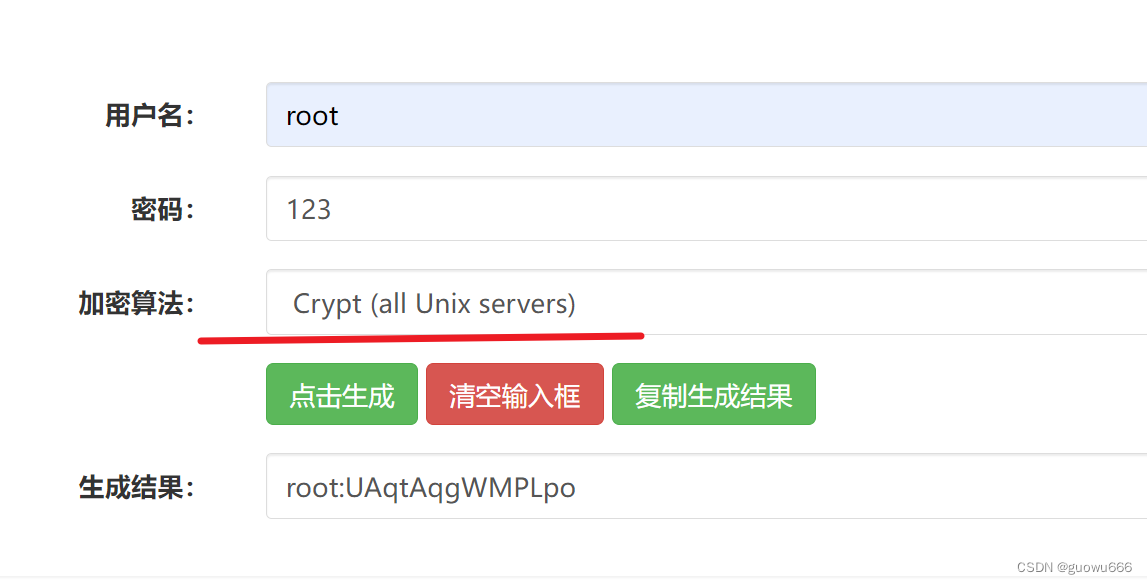
先写入密码
vim htpasswd

[root@localhost nginx]# cat  htpasswd
zsj:/tiBshqlzdhC6
[root@localhost nginx]#
密码格式生成网站 http://www.jsons.cn/htpasswd/
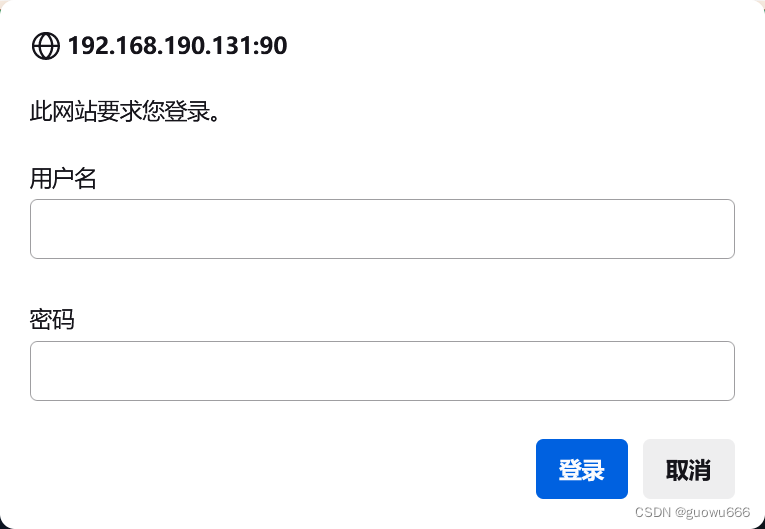
auth_basic "yiliao";
#auth_basic表示开启这个功能,"yiliao"是备注信息,随便写,一些老浏览器能看到,新浏览器都看不到备注信息了。

auth_basic_user_file /etc/nginx/htpasswd;  # 这是账号密码存放在哪个位置

server {
        listen     192.168.190.158:80;
        server_name  localhost;
        location / {
            root   yiliao;
            index  index.html index.htm;
             auth_basic "yiliao";
            auth_basic_user_file /etc/nginx/htpasswd;
        }

}
登陆时显示,输入正确显示正常网站,错误显示403
7.目录浏览
server {
        listen       192.168.190.131:80;
        server_name  localhost;
        autoindex on;  # 开启目录浏览功能
        autoindex_exact_size off; #显示文件大小的时候带单位
       location /

 {
            root   html;
            index  index.html index.htm;

        }

   }
注意:网站根目录下不能有index.html文件
mv index.html index.html.bak
8.nginx压缩
nginx
采用的压缩方式是gzip,nginx为什么压缩呢?为了省流量、加快传输速度。服务端的流量都是要花钱的。尤其是要做加速的网站,比如CDN加速,都是要收取流量费的。
·
dd if=/dev/zero of=/root/test bs=1M count=100 # 生成一个100M的测试文件
![]()
压缩后
gzip test![]()
很明显,如果服务器能够做压缩,既能够省流量,又能够加快传输速度。但是我们如果自己手动给每个文件进行压缩,就太慢了,所以我们部署Nginx的时候,一般都会给Nginx做自动压缩的配置:
           gzip on;
           gzip_min_length 1k;
           gzip_buffers     4 32k;
           gzip_http_version 1.1;
           gzip_comp_level 9;
           gzip_types text/html text/css text/xml application/javascript;
           gzip_vary on;
           gzip_disable "MSIE [1-7]\.";


 3808
3808


 被折叠的 条评论
为什么被折叠?
被折叠的 条评论
为什么被折叠?
 到【灌水乐园】发言


