


引出生命周期

此时调用change,定时器回调修改opacity,数据修改,模板重新解析,再次调用change。

挂载流程
更新流程
销毁流程
解绑(自定义)事件监听器

生命周期

注意注意注意!
但如果大家的模型层数据是从后台动态响应返回的,那么你肯定会遇到这么一个问题,为什么我mounted函数中的方法获取模型层数据是空的了??
经过我查看了:Vue.js 生命周期官方介绍,我才了解到:created和mounted执行时,异步初始化还没执行(还没执行完),也就是created里的数据还没获取到,mounted就开始了渲染视图的工作,那么这时模型层数据肯定就是为空的啦,而mounted只会调用一次,这就陷入了一个死局,mounted永远等不到created获取完数据后在渲染,那么解决的方法就是为mounted中的方法设置一个定时器,因为created获取数据的速度是很快的,我们只用让mounted停那么一丢丢时间就ok了!
解决方法:设定等待一个时间,确保你的初始值都已经被初始化在渲染视图
生命周期总结

 <div id="root">
        <!-- <h2 :style="{opacity}">hello,{{name}}</h2> -->
        <h2 :style="{opacity:opacity}">hello,{{name}}</h2>
        <button @click="stop">click stop</button>
        <button @click="opacity = 1">opacity 1</button>


    </div>
    <script type="text/javascript">
        Vue.config.productionTip = false;

        new Vue({
            el: "#root",
            data: {
                name: "atguigu",
                opacity: 1,


            },
            methods: {
                stop(){
                    this.$destroy();
                }
            },
            beforeDestroy() {
                clearInterval(this.timer);
            },

            //vue完成模板解析,并把初始的真实的dom元素放入页面后(挂载完毕),会调用该函数。
            mounted() {
                this.timer = setInterval(() => {
                    this.opacity -= 0.01;
                    if (this.opacity <= 0) { this.opacity = 1 }
                }, 16);
            },

        });


    </script>
组件化
templat可以写在文件上部,也可以写在配置对象里面。
templat
Vue中不使用template时:
整个root容器当作模板


Vue使用template时:
会直接替换掉root,把template当作模板进行解析。


组件不要写el属性。
new Vue({})、 Vue.extend、Vue.component
new Vue
1.new Vue({}),创建一个vm实例,vm.$mount('#app')挂载到app div上。
Vue.extend
1.Vue.extend({}),创建一个组件,组件的本质是一个VueComponent构造函数。
2.cosnt s = Vue.extend({options})可以简写为const s = {options}。简写也调用了Vue.extend。
3.写组件标签时<school></school>,就会创建school组件实例对象,相当于
new VueComponent({options})。
4.每次调用Vue.extend,返回的都是一个新的VueComponent。
内部sub变量接收VueComponent函数,返回sub。

vc是可复用的vm。el是vm特有的。
VueComponent.prototype.__proto__ === Vue.prototype
所以vc能够访问的Vue原型上的方法。
Vue.component

1.Vue.component其实内部是调用Vue.extend创建的子类构造方法,并且创建后放入Vue.options.components里面,以实现全局注册。而Vue.extend仅仅是创建子类构造方法,不放入Vue.options.components。其他细节和应用可看官方文档和网上文章。
// Vue.extend扩展子类
var subExtendClass = Vue.extend({
  name: 'SubExtendClass',
  data: function() {
    return {
      name: 'php'
    };
  },
  template: "<p>hi {{name}}, I'm dclnet</p>"
});
window.subExtendClass = subExtendClass;
console.log('Vue.extend class: subExtendClass ', subExtendClass);
// -----------------------------------------------
// Vue.component注册组件
var subComponent = Vue.component('SubComponent', {
  data: function() {
    return {
      name: 'java'
    };
  },
  template: "<p>hello {{name}}, I'm dclnet</p>"
});
window.subComponent = subComponent;
console.log('Vue.component class: subComponent ', subComponent);
// ===============================================
// html中使用组件
<div id="dclnet">
  <sub-component></sub-component>
  <sub-extend-class></sub-extend-class>
</div>

window.app = new Vue({
  el: '#dclnet',
  // 注意:这里直接放components里面,局部注册 <<<<<
  components: {'sub-extend-class': subExtendClass}
});


非单文件组件
data需要用函数式写法


<div id="root">
<h2>{{msg}}</h2>
<!--组件标签-->
<school>
</school>
<hr>
<student>
</student>
<student>
</student>
<hello>
</hello>
</div>
<div id="root2">
</div>
<script type="text/javascript">
Vue.config.productionTip = false;
//创建school组件
const school = Vue.extend({
template:`
<div>
<h2>schoolname:{{schoolname}}</h2>
<h2>schoolage{{schoolage}}</h2>
<button @click='show'>点击提示</button>
</div>
`,
data(){
return{
schoolname: "atguigu",
schoolage:20,
}
},
methods: {
show(){
alert(this.schoolname);
}
},
});
//创建stu组件
const student = Vue.extend({
template:`
<div>
<h2>stuname:{{stuname}}</h2>
<h2>stuage{{stuage}}</h2>
</div>
`,
data(){
return{
stuname:'tom',
stuage:18,
}
},
});
//创建hello组件
const hello = Vue.extend({
template:`
<div>
<h2>stuname:{{stuname}}</h2>
<h2>stuage{{stuage}}</h2>
</div>
`,
data(){
return{
stuname:'tom',
stuage:18,
}
},
});
//全局注册组件
Vue.component('hello',hello);
new Vue({
el: "#root",
data:{
msg:'this is msg'
},
//局部注册组件
components:{
school:school,
student,
}
});
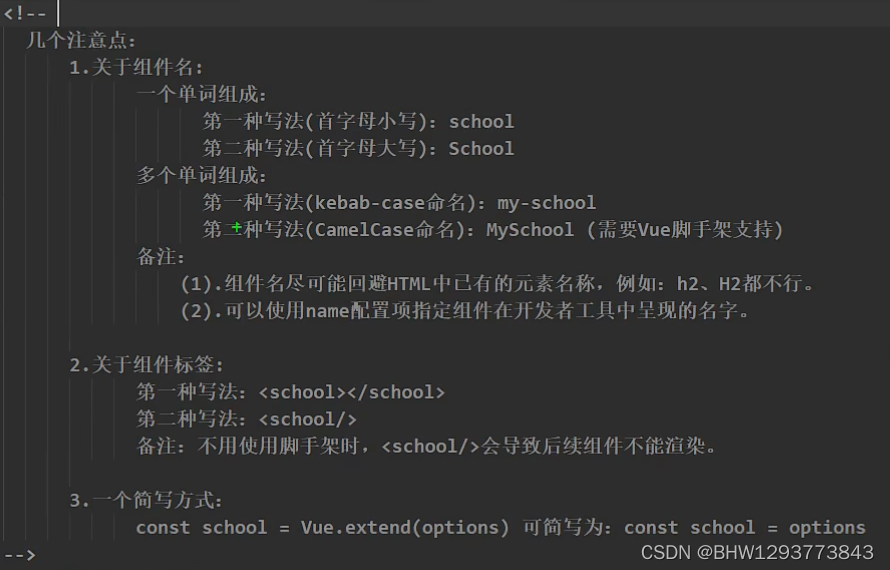
</script>组件的几个注意点
组件的嵌套


<!DOCTYPE html>
<html lang="en">

<head>
    <meta charset="UTF-8">
    <meta http-equiv="X-UA-Compatible" content="IE=edge">
    <meta name="viewport" content="width=device-width, initial-scale=1.0">
    <script type="text/javascript" src="../js/vue.js"></script>
    <title>Document</title>

</head>


<body>
    <div id="root">


    </div>


    <script type="text/javascript">
        Vue.config.productionTip = false;

        //创建student组件
        const student = Vue.extend({
            template:`
            <div>
                <h2>stuname:{{stuname}}</h2>
                <h2>stuage{{stuage}}</h2>
            </div>
            `,
            data(){
                return{
                    stuname:'tom',
                    stuage:18,
                }
            },

       });

        //创建school组件
       const school = Vue.extend({
            template:`
            <div>
                <h2>schoolname:{{schoolname}}</h2>
                 <h2>schoolage{{schoolage}}</h2>
                 <button @click='show'>点击提示</button>
                 <student></student>
            </div>
            `,
            data(){
                return{
                    schoolname: "atguigu",
                    schoolage:20,
                }
            },
            methods: {
                show(){
                    alert(this.schoolname);
                }
            },
            components:{
                student:student,
            }
       });

       //创建hello组件
       const hello = Vue.extend({
            template:`
            <div>
                <h2>{{msg}}</h2>

            </div>
            `,
            data(){
                return{
                    msg:'hello!'
                }
            },
       });


       const app = Vue.extend({
           template:`
                <div>
                    <hello></hello>

                    <school></school>
                </div>
           `,
           components:{
                school,
                hello,
            }


       })


       //vue
        new Vue({
            template:'<app></app>',
            el: "#root",
            //局部注册组件
            components:{
                app,
            }
        });


    </script>

</body>

</html>
VueComponent
每次调用extend,都返回了一个VueComponent


<!DOCTYPE html>
<html lang="en">

<head>
    <meta charset="UTF-8">
    <meta http-equiv="X-UA-Compatible" content="IE=edge">
    <meta name="viewport" content="width=device-width, initial-scale=1.0">
    <script type="text/javascript" src="../js/vue.js"></script>
    <title>Document</title>

</head>


<body>
    <div id="root">

        <!--组件标签-->
        <school>
        </school>

        <hello>
        </hello>


    </div>

    <div id="root2">

    </div>
    <script type="text/javascript">
        Vue.config.productionTip = false;


        //创建school组件
        const school = Vue.extend({

            template: `
            <div>
                <h2>schoolname:{{schoolname}}</h2>
                 <h2>schoolage{{schoolage}}</h2>
                 <button @click='show'>点击提示</button>
            </div>
            `,
            data() {
                return {
                    schoolname: "atguigu",
                    schoolage: 20,
                }
            },
            methods: {
                show() {
                    console.log(this)//VueComponent实例对象  vc
                    alert(this.schoolname);
                }
            },
        });


        //创建hello组件
        const hello = Vue.extend({

            template: `
            <div>
                <h2>hello:{{hello}}</h2>

            </div>
            `,
            data() {
                return {
                    hello: "hello",

                }
            },

        });


        console.log(school);//一个构造函数
        console.log(hello);//一个构造函数
        console.log(school === hello);//false

        new Vue({
            el: "#root",
            data: {

            },
            //局部注册组件
            components: {
                school: school,
                hello:hello,
            }

        });

    </script>

</body>

</html>
Vue实例与组件实例


一个重要的内置关系
![]()
复习原型对象:

让组件vc,可以访问到Vue原型对象(一个object对象)上的属性、方法。
*查找属性和方法,会沿着隐式原型链查找。

<body>
    <div id="root">
        <school></school>


    </div>


    <script type="text/javascript">

        Vue.config.productionTip = false;
         //全局注册组件
       //Vue.component('hello',hello);
        Vue.prototype.x = 123;//此时x在vm的原型对象上

        //创建school组件
       const school = Vue.extend({
            name:'atguigu',
            template:`
            <div>
                <h2>schoolname:{{schoolname}}</h2>
                 <h2>schoolage{{schoolage}}</h2>
                 <button @click='show'>点击提示x</button>
            </div>
            `,
            data(){
                return{
                    schoolname: "atguigu",
                    schoolage:20,
                }
            },
            methods: {
                show(){
                    alert(this.x);//vc.x
                }
            },
       });


        const vm = new Vue({
            el: "#root",
            data:{
                msg:'this is msg',
                //x:123,  此时x在vm上
            },

            components:{
               school,
            }

        });

        console.log(school.prototype.__proto__ === Vue.prototype);//true


    </script>

</body>
单文件组件

Student.vue:
<template>
  <div class="demo">
    <h2>stuname:{{ stuname }}</h2>
    <h2>stuage{{ stuage }}</h2>
  </div>
</template>


<script>

            export default Vue.extend({
                name:"student",
                data() {
                    return {
                    stuname: "tom",
                    stuage: 18,
                    };
                },
                });

            //export default student;
</script>


<style>
        .demo{
            background-color: yellow;
        }
</style>
School.vue:
<template>
    <div class="school">
        <h2>schoolname:{{ schoolname }}</h2>
        <h2>schoolage{{ schoolage }}</h2>
        <button @click="show">点击提示</button>
    </div>
</template>


<script>
        export default Vue.extend({
        name:'school',
        data() {
            return {
            schoolname: "atguigu",
            schoolage: 20,
            };
        },
        methods: {
            show() {
            alert(this.schoolname);
            },
        },
        });
</script>


<style>
.school {
  background-color: red;
}
</style>
App.vue:
<template>

    <div>
        <school></school>
        <student></student>

    </div>

</template>


<script>
    import School from './School.vue';
    import Student from './Student.vue';

    export default{
        name:'App',
        components:{
            School,
            Student,
        }


    }
</script>


<style>

</style>
main.js:
import App from './App.vue';


new Vue({

    el:'#root',
    template:' <App></App>',
    components:{
        App,
    }

})
index.html:
<!DOCTYPE html>
<html lang="en">
<head>

    <meta charset="UTF-8">
    <meta http-equiv="X-UA-Compatible" content="IE=edge">
    <meta name="viewport" content="width=device-width, initial-scale=1.0">

    <title>Document</title>

</head>

<body>

    <div id="root">

    </div>

    <script src="../js/vue.js"></script>
    <script src="./main.js"></script>
</body>
</html>
Vue脚手架

在桌面创建一个demo文件夹

编译helloworld
helloworld界面

分析脚手架结构
目前需要把组件名称改为双驼峰(SchoolMsg)这种,不然会报错!!!!!!!
不要用School!!!!

asssts :静态资源
components:子组件

public :页面
流程:执行nmp run serve,进入src找到main.js,发现需要引入App.vue,然后进入App.vue,引入App里面的子组件,main完成引入App,创建Vue实例,把组件放入容器中。
不需要在页面中引入main.js,脚手架已经配置好了。
main.js:
/*
该文件为入口文件
*/

//引入vue
import Vue from 'vue'

//引入App组件  所有组件的父组件
import App from './App.vue'

//关闭vue生产提示
Vue.config.productionTip = false

//创建vue实例对象
new Vue({
  //将App组件放入容器中
  render: h => h(App),
}).$mount('#app')
App.vue:
<template>

    <div>
        <img src="./assets/logo.png" alt="">
        <school></school>
        <student></student>

    </div>

</template>


<script>
    import School from './components/School.vue';
    import Student from './components/Student.vue';

    export default{
        name:'App',
        components:{
            School,
            Student,
        }


    }
</script>


<style>

</style>
index.html:
<!DOCTYPE html>
<html lang="">
  <head>
    <meta charset="utf-8">
    <!--使IE以最高级别渲染页面-->
    <meta http-equiv="X-UA-Compatible" content="IE=edge">
    <!--开启移动端理想视口-->
    <meta name="viewport" content="width=device-width,initial-scale=1.0">
    <!--配置页签图标  路径封装 public文件夹-->
    <link rel="icon" href="<%= BASE_URL %>favicon.ico">
    <!--配置网页标题-->
    <title><%= htmlWebpackPlugin.options.title %></title>
  </head>


  <body>
    <!--当浏览器不支持script时,标签中的元素就会被渲染-->
    <noscript>
      <strong>We're sorry but <%= htmlWebpackPlugin.options.title %> doesn't work properly without JavaScript enabled. Please enable it to continue.</strong>
    </noscript>

    <!--容器-->
    <div id="app"></div>
    <!-- built files will be auto injected -->
  </body>
</html>
目录结构:

编译项目:

render函数
使用template+components:

会报错,提示引入的Vue有问题:
当前引入语法(ES6模块化语法)

要么交给render函数,要么引入带有模板解析器的Vue。
当前引入的Vue版本(残缺了模板解析器):

此时接收一个函数作为参数,会在页面创建一个h1元素,效果等同于template:`<h1>你好啊<h1>`
此时为什么要用render?
因为考虑到了引入的是残缺版的Vue,不能解析模板的版本。

没有用到this,进行简写。并将组件App传入。

为什么要用不完整版本的Vue,节省打包后的文件体积,模板解析器也不应该出现在打包文件里。

解析标签类型的template


修改默认配置
在vue.config.js里面修改。

配置参考:配置参考 | Vue CLI (vuejs.org) https://cli.vuejs.org/zh/config/


ref属性

标签添加ref属性,vc的一个属性会有这个dom。
对于传统的HTML标签,id 和 ref 都能实现获取dom的功能,
对于组件标签,给它加id标签时,相当于给该组件最外层容器加id,获得外层div。![]()

添加ref时,获得的是组件实例对象。

<template>

    <div>
        <h1 v-text="msg" ref="title"></h1>
        <button @click="show">button get dom</button>
        <img src="./assets/logo.png" alt="">

        <school-info ref="sch"></school-info>

        <student-info></student-info>


    </div>

</template>


<script>
    import SchoolInfo from './components/SchoolInfo.vue';
    import StudentInfo from './components/StudentInfo.vue';

    export default{
        name:'App',
        data(){
            return {
                msg:'this is a msg!'
            }
        },
        components:{
            // eslint-disable-next-line vue/no-unused-components
            SchoolInfo,
            // eslint-disable-next-line vue/no-unused-components
            StudentInfo,
        },
        methods: {
            show(){
                console.log(this.$refs);
                console.log(this.$refs.title);//dom
                console.log(this.$refs.sch);//获取school组件实例对象

            }
        },


    }
</script>


<style>

</style>
_props配置


此时vc的_data中只有msg属性


使用v-bind: 使标签引号里面的内容变为js表达式,age的值是运行引号里面表达式的结果。
props上的属性优先级大于data里面的。
<template>
  <div class="demo">
    <h1>{{msg}}</h1>
    <h2>stuname:{{ Mystuname }}</h2>
    <h2>stuage:{{ Mystuage+1 }}</h2>
    <h2>stusex:{{ Mystusex }}</h2>
    <button @click="set">修改age</button>
  </div>
</template>


<script>

            export default {
                name:"StudentInfo",
                data() {
                    return {
                    msg:'尚硅谷666',//msg出现在vc身上
                    Mystuname:this.stuname,
                    Mystuage:this.stuage,
                    Mystusex:this.syusex,

                    };
                },

                props:['stuname','stuage','stusex'],//简单申明接收


                //接收的同时对类型进行限制
                /*
                props:{
                  stuname:String,
                  stuage:Number,
                  stusex:String,
                }*/


                //接收的同时对类型、默认值、必要性进行限制
                // props:{
                //   stuname:{
                //     type:String,
                //     required:true,//必须要传的参数
                //   },
                //   stuage:{
                //     type:Number,
                //     default:99,//默认值
                //   },
                //   stusex:{
                //     type:String,
                //     required:true,
                //   },
                //},
                methods:{
                  set(){

                      this.Mystunage ++;
                  }
                }

              }
            //export default student;
</script>


<style>
        .demo{
            background-color: yellow;
        }
</style>
mixin混入


mixin.js
// eslint-disable-next-line no-unused-vars
export const mixin = {
    methods: {
        show() {
          alert(this.name);
        },
      },
    mounted() {
        console.log('(mixin)挂载完毕')
    },
}

// eslint-disable-next-line no-unused-vars
export const mixin2 = {
    data(){
        return{
            x:200
        }
    }
}
StudentInfo.vue
<template>
  <div class="demo">
    <h1>{{ msg }}</h1>
    <h2 @click="show">stuname:{{ name }}</h2>
    <h2>stuage:{{ stuage }}</h2>
  </div>
</template>


<script>
//引入一个混合
// eslint-disable-next-line no-unused-vars
import {mixin} from '../mixin'
export default {
  name: "StudentInfo",
  data() {
    return {
      msg: "尚硅谷666", //msg出现在vc身上
      name: "jack",
      stuage: 18,
    };
  },
  mixins:[mixin],
  mounted() {
    console.log('(StudentInfo)挂载完毕')
  },
};
</script>


<style>
</style>
SchoolInfo.vue
<template>
  <div class="school">
    <h2 @click="show">schoolname:{{ name }}</h2>
    <h2>schoolage{{ schoolage }}</h2>
  </div>
</template>


<script>
//引入一个混合
// eslint-disable-next-line no-unused-vars
import {mixin} from '../mixin'
export default {
  name: "SchoolInfo",
  data() {
    return {
      name: "atguigu",
      schoolage: 20,
      x:66,//以本身的属性值为主
    };
  },
  mixins:[mixin],
  mounted() {
    console.log('(SchoolInfo)挂载完毕')
  },

};
</script>


<style>
</style>
全局引入混入:
/*
该文件为入口文件
*/

//引入vue
import Vue from 'vue'

//引入App组件  所有组件的父组件
import App from './App.vue'

//全局引入混合 vm vc 都能用
// eslint-disable-next-line no-unused-vars
//import {mixin,mixin2} from './components/mixin';

//关闭vue生产提示
Vue.config.productionTip = false

//Vue.mixin(mixin)
//Vue.mixin(mixin2)

//创建vue实例对象
new Vue({

  //将App组件放入容器中
  render: h => h(App),


}).$mount('#app')
插件

在 main.js引入并应用插件:

定义一个插件,其中定义了全局过滤器、全局自定义指令、全局混入、Vue原型对象方法。vm和vc都能用。
plugins.js:
// eslint-disable-next-line no-unused-vars
export default {
    install(Vue,x){
        console.log(x)//1
       //全局过滤器
       Vue.filter('mySlice',function(value){
           return value.slice(0,4);
       });

       //定义全局自定义指令
       //指令语法就是操作dom元素的属性,内容,绑定事件。
       Vue.directive('fbind', {
           //指令与元素成功绑定时调用(一上来就调用)
           bind(el, binding) {
                el.value = binding.value;
           },
           //指令所在元素插入页面时调用
           inserted(el) {
               //默认获取焦点
                el.focus();
           },
           //指令所在模板重新解析时调用
           update(el, binding) {
               el.value = binding.value;
           },
       });

       //全局混入
       Vue.mixin({
           data(){
               return{
                   x:100,
                   y:200,
               }
           },
           methods: {
               show(){
                   alert(this.y);
               }
           },
       });

       //给Vue原型添加方法
       //vm和vc都能用
       Vue.prototype.hello = ()=>{
           alert("hello");
       }
    }
}
SchoolInfo.vue:
<template>
  <div class="school">
    <h2>schoolname:{{ name|mySlice }}</h2>
    <h2>schoolage{{ schoolage }}</h2>
    <button @click="show">获取y</button>
    <button @click="hello">hello!</button>
  </div>
</template>


<script>

export default {
  name: "SchoolInfo",
  data() {
    return {
      name: "尚硅谷atguigu尚硅谷",
      schoolage: 20,
      x:66,//以本身的属性为准
    };
  },
};
</script>


<style>
</style>
StudentInfo.vue
<template>
  <div class="demo">
    <h1>{{ msg }}</h1>
    <h2 >stuname:{{ name }}</h2>
    <h2>stuage:{{ stuage }}</h2>
    <input type="text" v-fbind:value='name'>
  </div>
</template>


<script>

export default {
  name: "StudentInfo",
  data() {
    return {
      msg: "尚硅谷666", //msg出现在vc身上
      name: "jack",
      stuage: 18,
    };
  },
};
</script>


<style>
</style>
scoped样式
使两个子组件的class可以重名,并且效果不同。

查看并安装less-loader


 402
402

 被折叠的 条评论
为什么被折叠?
被折叠的 条评论
为什么被折叠?
 到【灌水乐园】发言


