


一、前言
1.本文代码实现的功能是配置类,指定自定义配置文件的位置和名称,开启对应配置类的属性注入功能,指定配置文件注入属性的前缀,生成getter和setter,toString方法等;
2.该程序代码是使用idea2021.12版本编写的,若使用其他软件请对照好配置;
3.这个程序具体的内容我忘了,只知道使用@Data@Configuration@Autowired@PropertySource@Test(指定自定义文件的位置,开启对应配置)等方法写的,具体实现的功能就是新建几个.yml和.java文件,实现在.yml文件中配置访问路径(输入信息)通过localhost:8080端口实现在网页上输出;
4.下面写的是这个表需要建的结构和代码段以及运行的结果;
5.这个博文讲的,我已将代码包发布到了我的资源里,有需要的可以直接下载并导入到自己的id里,看看能不能运行;
二、结构
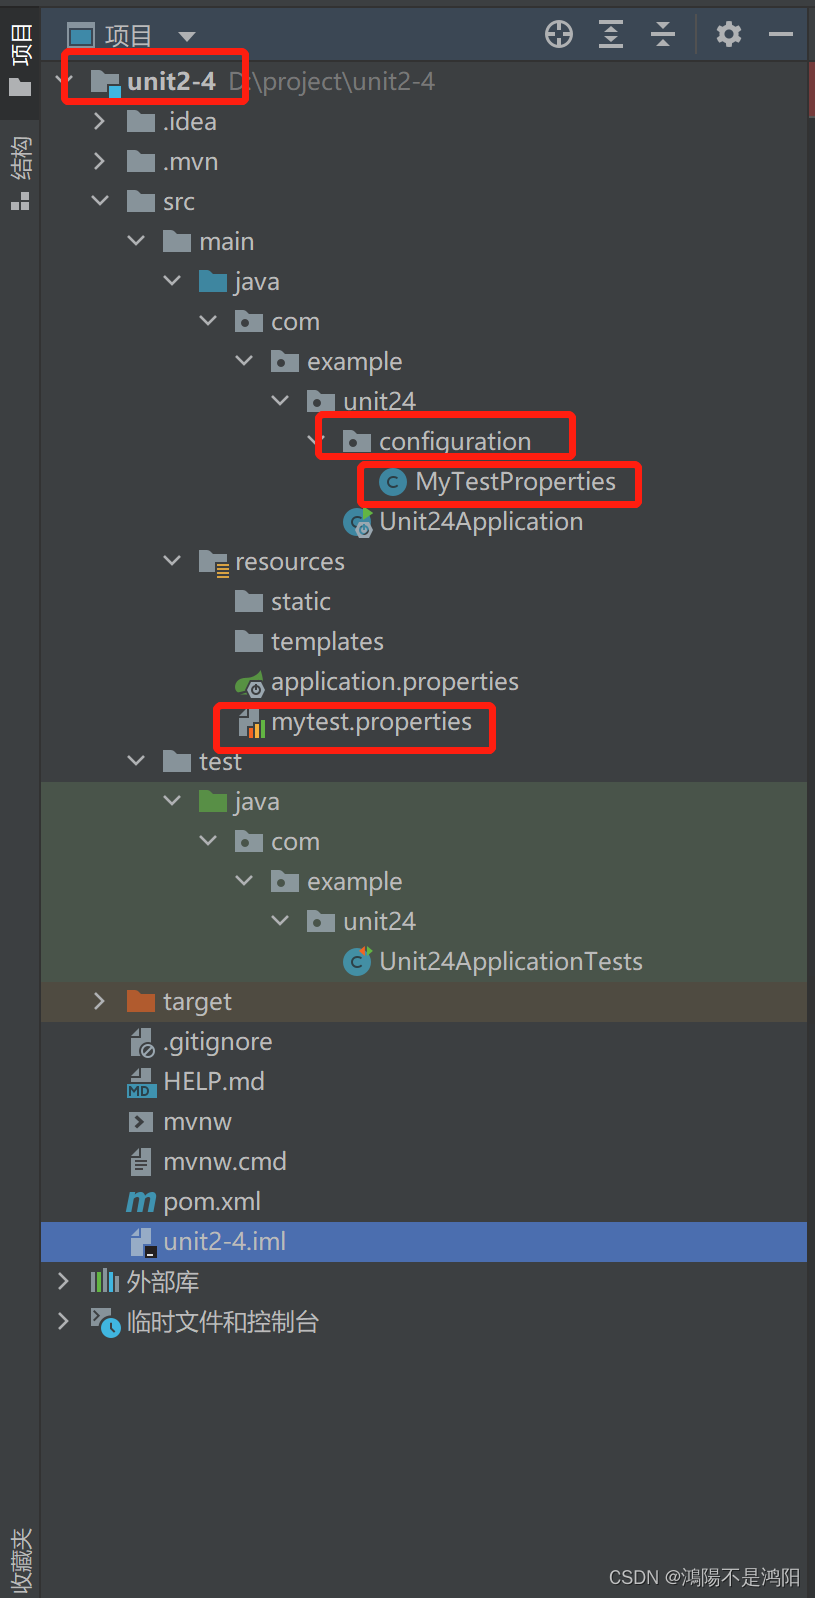
首先需要建包,这里就不多说了,我建的包名为unit2-4;
依次在包中src-main-java-com-example-unit24文件中新建一个软件包,名称为configuration;
其次在configuration软件包中新建MyTestProperties这个Java类文件,这个是实现配置类以及上文提到的有关更能的;
同时还需要在src-main-resources软件包中新建mytest.properties文件,这个是用来配置访问角色信息的,这个后缀一定要对;
原则上新建完文件是有Unit24Application和Unit24ApplicationTests这两个Java类文件的,不需要在新建,只需填写写代码;
以上为本代码的结构,下面为代码的结构,画框的就是需要编写的代码,下面会依次将各代码段粘贴
三、代码段
1.MyTestProperties.java类代码
package com.example.unit24.configuration;

import lombok.Data;
import org.springframework.boot.context.properties.ConfigurationProperties;
import org.springframework.boot.context.properties.EnableConfigurationProperties;
import org.springframework.context.annotation.Configuration;
import org.springframework.context.annotation.PropertySource;

import java.util.List;

//配置类
@Configuration
//指定自定义配置文件的位置和名称
@PropertySource("classpath:mytest.properties")
//开启对应配置类的属性注入功能
@EnableConfigurationProperties(MyTestProperties.class)
//指定配置文件注入属性的前缀
@ConfigurationProperties(prefix = "role")
//生成getter和setter,toString方法
@Data
public class MyTestProperties {
      private String name;
      private String description;
      private List<String> permissionids;

}
2.mytest.properties代码
#配置角色信息
#???key=value
role.name = 管理员
role.description = 所有权限
role.permissionids = 20,21,22
3.src——Unit24Application.java类代码
package com.example.unit24;

import org.springframework.boot.SpringApplication;
import org.springframework.boot.autoconfigure.SpringBootApplication;

@SpringBootApplication
public class Unit24Application {

    public static void main(String[] args) {
        SpringApplication.run(Unit24Application.class, args);
    }

}
4.test——Unit24ApplicationTests.java类代码
package com.example.unit24;

import com.example.unit24.configuration.MyTestProperties;
import org.junit.jupiter.api.Test;
import org.springframework.beans.factory.annotation.Autowired;
import org.springframework.boot.test.context.SpringBootTest;

@SpringBootTest
class Unit24ApplicationTests {
    @Autowired
    private MyTestProperties myTestProperties;
    @Test
    void contextLoads() {
        System.out.println(myTestProperties);
    }

}
四、运行结果
1.id控制台运行的结果


 2330
2330


 被折叠的 条评论
为什么被折叠?
被折叠的 条评论
为什么被折叠?
 到【灌水乐园】发言


