


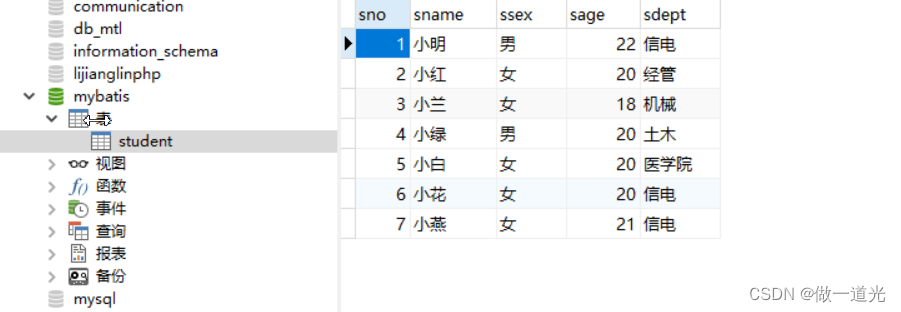
1.MySQL 创建数据库mybatis,新建表 student (以前创建好的表)
2.maven 依赖 pom.xml
<?xml version="1.0" encoding="UTF-8"?>

<project xmlns="http://maven.apache.org/POM/4.0.0" xmlns:xsi="http://www.w3.org/2001/XMLSchema-instance"
         xsi:schemaLocation="http://maven.apache.org/POM/4.0.0 http://maven.apache.org/xsd/maven-4.0.0.xsd">
    <parent>
        <artifactId>spring3</artifactId>
        <groupId>com.it</groupId>
        <version>1.0-SNAPSHOT</version>
    </parent>
    <modelVersion>4.0.0</modelVersion>

    <artifactId>springWeb</artifactId>
    <packaging>war</packaging>

    <name>springWeb Maven Webapp</name>
    <!-- FIXME change it to the project's website -->
    <url>http://www.example.com</url>

    <properties>
        <project.build.sourceEncoding>UTF-8</project.build.sourceEncoding>
        <maven.compiler.source>1.8</maven.compiler.source>
        <maven.compiler.target>1.8</maven.compiler.target>
    </properties>

    <dependencies>
        <!-- servlet依赖 -->
        <dependency>
            <groupId>javax.servlet</groupId>
            <artifactId>javax.servlet-api</artifactId>
            <version>3.1.0</version>
            <scope>provided</scope>
        </dependency>
        <!-- jsp依赖 -->
        <dependency>
            <groupId>javax.servlet.jsp</groupId>
            <artifactId>jsp-api</artifactId>
            <version>2.2.1-b03</version>
            <scope>provided</scope>
        </dependency>
        <!-- 单元测试-->
        <dependency>
            <groupId>junit</groupId>
            <artifactId>junit</artifactId>
            <version>4.11</version>
            <scope>test</scope>
        </dependency>
        <!-- spring核心ioc-->
        <dependency>
            <groupId>org.springframework</groupId>
            <artifactId>spring-context</artifactId>
            <version>5.2.5.RELEASE</version>
        </dependency>
        <!--做spring事务用到的-->
        <dependency>
            <groupId>org.springframework</groupId>
            <artifactId>spring-tx</artifactId>
            <version>5.2.5.RELEASE</version>
        </dependency>
        <dependency>
            <groupId>org.springframework</groupId>
            <artifactId>spring-jdbc</artifactId>
            <version>5.2.5.RELEASE</version>
        </dependency>
        <!--  mybatis依赖-->
        <dependency>
            <groupId>org.mybatis</groupId>
            <artifactId>mybatis</artifactId>
            <version>3.5.1</version>
        </dependency>
        <!--  mybatis和spring集成的依赖-->
        <dependency>
            <groupId>org.mybatis</groupId>
            <artifactId>mybatis-spring</artifactId>
            <version>1.3.1</version>
        </dependency>
        <!--mysql驱动-->
        <dependency>
            <groupId>mysql</groupId>
            <artifactId>mysql-connector-java</artifactId>
            <version>5.1.9</version>
        </dependency>
        <!--  阿里公司的数据库连接池-->
        <dependency>
            <groupId>com.alibaba</groupId>
            <artifactId>druid</artifactId>
            <version>1.1.12</version>
        </dependency>
    </dependencies>

    <build>

        <!--    设置编译compile生成traget文件时可以把后缀为xml的文件一起加入进去-->
        <!--  现在是把src/main/java目录中的xml文件包含到输出结果中,输出到target/classes目录中-->
        <resources>
            <resource>
                <directory>src/main/java</directory>
                <includes>
                    <include>**/*.properties</include>
                    <include>**/*.xml</include>
                </includes>
                <filtering>false</filtering>
            </resource>
            <resource>
                <directory>src/main/resources</directory>
                <includes>
                    <include>**/*.properties</include>
                    <include>**/*.xml</include>
                </includes>
                <filtering>false</filtering>
            </resource>
        </resources>


        <!--    指定jdk的版本  -->
        <plugins>
            <plugin>
                <artifactId>maven-compiler-plugin</artifactId>
                <version>3.1</version>
                <configuration>
                    <source>1.8</source>
                    <target>1.8</target>
                </configuration>
            </plugin>
        </plugins>


        <pluginManagement><!-- lock down plugins versions to avoid using Maven defaults (may be moved to parent pom) -->
            <plugins>
                <!-- clean lifecycle, see https://maven.apache.org/ref/current/maven-core/lifecycles.html#clean_Lifecycle -->
                <plugin>
                    <artifactId>maven-clean-plugin</artifactId>
                    <version>3.1.0</version>
                </plugin>
                <!-- default lifecycle, jar packaging: see https://maven.apache.org/ref/current/maven-core/default-bindings.html#Plugin_bindings_for_jar_packaging -->
                <plugin>
                    <artifactId>maven-resources-plugin</artifactId>
                    <version>3.0.2</version>
                </plugin>
                <plugin>
                    <artifactId>maven-compiler-plugin</artifactId>
                    <version>3.8.0</version>
                </plugin>
                <plugin>
                    <artifactId>maven-surefire-plugin</artifactId>
                    <version>2.22.1</version>
                </plugin>
                <plugin>
                    <artifactId>maven-jar-plugin</artifactId>
                    <version>3.0.2</version>
                </plugin>
                <plugin>
                    <artifactId>maven-install-plugin</artifactId>
                    <version>2.5.2</version>
                </plugin>
                <plugin>
                    <artifactId>maven-deploy-plugin</artifactId>
                    <version>2.8.2</version>
                </plugin>
                <!-- site lifecycle, see https://maven.apache.org/ref/current/maven-core/lifecycles.html#site_Lifecycle -->
                <plugin>
                    <artifactId>maven-site-plugin</artifactId>
                    <version>3.7.1</version>
                </plugin>
                <plugin>
                    <artifactId>maven-project-info-reports-plugin</artifactId>
                    <version>3.0.0</version>
                </plugin>
            </plugins>
        </pluginManagement>
    </build>
</project>
3.定义实体类 Student
package com.it.domain;

public class Student {
    private Integer sno;
    private String sname;
    private String ssex;
    private Integer sage;
    private String sdept;

    public Student() {
    }

    public Student(Integer sno, String sname, String ssex, Integer sage, String sdept) {
        this.sno = sno;
        this.sname = sname;
        this.ssex = ssex;
        this.sage = sage;
        this.sdept = sdept;
    }

    public Integer getSno() {
        return sno;
    }

    public void setSno(Integer sno) {
        this.sno = sno;
    }

    public String getSname() {
        return sname;
    }

    public void setSname(String sname) {
        this.sname = sname;
    }

    public String getSsex() {
        return ssex;
    }

    public void setSsex(String ssex) {
        this.ssex = ssex;
    }

    public Integer getSage() {
        return sage;
    }

    public void setSage(Integer sage) {
        this.sage = sage;
    }

    public String getSdept() {
        return sdept;
    }

    public void setSdept(String sdept) {
        this.sdept = sdept;
    }

    @Override
    public String toString() {
        return "Student{" +
                "sno=" + sno +
                ", sname='" + sname + '\'' +
                ", ssex='" + ssex + '\'' +
                ", sage=" + sage +
                ", sdept='" + sdept + '\'' +
                '}';
    }
}
4.定义 StudentDao 接口
package com.it.dao;

import com.it.domain.Student;

import java.util.List;

public interface StudentDao {
    List<Student> selectStudents();
    int insertStudent(Student student);
}
5定义映射文件 mapper
在Dao 接口的包中创建 MyBatis 的映射文件 mapper,命名与接口名相同,本例StudentDao.xml。mapper 中的 namespace 取值也为 Dao 接口的全限定性名。
<?xml version="1.0" encoding="UTF-8" ?>

<!DOCTYPE mapper
        PUBLIC "-//mybatis.org//DTD Mapper 3.0//EN"
        "http://mybatis.org/dtd/mybatis-3-mapper.dtd">
<mapper namespace="com.it.dao.StudentDao">
    <select id="selectStudents" resultType="com.it.domain.Student">
select * from student order by sno desc
    </select>
    <insert id="insertStudent">
        insert into student values (#{sno},#{sname},#{ssex},#{sage},#{sdept})
    </insert>
</mapper>
6 定义 Service 接口和实现类
接口
package com.it.service;

import com.it.domain.Student;

import java.util.List;

public interface StudentService {
    List<Student> queryStudent();
    int addStudent(Student student);
}
实现类
package com.it.service.impl;

import com.it.dao.StudentDao;
import com.it.domain.Student;
import com.it.service.StudentService;

import java.util.List;

public class StudentServiceImpl implements StudentService {

//    引用类型
    private StudentDao studentDao;
//使用set注入的方式
    public void setStudentDao(StudentDao studentDao) {
        this.studentDao = studentDao;
    }

    @Override
    public List<Student> queryStudent() {
        List<Student> students = studentDao.selectStudents();
        return students;
    }

    @Override
    public int addStudent(Student student) {
        int i = studentDao.insertStudent(student);
        return i;
    }
}
7 定义 MyBatis 主配置文件
在 src 下定义 MyBatis 的主配置文件,命名为 mybatis.xml。
这里有两点需要注意:
(1)主配置文件中不再需要数据源的配置了。因为数据源要交给 Spring 容器来管理了。
(2)这里对 mapper 映射文件的注册,使用<package/>标签,即只需给出 mapper 映射文件所在的包即可。因为 mapper 的名称与 Dao 接口名相同,可以使用这种简单注册方式。这种方式的好处是,若有多个映射文件,这里的配置也是不用改变的。当然,也可使用原来的<resource/>标签方式。
<?xml version="1.0" encoding="UTF-8" ?>
<!DOCTYPE configuration
        PUBLIC "-//mybatis.org//DTD Config 3.0//EN"
        "http://mybatis.org/dtd/mybatis-3-config.dtd">
<configuration>
<!--    设置日志-->
    <settings>
        <setting name="logImpl" value="STDOUT_LOGGING"/>
    </settings>

<!--    设置别名-->
    <typeAliases>
<!--   name:实体类所在的包名,表示这个包下的所有类都叫做这个别名-->
        <package name="com.it.domain"/>
    </typeAliases>


    <mappers>
<!--    name:是包名,这个包中的所有的mapper.xml一次都能加载!-->
        <package name="com.it.dao"/>
    </mappers>
</configuration>
8 修改 Spring 配置文件
(1) 数据源的配置
使用 JDBC 模板,首先需要配置好数据源,数据源直接以 Bean 的形式配置在 Spring 配置文件中。根据数据源的不同,其配置方式不同:
Druid 数据源 DruidDataSource
Druid 是阿里的开源数据库连接池。是 Java 语言中最好的数据库连接池。Druid 能够提供强大的监控和扩展功能。Druid 与其他数据库连接池的最大区别是提供数据库的 。
官网:https://github.com/alibaba/druid
使用地址:https://github.com/alibaba/druid/wiki/常见问题
配置连接池:

(2) 从属性文件读取数据库连接信息
为了便于维护,可以将数据库连接信息写入到属性文件中,使 Spring 配置文件从中读取数据。
属性文件名称自定义,但一般都是放在 src 下。
Spring 配置文件从属性文件中读取数据时,需要在<property/>的 value 属性中使用${ },将在属性文件中定义的 key 括起来,以引用指定属性的值。

创建jdbc.properties文件
jdbc.url=jdbc:mysql://localhost:3306/mybatis
jdbc.username=root
jdbc.password=123456
jdbc.max=20
该属性文件若要被 Spring 配置文件读取,其必须在配置文件中进行注册。使用<context>
标签。
该方式要求在 Spring 配置文件头部加入 spring-context.xsd 约束文件
<context:property-placeholder/>标签中有一个属性 location,用于指定属性文件的位置。
创建spring配置文件applicationContext
<?xml version="1.0" encoding="UTF-8"?>
<beans xmlns="http://www.springframework.org/schema/beans"
       xmlns:xsi="http://www.w3.org/2001/XMLSchema-instance"
       xmlns:context="http://www.springframework.org/schema/context"
       xsi:schemaLocation="http://www.springframework.org/schema/beans http://www.springframework.org/schema/beans/spring-beans.xsd http://www.springframework.org/schema/context https://www.springframework.org/schema/context/spring-context.xsd">

<!--  数据库的配置信息,写在一个独立的文件,编译修改数据库的配置内容
让spring知道jdbc.properties文件的位置
-->
    <context:property-placeholder location="classpath:jdbc.properties"/>


    <!--声明数据源DataSource,作用是连接数据库的-->
    <bean id="myDataSource" class="com.alibaba.druid.pool.DruidDataSource"
          init-method="init" destroy-method="close" >
<!--   set注入,给DruidDataSource提供连接数据库信息-->
<!--    使用属性配置文件中的数据,语法${key}-->
        <property name="url" value="${jdbc.url}"/>
        <property name="username" value="${jdbc.username}"/>
        <property name="password" value="${jdbc.password}"/>
        <property name="maxActive" value="${jdbc.max}"/>
    </bean>

<!--    声明mybatis中提供的SqlSessionFactoryBean类-->
    <bean id="sqlSessionFactory" class="org.mybatis.spring.SqlSessionFactoryBean">
<!--set注入,把德鲁伊数据库连接池赋给dataSource属性-->
        <property name="dataSource" ref="myDataSource"/>
<!-- mybais主配置文件的位置-->
        <property name="configLocation" value="classpath:mybatis.xml"/>
    </bean>

<!-- 创建dao对象,使用SqlSession的getMapper(Student.class)
MapperScannerConfigurer:在内部调用getMapper()生成每个dao接口的代理对象。
-->
    <bean class="org.mybatis.spring.mapper.MapperScannerConfigurer">
<!--  指定sqlSessionFactory对象的id-->
        <property name="sqlSessionFactoryBeanName" value="sqlSessionFactory"/>
<!--   指定包名,包名是dao接口所在的包名。
MapperScannerConfigurer会扫描这个包中的所有接口,把每个接口都执行一次,getMapper()方法,
得到每个接口的dao对象,创建好的dao对象是放入到spring的容器中的。
-->
        <property name="basePackage" value="com.it.dao"/>
    </bean>

<!--    声明service-->
    <bean id="studentService" class="com.it.service.impl.StudentServiceImpl">
        <property name="studentDao" ref="studentDao"/>
    </bean>

</beans>
Mapper 扫描配置器 MapperScannerConfigurer 会自动生成指定的基本包中 mapper 的代理对象。该 Bean 无需设置 id 属性。basePackage 使用分号或逗号设置多个包。向Service 注入Mapper 代理对象时需要注意,由于通过 Mapper 扫描配置器 MapperScannerConfigurer 生成的 Mapper 代理对象没有名称,所以在向 Service 注入 Mapper代理时,无法通过名称注入。但可通过接口的简单类名注入,因为生成的是这个 Dao 接口的对象。
<%@ page contentType="text/html;charset=UTF-8" language="java" %>
<html>
<head>
    <title>Title</title>
</head>
<body>
<p>注册学生</p>
<form action="RegisterServlet" method="post">
       <table>
           <tr>
               <td>id:</td>
               <td><input type="text" name="id"></td>
           </tr>
           <tr>
               <td>姓名:</td>
               <td><input type="text" name="name"></td>
           </tr>
           <tr>
               <td>年龄:</td>
               <td><input type="text" name="age"></td>
           </tr>
           <tr>
               <td>性别:</td>
               <td><input type="text" name="sex"></td>
           </tr>
           <tr>
               <td>院系:</td>
               <td><input type="text" name="dept"></td>
           </tr>

           <input type="submit" value="注册学生">
       </table>
</form>

</body>
</html>
package com.it.controller;

import com.it.domain.Student;
import com.it.service.StudentService;
import org.springframework.context.ApplicationContext;
import org.springframework.context.support.ClassPathXmlApplicationContext;

import java.io.IOException;

public class RegisterServlet extends javax.servlet.http.HttpServlet {
    protected void doPost(javax.servlet.http.HttpServletRequest request, javax.servlet.http.HttpServletResponse response) throws javax.servlet.ServletException, IOException {

        request.setCharacterEncoding("utf-8");//表示从客户端页面上获取过来的是utf-8的格式,去掉会产生乱码
        String id = request.getParameter("id");
        String name = request.getParameter("name");
        String age = request.getParameter("age");
        String sex = request.getParameter("sex");
        String dept = request.getParameter("dept");

//        创建spring的容器对象
        String config="applicationContext.xml";
        ApplicationContext ac=new ClassPathXmlApplicationContext(config);
        System.out.println("容器对象的信息,======="+ac);

//        获取service
        StudentService studentService = (StudentService) ac.getBean("studentService");
        Student student=new Student();
        student.setSno(Integer.parseInt(id));
        student.setSname(name);
        student.setSage(Integer.valueOf(age));
        student.setSsex(sex);
        student.setSdept(dept);
        studentService.addStudent(student);


//       给一个页面
        request.getRequestDispatcher("/result.jsp").forward(request,response);

    }

    protected void doGet(javax.servlet.http.HttpServletRequest request, javax.servlet.http.HttpServletResponse response) throws javax.servlet.ServletException, IOException {
doPost(request,response);
    }
}
<%@ page contentType="text/html;charset=UTF-8" language="java" %>
<html>
<head>
    <title>Title</title>
</head>
<body>
result.jsp注册成功
</body>
</html>
<?xml version="1.0" encoding="UTF-8"?>
<web-app xmlns="http://xmlns.jcp.org/xml/ns/javaee"
         xmlns:xsi="http://www.w3.org/2001/XMLSchema-instance"
         xsi:schemaLocation="http://xmlns.jcp.org/xml/ns/javaee http://xmlns.jcp.org/xml/ns/javaee/web-app_4_0.xsd"
         version="4.0">

    <servlet>
        <servlet-name>RegisterServlet</servlet-name>
        <servlet-class>com.it.controller.RegisterServlet</servlet-class>
    </servlet>
    <servlet-mapping>
        <servlet-name>RegisterServlet</servlet-name>
        <url-pattern>/RegisterServlet</url-pattern>
    </servlet-mapping>
</web-app>


1.数据表中第15条数据出现乱码是因为没有设置从页面获取的字符是utf-8的格式。设置后再次添加数据,数据不再乱码。
2.
当表单提交,跳转到 result.jsp 后,多刷新几次页面,查看后台输出,发现每刷新一次页面,就new 出一个新的 Spring 容器。即,每提交一次请求,就会创建一个新的 Spring 容器。对于一个应用来说,只需要一个 Spring 容器即可。所以,将 Spring 容器的创建语句放在 Servlet 的 doGet()或 doPost()方法中是有问题的。


 401
401

 被折叠的 条评论
为什么被折叠?
被折叠的 条评论
为什么被折叠?
 到【灌水乐园】发言


