


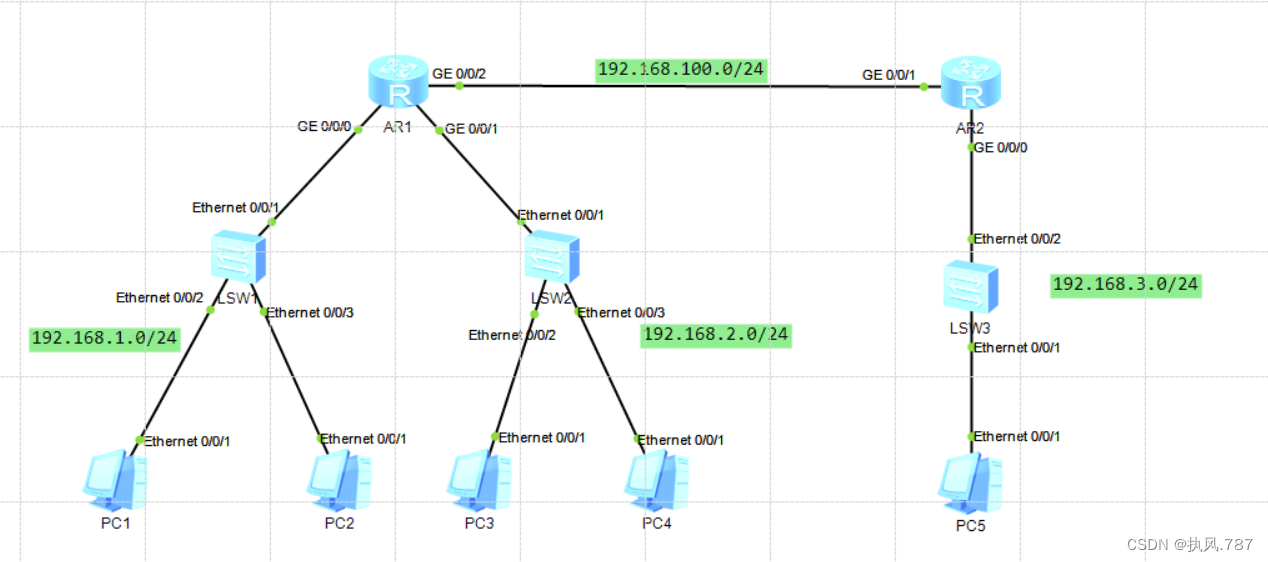
拓扑图说明:
1.配置拓扑图中,所有设备的IP地址,后期进行通信
2.统一路由内可以ping通,跨路由器是ping不通的,下边实验进行远程连接的方式连接
3.图中二层交换机不做任何配置,只负责路由通信
拓扑图:
 配置AR1路由器:
The device is running!

<Huawei>sy
Enter system view, return user view with Ctrl+Z.
[Huawei]sy R1
[R1]int g0/0/1     ##配置端口网关
[R1-GigabitEthernet0/0/1]ip add 192.168.2.254 24
[R1-GigabitEthernet0/0/1]int g0/0/0     ##配置端口网关
[R1-GigabitEthernet0/0/0]ip add 192.168.1.254 24
[R1-GigabitEthernet0/0/0]int g0/0/2     ##配置端口网关
[R1-GigabitEthernet0/0/2]ip add 192.168.100.254 24
[R1-GigabitEthernet0/0/2]q
[R1]un in en
Info: Information center is disabled.
[R1]
[R1]user-interface vty 0 4     ##配置最多同时5个人进行登录
[R1-ui-vty0-4]authentication-mode password
Please configure the login password (maximum length 16):huawei   #密码为huawei
[R1-ui-vty0-4]shell
[R1-ui-vty0-4]protocol inbound telnet	   #开通telnet服务
[R1-ui-vty0-4]user privilege level 15    #设置权限到最大15
[R1-ui-vty0-4]q
[R1]q
<R1>save   #保存退出
  The current configuration will be written to the device.
  Are you sure to continue? (y/n)[n]:y
  It will take several minutes to save configuration file, please wait.......
  Configuration file had been saved successfully
  Note: The configuration file will take effect after being activated
<R1>
配置AR2路由器:
The device is running!

<Huawei>sy
Enter system view, return user view with Ctrl+Z.
[Huawei]un in en
Info: Information center is disabled.
[Huawei]sy R2
[R2]int g0/0/0    #配置端口IP地址
[R2-GigabitEthernet0/0/1]ip add 192.168.100.253 24
[R2-GigabitEthernet0/0/1]q
[R2]q
<R2>telnet 192.168.100.254   #telnet 远程登录地址
  Press CTRL_] to quit telnet mode
  Trying 192.168.100.254 ...
  Connected to 192.168.100.254 ...

Login authentication


Password:    #输入密码即可连接,并可以配置
<R1>sy
Enter system view, return user view with Ctrl+Z.
[R1]
<R2>
PC终端:


 3万+
3万+


 被折叠的 条评论
为什么被折叠?
被折叠的 条评论
为什么被折叠?
 到【灌水乐园】发言


