


文章目录
前言
跟的是bili的银角大王,学的笔记记录下来自用
一、Flask基本框架
前端引入
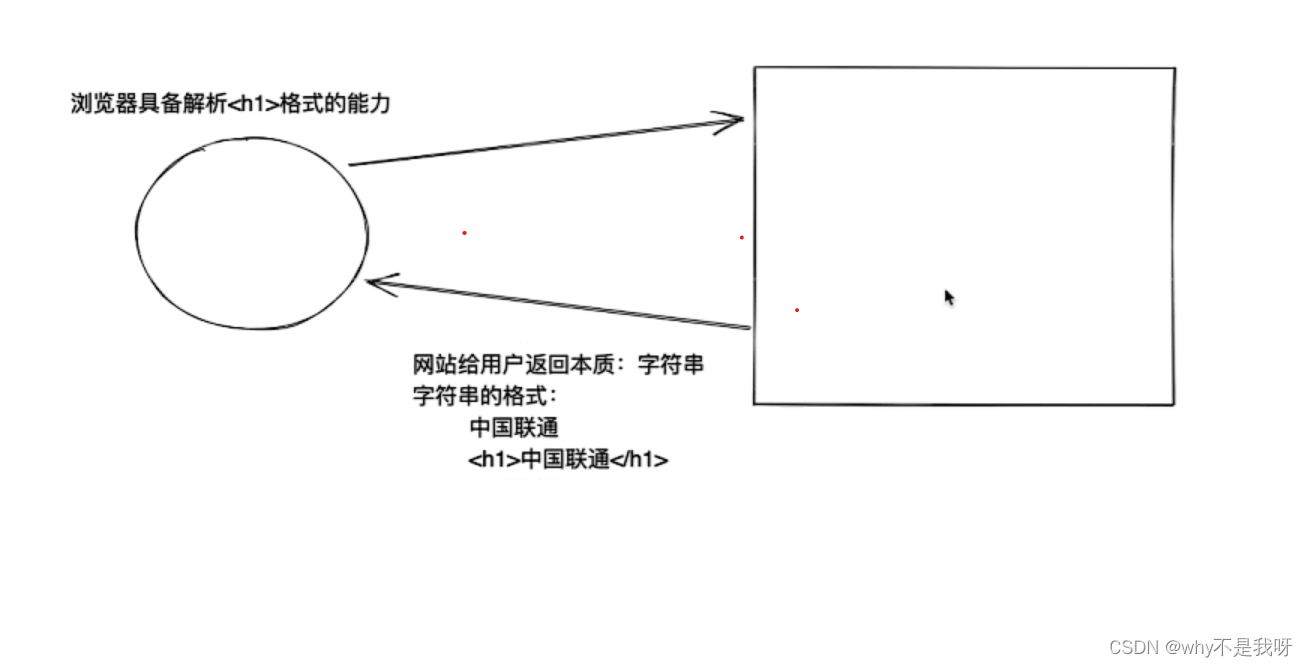
学习浏览器能够识别的标签
Flask框架为了写标签方便,支持将字符串写入到文件里。
from flask import Flask,render_template
app=Flask(__name__)
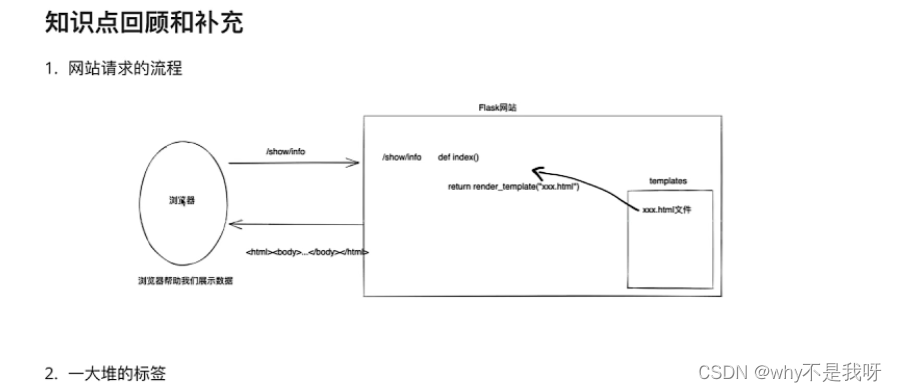
#创建了/show/info和函数index的对应关系
#以后用户在浏览器访问/show/info,网站自动执行index
@app.route("/show/info")
def index():
#默认去当前目录的templates文件夹中找
return render_template("index.html")
@app.route("/get/news")
def get_news():\
return render_template("getnews.html")
@app.route("/goods/list")
def goods_list():
return render_template("goods_list.html")
if __name__ == '__main__':
app.run()
这里需要在根目录下面创建一个templates文件夹,里面是待访问的html文件
二、html标签
h1、h2、h3分别是一二三级标题和div一样,都是块级标签
a img span都是行内标签也叫做内联标签,他们分别是超链接、图片(自封闭)、行文字
图片img有两种引用方式,一种是直接引用别人的图片,检查图片的网页域名。另一种是在根目录下的static里面保存图片,此时src为"/static/xxx.xx"
这是其中一个文件的代码
<!DOCTYPE html>
<html lang="en">
<head>
    <meta charset="UTF-8">
    <title>Title</title>
</head>
<body>
    <div>
        <span>时间:</span>
        <span>2021-11-11-11:11:11</span>
    </div>
    <h1>中国联通</h1>
    <h3>广西联通</h3>
    <span style="color: darkgreen">挖掘及</span><span>山东蓝翔</span>
    <div>中国山东</div>
    <a href="https://www.bilibili.com/video/BV1Cg411A77m?p=2&vd_source=3ca838002318bd68cff3e8772f1f2c84">点击跳转</a>
    <a href="/get/news">get news</a>
</body>
</html>
列表标签(也是块级标签),表格哪里添加了个border=“1”,使得表格有了边框
<h1>运营商列表</h1>
    <ul>
        <li>中国移动</li>
        <li>中国移动</li>
        <li>中国移动</li>
    </ul>
    <h1>运营商列表</h1>
    <ol>
        <li>中国移动</li>
        <li>中国移动</li>
        <li>中国移动</li>
    </ol>
    <table border="1">
        <thead>
            <tr> <th>ID</th> <th>姓名</th> <th>年龄</th></tr>
        </thead>
        <tbody>
        <tr><th>10</th><th>王泓一</th><th>21</th></tr>
        <tr><th>10</th><th>王泓一</th><th>21</th></tr>
        <tr><th>10</th><th>王泓一</th><th>21</th></tr>
        </tbody>
    </table>
1交互系列
上面的标签都是页面展示使用,下面介绍的标签是用户向页面反馈时用到的标签,包括input和select标签
1iput系列
- text 用户名
- password 密码
- radio 单选,一般需要value设置成一样的值
- checkbox 多选
代码如下
 <h1>用户注册</h1>
  <div>
    用户名:<input type="text">
  </div>
  <div>
    密码:<input type="password">
  </div>
  <div>
  <input type="radio" value="1">男
  <input type="radio" value="1">女
  </div>
  <div>
  爱好:
  <input type="checkbox">篮球
  <input type="checkbox">足球
  <input type="checkbox">乒乓球
  <input type="checkbox">溜溜球
    </div>
2 select系列
城市:
  <select name="" id="">
    <option >北京</option>
    <option >上海</option>
    <option >深圳</option>
  </select>
    </div>
   <div>
擅长领域:
    <select name="" id="" multiple>
    <option >玩手机</option>
    <option >吃饭</option>
    <option >睡觉</option>
2.小实践
用a嵌套img实现点击图片转到功能,也就是上面的goods_list.html文件。
注意target='_blank‘可以实现在新页面打开
<!DOCTYPE html>
<html lang="en">
<head>
    <meta charset="UTF-8">
    <title>Title</title>
</head>
<body>
    <h1>商品列表</h1>
    <a href="https://www.mi.com/shop/buy/detail?product_id=19496" target="_blank">
        <img src="/static/a1.webp" style="height: 200px" alt="">
    </a>
    <a href="https://www.mi.com/shop/buy/detail?product_id=19440">
        <img src="/static/a2.png" style="height: 200px" alt="">
    </a>
    <a href="https://www.mi.com/shop/buy/detail?product_id=19312">
        <img src="/static/a3.png" style="height: 200px" alt="">
    </a>
</body>
</html>
该处使用的url网络请求的数据。
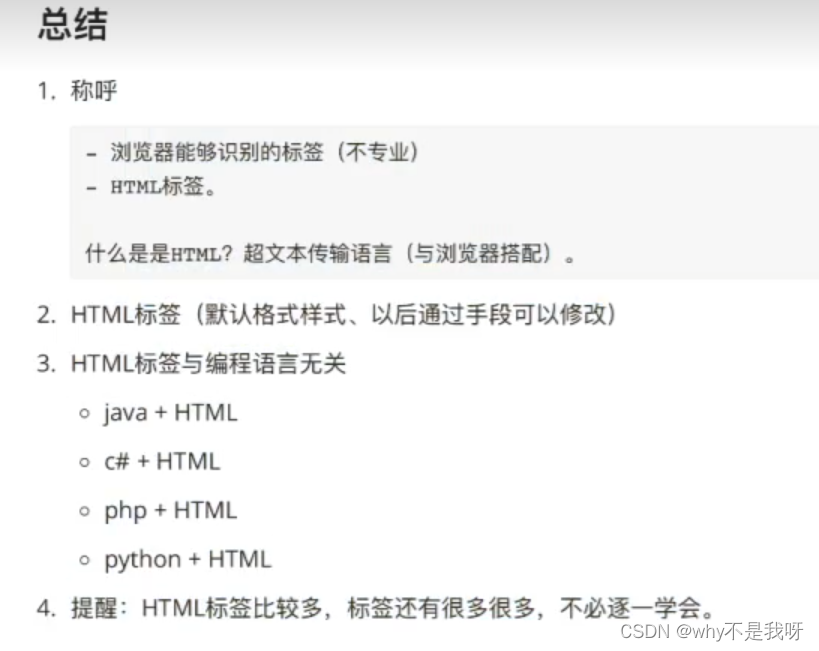
总结
目前学的东西比较少,后面再慢慢补充,积硅步以致千里
2023/12/17更新
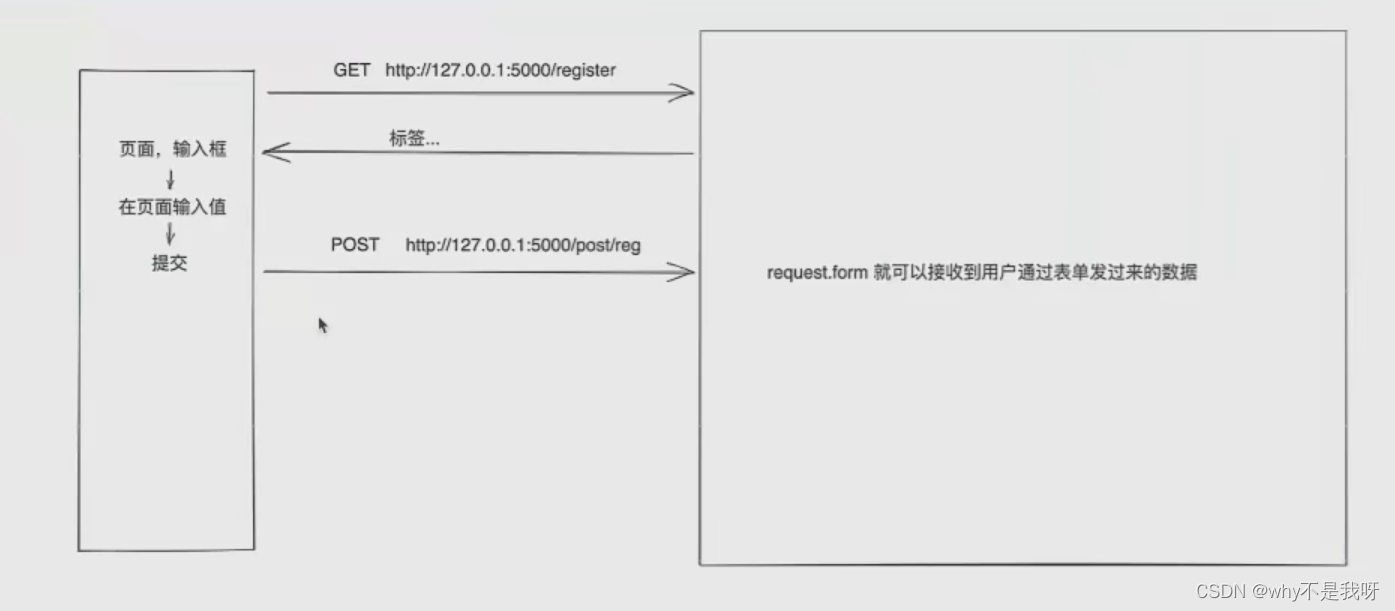
主要包括 post和get请求的不同,以及创建了两个页面register和login来进行实践
post和get请求的认识
写一个申请,实现get和post两种途径传递值
示例1
下面是代码,要提交的信息和按钮一定要包含在form里面
from flask import Flask,render_template,request

app=Flask(__name__)

@app.route('/register',methods=['GET'])
def register():
    return render_template('register.html')

@app.route('/do/reg',methods=['GET'])
def do_register():
    print(request.args)
    return "注册成功"

@app.route('/post/reg',methods=['POST'])
def post_reg():
    print(request.form)#注意这里是form
    return "注册成功"

if __name__ == '__main__':
    app.run()
post会将浏览器返回的信息隐藏起来,而get会直接将其显示再url中
<!DOCTYPE html>
<html lang="en">
<head>
    <meta charset="UTF-8">
    <title>Title</title>
</head>
<body>
<h1>用户注册</h1>
<form method="post" action="post/reg">
    <div>
        用户名: <input type="text" name="user"/>
    </div>
    <div>
        密码: <input type="password" name="psw">
    </div>
    <div>
        <input type="radio" name="gender" value="1">男
        <input type="radio" name="gender" value="2">女
    </div>
    <div>
        爱好:
        <input type="checkbox" name="hobby" value="10">篮球
        <input type="checkbox" name="hobby" value="20">足球
        <input type="checkbox" name="hobby" value="30">乒乓球
        <input type="checkbox" name="hobby" value="40">溜溜球
    </div>
    <div>
        <select name="city" id="">
            <option value="bj">北京</option>
            <option value="sh">上海</option>
            <option value="sz">深圳</option>
        </select>
        <select name="skill" id="" multiple>
            <option value="100">吃饭</option>
            <option value="101">睡觉</option>
            <option value="102">打球</option>
        </select>
    </div>
    <div>
        <textarea name="more" id="" cols="30" rows="10"></textarea>
    </div>
    <input type="submit" value="submit按钮">
</form>

</body>
</html>
示例2
上面是把两种请求分开写,但是这个页面就是要完成注册这一个功能,所以可以想办法将其写到一个函数中去,这里html的action也要更改代码如下
from flask import Flask,render_template,request

app=Flask(__name__)

@app.route('/register',methods=['GET','POST'])
def register():
    if request.method=='GET':
        return render_template('register.html')
    else:
        user = request.form.get("user")
        psw = request.form.get("psw")
        gender = request.form.get("gender")
        hobby_list = request.form.getlist("hobby")
        city = request.form.get("city")
        skill = request.form.getlist("skill")
        more = request.form.get("more")

        # 将用户信息写入到文件中,实现注册
        print(user, psw, gender, hobby_list, city, skill, more)
        return "注册成功"


# @app.route('/post/reg',methods=['POST'])
# def post_reg():
#     #print(request.form)#注意这里是form
#     #也可以单个接受出来
#     user=request.form.get("user")
#     psw=request.form.get("psw")
#     gender=request.form.get("gender")
#     hobby_list=request.form.getlist("hobby")
#     city=request.form.get("city")
#     skill = request.form.getlist("skill")
#     more=request.form.get("more")
#
#     #将用户信息写入到文件中,实现注册
#     print(user,psw,gender,hobby_list,city,skill,more)
#     return "注册成功"

if __name__ == '__main__':
    app.run()
<!DOCTYPE html>
<html lang="en">
<head>
    <meta charset="UTF-8">
    <title>Title</title>
</head>
<body>
<h1>用户注册</h1>
<form method="post" action="register">
    <div>
        用户名: <input type="text" name="user"/>
    </div>
    <div>
        密码: <input type="password" name="psw">
    </div>
    <div>
        <input type="radio" name="gender" value="1">男
        <input type="radio" name="gender" value="2">女
    </div>
    <div>
        爱好:
        <input type="checkbox" name="hobby" value="10">篮球
        <input type="checkbox" name="hobby" value="20">足球
        <input type="checkbox" name="hobby" value="30">乒乓球
        <input type="checkbox" name="hobby" value="40">溜溜球
    </div>
    <div>
        <select name="city" id="">
            <option value="bj">北京</option>
            <option value="sh">上海</option>
            <option value="sz">深圳</option>
        </select>
        <select name="skill" id="" multiple>
            <option value="100">吃饭</option>
            <option value="101">睡觉</option>
            <option value="102">打球</option>
        </select>
    </div>
    <div>
        <textarea name="more" id="" cols="30" rows="10"></textarea>
    </div>
    <input type="submit" value="submit按钮">
</form>

</body>
</html>
示例3
然后再写一个登录界面login
from flask import Flask,render_template,request

app=Flask(__name__)


@app.route('/login' ,methods=['GET','POST'])
def login():
    if request.method=='GET':
        return render_template('login.html')
    else:
        user1 = request.form.get("username")
        psw1 = request.form.get("password")
        print(user1, psw1)
        return "登录成功"


if __name__ == '__main__':
    app.run()
html文件
<!DOCTYPE html>
<html lang="en">
<head>
    <meta charset="UTF-8">
    <title>Title</title>
</head>
<body>
<h1>用户登录</h1>
<form method="post" action="/login">
    用户名: <input type="text" name="username">
    密码: <input type="password" name="password">
    <input type="submit" value="提交">


</form>
</body>
</html>
总结
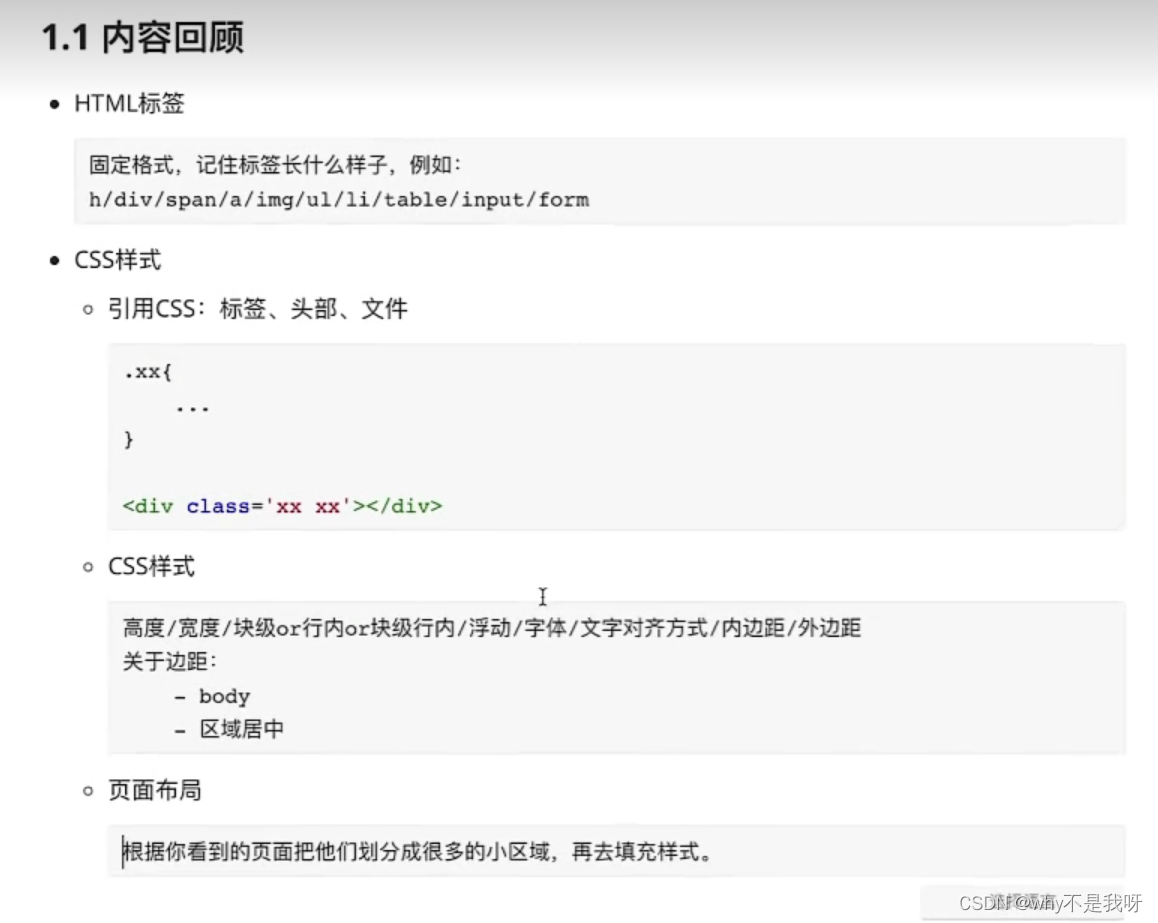
三、CSS入门
css,专门用来美化标签
- 基础CSS,写简单页面&看懂&改
- 模块 调整 修改
应用方式
3.11在标签上直接用
<img src="..." style="height:100px"
div style="color:red">中国联通</div>
3.12再head标签中写style
<!DOCTYPE html>
<html lang="en">
<head>
    <meta charset="UTF-8">
    <title>Title</title>
    <style>
        .c1{
            color:red;
        }
    </style>
</head>
<body>
<h1 class="c1">用户登录</h1>
<form method="post" action="/login">
    用户名: <input type="text" name="username">
    密码: <input type="password" name="password">
    <input type="submit" value="提交">


</form>
</body>
</html>
3.13写到文件中
这种方便于多个文件使用同一种css样式
##css代码
.c1{
	height:100px;
}
.c2{
	color:red;
}
<!DOCTYPE html>
<html lang="en">
<head>
    <meta charset="UTF-8">
    <title>Title</title>
    <link rel="stylesheet" href="common.css"/>
</head>
<body>
<h1 class="c1">用户登录</h1>
<h2 class="c2">用户登录</h2>
<form method="post" action="/login">
    用户名: <input type="text" name="username">
    密码: <input type="password" name="password">
    <input type="submit" value="提交">


</form>
</body>
</html>
案例:flask中的应用(登陆注册)
.和class关联
<!DOCTYPE html>
<html lang="en">
<head>
    <meta charset="UTF-8">
    <title>Title</title>
    <style>
        .c1{
            color:red;
        }
         .c2{
            height:50px;
        }
    </style> <!-- 方便复用-->
</head>
<body>
<h1 class="c1">用户登录</h1>
<form method="post" action="/login">
    <div class="c2">
    用户名: <input type="text" name="username">
    </div>
    <div class="c2">
    密码: <input type="password" name="password">
    </div>
    <input type="submit" value="提交">


</form>
</body>
</html>
3.2stml开发脱离flask
问题:用Flask开发不方便
- 每次都需要重启
- 规定有些文件必须放在某些文件夹
- 创建新页面
- 函数
- HTML文件
实际上pycharm自带了可以直接看页面效果的功能,所以可以将注意力只放在html文件上,专心做html
3.3 css选择器
id选择器
#c1{
}
#c1{
}
<div id="c1" ></div>
id不能重复,类可以,而且id优先级比类选择器高
类选择器
.c1{
}
<div class="c1" ></div>
标签选择器
 li{
             color: deeppink;
         }
  <ul>
  	<li>北京</li>
    <li>北京</li>
    <li>北京</li>
</ul>
这种标签选择器太绝对了
- 属性选择器
input[type='text']{
  border:1px solid red;
         }

.v1[xx="456"]{
 	color:gold;
}

用户名: <input type="text" name="username">
<div class="v1" xx="456">
	abcd
</div>
- 后代选择器
.y1 li {
            color: deeppink;
        }
        .y1 >a{
            color:dodgerblue;
        }
<div class="y1">
      <a href="">外层a标签</a>
      <div>
          <a href=""> 内层a标签</a>
      </div>
  <ul>
      <li>北京</li>
      <li>北京</li>
      <li>北京</li>
  </ul>
   <ul class="y1">
      <li>北京</li>
      <li>北京</li>
      <li>北京</li>
  </ul>
 </div>
关于选择器
多:类选择器,标签选择器,后代选择器
少:属性 id用的少
关于多个样式&覆盖
看的是在type中定义的顺序,谁在后面定义,就用谁
.c1 {
    color: red;
}

.c2 {
    height: 50px ;
    color: darkgreen;
}

<h1 class="c2 c1">用户登录</h1>
<!--绿色-->
也可以不让后面定义的样式覆盖我
.c1 {
    color: red !important;
}
3.4样式
1高度和宽度
.c1{
	height:300px;
	width:500px;
	}
.c2{
	height:20%;
	}
	高度不支持百分比
注意事项:
宽度支持百分比
行内标签:默认无效
块级标签:默认有效
2块级和行内标签
- 块级
- 行内
- css样式:标签->display:inline-block
inline标签实例
<!DOCTYPE html>
<html lang="en">
<head>
    <meta charset="UTF-8">
    <title>Title</title>
    <style>
        .c1{
        display: inline-block;
        height: 300px;
        width: 500px;
        border:1px solid red


    </style>
</head>
<body>
    <h1 class="c1">你好</h1>
</body>
</html>
块级和行内标签是可以转换的
<body>
    <div style="display: inline;">
        中国
    </div>
    <span style="display: block;">
        联通
    </span>
</body>
块级和块级&行内用的比较多
3字体和颜色
.c1 {
            color: beige; 颜色
            font-size: 58px;大小
            font-weight:400;宽度
            font-family: Microsoft Yahei; 字体
        }
4对齐方式
.c1 {
            height: 300px;
            width: 500px;
            border: 1px solid red;
            text-align: center;水平居中
            line-height: 300px;这种只能是一行用
        }
5浮动
div默认是块级标签,如果浮动起来,就不一样了
<!DOCTYPE html>
<html lang="en">
<head>
    <meta charset="UTF-8">
    <title>Title</title>
    <style>
        .c1 {
            height: 300px;
            width: 500px;
            border: 1px solid red;
            text-align: center;
            line-height: 300px;
        }
        .item{
            float: left;
            width:280px ;
            height: 170px;
            border: 1px solid red;
        }


    </style>
</head>
<body>
<span style="float: left">左边</span>
<span style="float: right">右边</span>
<div>
<div class="item"></div>
<div class="item"></div>
<div class="item"></div>
<div class="item"></div>
<div class="item"></div>
</div>
</body>
</html><!--注释快捷键:ctrl+shift+?-->
如果让标签float起来,就会脱离文档流。(撑不起来父亲),此时要在float的最后一行加一个style clear:both
<div style="background-color: blue">
    <div class="item"></div>
    <div class="item"></div>
    <div class="item"></div>
    <div class="item"></div>
    <div class="item"></div>
    <div style="clear:both;"> </div>
    <div> 下一个div</div>
</div>
6内边距
.outer{
            border: 1px solid red;
            width: 200px;
            height: 200px;
            padding-top: 20px;
            padding-left: 20px;
            padding-right: 20px;

        }
        /*加padding会导致边框往外再扩20px*
        也可以padding: 20px
        or padding 20px 5px 3px 10px 上右下左/
         */


<div class="outer">
    <div style="background-color: gold">
        听妈妈的话
    </div>
    <div>
        小朋友你是否有很多问好
    </div>
7外边距
外边距,我与别人加点距离
<!DOCTYPE html>
<html lang="en">
<head>
    <meta charset="UTF-8">
    <title>Title</title>

</head>
<body>
<div style="background-color: darkgreen;height: 200px"></div>
<div style="background-color: blue;height: 100px;margin-top: 20px"></div>
</body>
</html>
案例:小米商城
<!DOCTYPE html>
<html lang="en">
<head>
    <meta charset="UTF-8">
    <title>Title</title>

    <style>
        body {
            margin: 0;
        }

        .header {

            background-color: #333;
        }

        .header .left1 {
            float: left;
            color: white;

        }

        .header .rigth1 {
            float: right;
            color: white;

        }
        .container{
            width:1226px;
            margin: 0 auto;
        }
        .header a{
            color: #b0b0b0;
            line-height: 40px;
            display: inline-block;
            font-size: 12px;
            margin-right: 10px;
        }
    </style>
</head>

<body>
<div class="header">
    <div class="container">
        <div class="left1">
            <a href="">小米商城</a>
            <a href="">MIUI</a>
            <a href="">云服务</a>
            <a href="">油品</a>
            <a href="">开放平台</a>
        </div>

        <div class="rigth1">
            <a href="">登录</a>
            <a href="">注册</a>
            <a href="">消息通知</a>
        </div>
        <div style="clear: both"></div>
        <!--这行可以撑起父亲-->
    </div>
</div>

</body>
</html>
总结
- 如何去除body页边距
- 文本居中和区域居中要区分
- 父亲没有高度或者没有宽度,可以被孩子支撑起来
- 浮动起来后要clear:both
CSS案例


 2180
2180


 被折叠的 条评论
为什么被折叠?
被折叠的 条评论
为什么被折叠?
 到【灌水乐园】发言


