


一、JqueryEasyUI datagrid 的使用方式
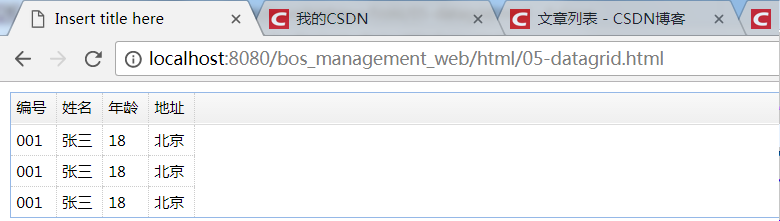
1、将静态HTML渲染为datagrid样式
(1)、html代码
<!DOCTYPE html>
<html>
<head>
<meta charset="UTF-8">
<title>Insert title here</title>
	<!-- 引入easyui资源文件 -->
	<link rel="stylesheet" type="text/css" href="../js/easyui/themes/default/easyui.css">
	<link rel="stylesheet" type="text/css" href="../js/easyui/themes/icon.css">
	<script type="text/javascript" src="../js/jquery-1.8.3.js"></script>
	<script type="text/javascript" src="../js/easyui/jquery.easyui.min.js"></script>
	<script type="text/javascript" src="../js/easyui/locale/easyui-lang-zh_CN.js"></script>
</head>
<body>
	<table class="easyui-datagrid">
		<thead>
			<tr>
				<th data-options="field:'id'">编号</th>
				<th data-options="field:'name'">姓名</th>
				<th data-options="field:'age'">年龄</th>
				<th data-options="field:'address'">地址</th>
			</tr>
		</thead>
		<tbody>
			<tr>
				<td>001</td>
				<td>张三</td>
				<td>18</td>
				<td>北京</td>
			</tr>
			<tr>
				<td>001</td>
				<td>张三</td>
				<td>18</td>
				<td>北京</td>
			</tr>
			<tr>
				<td>001</td>
				<td>张三</td>
				<td>18</td>
				<td>北京</td>
			</tr>
		</tbody>
	</table>
</body>
</html>
(2)、页面展示效果
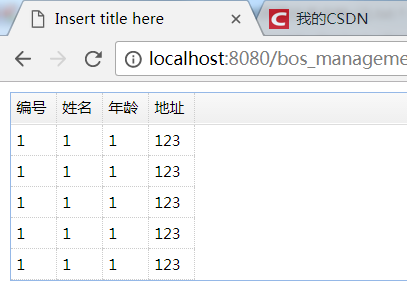
2、发送ajax请求获取动态json数据构建datagrid
(1)、html代码
<!DOCTYPE html>
<html>
<head>
<meta charset="UTF-8">
<title>Insert title here</title>
<!-- 引入easyui资源文件 -->
<link rel="stylesheet" type="text/css" href="../js/easyui/themes/default/easyui.css">
<link rel="stylesheet" type="text/css" href="../js/easyui/themes/icon.css">
<script type="text/javascript" src="../js/jquery-1.8.3.js"></script>
<script type="text/javascript" src="../js/easyui/jquery.easyui.min.js"></script>
<script type="text/javascript" src="../js/easyui/locale/easyui-lang-zh_CN.js"></script>
</head>
<body>
<!-- 使用datagrid,是需要提供一个URL地址,表格对象会自动发送ajax请求,加载json数据,
但是要求json数据中的key和下面datagrid-optons中的field属性的value对应 -->
<table class="easyui-datagrid" data-options="url:'../data/datagrid.json'">
<thead>
<tr>
<th data-options="field:'id'">编号</th>
<th data-options="field:'name'">姓名</th>
<th data-options="field:'age'">年龄</th>
<th data-options="field:'address'">地址</th>
</tr>
</thead>
</body>
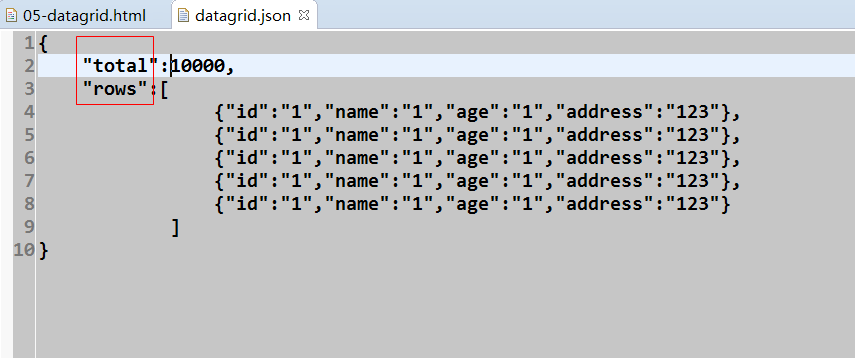
</html>(2)、json数据
[
	{"id":"1","name":"1","age":"1","address":"123"},
	{"id":"1","name":"1","age":"1","address":"123"},
	{"id":"1","name":"1","age":"1","address":"123"},
	{"id":"1","name":"1","age":"1","address":"123"},
	{"id":"1","name":"1","age":"1","address":"123"}
]
(3)、页面展示效果
3、使用easyui提供的API动态创建datagrid表格
(1)、html代码
<!DOCTYPE html>
<html>
<head>
<meta charset="UTF-8">
<title>Insert title here</title>
<!-- 引入easyui资源文件 -->
<link rel="stylesheet" type="text/css" href="../js/easyui/themes/default/easyui.css">
<link rel="stylesheet" type="text/css" href="../js/easyui/themes/icon.css">
<script type="text/javascript" src="../js/jquery-1.8.3.js"></script>
<script type="text/javascript" src="../js/easyui/jquery.easyui.min.js"></script>
<script type="text/javascript" src="../js/easyui/locale/easyui-lang-zh_CN.js"></script>
<!-- 使用js动态创建表格 -->
<script type="text/javascript">
$(function(){
//调用easyui提供的API在页面动态创建一个datagrid
$("#mytables").datagrid({
//定义表格表头上的所有列
columns:[[
{id:'id',title:'编号',field:'id',checkbox:true},//每个json对应一列
{id:'name',title:'姓名',field:'name'},
{id:'age',title:'年龄',field:'age'},
{id:'address',title:'地址',field:'address'}
]],
url:'../data/datagrid.json',//数据的地址
rownumbers:true,//显示行号
singleSelect:true,//是否可以单行选中
//定义表格的工具栏
toolbar:[
{text:'添加',iconCls:'icon-add'},//每个json表示一个按钮
{text:'删除',iconCls:'icon-remove'},
{text:'查询',iconCls:'icon-search',handler:function(){ //handler:给按钮绑定点击事件
alert("执行查询操作");
}}
],
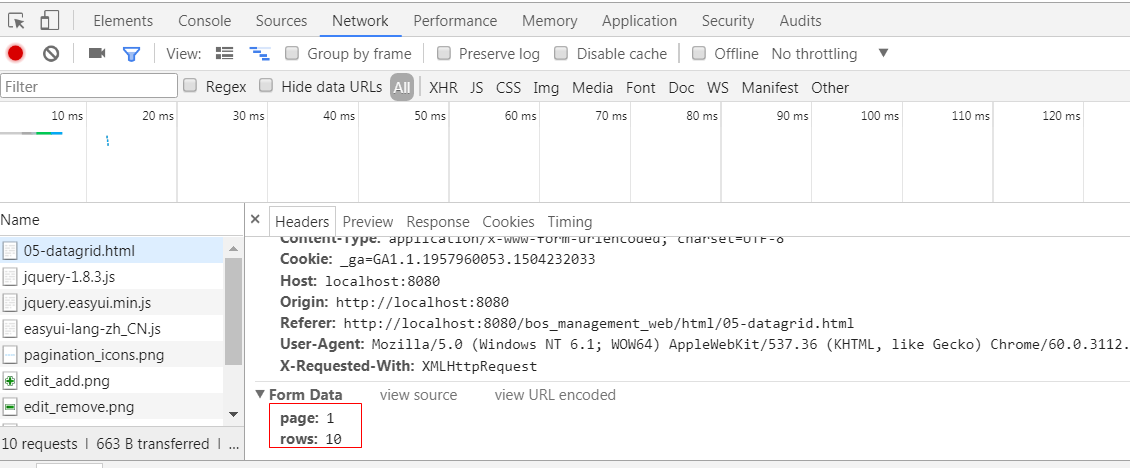
pagination:true //显示分页条
});
});
</script>
</head>
<body>
<table id="mytables"></table>
</body>
</html>(2)、json数据
(3)、注意:加入分页条件之后,请求中带有两个参数
二、收派标准管理
1、基于datagrid和spring data JPA实现收派标准的分页查询
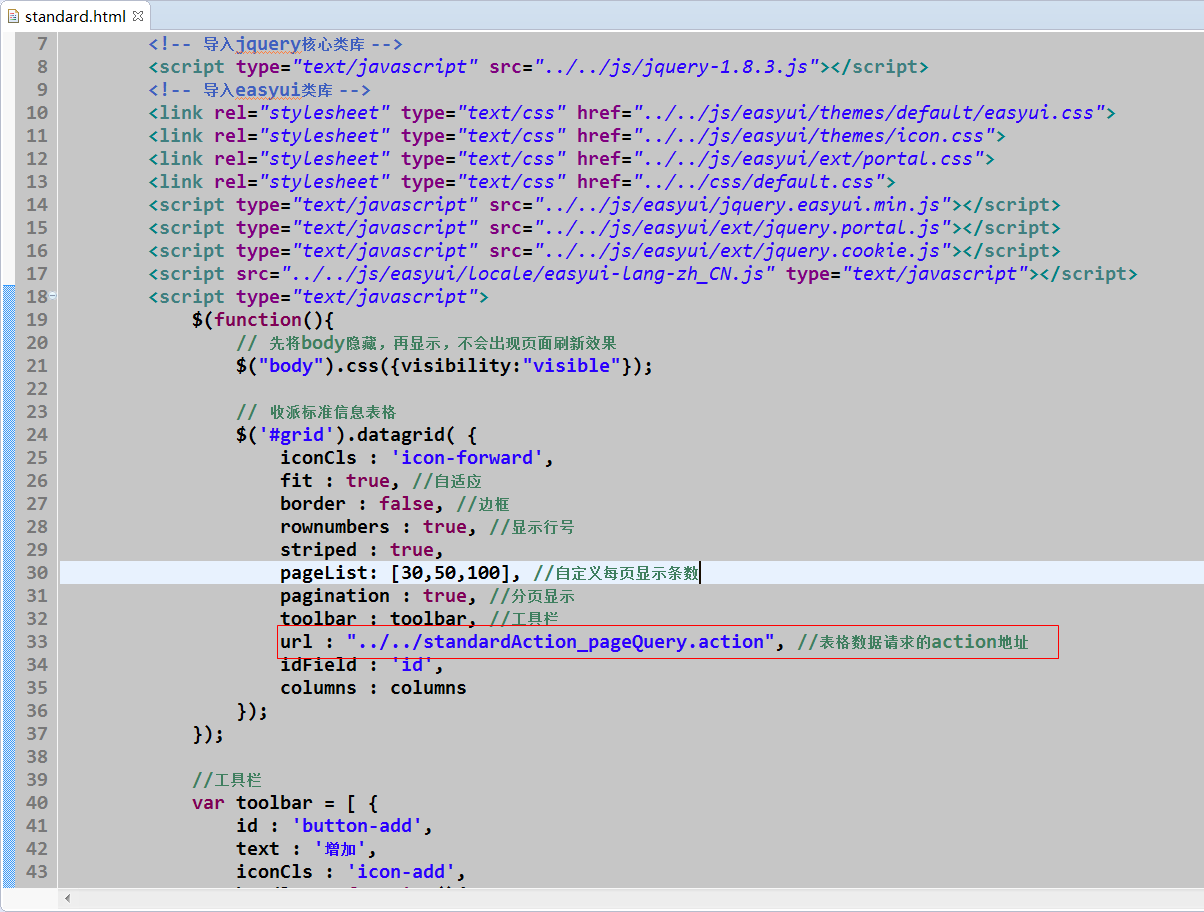
(1)、修改收派标准页面中数据url地址
(2)、编写Action类中的代码
package com.itheima.bos.web.action.base;
import java.io.IOException;
import java.util.HashMap;
import java.util.List;
import java.util.Map;
import javax.servlet.http.HttpServletResponse;
import org.apache.struts2.ServletActionContext;
import org.apache.struts2.convention.annotation.Action;
import org.apache.struts2.convention.annotation.Namespace;
import org.apache.struts2.convention.annotation.ParentPackage;
import org.apache.struts2.convention.annotation.Result;
import org.springframework.beans.factory.annotation.Autowired;
import org.springframework.context.annotation.Scope;
import org.springframework.data.domain.Page;
import org.springframework.data.domain.PageRequest;
import org.springframework.data.domain.Pageable;
import org.springframework.stereotype.Controller;
import com.itheima.bos.domain.base.Standard;
import com.itheima.bos.service.base.StandardService;
import com.opensymphony.xwork2.ActionSupport;
import com.opensymphony.xwork2.ModelDriven;
import net.sf.json.JSONObject;
/**
* 收派标准的动作类
* @author Administrator
*
*/
@Namespace("/")
@ParentPackage("struts-default")
@Controller
@Scope("prototype")
public class StandardAction extends ActionSupport implements ModelDriven<Standard> {
private Standard model = new Standard();
@Override
public Standard getModel() {
return model;
}
@Autowired
private StandardService standardService;
/*
* 保存收派标准
*/
@Action(value="standardAction_save",results={
@Result(name="success",location="/pages/base/standard.html")
})
public String save(){
standardService.save(model);
return "success";
}
//使用属性驱动,封装页面传递的分页参数
private int page;//当前页码
private int rows;//每页显示条数
public void setPage(int page) {
this.page = page;
}
public void setRows(int rows) {
this.rows = rows;
}
/*
* 收派标准分页查询
*/
@Action(value="standardAction_pageQuery")
public String pageQuery() throws Exception{
//创建一个pageable对象,封装分页参数,pageable对象是spring data JPA提供的一个对象,用来做分页的
Pageable pageable = new PageRequest(page - 1, rows);//注意:pageable中当前页是从0开始的,所以要 - 1
Page<Standard> page = standardService.pageQuery(pageable);
//获取总条数
long total = page.getTotalElements();
//获取数据集合
List<Standard> rows = page.getContent();
//定义map,封装总条数和数据集合
Map<String, Object> map = new HashMap<String, Object>();
map.put("total", total);
map.put("rows", rows);
//JSONObject 是将单个对象或者Map对象转换为json
//JSONArray 是将数组、集合对象转换为json
String data = JSONObject.fromObject(map).toString();
//使用输出流将数据写回客户端浏览器
HttpServletResponse response = ServletActionContext.getResponse();
//设置相应数据的格式和编码
response.setContentType("text/json;charset=UTF-8");
response.getWriter().print(data);
return NONE;
}
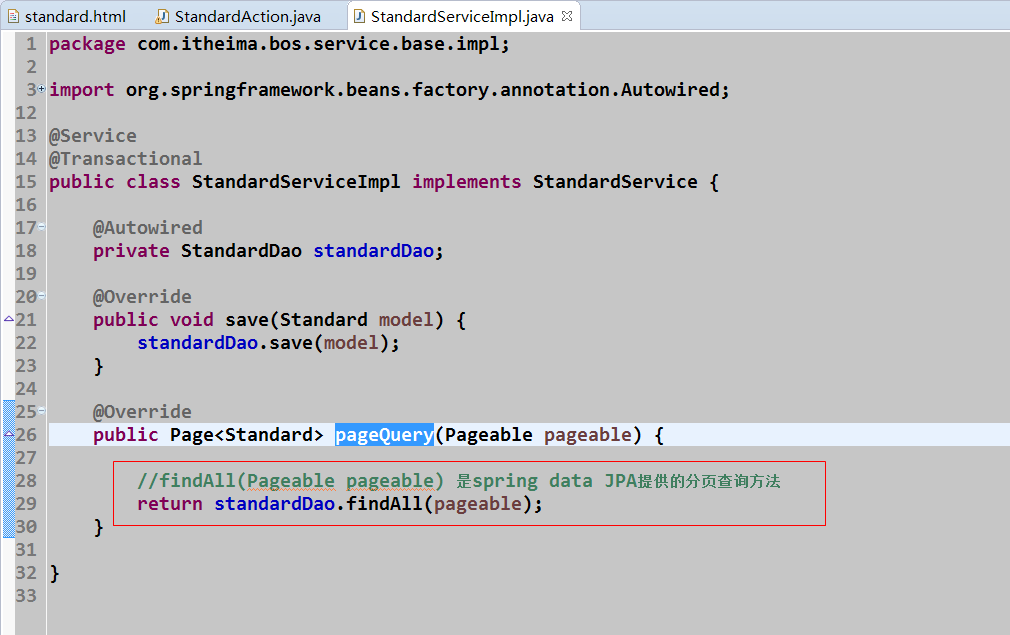
}(3)、Service层代码
(4)、页面展示效果

2、修改收派标准
(1)、编写html中修改按钮绑定的事件
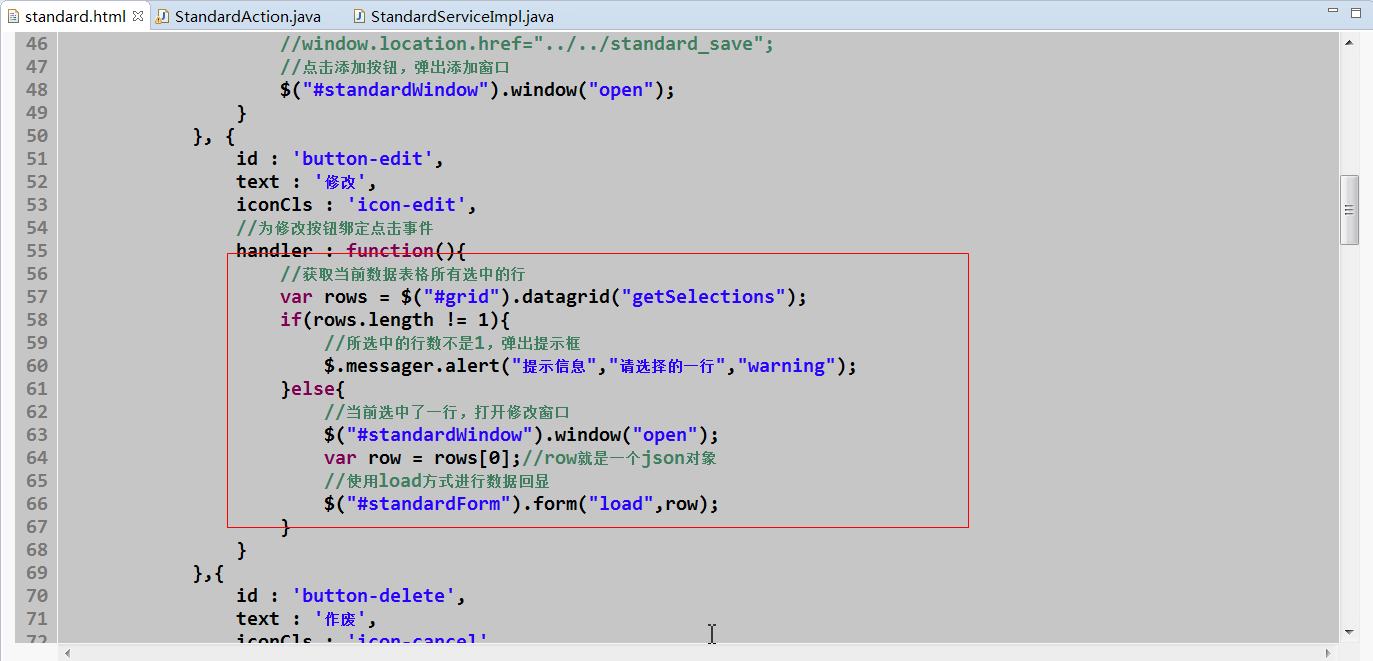
				id : 'button-edit',
				text : '修改',
				iconCls : 'icon-edit',
				//为修改按钮绑定点击事件
				handler : function(){
					//获取当前数据表格所有选中的行
					var rows = $("#grid").datagrid("getSelections");
					if(rows.length != 1){
						//所选中的行数不是1,弹出提示框
						$.messager.alert("提示信息","请选择的一行","warning");
					}else{
						//当前选中了一行,打开修改窗口
						$("#standardWindow").window("open");
						var row = rows[0];//row就是一个json对象
						//使用load方式进行数据回显
						$("#standardForm").form("load",row);
					}
				}
三、快递员管理
1、使用Combobox实现下拉框
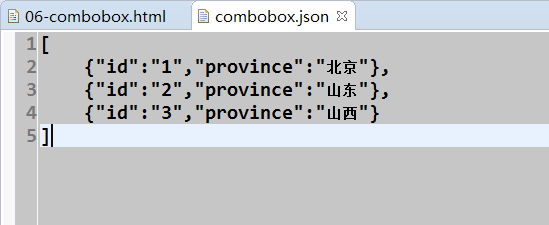
(1)、组织json数据
(2)、编写html代码
<!DOCTYPE html>
<html>
<head>
<meta charset="UTF-8">
<title>Insert title here</title>
<!-- 引入easyui资源文件 -->
<link rel="stylesheet" type="text/css" href="../js/easyui/themes/default/easyui.css">
<link rel="stylesheet" type="text/css" href="../js/easyui/themes/icon.css">
<script type="text/javascript" src="../js/jquery-1.8.3.js"></script>
<script type="text/javascript" src="../js/easyui/jquery.easyui.min.js"></script>
<script type="text/javascript" src="../js/easyui/locale/easyui-lang-zh_CN.js"></script>
</head>
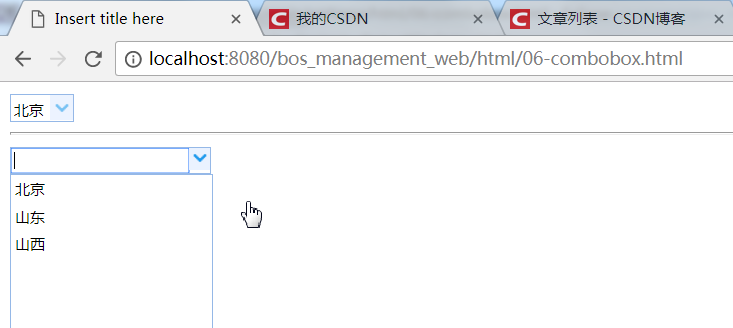
<body>
<!-- 第一种静态数据 -->
<select class="easyui-combobox">
<option value="1">北京</option>
<option value="2">河北</option>
<option value="3">天津</option>
</select>
<hr>
<!-- 第二种:动态加载下拉列表数据,此种方式比较常用 -->
<input class="easyui-combobox" data-options="url:'../data/combobox.json',
textField:'province',valueField:'id'">
</body>
</html>(3)、页面展示效果
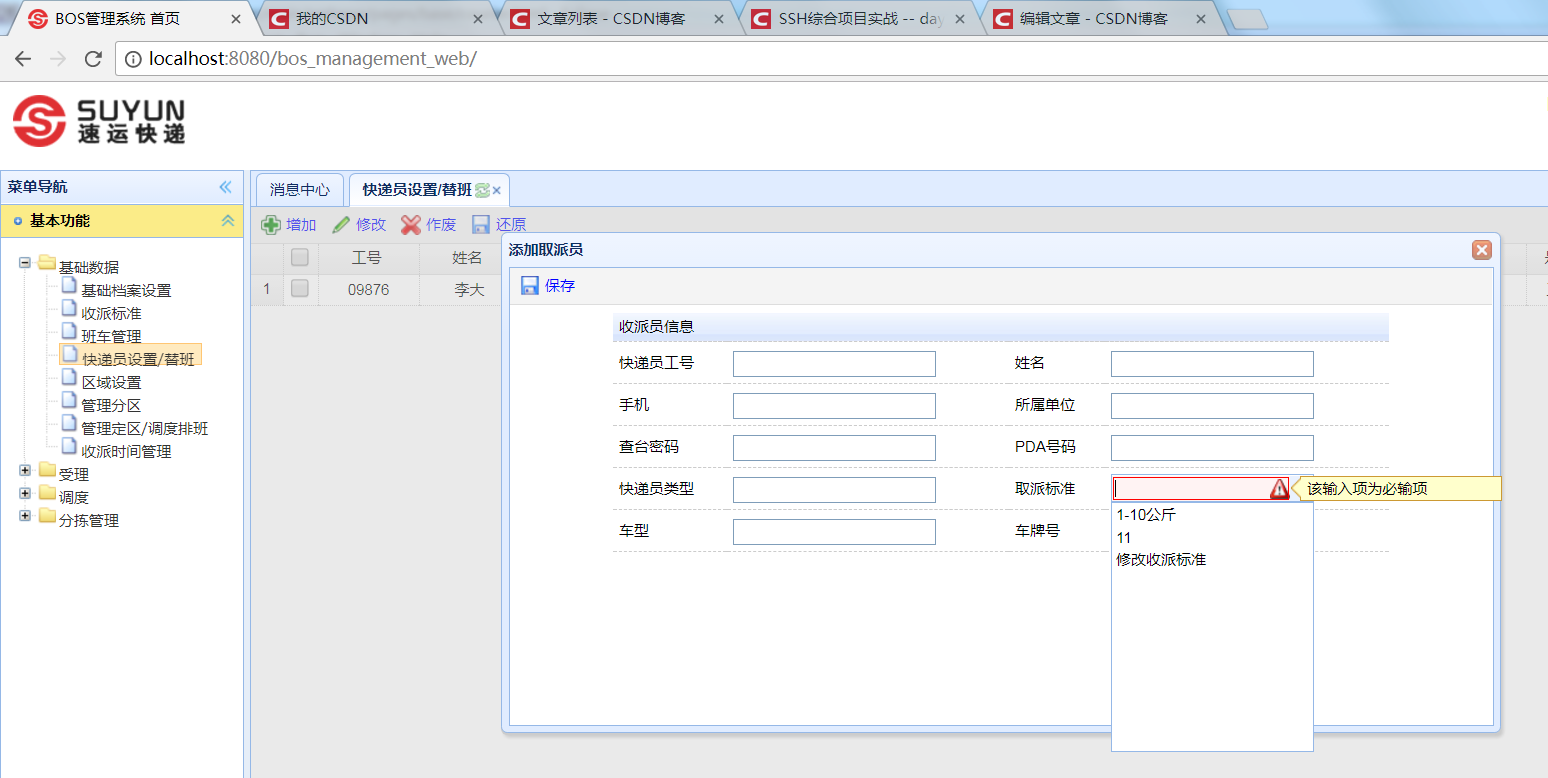
2、快递员添加功能,使用combobox展示收派标准数据
(1)、修改快递员添加中combobox
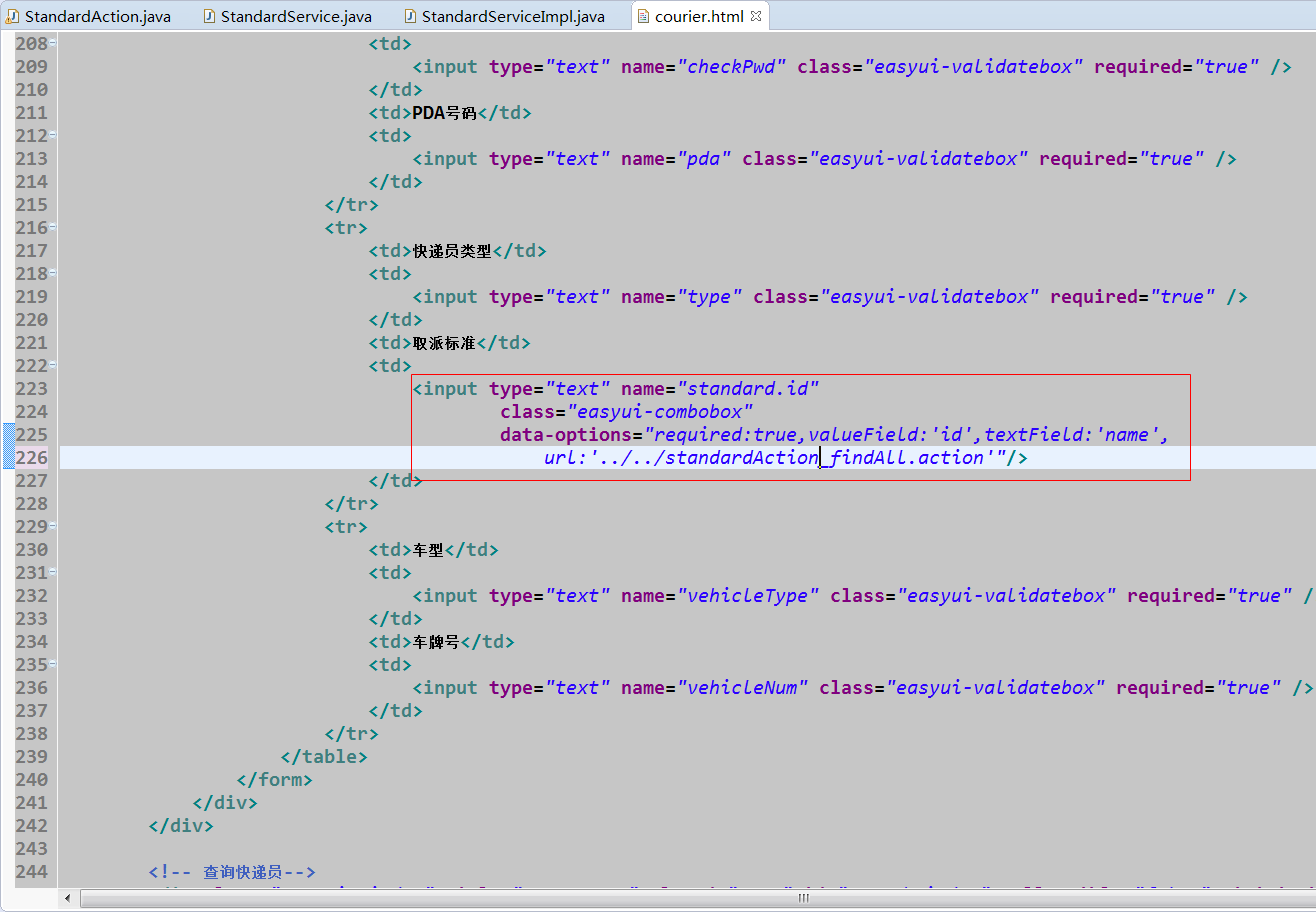
	<input type="text" name="standard.id"
			class="easyui-combobox"
			data-options="required:true,valueField:'id',textField:'name',
				url:'../../standardAction_findAll.action'"/>
(2)、编写收派标准Action中查询所有的代码
	/**
	 * 获取所有收派标准
	 * @throws Exception
	 */
	@Action(value="standardAction_findAll")
	public String findAll() throws Exception{
		List<Standard> sList = standardService.findAll();
		String data = JSONArray.fromObject(sList).toString();
		HttpServletResponse response = ServletActionContext.getResponse();
		response.setContentType("text/json;charset=UTF-8");
		response.getWriter().print(data);
		return NONE;
	}
(3)、编写收派标准Service代码
	/**
	 * 获取所有收派标准
	 */
	public List<Standard> findAll() {
		return standardDao.findAll();
	}
(4)、页面展示效果
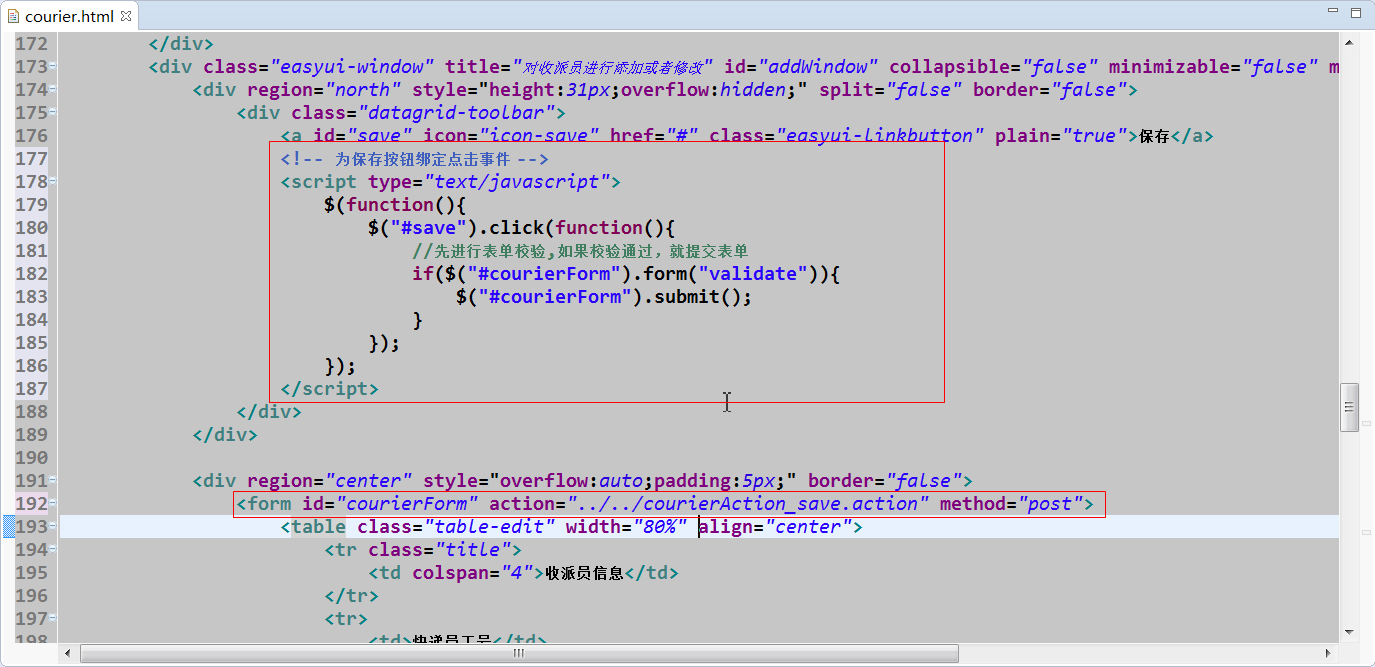
(5)、为提交按钮绑定事件
	<script type="text/javascript">
		$(function(){
			$("#save").click(function(){
				//先进行表单校验,如果校验通过,就提交表单
				if($("#courierForm").form("validate")){
					$("#courierForm").submit();
				}
			});
		});
	</script>
(6)、编写添加收件员Action代码
package com.itheima.bos.web.action.base;

import org.apache.struts2.convention.annotation.Action;
import org.apache.struts2.convention.annotation.Namespace;
import org.apache.struts2.convention.annotation.ParentPackage;
import org.apache.struts2.convention.annotation.Result;
import org.springframework.beans.factory.annotation.Autowired;
import org.springframework.context.annotation.Scope;
import org.springframework.stereotype.Controller;

import com.itheima.bos.domain.base.Courier;
import com.itheima.bos.service.base.CourierService;
import com.opensymphony.xwork2.ActionSupport;
import com.opensymphony.xwork2.ModelDriven;


@Controller
@Namespace("/")
@ParentPackage("struts-default")
@Scope("prototype")
public class CourierAction extends ActionSupport implements ModelDriven<Courier> {

	private Courier model = new Courier();

	public Courier getModel() {
		return model;
	}

	@Autowired
	private CourierService serivce;

	@Action(value="courierAction_save",
			results={
					@Result(name="success", location="/pages/base/courier.html")
			})
	public String save(){
		serivce.save(model);
		return SUCCESS;
	}

}
(7)、编写收件员Service层代码
package com.itheima.bos.service.base.impl;

import org.springframework.beans.factory.annotation.Autowired;
import org.springframework.stereotype.Service;
import org.springframework.transaction.annotation.Transactional;

import com.itheima.bos.dao.base.CourierDao;
import com.itheima.bos.domain.base.Courier;
import com.itheima.bos.service.base.CourierService;

@Service
@Transactional
public class CourierServiceImpl implements CourierService {

	@Autowired
	private CourierDao dao;

	/**
	 * 添加收件员的方法
	 */
	public void save(Courier model) {
		dao.save(model);
	}

}
(8)、编写收件员Dao层代码
package com.itheima.bos.dao.base;

import org.springframework.data.jpa.repository.JpaRepository;

import com.itheima.bos.domain.base.Courier;

public interface CourierDao extends JpaRepository<Courier, Integer> {

}
2、快递员无条件分页查询
(1)、修改html中组建表格数据的url
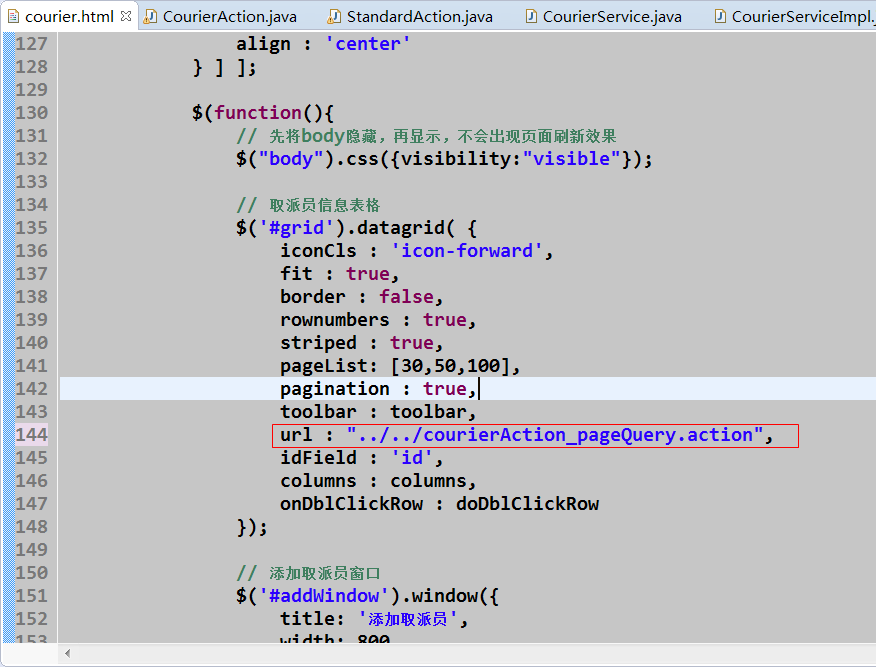
(2)、编写CourierAction中分页查询方法
package com.itheima.bos.web.action.base;

import java.io.IOException;
import java.util.HashMap;
import java.util.List;
import java.util.Map;

import javax.servlet.http.HttpServletResponse;

import org.apache.struts2.ServletActionContext;
import org.apache.struts2.convention.annotation.Action;
import org.apache.struts2.convention.annotation.Namespace;
import org.apache.struts2.convention.annotation.ParentPackage;
import org.apache.struts2.convention.annotation.Result;
import org.springframework.beans.factory.annotation.Autowired;
import org.springframework.context.annotation.Scope;
import org.springframework.data.domain.Page;
import org.springframework.data.domain.PageRequest;
import org.springframework.data.domain.Pageable;
import org.springframework.stereotype.Controller;

import com.itheima.bos.domain.base.Courier;
import com.itheima.bos.service.base.CourierService;
import com.opensymphony.xwork2.ActionSupport;
import com.opensymphony.xwork2.ModelDriven;

import net.sf.json.JSONObject;
import net.sf.json.JsonConfig;

@Controller
@Namespace("/")
@ParentPackage("struts-default")
@Scope("prototype")
public class CourierAction extends ActionSupport implements ModelDriven<Courier> {

	private Courier model = new Courier();

	public Courier getModel() {
		return model;
	}

	@Autowired
	private CourierService serivce;

	@Action(value = "courierAction_save", results = {
			@Result(name = "success", location = "/pages/base/courier.html") })
	public String save() {
		serivce.save(model);
		return SUCCESS;
	}

	// 使用属性驱动,封装页面传递的分页参数
	private int page;
	private int rows;

	public void setPage(int page) {
		this.page = page;
	}

	public void setRows(int rows) {
		this.rows = rows;
	}

	/**
	 * 分页查询方法
	 * @throws Exception
	 */
	@Action(value="courierAction_pageQuery")
	public String pageQuery() throws Exception{
		//创建一个pageable对象,封装分页参数
		Pageable pageable = new PageRequest(page - 1, rows);
		//调用方法查询分页对象
		Page<Courier> page = serivce.pageQuery(pageable);
		//获取总条数
		long total = page.getTotalElements();
		//获取数据集合
		List<Courier> rows = page.getContent();
		//定义map,封装数据
		Map<String, Object> map = new HashMap<String, Object>();
		map.put("total", total);
		map.put("rows", rows);
		//转换json,使用jsonConfig排除对象中不需要转换的属性
		JsonConfig jsonConfig = new JsonConfig();
		jsonConfig.setExcludes(new String[]{"fixedAreas","takeTime"});//fixedAreas是Courier类中的一个属性
		String data = JSONObject.fromObject(map,jsonConfig).toString();
		//使用输出流将数据写回到浏览器
		HttpServletResponse response = ServletActionContext.getResponse();
		response.getWriter().print(data);
		return NONE;
	}

}
(3)、编写CourierService方法
	/**
	 * 分页查询所有快递员信息
	 */
	public Page<Courier> pageQuery(Pageable pageable) {
		return dao.findAll(pageable);
	}
3、快递员批量删除
注意:当前所有的删除都使用逻辑删除,即数据库中保留数据,修改状态字段
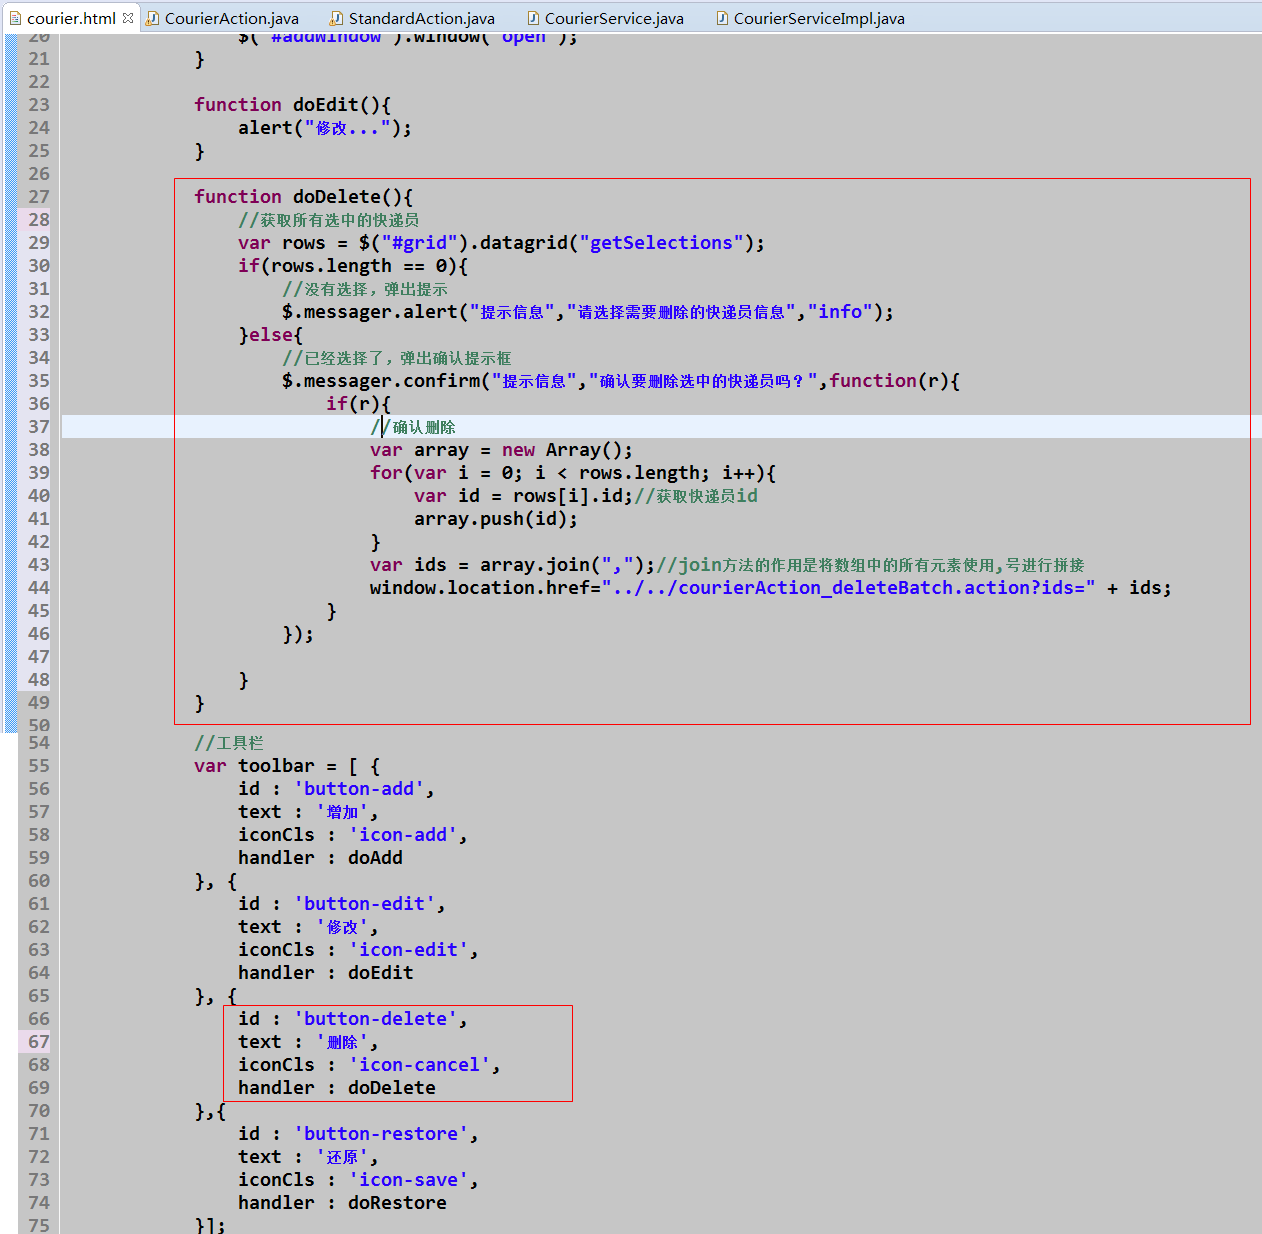
(1)、修改快递员页面中删除操作的按钮的js事件
			function doDelete(){
				//获取所有选中的快递员
				var rows = $("#grid").datagrid("getSelections");
				if(rows.length == 0){
					//没有选择,弹出提示
					$.messager.alert("提示信息","请选择需要删除的快递员信息","info");
				}else{
					//已经选择了,弹出确认提示框
					$.messager.confirm("提示信息","确认要删除选中的快递员吗?",function(r){
						if(r){
							//确认删除
							var array = new Array();
							for(var i = 0; i < rows.length; i++){
								var id = rows[i].id;//获取快递员id
								array.push(id);
							}
							var ids = array.join(",");//join方法的作用是将数组中的所有元素使用,号进行拼接
							window.location.href="../../courierAction_deleteBatch.action?ids=" + ids;
						}
					});

				}
			}
(2)、编写后台Action代码
	/**
	 * 批量删除的方法
	 */
	@Action(value="courierAction_deleteBatch",results={
			@Result(name="success",type="redirect",location="/pages/base/courier.html")
	})
	public String deleteBatch(){
		serivce.deleteBatch(ids);
		return SUCCESS;
	}
(3)、编写后台Service代码
	/**
	 * 批量删除快递员
	 * @param ids
	 */
	public void deleteBatch(String ids){
		if(StringUtils.isNotBlank(ids)){
			//分割字符串
			String[] courierIds = ids.split(",");
			for (String id : courierIds) {
				int courierId = Integer.parseInt(id);
				//执行方法进行更新操作
				dao.deleteCourier(courierId);
			}
		}
	}
(4)、编写后台Dao层代码
package com.itheima.bos.dao.base;

import org.springframework.data.jpa.repository.JpaRepository;
import org.springframework.data.jpa.repository.Modifying;
import org.springframework.data.jpa.repository.Query;

import com.itheima.bos.domain.base.Courier;

public interface CourierDao extends JpaRepository<Courier, Integer> {

	/**
	 * 批量删除收派员 -- 逻辑删除
	 * @param courierId
	 */
	@Query("update Courier set deltag = '1' where id = ?")
	@Modifying
	public void deleteCourier(int courierId);

}


 被折叠的 条评论
为什么被折叠?
被折叠的 条评论
为什么被折叠?
 到【灌水乐园】发言


