


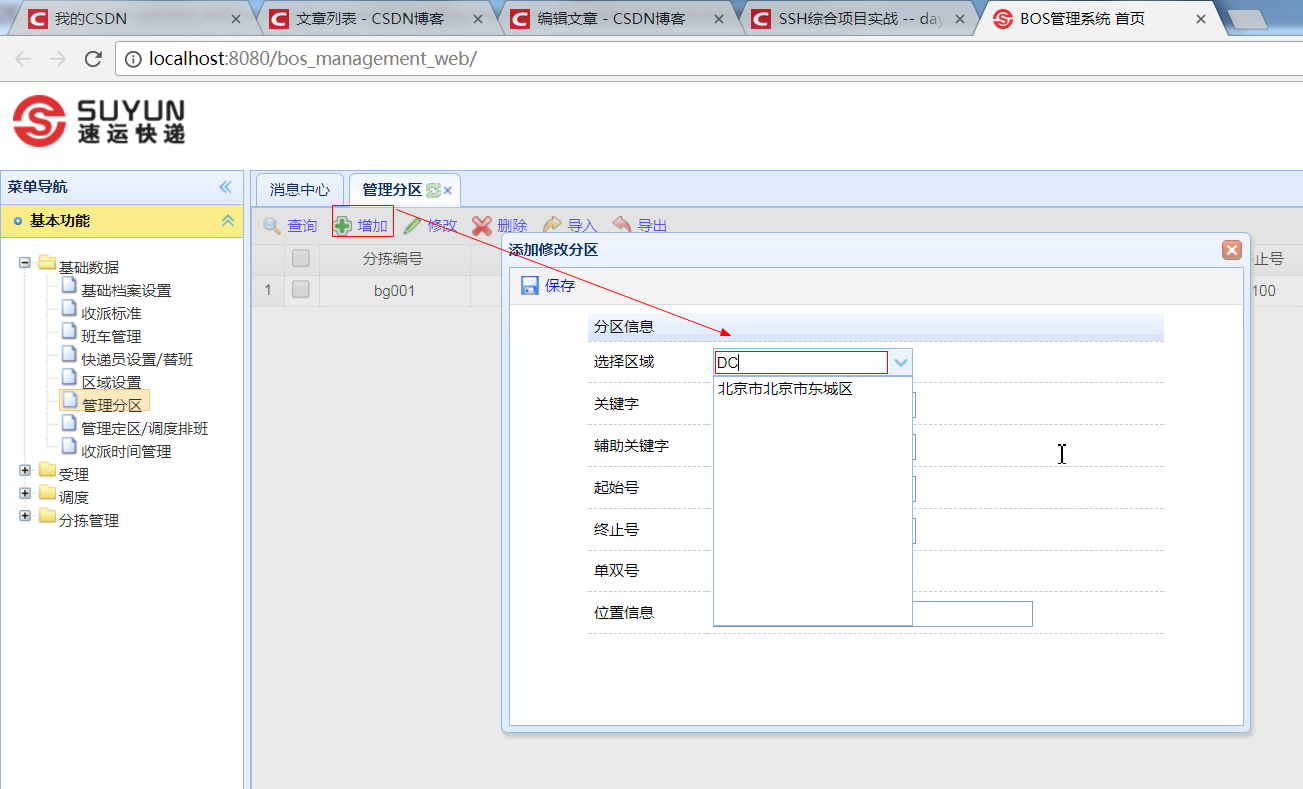
一、分区功能
1、在sub_area.html页面编写添加功能

2、在Area.java中提供getName()方法

3、编写AreaAction中查询所有方法

4、编写combobox中输入字段,自动筛选的功能
(1)、API

(2)、修改combobox属性

(3)、修改AreaAction代码
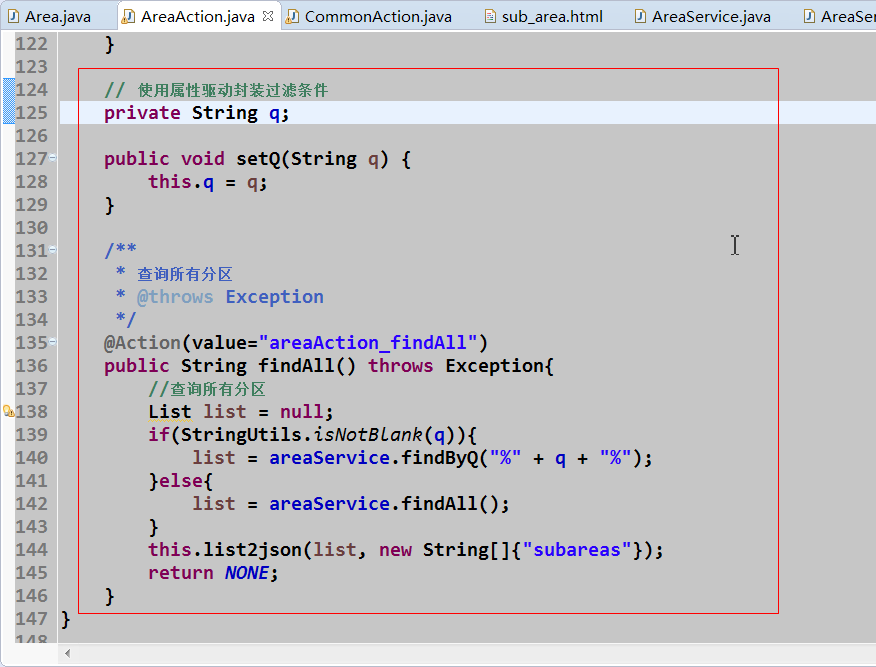
	// 使用属性驱动封装过滤条件
	private String q;

	public void setQ(String q) {
		this.q = q;
	}

	/**
	 * 查询所有分区
	 * @throws Exception
	 */
	@Action(value="areaAction_findAll")
	public String findAll() throws Exception{
		//查询所有分区
		List list = null;
		if(StringUtils.isNotBlank(q)){
			list = areaService.findByQ("%" + q + "%");
		}else{
			list = areaService.findAll();
		}
		this.list2json(list, new String[]{"subareas"});
		return NONE;
	}
5、编写Service层代码
	/**
	 * 查询所有分区
	 */
	public List<Area> findAll() {

		return areaDao.findAll();
	}

	/**
	 * 带过滤条件的分区查询
	 */
	public List<Area> findByQ(String q) {

		return areaDao.findByQ(q);
	}
6、编写Dao层代码
package com.itheima.bos.dao.base;

import java.util.List;

import org.springframework.data.jpa.repository.JpaRepository;
import org.springframework.data.jpa.repository.Query;

import com.itheima.bos.domain.base.Area;

public interface AreaDao extends JpaRepository<Area, String> {

	//根据条件模糊查询的另一种写法
	@Query("from Area a where a.province like ?1 or a.city like ?1 or a.district like ?1 or a.shortcode like ?1 or citycode like ?1")
	public List<Area> findByQ(String q);
}
7、页面展示效果
8、为保存按钮绑定单击事件
	<script type="text/javascript">
		//为保存按钮绑定点击事件
		$(function(){
			$("#save").click(function(){
				if($("#subareaForm").form("validate")){
					//提交
					$("#subareaForm").submit();
				}
			});
		});
	</script>

9、分区服务端代码的编写
(1)、编写SubAreaAction中保存的代码
package com.itheima.bos.web.action.base;

import org.apache.struts2.convention.annotation.Action;
import org.apache.struts2.convention.annotation.Namespace;
import org.apache.struts2.convention.annotation.ParentPackage;
import org.apache.struts2.convention.annotation.Result;
import org.springframework.beans.factory.annotation.Autowired;
import org.springframework.context.annotation.Scope;
import org.springframework.stereotype.Controller;

import com.itheima.bos.domain.base.SubArea;
import com.itheima.bos.service.base.SubAreaService;
import com.itheima.bos.web.action.base.common.CommonAction;

/**
 * 分区管理的action
 * @author Administrator
 *
 */
@Controller
@Namespace("/")
@ParentPackage("struts-default")
@Scope("prototype")
public class SubAreaAction extends CommonAction<SubArea> {

	private SubArea model = getModel();

	@Autowired
	private SubAreaService service;

	@Action(value="subareaAction_save",results={
			@Result(name="success",type="redirect",location="/pages/base/sub_area.html")
	})
	public String save(){
		service.save(model);
		return SUCCESS;
	}
}
(2)、编写Service层
package com.itheima.bos.service.base.impl;

import java.util.UUID;

import org.springframework.beans.factory.annotation.Autowired;
import org.springframework.stereotype.Service;
import org.springframework.transaction.annotation.Transactional;

import com.itheima.bos.dao.base.SubAreaDao;
import com.itheima.bos.domain.base.SubArea;
import com.itheima.bos.service.base.SubAreaService;

@Service
@Transactional
public class SubAreaServiceImpl implements SubAreaService {

	@Autowired
	private SubAreaDao dao;

	/**
	 * 添加分区
	 */
	public void save(SubArea model) {
		model.setId(UUID.randomUUID().toString());
		dao.save(model);
	}

}
(3)、编写Dao层代码
package com.itheima.bos.dao.base;
import org.springframework.data.jpa.repository.JpaRepository;
import com.itheima.bos.domain.base.SubArea;
public interface SubAreaDao extends JpaRepository<SubArea, String> {
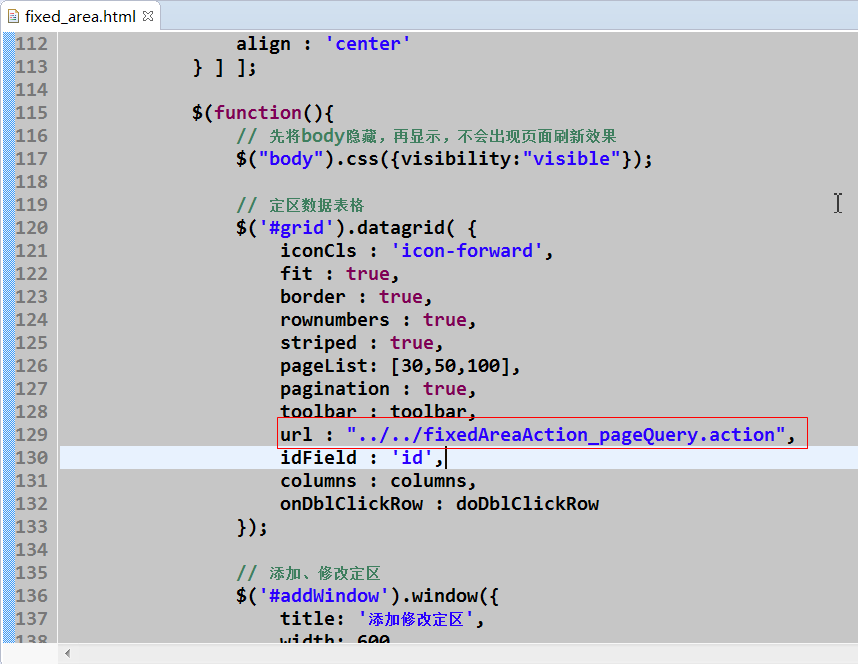
}二、定区功能 -- 分页和添加
1、修改fiexdArea.html中datagrid加载的url

2、编写FiexdAreaAction代码
package com.itheima.bos.web.action.base;

import org.apache.struts2.convention.annotation.Action;
import org.apache.struts2.convention.annotation.Namespace;
import org.apache.struts2.convention.annotation.ParentPackage;
import org.apache.struts2.convention.annotation.Result;
import org.springframework.beans.factory.annotation.Autowired;
import org.springframework.context.annotation.Scope;
import org.springframework.data.domain.Page;
import org.springframework.data.domain.PageRequest;
import org.springframework.data.domain.Pageable;
import org.springframework.stereotype.Controller;

import com.itheima.bos.domain.base.FixedArea;
import com.itheima.bos.service.base.FixedAreaService;
import com.itheima.bos.service.base.impl.FixedAreaServiceImpl;
import com.itheima.bos.web.action.base.common.CommonAction;

/**
 * 定区管理
 * @author Administrator
 *
 */
@Controller
@Namespace("/")
@Scope("prototype")
@ParentPackage("struts-default")
public class FixedAreaAction extends CommonAction<FixedArea> {

	private FixedArea model = this.getModel();

	@Autowired
	private FixedAreaService service = new FixedAreaServiceImpl();

	/**
	 * 分页查询定区
	 */
	@Action(value="fixedAreaAction_pageQuery")
	public String pageQuery(){
		//创建pageable对象,封装分页参数
		Pageable pageable = new PageRequest(page - 1, rows);
		Page<FixedArea> page = service.pageQuery(pageable);
		this.page2json(page, new String[]{"subareas","couriers"});
		return NONE;
	}

	/**
	 * 添加定区
	 */
	@Action(value="fixedAreaAction_save",results={
			@Result(name="success",type="redirect", location="/pages/base/fixed_area.html")
	})
	public String save(){
		service.save(model);
		return SUCCESS;
	}
}
3、编写service层代码
package com.itheima.bos.service.base.impl;

import org.springframework.beans.factory.annotation.Autowired;
import org.springframework.data.domain.Page;
import org.springframework.data.domain.Pageable;
import org.springframework.stereotype.Service;
import org.springframework.transaction.annotation.Transactional;

import com.itheima.bos.dao.base.FixedAreaDao;
import com.itheima.bos.domain.base.FixedArea;
import com.itheima.bos.service.base.FixedAreaService;

@Service
@Transactional
public class FixedAreaServiceImpl implements FixedAreaService {

	@Autowired
	private FixedAreaDao dao;

	/**
	 * 添加定区
	 */
	public void save(FixedArea model) {
		dao.save(model);
	}

	/**
	 * 分页查询所有定区
	 */
	public Page<FixedArea> pageQuery(Pageable pageable) {
		return dao.findAll(pageable);
	}
}
4、编写Dao层代码
package com.itheima.bos.dao.base;

import org.springframework.data.jpa.repository.JpaRepository;
import org.springframework.data.jpa.repository.JpaSpecificationExecutor;

import com.itheima.bos.domain.base.FixedArea;

public interface FixedAreaDao extends JpaRepository<FixedArea, String>,JpaSpecificationExecutor<FixedArea> {

}
三、基于CXF开发的WebService服务
1、CXF整合spring服务端开发
(1)、创建web项目,导入必要的jar包

(2)、在web.xml中配置CXF核心servlet
	<!-- 配置CXF的servlet -->
	<servlet>
		<servlet-name>cxf</servlet-name>
		<servlet-class>org.apache.cxf.transport.servlet.CXFServlet</servlet-class>
		<!-- 指定spring配置文件位置 -->
		<init-param>
			<param-name>config-location</param-name>
			<param-value>classpath:applicationContext.xml</param-value>
		</init-param>
	</servlet>

	<servlet-mapping>
		<servlet-name>cxf</servlet-name>
		<url-pattern>/webservice/*</url-pattern>
	</servlet-mapping>
(3)、编写服务方法
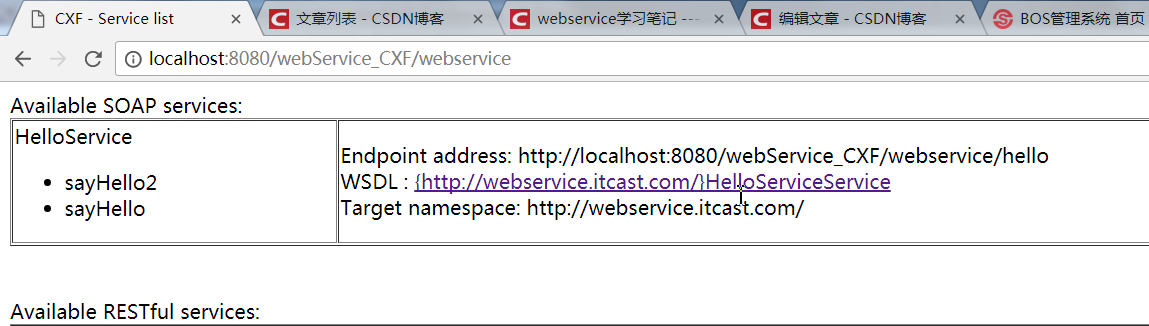
package com.itcast.webservice;

import javax.jws.WebService;

@WebService
public class HelloService {

	public String sayHello(String name, int age){
		System.out.println("服务端的sayHello方法被调用了...");
		return "hello" + name;
	}

	public String sayHello2(String name, int age){
		System.out.println("服务端的sayHello方法被调用了...");
		return "hello2" + name;
	}
}
(4)、编写spring配置文件
<?xml version="1.0" encoding="UTF-8"?>
<beans xmlns="http://www.springframework.org/schema/beans"
xmlns:xsi="http://www.w3.org/2001/XMLSchema-instance"
xmlns:jaxws="http://cxf.apache.org/jaxws"
xmlns:soap="http://cxf.apache.org/bindings/soap"
xsi:schemaLocation="http://www.springframework.org/schema/beans
					http://www.springframework.org/schema/beans/spring-beans.xsd
					http://cxf.apache.org/bindings/soap
					http://cxf.apache.org/schemas/configuration/soap.xsd
					http://cxf.apache.org/jaxws
					http://cxf.apache.org/schemas/jaxws.xsd">

	<!-- 注册简单的CXF服务 -->
	<jaxws:endpoint id="myService" address="/hello" implementor="com.itcast.webservice.HelloService">
	</jaxws:endpoint>
</beans>
(5)、启动项目,进行测试
2、CXF客户端开发--方式1:使用命令生成客户端代码
(1)、根据 wsdl 地址生成客户端代码


(2)、创建客户端项目,将生成的代码拷入src下

(3)、创建测试类,进行服务调用
package com.itcast.webservice.test;

import com.itcast.webservice.HelloService;
import com.itcast.webservice.HelloServiceService;

public class App {

	public static void main(String[] args) {
		HelloServiceService service = new HelloServiceService();
		HelloService port = service.getHelloServicePort();
		String hello = port.sayHello("小明", 14);
		System.out.println(hello);
	}
}
3、CXF客户端开发--方式2:在spring配置文件中注册代理对象调用
(1)、创建java工程,导入jar包

(2)、使用wsimport或者wsdl2java命令解析wsdl文件生成本地代码,只需要接口文件即可
(3)、编写spring配置文件
<?xml version="1.0" encoding="UTF-8"?>
<beans xmlns="http://www.springframework.org/schema/beans"
xmlns:xsi="http://www.w3.org/2001/XMLSchema-instance"
xmlns:jaxws="http://cxf.apache.org/jaxws"
xmlns:soap="http://cxf.apache.org/bindings/soap"
xsi:schemaLocation="http://www.springframework.org/schema/beans
					http://www.springframework.org/schema/beans/spring-beans.xsd
					http://cxf.apache.org/bindings/soap
					http://cxf.apache.org/schemas/configuration/soap.xsd
					http://cxf.apache.org/jaxws
					http://cxf.apache.org/schemas/jaxws.xsd">

	<!-- 注册客户端代理对象,用于访问WebService服务 -->
	<jaxws:client id="myClient" address="http://localhost:8080/webService_CXF/webservice/hello"
			serviceClass="com.itcast.webservice.HelloService">
	</jaxws:client>
</beans>
(4)、编写测试类
package com.itcast.test;

import org.springframework.context.ApplicationContext;
import org.springframework.context.support.ClassPathXmlApplicationContext;

import com.itcast.webservice.HelloService;

public class App {

	public static void main(String[] args) {
		//创建spring工厂
		ApplicationContext ctx = new ClassPathXmlApplicationContext("applicationContext.xml");
		//从工厂中获取代理对象
		HelloService proxy = (HelloService) ctx.getBean("myClient");
		String ret = proxy.sayHello("小华", 18);
		System.out.println(ret);
	}
}


 972
972

 被折叠的 条评论
为什么被折叠?
被折叠的 条评论
为什么被折叠?
 到【灌水乐园】发言


