


源码资源链接(欢迎下载,保证有用):https://download.csdn.net/download/wise18146705004/11584211
springboot的thymeleaf模板是一种模板引擎,相对来说操作简单,用的也十分广泛。与ajax用于用途很类似。
但是它具体怎么将前端页面与后端的系统结合在一起呢?我们该如何去使用它呢?并且spring data jpa该如何去使用呢?这个教程讲教会大家用这一整套的流程。相信你将受益匪浅。。。。。。大家来学习吧
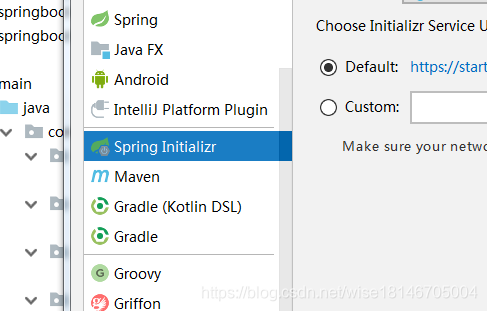
1、首先使用springboot方式(即spring Initializr方式)创建一个工程,最后只选用web模块里面的pring web starter选项即可。工程名字就叫springboot(如图所示)
2、在pom.xml中添加所有需要的依赖:
如下所示:
<!--工程启动依赖-->
<dependency>
   <groupId>org.springframework.boot</groupId>
   <artifactId>spring-boot-starter-web</artifactId>
</dependency>
<!--工程测试依赖-->
<dependency>
   <groupId>org.springframework.boot</groupId>
   <artifactId>spring-boot-starter-test</artifactId>
   <scope>test</scope>
</dependency>
<!--jpa使用依赖-->
<dependency>
   <groupId>org.springframework.boot</groupId>
   <artifactId>spring-boot-starter-data-jpa</artifactId>
</dependency>
<!--aop使用依赖-->
<dependency>
   <groupId>org.springframework.boot</groupId>
   <artifactId>spring-boot-starter-aop</artifactId>
   <version>2.1.6.RELEASE</version>
</dependency>
<!--themeleaf使用依赖-->
<dependency>
   <groupId>org.springframework.boot</groupId>
   <artifactId>spring-boot-starter-thymeleaf</artifactId>
</dependency>
<!--免重复重启工程的依赖,引入后只需要编译即可-->
<dependency>
   <groupId>org.springframework.boot</groupId>
   <artifactId>spring-boot-devtools</artifactId>
   <version>2.1.6.RELEASE</version>
</dependency>
<!--mysql连接的依赖,这里要注意了,版本太高,有可能会出问题,所以你最好要指定版本-->
<dependency>
   <groupId>mysql</groupId>
   <artifactId>mysql-connector-java</artifactId>
   <version>5.1.47</version>
   <scope>runtime</scope>
</dependency>
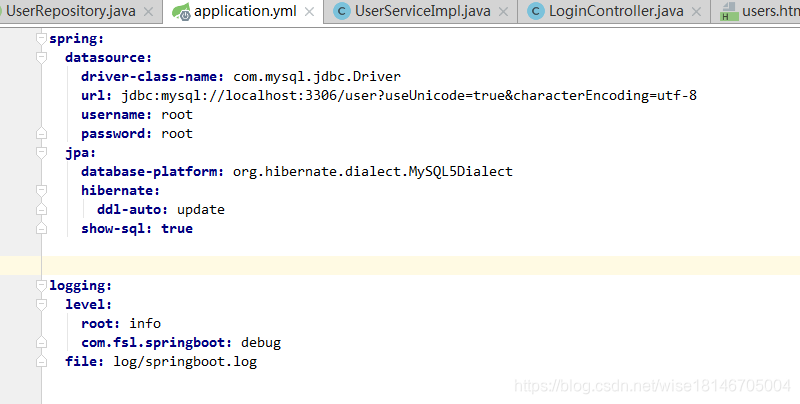
3、配置application.yml文件(建议使用yml格式的配置文件,因为它有快捷提示,不容易敲错,但是冒号后面一定要记得加上一个空格,否则会报错)
如下图所示:
#配置数据库的连接以及配置使用spring data jpa的方式操作数据库
spring:
  datasource:
    driver-class-name: com.mysql.jdbc.Driver
    url: jdbc:mysql://localhost:3306/user?useUnicode=true&characterEncoding=utf-8
    username: root
    password: root
  jpa:
    database-platform: org.hibernate.dialect.MySQL5Dialect
    hibernate:
      ddl-auto: update
    show-sql: true

#配置日志打印的位置,属于aop的内容,大家可以先写上
logging:
  level:
    root: info
    com.fsl.springboot: debug
  file: log/springboot.log
如图:
4、然后开始配置后端代码
实体类的构建:
package com.fsl.springboot.po;

import javax.persistence.*;

@Entity
@Table(name="t_user")
public class User {

    @Id
    @Column(name = "id",nullable = false)
    private Long id;

    @Column(name = "name")
    private String name;

    @Column(name = "gender")
    private String gender;

    @Column(name = "weight")
    private String weight;

    public User() {
    }

    public User(String name, String gender, String weight) {
        this.name = name;
        this.gender = gender;
        this.weight = weight;
    }

    @Override
    public String toString() {
        return "User{" +
                "id=" + id +
                ", name='" + name + '\'' +
                ", gender='" + gender + '\'' +
                ", weight='" + weight + '\'' +
                '}';
    }

    public Long getId() {
        return id;
    }

    public void setId(Long id) {
        this.id = id;
    }

    public String getName() {
        return name;
    }

    public void setName(String name) {
        this.name = name;
    }

    public String getGender() {
        return gender;
    }

    public void setGender(String gender) {
        this.gender = gender;
    }

    public String getWeight() {
        return weight;
    }

    public void setWeight(String weight) {
        this.weight = weight;
    }
}
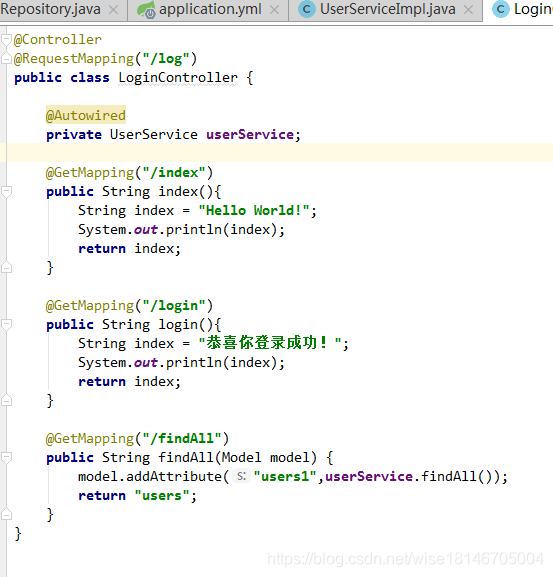
controller层:
package com.fsl.springboot.controller;

import com.fsl.springboot.po.User;
import com.fsl.springboot.service.UserService;
import org.springframework.beans.factory.annotation.Autowired;
import org.springframework.stereotype.Controller;
import org.springframework.ui.Model;
import org.springframework.web.bind.annotation.GetMapping;
import org.springframework.web.bind.annotation.RequestMapping;
import org.springframework.web.bind.annotation.RestController;

import java.awt.*;

@Controller//记住当你从后端传来的数据要展示在前端的页面就要用Controller,不用它传到前端的就是一个字符,而且不会进入页面区域
@RequestMapping("/log")//路径配置
public class LoginController {

    @Autowired
    private UserService userService;//service注入

    @GetMapping("/index")
    public String index(){//测试后端
        String index = "Hello World!";
        System.out.println(index);
        return index;
    }

    @GetMapping("/login")
    public String login(){
        String index = "恭喜你登录成功!";
        System.out.println(index);
        return index;
    }

    @GetMapping("/findAll")
    public String findAll(Model model) {//查询数据传值前端的方法
        model.addAttribute("users1",userService.findAll());//获取所有的后端数据
        return "users";//传递至users.html文件,并发布在前端浏览器
    }
}
如图所示:
service层:
UserService:
package com.fsl.springboot.service;

import com.fsl.springboot.po.User;

import java.util.List;

public interface UserService {

    public List<User> findAll();
}
UserServiceImpl:
package com.fsl.springboot.service;

import com.fsl.springboot.repository.UserRepository;
import com.fsl.springboot.po.User;
import org.springframework.beans.factory.annotation.Autowired;
import org.springframework.stereotype.Service;

import java.util.List;

@Service
public class UserServiceImpl implements UserService {

    @Autowired
    private UserRepository userRepository;

    @Override
    public List<User> findAll() {
        return userRepository.findAll();
    }
}
dao层:这一层只需要继承一个接口即可(user为实体类,也即是要操作的类或者说数据表的外在。Long是数据表键的类型)
package com.fsl.springboot.repository;

import com.fsl.springboot.po.User;
import org.springframework.data.jpa.repository.JpaRepository;

public interface UserRepository extends JpaRepository<User,Long> {
}
5、到这一步,你还需要在数据库中创建一个数据库名字为:user。最后你运行一下就会在数据库中产生一个名字为t_user的数据表(当然你必须要注意了,你要先把controller层返回页面的方法里面的那个页面值设为空串“”,不然可能会报错),然后自己填一些数据进去
6、前端页面的制作
直接使用semantic UI框架做一个表格:
代码如下:
<!DOCTYPE html>
<html lang="en" xmlns:th="http://www.w3.org/1999/xhtml">
<head th:replace="_fragments :: head(~{::title})">
    <meta charset="UTF-8">
    <meta name="viewport" content="width=device-width, initial-scale=1.0">
    <title>测试</title>
    <link rel="stylesheet" href="https://cdn.jsdelivr.net/semantic-ui/2.2.4/semantic.min.css" >
    <link rel="stylesheet" href="../static/css/me.css" >
</head>
<body>
    <div class="m-container-small m-padded-tb-big">
        <div class="ui container">
            <div>
                <table class="ui compact teal table">
                    <thead>
                    <tr>
                        <th></th>
                        <th>姓名</th>
                        <th>性别</th>
                        <th>体重</th>
                    </tr>
                    </thead>
                    <tbody>
                    <tr th:each="user : ${users1}">
                        <td th:text="${user.id}">1</td>
                        <td th:text="${user.name}">付少</td>
                        <td th:text="${user.gender}">男</td>
                        <td th:text="${user.weight}">130</td>
                    </tr>
                    <!--/*-->
                    <tr>
                        <td>2</td>
                        <td>张三</td>
                        <td>女</td>
                        <td>90</td>
                    </tr>
                    <!--*/-->
                    </tbody>
                </table>
            </div>
        </div>
    </div>
</body>
</html>
7、运行工程,并且使用该链接访问: http://127.0.0.1:8080/log/findAll
运行结果如下图:
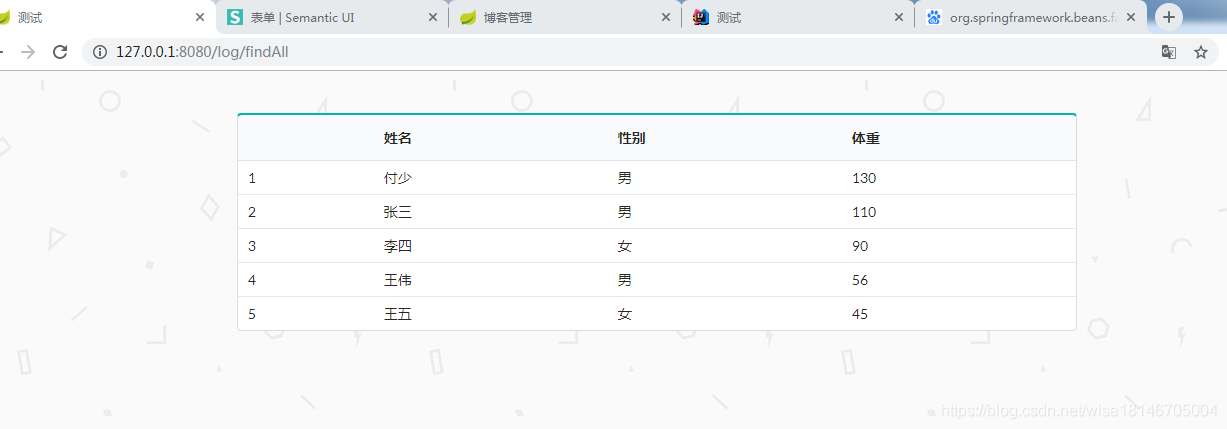 这样的话就都搞定了!你已经学会了


 1万+
1万+

 被折叠的 条评论
为什么被折叠?
被折叠的 条评论
为什么被折叠?
 到【灌水乐园】发言


