


我们直接上代码
不对,先在pubspec.yaml 上添加dependences
好,现在上代码
import 'package:flutter/material.dart';
import 'package:go_router/go_router.dart';

void main() => runApp(const MyApp());

/// The route configuration.
final GoRouter _router = GoRouter(
  routes: <RouteBase>[
    GoRoute(
      path: '/',
      builder: (BuildContext context, GoRouterState state) {
        return const HomeScreen();
      },
      routes: <RouteBase>[
        GoRoute(
          path: 'details',
          builder: (BuildContext context, GoRouterState state) {
            return const DetailsScreen();
          },
        ),
        GoRoute(
            path: "loging",
            builder: (BuildContext context, GoRouterState state){
              return  LogingPage();
            }
        ),
      ],


    ),
  ],
);

/// The main app.
class MyApp extends StatelessWidget {
  /// Constructs a [MyApp]
  const MyApp({super.key});

  @override
  Widget build(BuildContext context) {
    return MaterialApp.router(
      routerConfig: _router,
    );
  }
}

/// The home screen
class HomeScreen extends StatelessWidget {
  /// Constructs a [HomeScreen]
  const HomeScreen({super.key});

  @override
  Widget build(BuildContext context) {
    return Scaffold(
      appBar: AppBar(title: const Text('Home Screen')),
      // body: Center(
      //   child: ElevatedButton(
      //     onPressed: () => context.go('/details'),
      //     child: const Text('Go to the Details screen'),
      //   ),
      // ),
      body: Center(
        child: Column(
          crossAxisAlignment: CrossAxisAlignment.center,
          mainAxisAlignment: MainAxisAlignment.center,
          children: [
            ElevatedButton(
              onPressed: () => context.go("/details"),
              child: Text('Go to the Details screen'),
              style: ElevatedButton.styleFrom(
                foregroundColor: Colors.white,  // 设置按钮文本颜色为白色
                backgroundColor: Colors.blue, // 设置按钮背景为蓝色
                padding: EdgeInsets.symmetric(vertical: 16, horizontal: 24), // 设置按钮内边距
                textStyle: TextStyle(fontSize: 16), // 设置按钮文本样式
                shape: RoundedRectangleBorder(
                  borderRadius: BorderRadius.circular(8), // 设置按钮圆角
                ),
              ),
            ),
            ElevatedButton(
              onPressed: () => context.go("/loging"),
              child: Text('Go to the LoginPage'),
              style: ElevatedButton.styleFrom(
                foregroundColor: Colors.white, // 设置按钮文本颜色为白色
                backgroundColor: Colors.green, // 设置按钮背景为绿色
                padding: EdgeInsets.symmetric(vertical: 16, horizontal: 24), // 设置按钮内边距
                textStyle: TextStyle(fontSize: 16), // 设置按钮文本样式
                shape: RoundedRectangleBorder(
                  borderRadius: BorderRadius.circular(8), // 设置按钮圆角
                ),
              ),
            ),

          ],
        ),
      )
    );
  }
}

/// The details screen
class DetailsScreen extends StatelessWidget {
  /// Constructs a [DetailsScreen]
  const DetailsScreen({super.key});

  @override
  Widget build(BuildContext context) {
    return Scaffold(
      appBar: AppBar(title: const Text('Details Screen')),
      body: Center(
        child: ElevatedButton(
          onPressed: () => context.go('/'),
          child: const Text('Go back to the Home screen'),
        ),
      ),
    );
  }
}

class LogingPage extends StatelessWidget {
  @override
  Widget build(BuildContext context) {
    return Scaffold(
      appBar: AppBar(
        title: Text('Loging'),
      ),
      body: Center(
        child: Column(
          mainAxisAlignment: MainAxisAlignment.center,
          children: [
            // 账号输入框
            Padding(
              padding: EdgeInsets.symmetric(horizontal: 16),
              child: TextField(
                decoration: InputDecoration(
                  labelText: 'Username',
                ),
              ),
            ),
            SizedBox(height: 16),
            // 密码输入框
            Padding(
              padding: EdgeInsets.symmetric(horizontal: 16),
              child: TextField(
                obscureText: true,
                decoration: InputDecoration(
                  labelText: 'Password',
                ),
              ),
            ),
            SizedBox(height: 24),
            // 登录按钮
            ElevatedButton(
              onPressed: () {
                // 处理登录逻辑
                // ...
              },
              //child: Text('Login'),
              child: Column(
                crossAxisAlignment: CrossAxisAlignment.center,
                mainAxisAlignment: MainAxisAlignment.center,
                children: [
                  Text("loging"),
              Padding(padding: EdgeInsets.only(top: 30.0)),
              ElevatedButton(
                onPressed: () => context.go("/"),

                child: Text('Go to the start'),
                style: ElevatedButton.styleFrom(
                  foregroundColor: Colors.white,
                  backgroundColor: Colors.amber,
                ),
              )
                ],
              ),
            ),
          ],
        ),
      ),
    );
  }
}
让我来分析一下代码
创建了一个GoRouter实例_router,用于配置应用程序的路由信息。
final GoRouter _router = GoRouter(
  routes: <RouteBase>[
    GoRoute(
      path: '/',
      builder: (BuildContext context, GoRouterState state) {
        return const HomeScreen();
      },
      routes: <RouteBase>[
        GoRoute(
          path: 'details',
          builder: (BuildContext context, GoRouterState state) {
            return const DetailsScreen();
          },
        ),
        GoRoute(
            path: "loging",
            builder: (BuildContext context, GoRouterState state){
              return  LogingPage();
            }
        ),
      ],


    ),
  ],
);
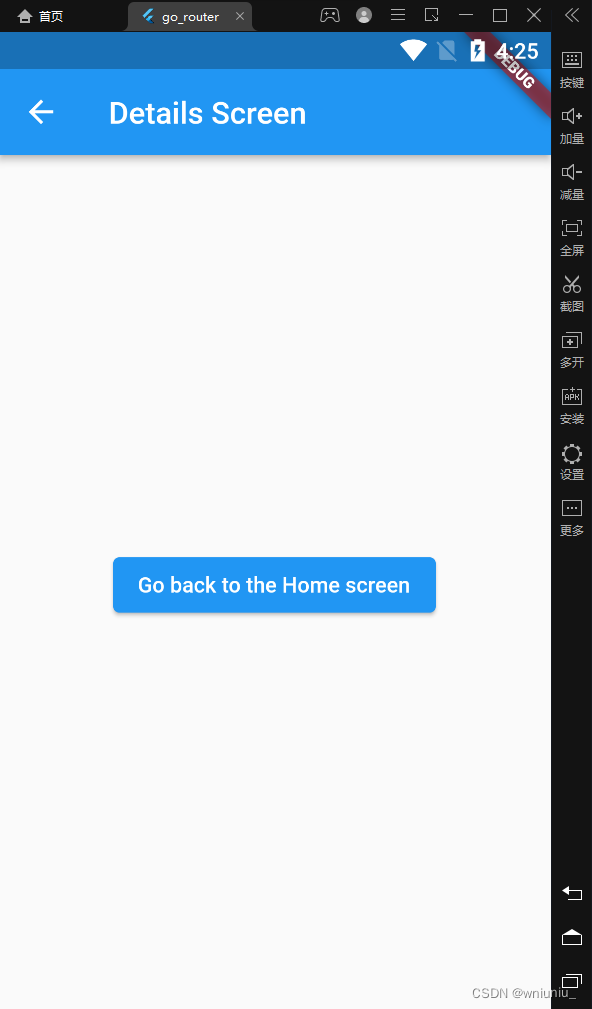
这段代码扩展了原始路由配置,使得应用程序具有三个路由:
- 根路由'/',映射到
HomeScreen小部件。 - 子路由'details',映射到
DetailsScreen小部件。 - 子路由'loging',映射到
LogingPage小部件。
这样,当应用程序导航到'/details'路径时,将显示DetailsScreen小部件;导航到'/loging'路径时,将显示LogingPage小部件。
那要怎么跳转呢
children: [
            ElevatedButton(
              onPressed: () => context.go("/details"),
              child: Text('Go to the Details screen'),
              style: ElevatedButton.styleFrom(
                foregroundColor: Colors.white,  // 设置按钮文本颜色为白色
                backgroundColor: Colors.blue, // 设置按钮背景为蓝色
                padding: EdgeInsets.symmetric(vertical: 16, horizontal: 24), // 设置按钮内边距
                textStyle: TextStyle(fontSize: 16), // 设置按钮文本样式
                shape: RoundedRectangleBorder(
                  borderRadius: BorderRadius.circular(8), // 设置按钮圆角
                ),
              ),
            ),
            ElevatedButton(
              onPressed: () => context.go("/loging"),
              child: Text('Go to the LoginPage'),
              style: ElevatedButton.styleFrom(
                foregroundColor: Colors.white, // 设置按钮文本颜色为白色
                backgroundColor: Colors.green, // 设置按钮背景为绿色
                padding: EdgeInsets.symmetric(vertical: 16, horizontal: 24), // 设置按钮内边距
                textStyle: TextStyle(fontSize: 16), // 设置按钮文本样式
                shape: RoundedRectangleBorder(
                  borderRadius: BorderRadius.circular(8), // 设置按钮圆角
                ),
              ),
            ),

          ],
利用ElevatedButton 控件进行跳转,
onPressed: () => context.go("/loging"), //里面填写的是路由的路径名称
看看效果图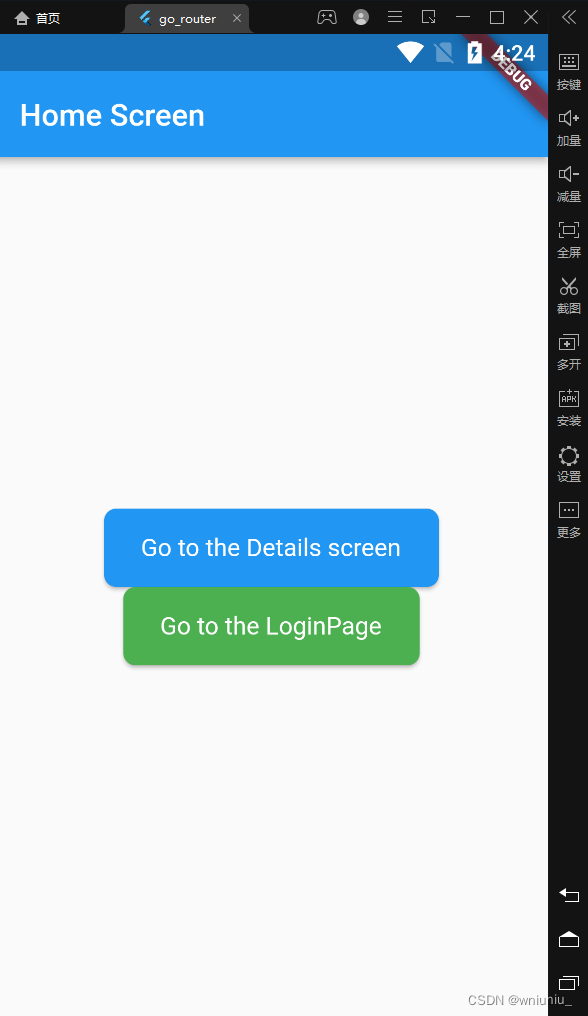


 3126
3126


 被折叠的 条评论
为什么被折叠?
被折叠的 条评论
为什么被折叠?
 到【灌水乐园】发言


