 LabVIEW机器学习与深度学习工具包实战指南


文章目录
总述

机器学习工具包
Analytics and Machine Learning
分析和机器学习工具包
LabVIEW分析和机器学习工具包是LabVIEW的一个软件附件,旨在提供机器学习所需的训练模型。这些模型包含了异常检测、分类以及聚类算法,从而可以从大量数据中识别出模式(pattern)。
此外,这些模型还可以识别NI Linux Real-Time和Windows硬件上的新数据模式。LabVIEW分析和机器学习工具包适用于状态监测、预测性维护等应用。
下载地址:
LabVIEW Analytics and Machine Learning工具包
现在只有2017/2018版本了。
例程如下:
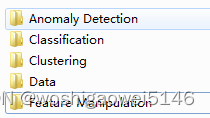
包括:缺陷检测,分类,聚类,降维。Data为训练和测试数据集。
Machine Learning Toolkit
Machine Learning Toolkit 和 AML 是进化的关系,不过Machine Learning Toolkit更基础。
包含以下几部分:
无监督学习
• k-均值
• K-中心
• k-中心点
• 模糊C均值聚类
• 高斯混合模型(GMM)
• 层次聚类
• 谱聚类算法
• 矢量量化(VQ)
• 自组织映射(SOM)
有监督学习
• 等距特征映射(Isomap)
• 局部线性嵌入(LLE)
• 多维标度(MDS)
• 主成分分析(PCA)
• 核的主分量分析
• 线性判别分析(LDA)
验证和可视化工具
聚类有效性指数
•兰德指数
• 戴维斯- 堡丁(DB)指数
• 杰卡德指数
• 邓恩指数
分类评价:
• 分类精度
• 混淆矩阵
学习结果可视化
• 可视化(2D&3D)
• 可视函数(2D&3D)
参考及下载地址:
LabVIEW Machine Learning Toolkit
神经网络工具包
DeepLTK工具包
介绍
Ngene开发的深度学习工具包,免费试用30天。
Deep Learning Toolkit for LabVIEW是LabVIEW的一款附加软件,可用于创建、配置、训练和部署深度神经网络(DNN)。借助该附加软件,您可以加快Nvidia图形处理单元(GPU)上DNN的训练和推理速度。该附加软件支持LabVIEW Real-Time终端的部署和推理。
此外,Deep Learning Toolkit for LabVIEW可帮助您实现DNN拓扑和指标的可视化,例如内存占用空间和运算处理复杂性。
在CPU上执行时,该附加软件无需外部库或引擎即可运行。
• 卷积核大小:3x3
• 最大图像尺寸:512x512px
• 最大层数(Conv-Activte-Pool):16
• 支持的 NI 平台:Kintex-7、Zynq-7000(NI IC-3173、NI sbRIO-9607)
官网:DeepLTK
下载地址:Deep Learning Toolkit for LabVIEW
安装破解
安装时,用VIPM管理员打开后,直接搜索在线安装。离线安装可能会报错。

https://www.amobbs.com/forum.php?mod=viewthread&action=printable&tid=5708538
支持的网络架构
- MLP - 多层感知器
- CNN - 卷积神经网络
- FCN - 全卷积网络
- ResNet - 用于图像识别的深度残差学习
- YOLO v2 - You Only Look Once对象检测
- U-Net - 语义分割
参考示例
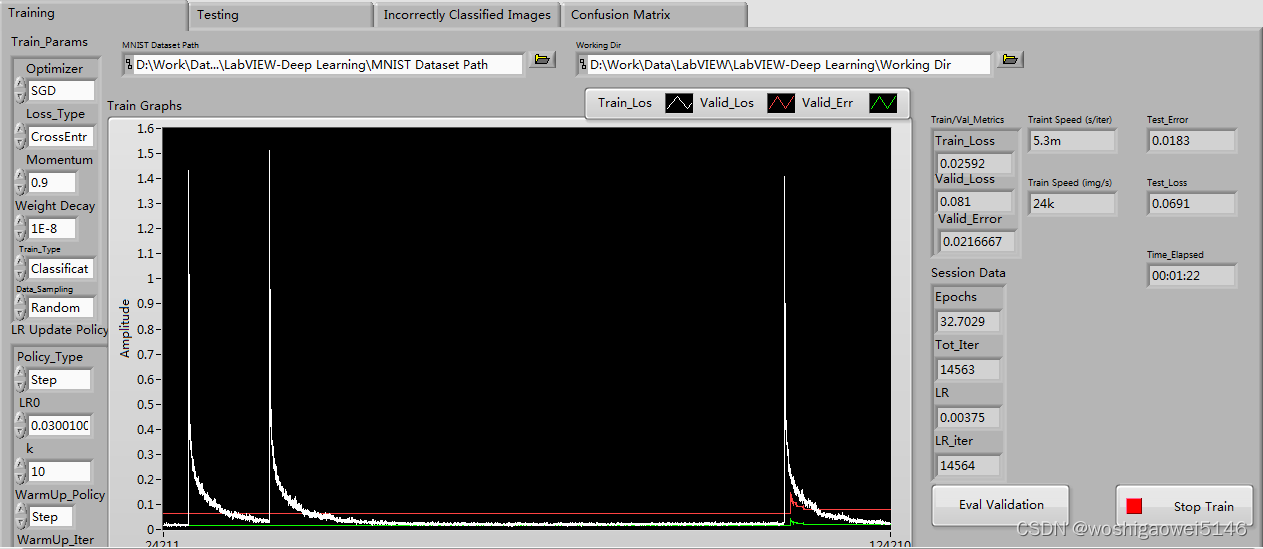
- MNIST_Classifier_MLP(Train_1D).vi —— 使用 MLP(多层感知器)架构在一维数据集上训练用于手写数字识别问题(基于 MNIST 数据库)中的图像分类任务的深度神经网络
- MNIST_Classifier_MLP(Train_3D).vi —— 使用 MLP(多层感知器)架构在 3 维数据集上训练用于手写数字识别问题(基于 MNIST 数据库)中的图像分类任务的深度神经网络
- MNIST_Classifier_CNN(Train).vi —— 使用 CNN(卷积神经网络)架构在手写数字识别问题中为图像分类任务训练深度神经网络
- MNIST_Classifier(Deploy).vi —— 通过自动加载从上述示例生成的网络配置和权重文件来部署预训练网络。
- MNIST_CNN_GPU —— 在 GPU 上加速 MNIST_Classifier_CNN(Train).vi 示例
- MNIST(RT_Deployment) —— 在 NI 的实时目标上部署预训练模型。
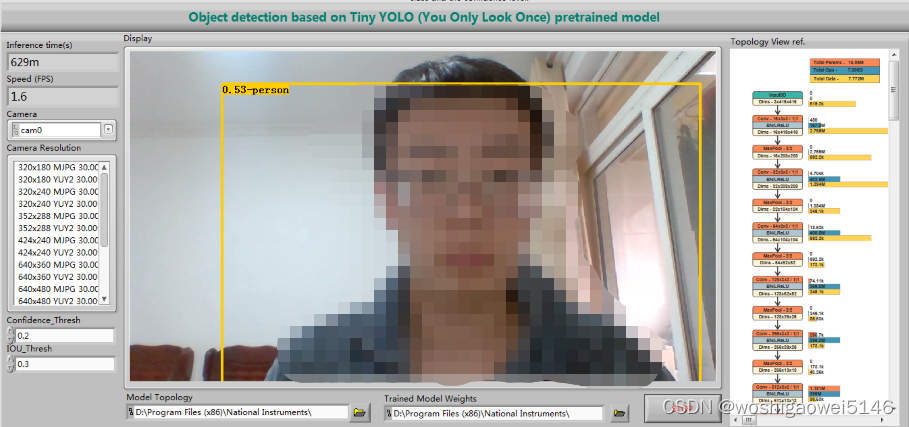
- YOLO_Object_Detection(Cam).vi —— 基于 YOLO 架构自动构建和加载用于对象检测的预训练网络。
- YOLO_GPU —— 在GPU上加速YOLO物体检测
- Object_Detection —— 演示用于在简单数据集上进行对象检测的神经网络训练。
生成文件:模型配置文件(.cfg),训练权重文件(.bin),网络可视化文件(.svg)
测试
MNIST手写训练:
MNIST测试:手写数字进行测试

YOLO识别:可以根据人移动实时检测
部署
导入训练好的.cfg配置文件,.bin训练权重文件。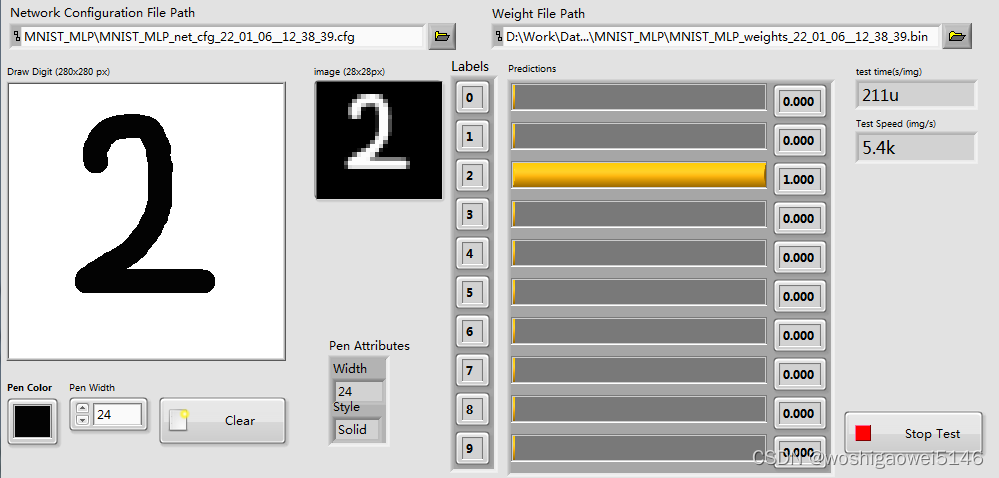
该工具包以模块化的方式设计,简化了LabVIEW中创建、构建、配置、训练和可视化深度神经网络的过程。
Deep Learning Toolkit完全在LabVIEW中开发,在CPU上执行时不需要任何外部库或引擎来实现功能,这使得将训练有素的系统部署到嵌入式目标上进行推理的过程无缝衔接。
DeepLTK FPGA 插件
FPGA Add-On for Deep Learning Toolkit for LabVIEW是LabVIEW的一款附加软件,可与深度学习工具包结合使用,帮助您在基于FPGA的嵌入式终端上部署并加速卷积神经网络。借助此附加软件的API,用户可以轻松地部署预训练的网络。
下载地址:FPGA Add-On for Deep Learning Toolkit for LabVIEW
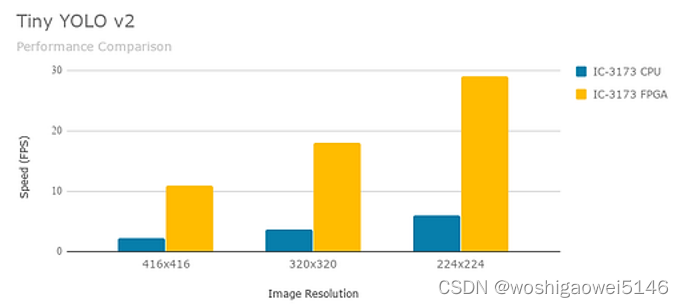
CPU 是最灵活的,允许设计和部署多种模型,以及在将数据输入网络之前实施自定义数据预处理。GPU 实际上是最强大的部署设备,但代价是更高的功耗。FPGA 在需要小尺寸和低功耗的情况下大放异彩。
与嵌入式 CPU 相比,FPGA 可以提供高达 5 倍的性能提升,同时功耗更低。YOLO(You Only Look Once)微型版本 2 对象检测模型在 CPU 和 FPGA 上的推理性能比较如下所示。
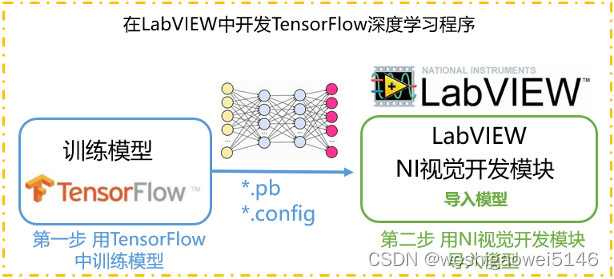
LabVIEW-TensorFlow应用流程
介绍
此处应用VDM自带的深度学习VI,Vision Development 模块目前支持 TensorFlow,这是 Google 的一种开源工具,可帮助为各种应用程序和要求开发深度学习模型。
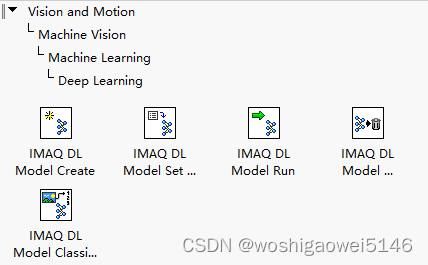
调用IMAQ DL Model示意图,网上的其他流程基本如此。
- 部署流程

NI Vision Model Importer 函数仅在 64 位平台上受支持。因此,建议在部署到需要 LabVIEW 32 位的 RT 终端之前在 LabVIEW 64 位环境中运行实验。
Saved Model是一种语言中立、可恢复和封闭的序列化格式。SavedModel 使更高级别的系统和工具能够生成、使用和转换 TensorFlow 模型。
Frozen Model针对推理进行了更优化,其中将权重和参数设置为常数,并从模型图中剥离训练节点(例如丢弃层)。此外,TensorFlow 等库提供了将SavedModel转换为量化的Frozen Model的实用程序,其中可以将浮点权重转换为 8 位和 16 位数据类型以加快推理速度。
- 数据类型转换
Tensorflow中张量Tensor和NI数据类型关系:


安装及配置
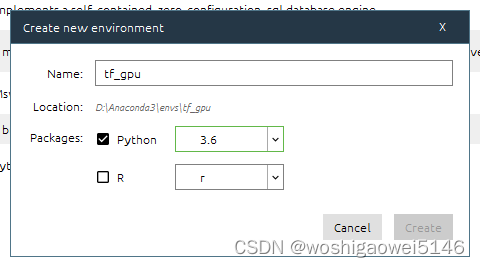
安装Anaconda并配置,管理员打开Anaconda Prompt,运行:
conda config --add channels https://mirrors.tuna.tsinghua.edu.cn/anaconda/pkgs/free/  //更换源
conda config --add channels https://mirrors.tuna.tsinghua.edu.cn/anaconda/pkgs/main/  //更换源
conda config --set show_channel_urls yes    //显示包的安装来源
创建虚拟环境:
安装VS Code、Microsoft Visual C++ build tools。
打开终端安装工具包(最好在虚拟环境中安装,利于管理,避免包的混乱和版本的冲突):
conda activate tf_cpu //激活虚拟环境
pip install pylint//Python源代码中查找bug的工具
pip install yapf //格式化Python代码的工具
conda install tensorflow //安装CPU版tensorflow
pip install --user matplotlib pillow lxml contextlib2 cython -i https://pypi.tuna.tsinghua.edu.cn/simple/ //深度学习相关库
pip install -i https://pypi.tuna.tsinghua.edu.cn/simple/ --upgrade openCV-python //安装Opencv库
conda install pandas //基于NumPy 的一种工具
测试:
Python
import tensorflow as tf
exit()
下载Tensorflow model并放置于某一目录下:
https://github.com/tensorflow/models
添加环境变量:
..\models\research;
..\models\research\slim;
..\models\research\object_detection
准备、训练及测试
路线:标注——xml转csv——csv转TFRecord——修改config文件——训练——导出pb模型——评估——部署
图片标注:可选择用labelImg、make-sense、RectLabel等,网上有很多。以labelImg为例,标注完会生成xml文件,其中保存了标注的信息。标注的分类在pbtxt标签映射文件中修改。
xml转csv:利用xml_to_csv.py把上一步标注的xml文件整合到csv文件。
python xml_to_csv.py -i [PATH_TO_IMAGES_FOLDER]/train -o [PATH_TO_ANNOTATIONS_FOLDER]/train_labels.csv
xml_to_csv.py:
"""
import os
import glob
import pandas as pd
import argparse
import xml.etree.ElementTree as ET


def xml_to_csv(path):
    """Iterates through all .xml files (generated by labelImg) in a given directory and combines them in a single Pandas datagrame.

    Parameters:
    ----------
    path : {str}
        The path containing the .xml files
    Returns
    -------
    Pandas DataFrame
        The produced dataframe
    """

    xml_list = []
    for xml_file in glob.glob(path + '/*.xml'):
        tree = ET.parse(xml_file)
        root = tree.getroot()
        for member in root.findall('object'):
            value = (root.find('filename').text,
                    int(root.find('size')[0].text),
                    int(root.find('size')[1].text),
                    member[0].text,
                    int(member[4][0].text),
                    int(member[4][1].text),
                    int(member[4][2].text),
                    int(member[4][3].text)
                    )
            xml_list.append(value)
    column_name = ['filename', 'width', 'height',
                'class', 'xmin', 'ymin', 'xmax', 'ymax']
    xml_df = pd.DataFrame(xml_list, columns=column_name)
    return xml_df


def main():
    # Initiate argument parser
    parser = argparse.ArgumentParser(
        description="Sample TensorFlow XML-to-CSV converter")
    parser.add_argument("-i",
                        "--inputDir",
                        help="Path to the folder where the input .xml files are stored",
                        type=str)
    parser.add_argument("-o",
                        "--outputFile",
                        help="Name of output .csv file (including path)", type=str)
    args = parser.parse_args()

    if(args.inputDir is None):
        args.inputDir = os.getcwd()
    if(args.outputFile is None):
        args.outputFile = args.inputDir + "/labels.csv"

    assert(os.path.isdir(args.inputDir))

    xml_df = xml_to_csv(args.inputDir)
    xml_df.to_csv(
        args.outputFile, index=None)
    print('Successfully converted xml to csv.')


if __name__ == '__main__':
    main()
csv文件转为TFRecord:利用generate_tfrecord.py文件将csv文件转为TFRecord(TFRecord 是Google官方推荐的一种二进制数据格式,内部使用了“Protocol Buffer”二进制数据编码,是Google专门为TensorFlow设计的一种数据格式)。
python generate_tfrecord.py --label=<LABEL> --csv_input=<PATH_TO_ANNOTATIONS_FOLDER>/train_labels.csv --output_path=<PATH_TO_ANNOTATIONS_FOLDER>/train.record
根据图片的分类修改以下generate_tfrecord.py程序:
"""
from __future__ import division
from __future__ import print_function
from __future__ import absolute_import

import os
import io
import pandas as pd
import tensorflow as tf
import sys
sys.path.append("../../models/research")

from PIL import Image
from object_detection.utils import dataset_util
from collections import namedtuple, OrderedDict

flags = tf.app.flags
flags.DEFINE_string('csv_input', '', 'Path to the CSV input')
flags.DEFINE_string('output_path', '', 'Path to output TFRecord')
# flags.DEFINE_string('label', '', 'Name of class label')
# if your image has more labels input them as
flags.DEFINE_string('label0', '', 'Name of class[0] label')
flags.DEFINE_string('label1', '', 'Name of class[1] label')
# flags.DEFINE_string('label2', '', 'Name of class[2] label')
# flags.DEFINE_string('label3', '', 'Name of class[3] label')
# flags.DEFINE_string('label4', '', 'Name of class[4] label')
# flags.DEFINE_string('label5', '', 'Name of class[5] label')
# flags.DEFINE_string('label6', '', 'Name of class[6] label')
# and so on.
flags.DEFINE_string('img_path', '', 'Path to images')
FLAGS = flags.FLAGS


# TO-DO replace this with label map
# for multiple labels add more else if statements
def class_text_to_int(row_label):
    # if row_label == FLAGS.label:
    #    return 1

    if row_label == FLAGS.label0:
        return 1
    elif row_label == FLAGS.label1:
        return 2
    # elif row_label == FLAGS.label2:
    #    return 3
    # elif row_label == FLAGS.label3:
    #    return 4
    # elif row_label == FLAGS.label4:
    #    return 5
    # elif row_label == FLAGS.label5:
    #    return 6
    # elif row_label == FLAGS.label6:
    #    return 7
    else:
        None


def split(df, group):
    data = namedtuple('data', ['filename', 'object'])
    gb = df.groupby(group)
    return [data(filename, gb.get_group(x)) for filename, x in zip(gb.groups.keys(), gb.groups)]


def create_tf_example(group, path):
    with tf.gfile.GFile(os.path.join(path, '{}'.format(group.filename)), 'rb') as fid:
        encoded_jpg = fid.read()
    encoded_jpg_io = io.BytesIO(encoded_jpg)
    image = Image.open(encoded_jpg_io)
    width, height = image.size

    filename = group.filename.encode('utf8')
    image_format = b'jpg'
    # check if the image format is matching with your images.
    xmins = []
    xmaxs = []
    ymins = []
    ymaxs = []
    classes_text = []
    classes = []

    for index, row in group.object.iterrows():
        xmins.append(row['xmin'] / width)
        xmaxs.append(row['xmax'] / width)
        ymins.append(row['ymin'] / height)
        ymaxs.append(row['ymax'] / height)
        classes_text.append(row['class'].encode('utf8'))
        classes.append(class_text_to_int(row['class']))

    tf_example = tf.train.Example(features=tf.train.Features(feature={
        'image/height': dataset_util.int64_feature(height),
        'image/width': dataset_util.int64_feature(width),
        'image/filename': dataset_util.bytes_feature(filename),
        'image/source_id': dataset_util.bytes_feature(filename),
        'image/encoded': dataset_util.bytes_feature(encoded_jpg),
        'image/format': dataset_util.bytes_feature(image_format),
        'image/object/bbox/xmin': dataset_util.float_list_feature(xmins),
        'image/object/bbox/xmax': dataset_util.float_list_feature(xmaxs),
        'image/object/bbox/ymin': dataset_util.float_list_feature(ymins),
        'image/object/bbox/ymax': dataset_util.float_list_feature(ymaxs),
        'image/object/class/text': dataset_util.bytes_list_feature(classes_text),
        'image/object/class/label': dataset_util.int64_list_feature(classes),
    }))
    return tf_example


def main(_):
    writer = tf.python_io.TFRecordWriter(FLAGS.output_path)
    path = os.path.join(os.getcwd(), FLAGS.img_path)
    examples = pd.read_csv(FLAGS.csv_input)
    grouped = split(examples, 'filename')
    for group in grouped:
        tf_example = create_tf_example(group, path)
        writer.write(tf_example.SerializeToString())

    writer.close()
    output_path = os.path.join(os.getcwd(), FLAGS.output_path)
    print('Successfully created the TFRecords: {}'.format(output_path))


if __name__ == '__main__':
    tf.app.run()
修改配置文件:…\models\research\object_detection\samples\configs\,以ssd_inception_v2_coco.config为例。
num_classes:修改自定义类别;
batch_size:修改批量训练大小;
fine_tune_checkpoint:修改为预训练模型路径/model.ckpt;
num_steps:修改为自定义步数;
input_path:修改为上一步生成的TFRecord文件,分为训练集和测试集;
label_map_path:修改为之前修改过的pbtxt标签映射文件。
训练:利用train.py文件进行训练:
python train.py --logtostderr --train_dir=path/to/train_dir --pipeline_config_path=上一步修改的config文件
train.py:
import functools
import json
import os
import tensorflow as tf

from object_detection.builders import dataset_builder
from object_detection.builders import graph_rewriter_builder
from object_detection.builders import model_builder
from object_detection.legacy import trainer
from object_detection.utils import config_util

tf.logging.set_verbosity(tf.logging.INFO)

flags = tf.app.flags
flags.DEFINE_string('master', '', 'Name of the TensorFlow master to use.')
flags.DEFINE_integer('task', 0, 'task id')
flags.DEFINE_integer('num_clones', 1, 'Number of clones to deploy per worker.')
flags.DEFINE_boolean('clone_on_cpu', False,
                     'Force clones to be deployed on CPU.  Note that even if '
                     'set to False (allowing ops to run on gpu), some ops may '
                     'still be run on the CPU if they have no GPU kernel.')
flags.DEFINE_integer('worker_replicas', 1, 'Number of worker+trainer '
                     'replicas.')
flags.DEFINE_integer('ps_tasks', 0,
                     'Number of parameter server tasks. If None, does not use '
                     'a parameter server.')
flags.DEFINE_string('train_dir', '',
                    'Directory to save the checkpoints and training summaries.')

flags.DEFINE_string('pipeline_config_path', '',
                    'Path to a pipeline_pb2.TrainEvalPipelineConfig config '
                    'file. If provided, other configs are ignored')

flags.DEFINE_string('train_config_path', '',
                    'Path to a train_pb2.TrainConfig config file.')
flags.DEFINE_string('input_config_path', '',
                    'Path to an input_reader_pb2.InputReader config file.')
flags.DEFINE_string('model_config_path', '',
                    'Path to a model_pb2.DetectionModel config file.')

FLAGS = flags.FLAGS


@tf.contrib.framework.deprecated(None, 'Use object_detection/model_main.py.')
def main(_):
  assert FLAGS.train_dir, '`train_dir` is missing.'
  if FLAGS.task == 0: tf.gfile.MakeDirs(FLAGS.train_dir)
  if FLAGS.pipeline_config_path:
    configs = config_util.get_configs_from_pipeline_file(
        FLAGS.pipeline_config_path)
    if FLAGS.task == 0:
      tf.gfile.Copy(FLAGS.pipeline_config_path,
                    os.path.join(FLAGS.train_dir, 'pipeline.config'),
                    overwrite=True)
  else:
    configs = config_util.get_configs_from_multiple_files(
        model_config_path=FLAGS.model_config_path,
        train_config_path=FLAGS.train_config_path,
        train_input_config_path=FLAGS.input_config_path)
    if FLAGS.task == 0:
      for name, config in [('model.config', FLAGS.model_config_path),
                           ('train.config', FLAGS.train_config_path),
                           ('input.config', FLAGS.input_config_path)]:
        tf.gfile.Copy(config, os.path.join(FLAGS.train_dir, name),
                      overwrite=True)

  model_config = configs['model']
  train_config = configs['train_config']
  input_config = configs['train_input_config']

  model_fn = functools.partial(
      model_builder.build,
      model_config=model_config,
      is_training=True)

  def get_next(config):
    return dataset_builder.make_initializable_iterator(
        dataset_builder.build(config)).get_next()

  create_input_dict_fn = functools.partial(get_next, input_config)

  env = json.loads(os.environ.get('TF_CONFIG', '{}'))
  cluster_data = env.get('cluster', None)
  cluster = tf.train.ClusterSpec(cluster_data) if cluster_data else None
  task_data = env.get('task', None) or {'type': 'master', 'index': 0}
  task_info = type('TaskSpec', (object,), task_data)

  # Parameters for a single worker.
  ps_tasks = 0
  worker_replicas = 1
  worker_job_name = 'lonely_worker'
  task = 0
  is_chief = True
  master = ''

  if cluster_data and 'worker' in cluster_data:
    # Number of total worker replicas include "worker"s and the "master".
    worker_replicas = len(cluster_data['worker']) + 1
  if cluster_data and 'ps' in cluster_data:
    ps_tasks = len(cluster_data['ps'])

  if worker_replicas > 1 and ps_tasks < 1:
    raise ValueError('At least 1 ps task is needed for distributed training.')

  if worker_replicas >= 1 and ps_tasks > 0:
    # Set up distributed training.
    server = tf.train.Server(tf.train.ClusterSpec(cluster), protocol='grpc',
                             job_name=task_info.type,
                             task_index=task_info.index)
    if task_info.type == 'ps':
      server.join()
      return

    worker_job_name = '%s/task:%d' % (task_info.type, task_info.index)
    task = task_info.index
    is_chief = (task_info.type == 'master')
    master = server.target

  graph_rewriter_fn = None
  if 'graph_rewriter_config' in configs:
    graph_rewriter_fn = graph_rewriter_builder.build(
        configs['graph_rewriter_config'], is_training=True)

  trainer.train(
      create_input_dict_fn,
      model_fn,
      train_config,
      master,
      task,
      FLAGS.num_clones,
      worker_replicas,
      FLAGS.clone_on_cpu,
      ps_tasks,
      worker_job_name,
      is_chief,
      FLAGS.train_dir,
      graph_hook_fn=graph_rewriter_fn)


if __name__ == '__main__':
  tf.app.run()
训练开始后,可以打开tensorboard看到训练过程。
tensorboard --logdir=文件名称 --host=127.0.0.1

导出模型:利用export_inference_graph.py将训练的结果导出。
python export_inference_graph.py --input_type image_tensor --pipeline_config_path path/to/之前修改的config文件 --trained_checkpoint_prefix path/to/model.ckpt(上一步生成的训练结果文件) --output_directory path/to/exported_model_directory
export_inference_graph.py:
import tensorflow as tf
from google.protobuf import text_format
from object_detection import exporter
from object_detection.protos import pipeline_pb2

slim = tf.contrib.slim
flags = tf.app.flags

flags.DEFINE_string('input_type', 'image_tensor', 'Type of input node. Can be '
                    'one of [`image_tensor`, `encoded_image_string_tensor`, '
                    '`tf_example`]')
flags.DEFINE_string('input_shape', None,
                    'If input_type is `image_tensor`, this can explicitly set '
                    'the shape of this input tensor to a fixed size. The '
                    'dimensions are to be provided as a comma-separated list '
                    'of integers. A value of -1 can be used for unknown '
                    'dimensions. If not specified, for an `image_tensor, the '
                    'default shape will be partially specified as '
                    '`[None, None, None, 3]`.')
flags.DEFINE_string('pipeline_config_path', None,
                    'Path to a pipeline_pb2.TrainEvalPipelineConfig config '
                    'file.')
flags.DEFINE_string('trained_checkpoint_prefix', None,
                    'Path to trained checkpoint, typically of the form '
                    'path/to/model.ckpt')
flags.DEFINE_string('output_directory', None, 'Path to write outputs.')
flags.DEFINE_string('config_override', '',
                    'pipeline_pb2.TrainEvalPipelineConfig '
                    'text proto to override pipeline_config_path.')
flags.DEFINE_boolean('write_inference_graph', False,
                     'If true, writes inference graph to disk.')
tf.app.flags.mark_flag_as_required('pipeline_config_path')
tf.app.flags.mark_flag_as_required('trained_checkpoint_prefix')
tf.app.flags.mark_flag_as_required('output_directory')
FLAGS = flags.FLAGS


def main(_):
  pipeline_config = pipeline_pb2.TrainEvalPipelineConfig()
  with tf.gfile.GFile(FLAGS.pipeline_config_path, 'r') as f:
    text_format.Merge(f.read(), pipeline_config)
  text_format.Merge(FLAGS.config_override, pipeline_config)
  if FLAGS.input_shape:
    input_shape = [
        int(dim) if dim != '-1' else None
        for dim in FLAGS.input_shape.split(',')
    ]
  else:
    input_shape = None
  exporter.export_inference_graph(
      FLAGS.input_type, pipeline_config, FLAGS.trained_checkpoint_prefix,
      FLAGS.output_directory, input_shape=input_shape,
      write_inference_graph=FLAGS.write_inference_graph)


if __name__ == '__main__':
  tf.app.run()
评估模型:利用eval.py评估训练结果。
python eval.py --logtostderr --checkpoint_dir=之前训练的文件路径 --eval_dir=path/to/eval_dir --pipeline_config_path=之前修改的config文件
eval.py:
import functools
import os
import tensorflow as tf

from object_detection.builders import dataset_builder
from object_detection.builders import graph_rewriter_builder
from object_detection.builders import model_builder
from object_detection.legacy import evaluator
from object_detection.utils import config_util
from object_detection.utils import label_map_util

tf.logging.set_verbosity(tf.logging.INFO)

flags = tf.app.flags
flags.DEFINE_boolean('eval_training_data', False,
                     'If training data should be evaluated for this job.')
flags.DEFINE_string(
    'checkpoint_dir', '',
    'Directory containing checkpoints to evaluate, typically '
    'set to `train_dir` used in the training job.')
flags.DEFINE_string('eval_dir', '', 'Directory to write eval summaries to.')
flags.DEFINE_string(
    'pipeline_config_path', '',
    'Path to a pipeline_pb2.TrainEvalPipelineConfig config '
    'file. If provided, other configs are ignored')
flags.DEFINE_string('eval_config_path', '',
                    'Path to an eval_pb2.EvalConfig config file.')
flags.DEFINE_string('input_config_path', '',
                    'Path to an input_reader_pb2.InputReader config file.')
flags.DEFINE_string('model_config_path', '',
                    'Path to a model_pb2.DetectionModel config file.')
flags.DEFINE_boolean(
    'run_once', False, 'Option to only run a single pass of '
    'evaluation. Overrides the `max_evals` parameter in the '
    'provided config.')
FLAGS = flags.FLAGS


@tf.contrib.framework.deprecated(None, 'Use object_detection/model_main.py.')
def main(unused_argv):
  assert FLAGS.checkpoint_dir, '`checkpoint_dir` is missing.'
  assert FLAGS.eval_dir, '`eval_dir` is missing.'
  tf.gfile.MakeDirs(FLAGS.eval_dir)
  if FLAGS.pipeline_config_path:
    configs = config_util.get_configs_from_pipeline_file(
        FLAGS.pipeline_config_path)
    tf.gfile.Copy(
        FLAGS.pipeline_config_path,
        os.path.join(FLAGS.eval_dir, 'pipeline.config'),
        overwrite=True)
  else:
    configs = config_util.get_configs_from_multiple_files(
        model_config_path=FLAGS.model_config_path,
        eval_config_path=FLAGS.eval_config_path,
        eval_input_config_path=FLAGS.input_config_path)
    for name, config in [('model.config', FLAGS.model_config_path),
                         ('eval.config', FLAGS.eval_config_path),
                         ('input.config', FLAGS.input_config_path)]:
      tf.gfile.Copy(config, os.path.join(FLAGS.eval_dir, name), overwrite=True)

  model_config = configs['model']
  eval_config = configs['eval_config']
  input_config = configs['eval_input_config']
  if FLAGS.eval_training_data:
    input_config = configs['train_input_config']

  model_fn = functools.partial(
      model_builder.build, model_config=model_config, is_training=False)

  def get_next(config):
    return dataset_builder.make_initializable_iterator(
        dataset_builder.build(config)).get_next()

  create_input_dict_fn = functools.partial(get_next, input_config)

  categories = label_map_util.create_categories_from_labelmap(
      input_config.label_map_path)

  if FLAGS.run_once:
    eval_config.max_evals = 1

  graph_rewriter_fn = None
  if 'graph_rewriter_config' in configs:
    graph_rewriter_fn = graph_rewriter_builder.build(
        configs['graph_rewriter_config'], is_training=False)

  evaluator.evaluate(
      create_input_dict_fn,
      model_fn,
      eval_config,
      categories,
      FLAGS.checkpoint_dir,
      FLAGS.eval_dir,
      graph_hook_fn=graph_rewriter_fn)


if __name__ == '__main__':
  tf.app.run()
同样可利用tensorboard看到评估过程。
tensorboard --logdir=文件名称 --host=127.0.0.1
部署
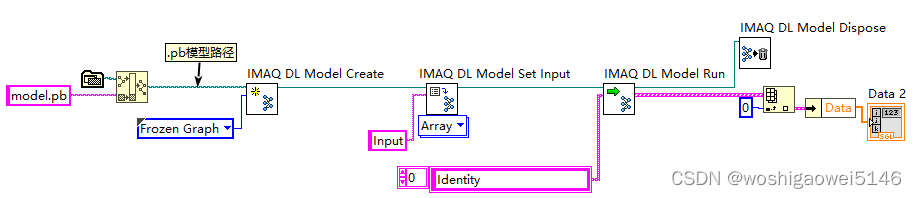
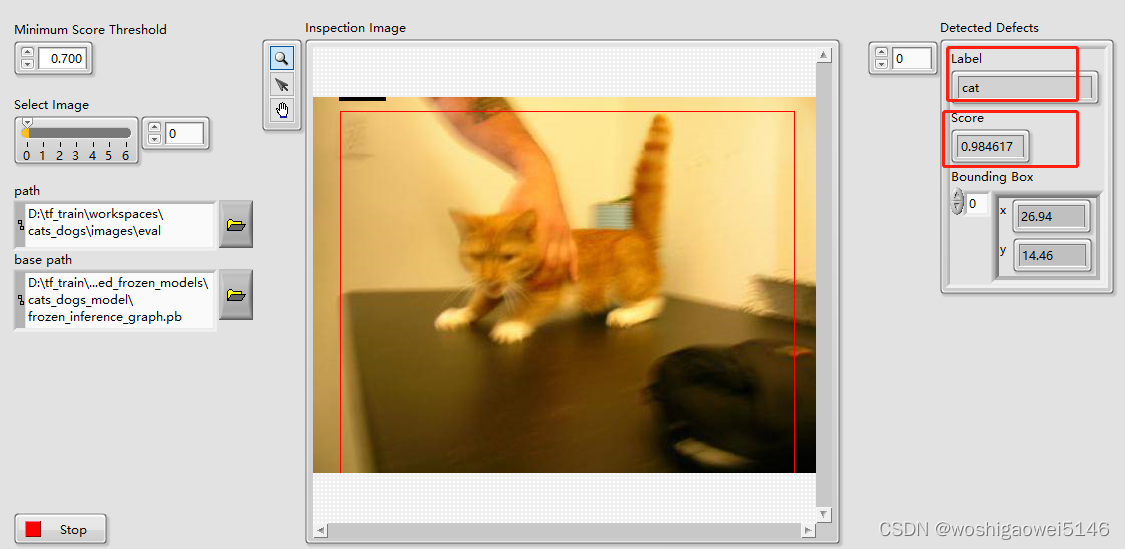
将之前生成的.pb冻结文件和图片路径输入。

总结
不管是什么框架下的模型,最快的方法就是稍加训练或不训练转成冻结模型或保存模型,然后直接用LabVIEW调用,即迁移学习。以上过程很繁琐,其实只要生成通过TensorFlow生成pb文件即可(yolo生成cfg和weights文件,可转为onnx文件),参考:
https://blog.csdn.net/huangcong159/article/details/106882311
训练过程依赖于python,labview只是用来部署和应用,不过这也足够了,符合应用的目的。
想要深入研究需要利用TensorFlow、Pytorch等框架创建、训练或修改模型。
pb文件转OpenVINO
在C:\Users\Public\Documents\National Instruments\model_optimizer安装requirements.txt所需模块。在虚拟环境中:
pip install -i https://pypi.tuna.tsinghua.edu.cn/simple/ -r .\requirements_tf.txt
下载http://download.tensorflow.org/models/object_detection/ssd_mobilenet_v2_coco_2018_03_29.tar.gz解压缩放在…\National Instruments\model_optimizer
python ni\convert2ir.py -t ssd_mobilenet_v2 -i ssd_mobilenet_v2_coco_2018_03_29\frozen_inference_graph.pb -p ssd_mobilenet_v2_coco_2018_03_29\pipeline.config
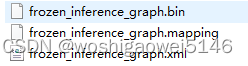
生成openvino所需的xml和bin文件
导入模型时,选择openvino并选择xml文件。
LabVIEW-OpenVINO介绍
介绍
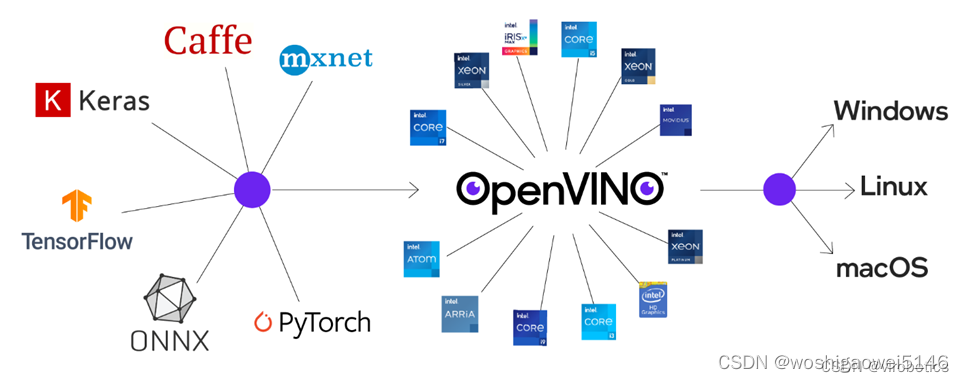
OpenVINO(开放视觉推理和神经网络优化)是一个开源软件工具包,旨在优化、加速和部署用户应用程序的深度学习模型。
OpenVINO™ 是用于优化和部署 AI 推理的开源工具包。OpenVINO是一个Pipeline工具集,同时可以兼容各种开源框架训练好的模型。可以轻松的将预训练模型在Intel的CPU上快速部署起来。
OpenVINO 是英特尔基于自身现有的硬件平台开发的一种可以加快高性能计算机视觉和深度学习视觉应用开发速度工具套件,支持各种英特尔平台的硬件加速器上进行深度学习,并且允许直接异构执行。
OpenVINO中模型优化器(Model Optimizer)支持tensorflow/Caffe模型转换为OpenVINO的中间层表示IR(intermediate representation),从而实现对模型的压缩与优化,方便推断引擎更快的加载与执行这些模型。
IR 模型或中间表示模型主要是 xml 文件,其中包含有关模型的图形信息。它们强制附带同名的“.bin”文件,其中包含与定义的模型相关的权重和偏差。

OpenVINO 工具包的核心组件是 DLDT(Deep Learning Deployment Toolkit,深度学习部署工具包)。
DLDT主要包括模型优化器(Model Optimizer)和推理引擎(Inference engine, IE)两部分。
模型优化器:负责将各种格式的深度神经网络模型转换成统一的自定义格式,并在转换过程中进行模型优化;
推理引擎: 接受经过模型优化器转换并优化的网络模型,为Intel的各种计算设备提供高性能的神经网络推理运算。
包括xml和bin文件,前者是网络结构的描述,后者是权重文件。
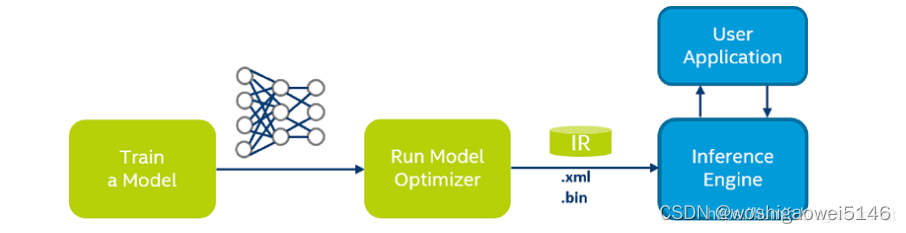
工作流程
• 训练一个DLDT支持的深度网络模型(Train a Model),如:TensorFlow、Caffe、MaxNet等等。
• 用模型优化器(Model Optimizer)对网络模型行编译和优化(Run Model Optimizer),生成Openvino IR(Intermediate Representation,中间表示)格式的网络配置文件(.xml 文件)和模型参数文件(.bin 文件);
• 调用推理引擎(Inference Engine)进行网络运算,其结果和应用程序 (User Application)进行交互。
参考:OpenVINO
Virobotics-AI 系列工具包
由virobotics(上海仪酷智能科技有限公司)开发的LabVIEW AI 系列工具包。
主要分为:
- LabVIEW AI 视觉工具包
- LabVIEW 开放神经网络交互工具包(ONNX)
- LabVIEW图形化TensoRT工具包
- LabVIEW图形化OpenVINO工具包
此人工智能视觉工具包主要优势如下:
- 图形化编程,无需掌握文本编程基础即可完成机器视觉项目。
- 多种摄像头数据采集和矩阵计算。
- 数百种图像算子的调用。
- 提供tensorflow、pytorch、caffe、darknet、onnx、paddle等多种框架深度学习模型的调用并实现推理。
- 支持Nvidia GPU、Intel、TPU、NPU多种加速。
- 提供近百个应用程序范例,包括物体分类、物体检测、物体测量、图像分割、 人脸识别、自然场景下OCR等多种实用场景。

详细请参考下文及其系列文章,有源码,而且写的非常好:
故障问题解决
错误-1074395541
当前平台不支持此功能。
解决方案:必须使用LabVIEW 64bit。
错误-1074395539
这个错误是从Tensorflow上报的。
解决方案:这是由于保存的模型和推理环境之间的 Tensorflow 版本不同。请检查您保存的模型和推理环境的 Tensorflow 版本并确保它们都是 1.4 版。
.pb文件的路径错误。20220109
https://forums.ni.com/t5/LabVIEW-Idea-Exchange/Tensorflow-API-for-LabVIEW/idi-p/3248737>
-AttributeError: module ‘google.protobuf.descriptor‘ has no attribute ‘_internal_create_key‘
https://blog.csdn.net/lemon4869/article/details/107299879
numpy.ufunc size changed, may indicate binary incompatibility.
pip install --upgrade numpy -i http://pypi.douban.com/simple/ --trusted-host pypi.douban.com


 1605
1605

 被折叠的 条评论
为什么被折叠?
被折叠的 条评论
为什么被折叠?
 到【灌水乐园】发言


