


一、实验目标
1、安卓移动端开发环境搭建
2、编写第一个 Android 应用小程序
二、实验步骤
1、安卓移动端开发环境搭建
1.1 电脑安装 jdk
创建一个英文名称的文件夹(尽量别用中文),将下载好的 jdk 保存至该目录下,运行 .exe 文件,选择要安装的路径(全英文),其余默认,完成后可以在目标文件夹下找到下面两个文件。

1.2 JAVA环境配置——环境变量配置
右键此电脑 --> 属性 --> 高级系统设置 --> 环境变量

目录为之前 JDK 安装的目录,修改完毕后点击确定保存。
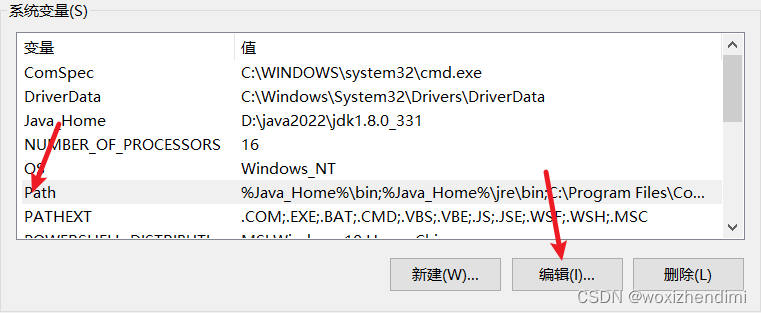
点击 Path,选择编辑,将以下配置复制粘贴放在最前面,再 确定 保存
配置:%Java_Home%\bin;%Java_Home%\jre\bin;
添加配置:
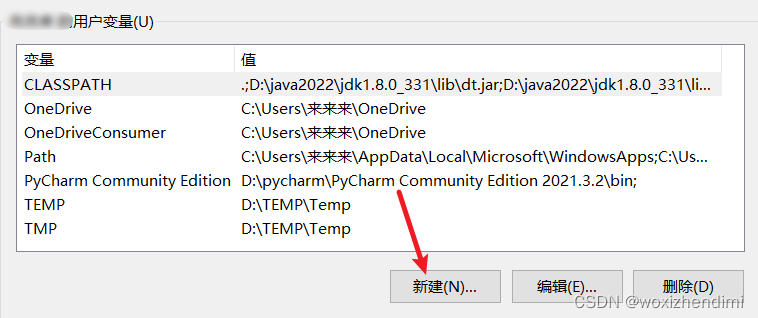
变量名:CLASSPATH
变量值:.;%JAVA_HOME%\lib\dt.jar;%JAVA_HOME%\lib\tools.jar;
点击确定保存,java 在 windows 环境下的环境配置就完成了。
保存后,可以通过 win + R 再输入 cmd 回车后输入 java 或 java -version 进行检查。
1.3 Android studio安装(含SDK)
下载地址:https://developer.android.google.cn/studio#downloads
运行exe文件,按照默认即可,当提示导入自己的设置时,可以选择跳过,后期自己配置。
下载完成后,第一个任务就完成了。
2、编写第一个 Android 应用小程序
运行Android Studio(在安装文件夹 bin 目录下倒数第四个文件),选择新建项目(New Project),在 Phone and Tablet 下选择 Empty Activity。

注意修改语言为Java。
由于是第一次打开,可能会下载一些东西,不用管让他下载就好,下载完成后:app --> res --> layout --> activity_main.xml,进行项目设计。
2.1 LinearLayout 线性布局
在安卓开发中,用的相对频繁的是线性布局和相对布局,在大多数的情况下使用这两种布局都能完成。线性布局相对简单,就是所有控件都依次排序,谁也不会覆盖谁。线性布局需要定义一个方向(横向或纵向),下面简单介绍一下 weight(权重属性): weight 属性用来等比例地划分区域的,但需要注意是对当前布局中剩余空间进行分配,因此可能会出现比例倒置的情况,因此谷歌建议水平线性布局的宽度设置成0dp后再设置对应控件的权重,垂直的高度设置成0再设置权重。
2.2 页面设计
本次实验中,需要复刻下面这张图,页面上主要包含5组列表,每组列表包含1~2个表项,每个表项包含图标、名称和箭头。
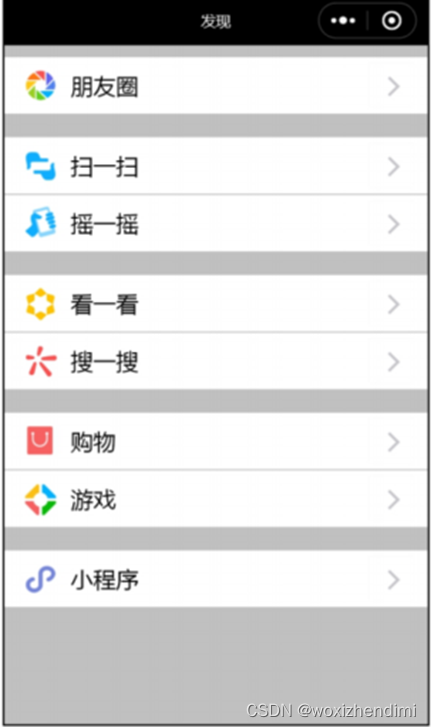
因此可以设计一个外部总垂直布局 ,包含5组列表,用五个 LinearLayout 来构建这5组列表,每组列表组单独构建,列表组之间存在间隔。
代码如下:
<?xml version="1.0" encoding="utf-8"?>
<LinearLayout xmlns:android="http://schemas.android.com/apk/res/android"
android:orientation = "vertical"
android:background="#e5e5e5"
android:layout_width="match_parent"
android:layout_height="match_parent">
<LinearLayout
android:background="#fff"
android:orientation="horizontal"
android:layout_width="match_parent"
android:layout_height="60dp">
<ImageView
android:layout_marginStart="15dp"
android:layout_gravity="center_vertical"
android:background="@mipmap/icon_pengyou"
android:layout_width="40dp"
android:layout_height="40dp" />
<TextView
android:layout_marginLeft="10dp"
android:textStyle="bold"
android:textColor="#333"
android:textSize="18dp"
android:gravity="center_vertical"
android:layout_weight="1"
android:text="朋友圈"
android:layout_width="0dp"
android:layout_height="match_parent" />
<ImageView
android:layout_width="wrap_content"
android:layout_height="wrap_content"
android:layout_gravity="center_vertical"
android:layout_marginEnd="15dp"
android:background="@mipmap/right" />
</LinearLayout>
<LinearLayout
android:layout_marginTop="20dp"
android:background="#fff"
android:orientation="horizontal"
android:layout_width="match_parent"
android:layout_height="60dp">
<ImageView
android:layout_marginStart="15dp"
android:layout_gravity="center_vertical"
android:background="@mipmap/saoyisao"
android:layout_width="40dp"
android:layout_height="40dp" />
<TextView
android:layout_marginLeft="10dp"
android:textStyle="bold"
android:textColor="#333"
android:textSize="18dp"
android:gravity="center_vertical"
android:layout_weight="1"
android:text="扫一扫"
android:layout_width="0dp"
android:layout_height="match_parent" />
<ImageView
android:layout_width="wrap_content"
android:layout_height="wrap_content"
android:layout_gravity="center_vertical"
android:layout_marginEnd="15dp"
android:background="@mipmap/right" />
</LinearLayout>
其余相似,不再赘述。
</LinearLayout>在编写程序过程中,不需要一个字一个字的敲,多利用软件自带的自动补全即可。
三、程序运行结果
保存后重新编译,最终效果如下:

四、问题总结与体会
1、在安装过程中因为网络问题经常卡顿,解决方法是 try again
2、体会
本次实验是安卓小程序开发的入门级实验,主要是为了让同学们熟悉环境搭建,以及简单地进行一个前端页面的设计,类比其他前端语言,很容易理解。期待下一个实验🌹🌹🌹


 1万+
1万+


 被折叠的 条评论
为什么被折叠?
被折叠的 条评论
为什么被折叠?
 到【灌水乐园】发言


