


 本文深入介绍了Transformer模型的架构,包括编码器的词嵌入、位置编码、注意力机制(自注意力和多头注意力)、前馈全连接层和规范化层。同时,解码器的部分也进行了详述,强调了解码器中的遮罩机制以及输出部分的实现。文章通过实例代码展示了各组件的实现方式,帮助理解Transformer如何并行处理信息和处理长文本序列的能力。
Tansformer 架构分析
提示:这里可以添加系列文章的所有文章的目录,目录需要自己手动添加
第一节 核心架构 Encoder, Decoder
第二节 Embedding- 词嵌入
第三节 Positional Encoding - 位置编码
提示:写完文章后,目录可以自动生成,如何生成可参考右边的帮助文档
前言
提示:这里可以添加本文要记录的大概内容:
Transformer是在解决RNN问题提出来的,它的两大贡献:
- 并行运算,加快运算速度, 同时意味着需要更多GPU,用空间换时间。这也是未来发展趋势
- 对于长文本翻译等效果很好,解决了RNN长句翻译效果差问题。
后续我将用一个句子 Birds eat worms (小鸟吃虫)案例来介绍Transformer各个模块。
一、Transformer是什么?
Transformer采用Seq2Seq. Encode与Decode编码模式,最主要的部件是多头注意力机制(Multi-Head Attention).
它的主要架构如图:
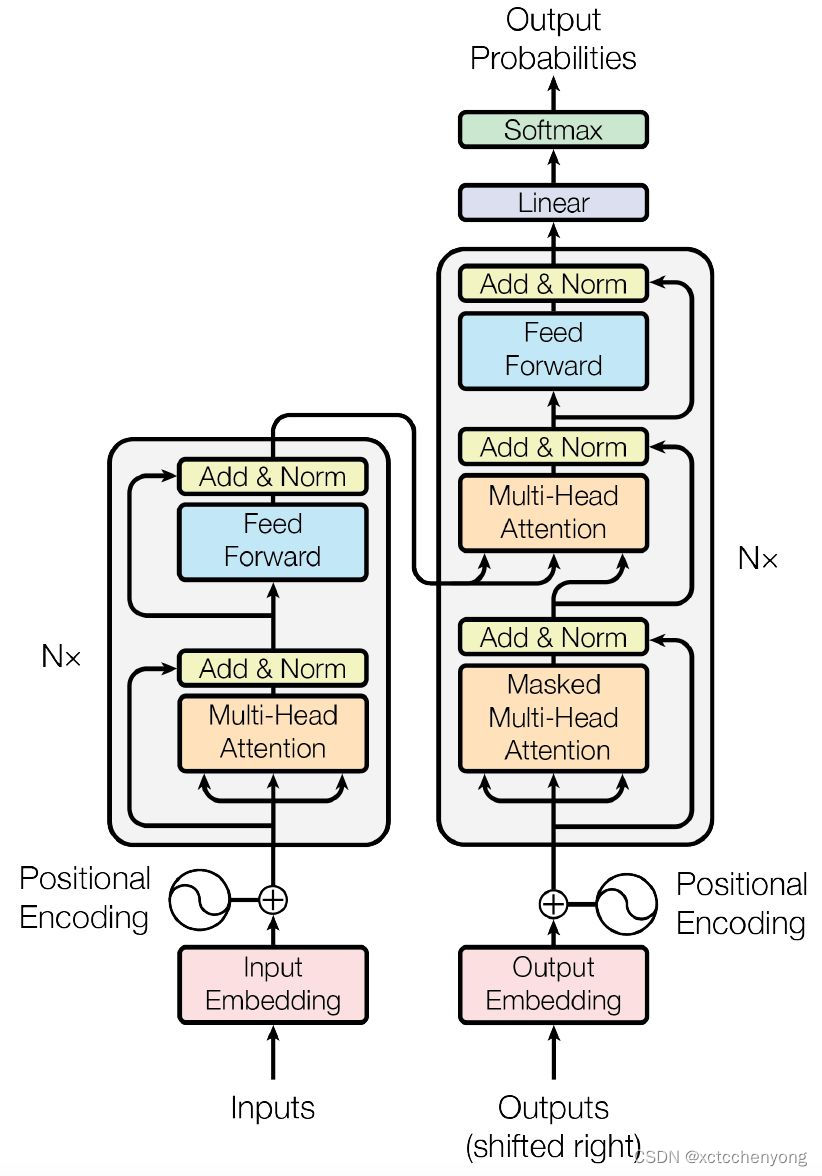
二、编码器
2.1 Code Embedding
- 作用: 将词转换成向量, 之前是用one-hot. 但知道one-hot有很多问题
- 关键点: nn.Embedding, 有可学习的参数。
代码实现
from torch import nn
import math

class Embeddings(nn.Module):
    def __init__(self, vocab_size, d_model):
        super(Embeddings, self).__init__()
        self.d_model = d_model
        self.emb = nn.Embedding(self.vocab_size, self.d_model)

    def forward(self, x):
        # 在这里加入math.sqrt(self.d_model) 是对emb的缩放功能
        x = self.emb(x) * math.sqrt(self.d_model)
        return x
2.2 Positional Encoding
作用
我们知道, 文本相等位置信息很重要。 同样3个字:
1. Birds eat worms
2. Worms eat birds
想表达的意思完全不同。
数学公式
P
E
(
p
o
s
,
2
i
)
=
s
i
n
(
p
o
s
/
1000
0
2
i
/
d
m
o
d
e
l
)
PE(pos, 2i) = sin(pos / 10000^{2i/d_{model}})
PE(pos,2i)=sin(pos/100002i/dmodel)
P
E
(
p
o
s
,
2
i
+
1
)
=
c
o
s
(
p
o
s
/
1000
0
2
i
/
d
m
o
d
e
l
)
PE(pos, 2i+1) = cos(pos / 10000^{2i/d_{model}})
PE(pos,2i+1)=cos(pos/100002i/dmodel)
Notes:
- 为什么没用简单的
1
,
2
,
3
,
.
.
.
1, 2, 3,...
1,2,3,... 或
1
,
1
2
,
1
3
,
1
4
,
.
.
.
1,\frac{1}{2},\frac{1}{3},\frac{1}{4},...
1,21,31,41,...作为Positional Encoding?
因为Embedding数值一般都是 ( − 1 , 1 ) (-1, 1) (−1,1) 内容. 所以用sin函数使得数据夹在 ( − 1 , 1 ) (-1, 1) (−1,1)内。 - 为什么要加入 1000 0 2 i / d m o d e l 10000^{2i/d_{model}} 100002i/dmodel? sin函数是 2 ∗ π 2*\pi 2∗π 周期函数,加入上面方程,加大函数周期。
- 上述函数可以改写为 P E ( p o s , 2 i ) = s i n ( p o s ∗ e ( 2 ∗ i ) ∗ ( − l n ( 10000 ) / d m o d e l ) ) PE(pos, 2i) = sin(pos * e^{ (2*i) *(-ln(10000)/d_{model})}) PE(pos,2i)=sin(pos∗e(2∗i)∗(−ln(10000)/dmodel))
代码实现
代码如下(示例):
import torch
from torch import nn
from torch.autograd import Variable
import math

class PositionalEncoding(nn.Module):
    def __init__(self, d_model, dropout = 0.1, max_len= 512):
        super(PositionalEncoding, self).__init__()
        self.dropout = nn.Dropout(dropout)
        #初试化 位置矩阵 max_len 代表矩阵长度, d_model 代表字的维度默认:512
        pe = torch.zeros(max_len, d_model)
        # 添加位置信息为m*1矩阵
        position = torch.arange(0, max_len).unsqueeze(1)
        # 方法1 实现
        ## div_term1 = torch.pow(torch.tensor(10000.0), torch.arange(0, d_model, 2).float() / d_model)
        ## div_term2 = torch.pow(torch.tensor(10000.0), torch.arange(1, d_model, 2).float() / d_model)

        # 方法2 实现 浙大代码是这么写的  如上图转化后公式,看的更简洁
        div_term = torch.exp(torch.arange(0, d_model, 2)* - math.log(10000.0)/d_model)

        pe[:,0::2] = torch.sin(position*div_term)
        pe[:,1::2] = torch.cos(position*div_term)
        # 加维度1 使得,与 embedding 输入保持一致
        pe = pe.unsqueeze(0)
        # 加入缓存, 不参与训练
        self.register_buffer("pe", pe)

    def forward(self, x):
            x = x + Variable(self.pe[:, :x.size(1)], requires_grad=False)
            return self.dropout(x)
代码测试(示例):
if __name__ == "__main__":
	# 生成Embedding Code
	num_embedding = 11
	embedding_dim = 512
	x = torch.LongTensor([[1, 2, 3, 4, 5], [6, 7, 8, 9, 10]])
	# embeds = nn.Embedding(num_embedding, embedding_dim)
	# 引用自定义的Embeddings
	embeds = Embeddings(num_embedding, embedding_dim)
	embeds_codes = embeds(x)
	print('embeds_codes shape:' + str(embeds_codes.shape))

	# 调用Positional Encoding
	positionEncoding = PositionalEncoding(embedding_dim)
	position_codes = positionEncoding(embeds_codes)
	print('position_codes shape:' + str(position_codes.shape))
运行结果是:
embeds_codes shape:torch.Size([2, 5, 512])
position_codes shape:torch.Size([2, 5, 512])
问题待解: 我不知道为什么 num_embedding = 10 时, 为什么
在 embeds_codes = embeds(x)处
出现
IndexError: index out of range in self 错误?
现在已经知道: num_embedding 代表的是 词的个数。 如: I like it. Do you it? 这个有 {‘I’, ‘you’, ‘it’, ‘do’, ‘love’} 五个词
2.3 注意力机制
本质
注意力机制的本质就是定位到感兴趣的信息,抑制无用信息,结果通常都是以概率图或者概率特征向量的形式展示。
2.3.1 DotProduction自注意力机制
缩放点乘注意力机制(Scaled Dot-Product Attention, SDPA)是一种注意力机制,用于多头自注意力机制中的注意力权重。其数学公式如下:
实现图例
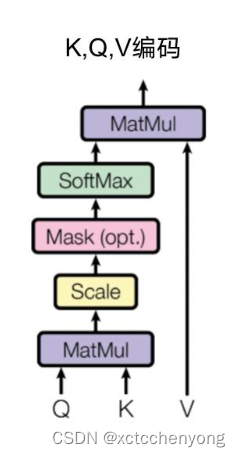
数学公式
缩放点乘注意力机制(Scaled Dot-Product Attention, SDPA)是一种注意力机制,用于多头自注意力机制中的注意力权重。其数学公式如下:
a
t
t
e
n
t
i
o
n
(
Q
,
K
,
V
)
=
s
o
f
t
m
a
x
(
Q
∗
K
T
d
k
)
V
attention(Q, K, V) = softmax( \frac{Q*K^{T}}{\sqrt{d_{k}}})V
attention(Q,K,V)=softmax(dkQ∗KT)V
其中,
Q
、
K
、
V
分别表示查询、键和值的矩阵,
d
k
表示键的维度。
其中,Q、K、V分别表示查询、键和值的矩阵,\sqrt{d_{k}} 表示键的维度。
其中,Q、K、V分别表示查询、键和值的矩阵,dk表示键的维度。
在
S
D
P
A
中,使用
d
k
作为缩放因子,以使注意力机制更难被干扰。此外,使用
d
k
对
Q
K
T
进行缩放,可以使注意力权重更集中于较大的值
在SDPA中,使用 \sqrt{d_{k}}作为缩放因子,以使注意力机制更难被干扰。 此外,使用 \sqrt{d_{k}} 对QK^{T} 进行缩放,可以使注意力权重更集中于较大的值
在SDPA中,使用dk作为缩放因子,以使注意力机制更难被干扰。此外,使用dk对QKT进行缩放,可以使注意力权重更集中于较大的值
-
Q
∗
K
T
的含义是查找词跟词之间的相关性。
Q*K^T 的含义是查找词跟词之间的相关性。
Q∗KT的含义是查找词跟词之间的相关性。
如: 句子 Birds eat worms. 我们假设 第一维表示 羽毛特征, 第二维表示心脏特征, 第三维 是否会飞
b i r d s ⃗ : ( 1 1 1 ) e a t ⃗ : ( 0 0.3 0.1 ) w o r m s ⃗ : ( 0.3 0 0 ) \vec{birds} :\left(\begin {array}{c} 1 \\ 1 \\ 1 \\ \end{array}\right) \vec{eat}:\left(\begin {array}{c} 0 \\ 0.3 \\ 0.1 \\ \end{array}\right) \vec{worms}: \left(\begin {array}{c} 0.3 \\ 0 \\ 0 \\ \end{array}\right ) birds: 111 eat: 00.30.1 worms: 0.300
a 0 , 1 表示 b i r d s 和 e a t 之间的关联 a_{0,1} 表示 birds 和 eat 之间的关联 a0,1表示birds和eat之间的关联
代码实现
import torch
import math
from torch import nn
import torch.nn.functional as F

class DotProductionAttention(nn.Module):
    def __init__(self, dropout=0):
        '''

        :param dropout: 对最后结果做适当的实效操作,降低过拟合
        '''
        super(DotProductionAttention, self).__init__()
        self.dropout = nn.Dropout(dropout)

    def forward(self, query, key, value, mask=None):
        '''

        :param query: 数据的查询矩阵: batch_size * sequence_len * dim_model
        :param key: 关键值矩阵: batch_size * sequence_len * dim_model
        :param value: 值矩阵:
        :param mask:
        :return:
        '''
        # 得到dim_model
        d_model = query.size(-1)

        # Q*K^T / sqrt(d_mode)
        scores = torch.matmul(query, key.transpose(-2, -1)) / math.sqrt(d_model)

        # 是否对后续数据遮罩
        if mask is not None:
            # 对于mask == 0的元素 替换成 10的-9次方的数
            scores = scores.masked_fill(mask == 0, -1e9)

        # 获得注意力权重
        attention_weights = F.softmax(scores, dim=-1)
        # attention * value
        return torch.matmul(self.dropout(attention_weights), value)

if __name__ == '__main__':
    inputs = torch.FloatTensor([[1, 1, 1], [0, 0.3, 0.1], [0.3, 0, 0]])
    x = inputs.unsqueeze(0)
    dotProductionAtt = DotProductionAttention()
    x = dotProductionAtt(x, x, x)
    print(x)
得到结果:
tensor([[[0.7417, 0.7444, 0.7133],
[0.4699, 0.4753, 0.4115],
[0.4642, 0.4593, 0.3976]]])
我理解的 第一行 第二列 表示 birds 与 eat 相关性在0.7444
第一行 第三列 表示 birds 与 worms 相关性在0.7133
2.3.2 遮罩多头注意力(Mask Multi-Head Attention)
作用:遮住未来的信息,因为我们看文本时, 是从头看到尾。
import torch
import torch.nn.functional as F


def masked_softmax(X, valid_len):
    """
    X: 3D tensor(batch_size, width, height)
    valid_lens: 1D or 2D tensor
    eg:
    X = [[[1, 2, 3, 4]
        [5, 6, 7, 8]]]
    valid_len = [3]
    则分别取每行前三个数据有效 得到
    X = [[[1, 2, 3, 0]
        [5, 6, 7, 0]]]
    """

    def _sequence_mask(X, valid_lens, value=0):
        max_len = X.size(1)
        # 这个是实现 小于 valid_len 设置为true. 但不明白为什么加[:,None]
        masks = torch.arange(max_len, dtype=torch.float32)[None, :] < valid_len[:, None]
        # ~ 是取反的操作
        X[~masks] = value

    if valid_len is None:
        return F.softmax(X, dim=-1)
    else:
        x_shape = X.shape
        if valid_len.dim() == 1:
            valid_len = torch.repeat_interleave(valid_len, x_shape[1])
        else:
            valid_len = valid_len.reshape(-1)
        # On the last axis, replace masked elements with a very large negative
        # value, whose exponentiation outputs 0
        _sequence_mask(X.reshape(-1, x_shape[-1]), valid_len, -1e6)
        return F.softmax(X.reshape(x_shape), dim=-1)


if __name__ == "__main__":
    # 对每个批量的第1行最大到第2个元素, 对第2行最大元素到第3个元素
    X = torch.rand(2, 2, 4)
    masked_softmax(X, torch.tensor([2, 3]))
    print(X)
    # tensor([[[7.3517e-01, 5.6618e-01, -1.0000e+06, -1.0000e+06],
    #          [6.5869e-02, 3.9414e-01, -1.0000e+06, -1.0000e+06]],
    #
    #         [[7.7070e-01, 5.5316e-01, 9.9894e-01, -1.0000e+06],
    #          [3.8776e-01, 8.5115e-01, 9.8560e-01, -1.0000e+06]]])
    # 或是对每个批量做不同设置
    masked_softmax(torch.rand(2, 2, 4), torch.tensor([[1, 3], [2, 4]]))
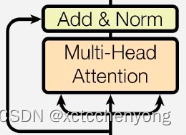
2.3.3 多头注意力机制
实现图例
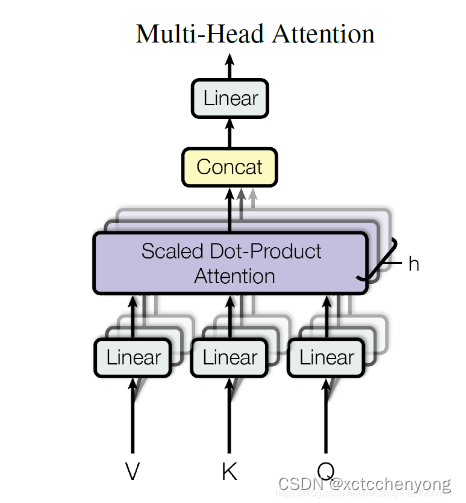
数学公式
M
u
l
t
i
H
e
a
d
(
Q
,
K
,
V
)
=
C
o
n
c
a
t
(
h
e
a
d
1
,
h
e
a
d
2
,
.
.
.
,
h
e
a
d
n
)
∗
W
o
MultiHead(Q, K, V) = Concat(head_{1},head_{2},..., head_{n})* W^{o}
MultiHead(Q,K,V)=Concat(head1,head2,...,headn)∗Wo
其中
h
e
a
d
i
=
A
t
t
e
n
t
i
o
n
(
Q
W
i
q
,
K
W
i
k
,
V
W
i
v
)
head_{i}= Attention(QW^{q}_{i},KW_{i}^{k},VW^{v}_{i})
headi=Attention(QWiq,KWik,VWiv)
A
t
t
e
n
t
i
o
n
(
Q
,
K
,
V
)
=
s
o
f
t
m
a
x
(
Q
∗
K
T
d
k
)
V
Attention(Q, K, V) = softmax( \frac{Q*K^{T}}{\sqrt{d_{k}}})V
Attention(Q,K,V)=softmax(dkQ∗KT)V
代码实现
import copy
def clones(module, N):
   return nn.ModuleList([copy.deepcopy(module for _ in range(N))])

class MultiHeadAttention(nn.Module):
    def __init__(self, head, embedding_size, dropout=0.1):
      super(MultiHeadAttention, self).__init__()
       assert embedding_size % head == 0
       self.head = head
       self.d_k = embedding_size // head
       self.embedding_size = embedding_size
       self.dropout = nn.Dropout(dropout)
       self.linears = clones(nn.Linear, 4)

    def forward(self, query, key, value, mask=None):

       if mask is not None:
         mask = mask.unsqueeze(1)
       batch_size = query.size(0)
       query, key, value = [model(x).view(batch_size, -1, self.head, self.d_k).transpose(1,2) for model, x in zip(self.linears, (query, key, value))]
       dotProductionAtt = DotProductionAttention()
       x = dotProductionAtt(query, key, value)
       x = x.traspose(1,2).contiguous.view(batch_size,-1, self.head*self.d_k)
       return x.linears[-1](x)
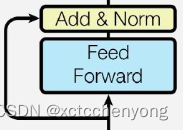
2.4 前馈全连接层
作用
注意力机制拟合的不够, 需要增加拟合. 实现的方式其实就是增加两个全连接层
数学公式
F F N ( x ) = M a x ( 0 , x W 1 + b 1 ) W 2 + b 2 FFN(x) = Max(0, xW_{1}+b_{1})W_{2}+b_{2} FFN(x)=Max(0,xW1+b1)W2+b2
代码实现
import torch
from torch import nn
from torch.nn import functional as F


class PositionalwiseFeedForward(nn.Module):
    def __init__(self, embedding_size, d_ff, dropout=0.1):
        super(PositionalwiseFeedForward, self).__init__()

        self.linear1 = nn.Linear(embedding_size, d_ff)
        self.linear2 = nn.Linear(d_ff, embedding_size)
        self.dropout = nn.Dropout(dropout)

    def forward(self, x):
        return self.linear2(self.dropout(F.relu(self.linear1(x))))


if __name__ == '__main__':
    embedding_size = 512
    d_ff = 64
    pff = PositionalwiseFeedForward(embedding_size, d_ff)
    x = torch.rand((3, 64, 512))
    x = pff(x)
    print(x)
    print(x.shape)
2.5 规范化层
作用
正则化数据,方面数据训练。与BatchNorm相比,BatchNorm 是在第一个维度即batch_size维度进行批量归一, 而LayerNorm是在最后一个维度,即层嵌入维度进行批量归一
数学公式
L a y e r N o r m ( x ) = a 2 ∗ x − m e a n s t d + e p s + b 2 LayerNorm(x) = a_2 * \frac{x-mean}{std+ eps} + b_2 LayerNorm(x)=a2∗std+epsx−mean+b2
代码实现
import torch
from torch import nn

class LayerNorm(nn.Module):
    def __init__(self, features_size, eps=1e-6):
        super(LayerNorm, self).__init__()

        self.a2 = nn.Parameter(torch.ones(features_size))
        self.b2 = nn.Parameter(torch.zeros(features_size))
        self.eps = eps

    def forward(self, x):
        mean = x.mean(-1, keepdim=True)
        std = x.std(-1, keepdim=True)
        return self.a2 * (x - mean) / (std + self.eps) + self.b2

if __name__ == '__main__':
    features_size = 512
    layerNorm = LayerNorm(features_size)
    x = torch.rand((3, 64, 512))
    print(x)
    layerX = layerNorm(x)
    print(layerX)
    print(layerX.shape)
2.6 连接子层
import torch
from torch import nn
# from torch.autograp import Variable

class SubLayerConnection(nn.Module):
    def __init__(self, vocab_size, dropout=0.1):
       super(SubLayerConnection, self).__init__()
       self.Norm = LayerNorm(vocab_size)
       self.Dropout = nn.Dropout(dropout)

    def forward(self, x, sublayer):
       return x + self.Dropout(sublayer(self.Norm(x)))


if __name__ == '__main__':
   vocab_size = 3
   d_model = 1
   head = 1
   # mask = Variable(torch.zeros(3, 3, 3)
   mult_head = MultiHeadAttention(head, vocab_size)
   sublayer = lambda x: mult_head(x, x, x) #, mask
   sc=SubLayerConnection(d_model)
   x = torch.rand(3, 3, 3)
   x =sc(x, sublayer)
   print(x)
   print(x.shape)
2.7 编码器层
代码实现
import torch
from torch import nn
import copy
from torch.autograd import Variable

def clone(model, N):
    return nn.ModuleList([copy.deepcopy(model) for _ in range(N)])


class EncodingLayer(nn.Module):
    def __init__(self, vocab_size, atten, feed_forward, dropout=0.1):
        super(EncodingLayer, self).__init__()
        self.sub_layers = clone(SubLayerConnection(vocab_size, dropout), 2)
        self.vocab_size = vocab_size
        self.atten = atten
        self.feed_forward = feed_forward
        self.dropout = nn.Dropout(dropout)

    def forward(self, x1, mask):
        x1 = self.sub_layers[0](x1, lambda x: self.atten(x, x, x))
        return self.sub_layers[1](x1, lambda x: self.feed_forward(x))


if __name__ == '__main__':
    embedding_size = 512
    head = 8
    multihead_attention = MultiHeadAttention(embedding_size, head)
    d_ff = 64
    ff = PositionalwiseFeedForward(embedding_size, 64)
    encoding_layer = EncodingLayer(embedding_size, multihead_attention, ff)

    x = torch.rand(1, 64, 512)
    mask = Variable(torch.zeros(64, 512))
    x = encoding_layer(x, mask)
    print(x)
    print(x.shape)
2.8 编码器
代码实现
import torch
from torch import nn
from encoder_layers import clone, EncodingLayer
from layer_normal import LayerNorm
from self_attention import MultiHeadAttention
from positional_wise_feed_forward import PositionalwiseFeedForward


class Encoder(nn.Module):
    def __init__(self, layer, embedding_size, num):
        super(Encoder, self).__init__()
        self.layers = clone(layer, num)
        self.norm = LayerNorm(embedding_size)

    def forward(self, x):
        for layer in self.layers:
            x = layer(x)
        return self.norm(x)


if __name__ == '__main__':
    vocab_size = 512
    head = 8
    multi_attention = MultiHeadAttention(vocab_size, head)
    d_ff = 64
    feed_forward = PositionalwiseFeedForward(vocab_size, d_ff)
    encoder_layer = EncodingLayer(vocab_size, multi_attention, feed_forward)
    encoder = Encoder(encoder_layer, vocab_size, 6)
    x = torch.rand(3, 64, 512)
    x = encoder(x)
    print(x)
    print(x.shape)
3.1 解码器
图示
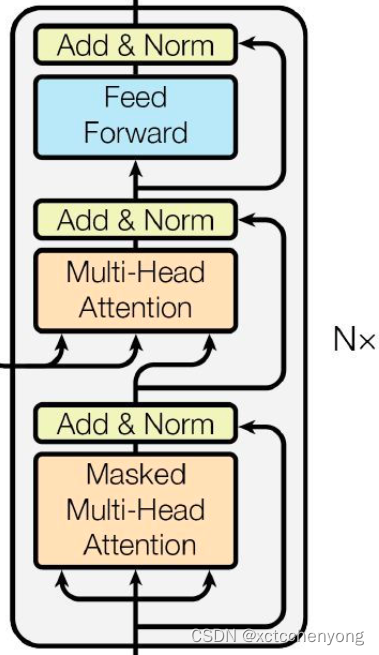
代码实现
class DecoderLayer(nn.Module):
    def __init__(self, feature_size, self_att, src_att, feed_forward, dropout):
        super(DecoderLayer, self).__init__()
        self.feature_size = feature_size
        self.self_att = self_att
        self.src_att = src_att
        self.ff = feed_forward
        self.layers = clone(SubLayerConnection(feature_size, dropout), 3)

    def forward(self, x, m_encoder, source_mask, target_mask):
        x = self.layers[0](x, lambda x1: self.self_att(x1, x1, x1, target_mask))
        x = self.layers[1](x, lambda x1: self.src_att(x1, m_encoder, m_encoder, source_mask))
        return self.layers[2](x, self.ff)


class Decoder(nn.Module):
    def __init__(self, layer, num_layer, embedding_size):
        super(Decoder, self).__init__()
        self.layers = clone(layer, num_layer)
        self.norm = LayerNorm(embedding_size)

    def forward(self, x, memory, source_mask, target_mask):
        for layer in self.layers:
            x = layer(x, memory, source_mask, target_mask)
        return self.norm(x)

if __name__ == "__main__":
    d_model = 512
    vocab_size = 100
    num_layer = 6
    head = 8
    dropout = 0.1
    c = copy.deepcopy
    att = MultiHeadAttention(head, d_model, dropout)

    d_ff = 64
    ff = PositionalWiseFeedForward(d_model, d_ff, dropout)
    layer = DecoderLayer(d_model, c(att), c(att), c(ff), dropout)
    decode = Decoder(layer, num_layer, d_model)

    x = torch.rand(2, 4, 512)
    memory = x
    mask = Variable(torch.zeros(2, 4, 4))
    source_mask = target_mask = mask
    x = decode(x, memory, source_mask, target_mask)
3.2 输出部分实现
图示
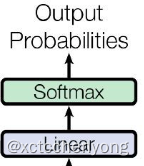
代码实现
class Generator(nn.Module):
    def __init__(self, d_model, vocab_size):
        super(Generator, self).__init__()
        self.project = nn.Linear(d_model, vocab_size)

    def forward(self, x):
        return F.log_softmax(self.project(x), dim=-1))

if __name__ == '__main__':
    d_model = 512
    vocab_size = 1000
    x = torch.randn(2, 4, 512)
    gen = Generator(d_model, vocab_size)
    gen_result = gen(x)
    print(gen_result.shape)
    assert gen_result.shape, (2, 4, 1000)
总结
提示:这里对文章进行总结:
问题待解:
- 这个数据怎么训练? 是否是有监督学习?
- 词向量长度很长, 中文估计至少也有5000多,怎么解决这么长的问题?


 1447
1447


 被折叠的 条评论
为什么被折叠?
被折叠的 条评论
为什么被折叠?
 到【灌水乐园】发言


