


2.3 操作张量
2.3.1 算术操作
2.3.1.1 加法操作
import torch

x = torch.tensor([1,2,3])
y = torch.tensor([4,5,6])

print(x+y)
print(torch.add(x,y))
print(y.add_(x))		#这种方法的加法会改变y的值
输出:
tensor([5, 7, 9])
tensor([5, 7, 9])
tensor([5, 7, 9])
2.3.1.2 减法操作
import torch

x = torch.tensor([1,2,3])
y = torch.tensor([4,5,6])

print(x-y)
print(torch.sub(x,y))
print(x.sub_(y))		#这种方法的加法会改变y的值
输出:
tensor([-3, -3, -3])
tensor([-3, -3, -3])
tensor([-3, -3, -3])
2.3.1.3 乘法操作
import torch

x = torch.tensor([1,2,3])
y = torch.tensor([4,5,6])

print(x*y)
print(torch.multiply(x,y))
print(x.multiply_(y))		#这种方法的加法会改变y的值
输出:
tensor([ 4, 10, 18])
tensor([ 4, 10, 18])
tensor([ 4, 10, 18])
2.3.1.4 除法操作
import torch

x = torch.tensor([1.,2.,3.])
y = torch.tensor([4.,5.,6.])

print(x/y)
print(torch.div(x,y))
print(x.div_(y))		#这种方法的加法会改变y的值
输出:
tensor([0.2500, 0.4000, 0.5000])
tensor([0.2500, 0.4000, 0.5000])
tensor([0.2500, 0.4000, 0.5000])
2.3.1.5 倒数操作
import torch

x = torch.tensor([1.,2.,3.])

print(x.reciprocal())
输出:
tensor([1.0000, 0.5000, 0.3333])
2.3.1.6 幂运算
pow() 函数将第一个输入数组中的元素作为底数,计算它与第二个输入数组中相应元素的幂。
import torch

x = torch.tensor([1.,2.,3.])
y = torch.tensor([4.,5.,6.])

print(torch.pow(x,y))
输出:
tensor([ 1., 32., 729.])
【插】广播机制
当两个张量的维度不同,对他们进行运算时,需要对维度小的张量进行扩展,扩展成高纬度的张量,这个扩展的过程采用的是广播机制,即对低维度数据进行广播式(拷贝)扩展。
import torch
import numpy as np

a = torch.arange(9).reshape(3,3)
b = np.array([10,10,10])

print (a)
print (b)
print (np.add(a,b))
输出:
tensor([[0, 1, 2],
        [3, 4, 5],
        [6, 7, 8]])
[10 10 10]
tensor([[10, 11, 12],
        [13, 14, 15],
        [16, 17, 18]])
2.3.2 索引
可以使用索引操作来访问Tensor的一部分
【注意】:索引出来的结果与原数据共享内存,一个改变,另一个也随之改变
-
案例1:
import torch

x = torch.eye(5)

print(x)
print(x[0])
print(x[0,:])	#这两个效果一样
输出:
tensor([[1., 0., 0., 0., 0.], [0., 1., 0., 0., 0.], [0., 0., 1., 0., 0.], [0., 0., 0., 1., 0.], [0., 0., 0., 0., 1.]]) tensor([1., 0., 0., 0., 0.]) tensor([1., 0., 0., 0., 0.]) -
案例2:
import torch

x = torch.eye(5)
y = x[0,:]
y += 1

print(y)
print(x)
输出:
tensor([2., 1., 1., 1., 1.])
tensor([[2., 1., 1., 1., 1.],
        [0., 1., 0., 0., 0.],
        [0., 0., 1., 0., 0.],
        [0., 0., 0., 1., 0.],
        [0., 0., 0., 0., 1.]])
除了使用索引进行数据的选择,Pytorch还提供了一些高级的选择函数
2.3.2.1 index_select
-
函数功能:在指定的维度dim上选取
index_select(input, dim, index)input表示输入的变量;dim表示从第几维挑选数据,类型为int值;index表示从选择维度中的哪个位置挑选数据,类型为torch.Tensor类的实例;
第一个参数是索引的对象,第二个参数0表示按行索引,1表示按列进行索引,第三个参数是一个tensor,就是索引的序号,比如b里面tensor[0, 2]表示第0行和第2行,c里面tensor[1, 3]表示第1列和第3列。
import torch

x = torch.eye(5)
y = torch.index_select(x,0,torch.tensor([0,3]))
z = torch.index_select(x,1,torch.tensor([0,3]))

print(x)
print(y)
print(z)
输出:
tensor([[1., 0., 0., 0., 0.],
        [0., 1., 0., 0., 0.],
        [0., 0., 1., 0., 0.],
        [0., 0., 0., 1., 0.],
        [0., 0., 0., 0., 1.]])
tensor([[1., 0., 0., 0., 0.],
        [0., 0., 0., 1., 0.]])
tensor([[1., 0.],
        [0., 0.],
        [0., 0.],
        [0., 1.],
        [0., 0.]])
2.3.2.2 masked_select
- 函数功能:使用mask掩码,取出对应于mask中为true位置的数
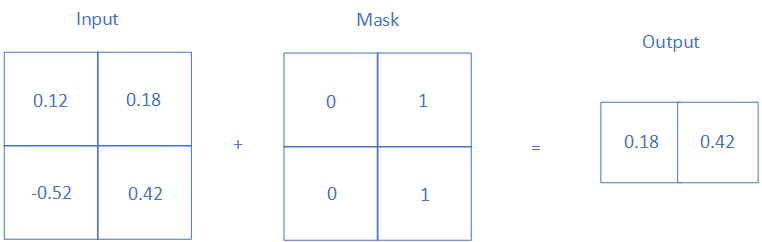
import torch

x = torch.randn(3,3)
mask = torch.BoolTensor([[0,0,1],
                         [0,1,0],
                         [1,0,0]])

print(x)
print(torch.masked_select(x,mask))
输出:
tensor([[-1.1849,  0.1880, -0.2666],
        [ 0.6040, -0.0858, -0.6069],
        [-0.1498,  0.5126,  2.0059]])
tensor([-0.2666, -0.0858, -0.1498])
2.3.2.3 nonzero
-
函数功能:取非0元素的下标
torch.nonzero(input) -
举例
import torch

mask = torch.ByteTensor([[0,0,1],
                         [0,1,0],
                         [1,0,0]])

print(torch.nonzero(mask))
输出:
tensor([[0, 2],
        [1, 1],
        [2, 0]])
2.3.2.4 gather
-
函数功能:根据 index 参数(即是索引),按照dim指定的维度,返回数组里面对应位置的值
gather(input,dim,index) -
举例
import torch

x = torch.Tensor([[1, 2, 3, 4], [5, 6, 7, 8], [9, 10, 11, 12]])
index = torch.LongTensor([[0, 1], [2, 0], [1, 1]])

print(x)
print(torch.gather(x,dim=0, index=index))
print(torch.gather(x,dim=1, index=index))
输出:
tensor([[ 1.,  2.,  3.,  4.],
        [ 5.,  6.,  7.,  8.],
        [ 9., 10., 11., 12.]])
tensor([[1., 6.],
        [9., 2.],
        [5., 6.]])
tensor([[ 1.,  2.],
        [ 7.,  5.],
        [10., 10.]])
【解释】:
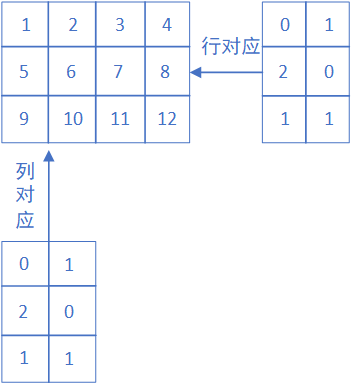
- 若dim = 0,index中的索引值应该为某一列中的索引值,即上图中的列对应
- 若dim = 1,index中的索引值应该为某一行中的索引值,即上图中的行对应
2.3.3 改变形状
使用Tensor.view改变形状,view后的张量与原张量共享内存。
-
案例1:view的普通用法,作用相当于numpy中的reshape,重新定义矩阵的形状。变换前后元素个数必须相等。
import torch

x = torch.arange(1,10)
y = x.view(3,3)
print(x)
print(y)

y[0][0]=10
print(x)
print(y)
输出:
tensor([1, 2, 3, 4, 5, 6, 7, 8, 9]) tensor([[1, 2, 3], [4, 5, 6], [7, 8, 9]]) tensor([10, 2, 3, 4, 5, 6, 7, 8, 9]) tensor([[10, 2, 3], [ 4, 5, 6], [ 7, 8, 9]]) -
案例2:使用参数-1,即根据另一个参数自动计算该参数的值。
import torch

x = torch.arange(1,10)
y = x.view(-1,3)
print(x)
print(y)
输出:
tensor([1, 2, 3, 4, 5, 6, 7, 8, 9])
tensor([[1, 2, 3],
        [4, 5, 6],
        [7, 8, 9]])
如果想要防止修改原数据,可以用clone函数创建一个副本:
import torch

x = torch.arange(1,10)
y = x.clone().view(-1,3)
print(x)
print(y)

y[0][0]=10
print(x)
print(y)
输出:
tensor([1, 2, 3, 4, 5, 6, 7, 8, 9])
tensor([[1, 2, 3],
        [4, 5, 6],
        [7, 8, 9]])
tensor([1, 2, 3, 4, 5, 6, 7, 8, 9])
tensor([[10,  2,  3],
        [ 4,  5,  6],
        [ 7,  8,  9]])
2.3.4 线性函数
2.3.4.1 torch.trace
-
函数功能:求矩阵对角线元素之和
import torch

x = torch.arange(1,10).view(3,3)

y = torch.arange(1,13).view(3,4)

print(x)
print(torch.trace(x),'\n')

print(y)
print(torch.trace(y))
输出:
tensor([[1, 2, 3],
        [4, 5, 6],
        [7, 8, 9]])
tensor(15)

tensor([[ 1,  2,  3,  4],
        [ 5,  6,  7,  8],
        [ 9, 10, 11, 12]])
tensor(18)
2.3.4.2 torch.diag
-
函数功能:求对角线元素
import torch

x = torch.arange(1,10).view(3,3)

y = torch.arange(1,13).view(3,4)

print(x)
print(torch.diag(x),'\n')

print(y)
print(torch.diag(y))
输出:
tensor([[1, 2, 3],
        [4, 5, 6],
        [7, 8, 9]])
tensor([1, 5, 9])

tensor([[ 1,  2,  3,  4],
        [ 5,  6,  7,  8],
        [ 9, 10, 11, 12]])
tensor([ 1,  6, 11])
2.3.4.3 torch.triu/tril
-
函数功能:返回矩阵的上三角/下三角
import torch

x = torch.arange(1,10).view(3,3)

y = torch.arange(1,13).view(3,4)

print(x)
print(torch.triu(x))
print(torch.tril(x))

print(y)
print(torch.triu(y))
print(torch.tril(y))
输出:
tensor([[1, 2, 3],
        [4, 5, 6],
        [7, 8, 9]])
tensor([[1, 2, 3],
        [0, 5, 6],
        [0, 0, 9]])
tensor([[1, 0, 0],
        [4, 5, 0],
        [7, 8, 9]])

tensor([[ 1,  2,  3,  4],
        [ 5,  6,  7,  8],
        [ 9, 10, 11, 12]])
tensor([[ 1,  2,  3,  4],
        [ 0,  6,  7,  8],
        [ 0,  0, 11, 12]])
tensor([[ 1,  0,  0,  0],
        [ 5,  6,  0,  0],
        [ 9, 10, 11,  0]])
2.3.4.4 torch.mm
-
函数功能:矩阵相乘
import torch

x = torch.arange(1,10).view(3,3)

y = torch.arange(1,13).view(3,4)

print(x)
print(y)
print(torch.mm(x,y))
输出:
tensor([[1, 2, 3],
        [4, 5, 6],
        [7, 8, 9]])
tensor([[ 1,  2,  3,  4],
        [ 5,  6,  7,  8],
        [ 9, 10, 11, 12]])
tensor([[ 38,  44,  50,  56],
        [ 83,  98, 113, 128],
        [128, 152, 176, 200]])
2.3.4.5 torch.bmm
-
函数功能:矩阵按照batch进行相乘。A.shape=(b,w1,h1),B.shape=(b,w2,h2)。A可以看成b个shape均为w1和h1的二维矩阵堆叠,B可以看成b个shape均为w2和h2的二维矩阵堆叠。所以bmm(A,B)就是同一 b i b_i bi层的A,B两矩阵相乘,因此必须满足h1=w2。输出的C.shape=(b,w1,h2)
-
举例
import torch

x = torch.tensor([[[1,2,3],
                   [4,5,6]],
                  [[1,2,3],
                   [4,5,6]]])

y = torch.tensor([[[1,2],
                   [3,4],
                   [5,6]],
                  [[1,2],
                   [3,4],
                   [5,6]]])

print(x.shape)
print(y.shape)
print(torch.bmm(x,y))
print(torch.bmm(x,y).shape)
输出:
torch.Size([2, 2, 3])
torch.Size([2, 3, 2])
tensor([[[22, 28],
         [49, 64]],
        [[22, 28],
         [49, 64]]])
torch.Size([2, 2, 2])
2.3.4.6 torch.t
-
函数功能:矩阵转置
import torch

x = torch.arange(1,10).view(3,3)

print(x)
print(torch.t(x))
输出:
tensor([[1, 2, 3],
        [4, 5, 6],
        [7, 8, 9]])
tensor([[1, 4, 7],
        [2, 5, 8],
        [3, 6, 9]])
2.3.4.7 torch.dot
-
函数功能:矩阵内积,只能是1维的tensor
import torch

x = torch.arange(1,10)
y = torch.arange(1,10)

print(torch.dot(x,y))
输出:
tensor(285)
2.3.4.8 torch.inverse
-
函数功能:求矩阵的逆矩阵
import torch

x = torch.randn(4,4)

print(x)
print(torch.inverse(x))
输出:
tensor([[-0.0519,  1.3814, -0.3516, -0.5872],
        [ 0.3829,  0.8693, -0.4874,  0.1696],
        [ 0.3546,  0.5285,  0.2845, -0.4835],
        [ 0.0422,  0.0904, -1.2105, -1.8998]])
tensor([[-1.2769,  1.2298,  1.2845,  0.1776],
        [ 0.6749,  0.0719,  0.0465, -0.2140],
        [ 0.1653, -0.7749,  0.9026, -0.3500],
        [-0.1016,  0.5245, -0.5443, -0.3096]])
2.3.4 Tensor和Numpy互转
2.3.4.1 Tensor转Numpy
-
使用numpy函数
import torch

x = torch.randn(4,4)
y = x.numpy()

print(x)
print(y)
输出:
tensor([[ 0.2651,  2.1199, -0.1618,  0.4138],
        [ 0.8374, -0.0264,  0.1855, -1.8554],
        [-0.1712, -0.0624,  1.5829, -0.6257],
        [ 2.0453,  0.3610,  0.1464,  0.1015]])

[[ 0.26514146  2.1198921  -0.16183631  0.4137511 ]
 [ 0.83737147 -0.02638413  0.18554756 -1.8553554 ]
 [-0.1712239  -0.06235024  1.5829381  -0.6257176 ]
 [ 2.0452678   0.3609806   0.14644004  0.10152505]]
2.3.4.2 Numpy转Tensor
-
使用from_numpy函数
import torch
import numpy as np

x = np.ones(shape=[5,3])
y = torch.from_numpy(x)

print(x)
print(y)
输出:
[[1. 1. 1.]
 [1. 1. 1.]
 [1. 1. 1.]
 [1. 1. 1.]
 [1. 1. 1.]]

tensor([[1., 1., 1.],
        [1., 1., 1.],
        [1., 1., 1.],
        [1., 1., 1.],
        [1., 1., 1.]], dtype=torch.float64)
【PS】:以上两种方法都是共享内存,如果使用tensor的构造函数来构造tensor,将会得到一个新的tensor。
x = np.ones(shape=[5,3])
y = torch.tensor(x)
2.3.5 Tensor on GPU
-
用to方法,可以实现将tensor在CPU和GPU上运行互转
import torch if torch.cuda.is_available(): device = torch.device("cuda") x = torch.tensor([1,2]) y = torch.ones_like(x,device=device) x = x.to(device) z = x+y print(z) print(z.to("cpu",torch.double)) -
如果你装的pytorch是gpu版本的,上述运行结果如下:
tensor([2, 3], device='cuda:0')
tensor([2., 3.], dtype=torch.float64)


 2625
2625


 被折叠的 条评论
为什么被折叠?
被折叠的 条评论
为什么被折叠?
 到【灌水乐园】发言


