


Docker部署Javaweb项目
步骤:
1、使用Dockerfile构建MySQL镜像并创建容器导入SQL文件数据。
1.1、编写sources.list,实现阿里云镜像加速
deb http://mirrors.aliyun.com/ubuntu/ bionic main restricted universe multiverse
deb-src http://mirrors.aliyun.com/ubuntu/ bionic main restricted universe multiverse
deb http://mirrors.aliyun.com/ubuntu/ bionic-security main restricted universe multiverse
deb-src http://mirrors.aliyun.com/ubuntu/ bionic-security main restricted universe multiverse

deb http://mirrors.aliyun.com/ubuntu/ bionic-updates main restricted universe multiverse
deb-src http://mirrors.aliyun.com/ubuntu/ bionic-updates main restricted universe multiverse

deb http://mirrors.aliyun.com/ubuntu/ bionic-proposed main restricted universe multiverse
deb-src http://mirrors.aliyun.com/ubuntu/ bionic-proposed main restricted universe multiverse

deb http://mirrors.aliyun.com/ubuntu/ bionic-backports main restricted universe multiverse
deb-src http://mirrors.aliyun.com/ubuntu/ bionic-backports main restricted universe multiverse
1.2、编写构建MySQL镜像的Dockerfile文件
FROM ubuntu

MAINTAINER cwy

# 将sources.list复制到镜像下的/etc/apt/下面,修改镜像源地址
COPY sources.list /etc/apt/
# 拷贝SQL文件到home目录下
COPY eshop.sql /home/
# 更新apt,因为更换了sources.list,所以比较快,使用官方镜像源在国外,速度比较慢
RUN apt-get clean && apt-get update
# 安装MySQL
RUN apt-get -y install mysql-server
# mysqld.cnf文件中的字符串进行替换
RUN sed -Ei 's/127.0.0.1/0.0.0.0/' /etc/mysql/mysql.conf.d/mysqld.cnf
# 修改MySQL,ROOT用户的密码,创建数据库eshop,导入eshop.sql数据文件到数据库
RUN /etc/init.d/mysql start \
    && mysql -uroot -e "grant all privileges on *.* to 'root'@'%' identified by '123456';" \
    && mysql -uroot -e "grant all privileges on *.* to 'root'@'localhost' identified by '123456';" \
    && mysql -uroot -e "CREATE DATABASE IF NOT EXISTS eshop DEFAULT CHARACTER SET utf8 COLLATE utf8_general_ci;" \
    && mysql -uroot -p123456 --default-character-set=utf8 eshop < /home/eshop.sql

EXPOSE 3306

CMD ["/usr/bin/mysqld_safe"]
1.3、把文件传到虚拟机(在虚拟机里创建一个文件夹)
MySQL:Dockerfile、sources.list、eshop.sql
1.4、创建镜像(docker build -t [镜像名])
注意:这里的命令要在上面MySQL文件中执行
1.5、创建容器(docker run -d -p 3306:3306 [刚才创建的镜像名])
这里创建出来的容器要用(docker ps)查看下,看看有没有映射3306端口。(PORTS:0.0.0.0:3306->3306/tcp)
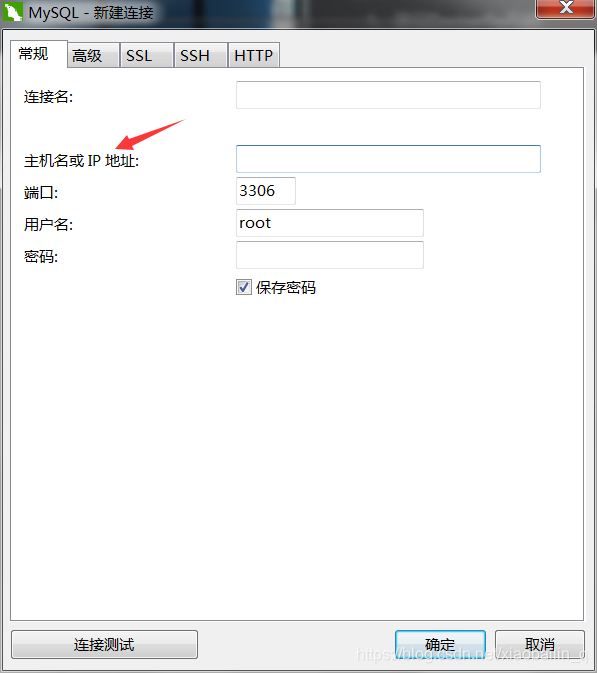
1.6、navicat工具连接MySQL容器,
这里的IP地址要填写虚拟机的IP
2、使用Dockerfile构建Tomcat镜像并部署Web应用
2.1、在程序中,配置文件里,jdbc:mysql的配置要配置虚拟机的IP地址和MySQL的端口
2.2、把项目打包成war包。
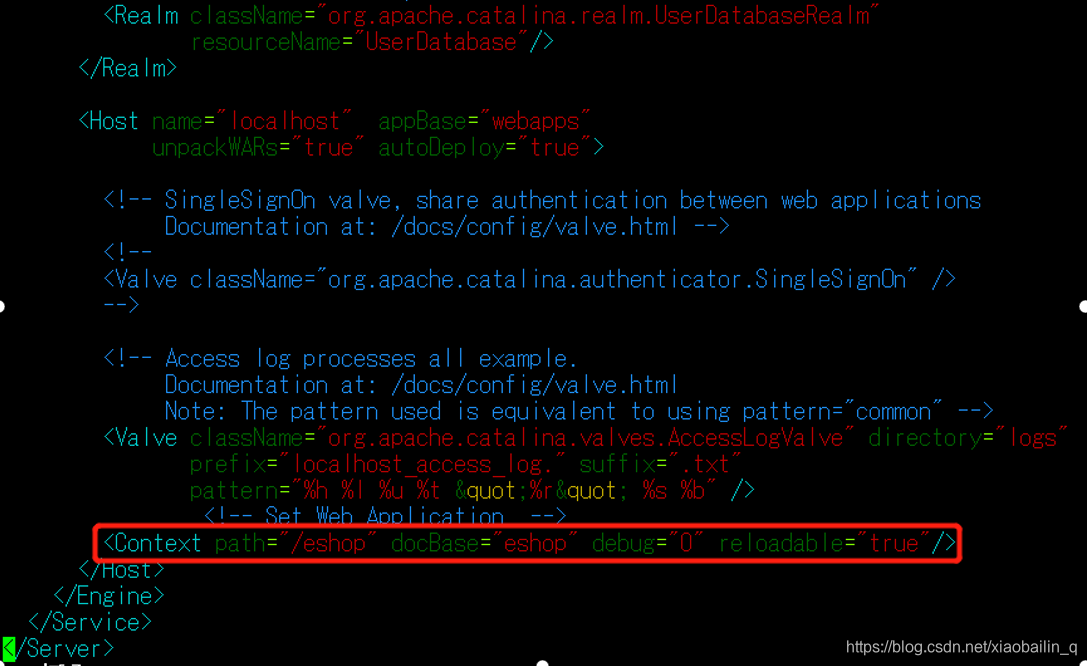
2.3、修改修改server.xml,添加对应的项目配置信息(修改项目名)
<Context path="/项目名" docBase="项目名" debug="0" reloadable="true"/>
2.4、编写构建Web项目的Dockerfile文件,修改 设置War文件的相对路径

2.5、把文件传到虚拟机(在虚拟机里创建一个文件夹)
tomcat:Dockerfile、apache-tomcat-7.0.57.tar.gz、jdk-8u131-linux-x64.tar.gz、server.xml、war文件夹(里面放程序生成的war文件)
2.6、创建镜像(docker build -t [镜像名])
注意:这里的命令要在上面tomcat文件中执行
2.7、创建容器(docker run -d -p 8080:8080 [刚才创建的镜像名])
这里创建出来的容器要用(docker ps)查看下,看看有没有映射8080端口。(PORTS:0.0.0.0:8080->8080/tcp)
到这里就可以在主机端用浏览器浏览,虚拟机IP地址:8080/项目名
素材.提取码:ru2m


 692
692


 被折叠的 条评论
为什么被折叠?
被折叠的 条评论
为什么被折叠?
 到【灌水乐园】发言


