


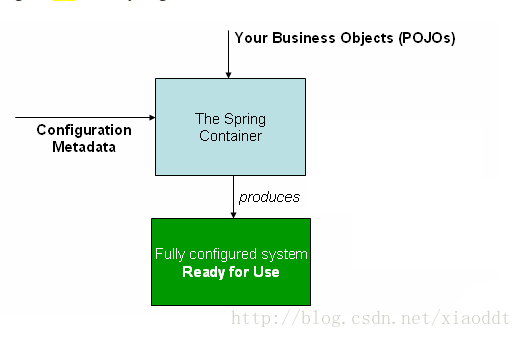
一:IoC 控制反转
IoC 控制反转,也叫依赖注入。主要用于解决程序中的依赖关系维护问题。理解依赖注入需要理解两方面的内容:
1.什么是依赖
所谓依赖,简单来说就是如果类A中包含有类B的对象,那么传统方式构造B对象的方法是B a = new B(),这就在A中形成了对B的依赖关系。
2.什么是注入?
所谓注入,拿上述实例来说,spring通过他的方式,也就是容器,将这些所依赖的对象统一管理起来,在程序中需要使用到的地方直接从容器中取得,这就好像是容器主动注入到程序中一样。
二:Container overview 容器概观
org.springframework.context.ApplicationContext 接口代表了IOC容器,他是初始化、配置、组装上述的Beans 而诞生的。常用的实现接口:ClassPathXmlApplicationContext 和 FileSystemXmlApplicationContext 分别是从classpath读取配置xml或者filesystem 读取 配置的xml 。 当然,现今metadata(元数据)的配置也可以通过java注解或者java代码实现。
2.1 Configuration metadata 元数据配置
传统的配置方式使用的是xml的配置,spring除了使用xml配置元数据以外,还允许使用 基于注解的配置方式 和 基于java-based的配置方式,现如今,很多开发者都是使用 java-based 的配置方式 , 本文分别对基于xml和java-based annocation 都进行了阐述
XML-based Configuration
配置格式:
<?xml version="1.0" encoding="UTF-8"?>
<beans xmlns="http://www.springframework.org/schema/beans"
    xmlns:xsi="http://www.w3.org/2001/XMLSchema-instance"
    xsi:schemaLocation="http://www.springframework.org/schema/beans
        http://www.springframework.org/schema/beans/spring-beans.xsd">

    <import resource="services.xml"/>
    <import resource="resources/messageSource.xml"/>
    <import resource="/resources/themeSource.xml"/>
    <bean id="..." class="...">
        <!-- collaborators and configuration for this bean go here -->
    </bean>

    <bean id="..." class="...">
        <!-- collaborators and configuration for this bean go here -->
    </bean>

    <!-- more bean definitions go here -->

</beans>其中,每一对<bean></bean> 代表了一个被注入的bean,其中的id 是一个确定bean身份的字符串,不可重复。class 代表的是类全名 这是id 身份对应的那个类。
容器初始化:
初始化容器很简单,如果配置文件在classpath下,可以直接使用
ApplicationContext context =
    new ClassPathXmlApplicationContext(new String[] {"services.xml", "daos.xml"});
即可,关于ClassPath和FileSystem等Resource,将在第二章阐述。
配置文件导入方式:
在实际项目中,可能有很多配置文件对应不同的层级,如果需要一个统一的配置文件进行管理,这个时候就需要用到配置文件的导入,语法如下:
<beans>
    <!-- 相对路径 -->
    <import resource="services.xml"/>
    <import resource="resources/messageSource.xml"/>
    <!-- 绝对路径 -->
    <import resource="/resources/themeSource.xml"/>

    <bean id="bean1" class="..."/>
    <bean id="bean2" class="..."/>
</beans>
resource使用相对路径和绝对路径均可
容器使用:
接口ApplicationContext 相当于一个大工厂,可以用于生产和维护各种经初始化的bean对象 主要使用方法:T getBean(String name, Class<T> requiredType)
// create and configure beans
ApplicationContext context =
    new ClassPathXmlApplicationContext(new String[] {"services.xml", "daos.xml"});

// retrieve configured instance
PetStoreService service = context.getBean("petStore", PetStoreService.class);

// use configured instance
List<String> userList = service.getUsernameList();
三:Bean 概况
spring IoC 容器管理各种各样的Bean,这些bean的创建都会在容器中存在元数据配置。最直观的就是上述的xml配置。
容器内部,bean定义表示BeanDefinition 其中包含且不只有下面的信息:
- 类全名:bean对应的类
- bean的行为配置元素,bean在容器中的行为(包括范围、生命周期和请他等等)
- 和其他bean的依赖关系
- 其他配置来新创建的对象,比如连接bean的数量管理,数据库连接池池大小。
Bean 定义
属性:
- class
- name
- scope
- constructor arguments
- properties
- autowiring mode
- initialization method
- destruction method
下面对这些属性进行说明:
class:
- 典型的通过在容器的bean中配置class属性将对应的class交给容器管理,避免在程序中使用的时候使用
new方法 - 静态内部类的配置:
class="com.example.Foo$Bar"其中Bar 是Foo的静态内部类
name:
一般而言,每一个bean的id是唯一的,但是name却可以有多个,他们可以通过别名进行区分:
<alias name="subsystemA-dataSource" alias="subsystemB-dataSource"/>
<alias name="subsystemA-dataSource" alias="myApp-dataSource" />
constructor arguments:
基于构造方法的注入:
如果bean的构造中包含有依赖关系,及包含其他对象。比如:
package x.y;

public class Foo {
    private int year;
    public Foo(Bar bar, Baz baz,int year) {
        // ...
    }

}
可以用过使用如下配置:
<beans>
    <bean id="foo" class="x.y.Foo">
        <constructor-arg ref="bar"/>
        <constructor-arg ref="baz"/>
        <!--构造中包含有基本类型或者String -->
        <constructor-arg type="int" value="7500000"/>
        <!--如果有多个基本类型或者String 也可以使用 “index”-->
        <!--<constructor-arg index="0" value="7500000"/>-->
        <!--还可以直接使用属性的名字-->
        <!--<constructor-arg name="year" value="7500000"/>-->
    </bean>
    <bean id="bar" class="x.y.Bar"/>
    <bean id="baz" class="x.y.Baz"/>

</beans>
基于Setter方法的注入:
如果你的bean中设置了该属性的setter方法,可以使用setter注入
public class ExampleBean {

    private AnotherBean beanOne;
    private YetAnotherBean beanTwo;
    private int i;

    public void setBeanOne(AnotherBean beanOne) {
        this.beanOne = beanOne;
    }

    public void setBeanTwo(YetAnotherBean beanTwo) {
        this.beanTwo = beanTwo;
    }

    public void setIntegerProperty(int i) {
        this.i = i;
    }

}<bean id="exampleBean" class="examples.ExampleBean">
<!-- setter injection using the nested ref element -->
<property name="beanOne">
<ref bean="anotherExampleBean"/>
</property>
<!-- setter injection using the neater ref attribute -->
<property name="beanTwo" ref="yetAnotherBean"/>
<property name="integerProperty" value="1"/>
</bean>
<bean id="anotherExampleBean" class="examples.AnotherBean"/>
<bean id="yetAnotherBean" class="examples.YetAnotherBean"/>对于construct注入和setter注入是可以混用的,一般而言,对于一些强制的依赖优先选用construct注入 而 非强制的以来可以使用setter注入,当然,在setter方法上使用@Require注解表示该依赖需要强制注入。
properties:
在上述setter注入中已有所阐述,表示bean中的属性,通过value或者ref赋值
在使用properties时候,也有一种简化的写法,如下:
<bean id="myDataSource" class="org.apache.commons.dbcp.BasicDataSource" destroy-method="close">
    <!-- results in a setDriverClassName(String) call -->
    <property name="driverClassName" value="com.mysql.jdbc.Driver"/>
    <property name="url" value="jdbc:mysql://localhost:3306/mydb"/>
    <property name="username" value="root"/>
    <property name="password" value="masterkaoli"/>
</bean>
可以写成:
<beans xmlns="http://www.springframework.org/schema/beans"
    xmlns:xsi="http://www.w3.org/2001/XMLSchema-instance"
    xmlns:p="http://www.springframework.org/schema/p"
    xsi:schemaLocation="http://www.springframework.org/schema/beans
    http://www.springframework.org/schema/beans/spring-beans.xsd">

    <bean id="myDataSource" class="org.apache.commons.dbcp.BasicDataSource"
        destroy-method="close"
        p:driverClassName="com.mysql.jdbc.Driver"
        p:url="jdbc:mysql://localhost:3306/mydb"
        p:username="root"
        p:password="masterkaoli"/>

</beans>注意需要导入p-namespace
对于内部类中的bean的属性赋值:
<bean id="outer" class="...">
    <!-- instead of using a reference to a target bean, simply define the target bean inline -->
    <property name="target">
        <bean class="com.example.Person"> <!-- this is the inner bean -->
            <property name="name" value="Fiona Apple"/>
            <property name="age" value="25"/>
        </bean>
    </property>
</bean>
对于Collections的配置:
<bean id="moreComplexObject" class="example.ComplexObject">
    <!--配置 java.util.Properties-->
    <property name="adminEmails">
        <props>
            <prop key="administrator">administrator@example.org</prop>
            <prop key="support">support@example.org</prop>
            <prop key="development">development@example.org</prop>
        </props>
    </property>
    <!-- 配置 java.util.List  -->
    <property name="someList">
        <list>
            <value>a list element followed by a reference</value>
            <ref bean="myDataSource" />
        </list>
    </property>
    <!-- 配置 java.util.Map -->
    <property name="someMap">
        <map>
            <entry key="an entry" value="just some string"/>
            <entry key ="a ref" value-ref="myDataSource"/>
        </map>
    </property>
    <!-- 配置 java.util.Set  -->
    <property name="someSet">
        <set>
            <value>just some string</value>
            <ref bean="myDataSource" />
        </set>
    </property>
</bean>
spring默认使用 eagerly create 即 急加载的方式 初始化所有单例bean 的,这样的目的主要是在程序启动的时候就可以检测bean初始化存在的错误 可以通过 设置 lazy-init="true" 来设置为懒加载Autowiring:
spring容器可以自动相互合作的beans,在<bean/> 的属性中加入autowire 元素,自动装配有四种模式:
- no : (默认)不使用自动装配
- byName: 通过name属性进行自动装配,比如:如果一个bean在定义的时候设置了byname 自动装配, 该bean包含了了一个
master属性和对应的setter方法,spring 会被命名master的bean 将其设值到前一个bean中。 - byType : 通过类型自动装配,要求容器中不得多余一个该类型的bean,不然会抛出异常。
- constructor :和byType类似 但是用在构造参数中
**自动装配的优点和缺点:**
优点:
1.自动装配减少配置具体属性和构造参数的必要性
2.自动装配能根据对象的改变更新配置,如果你需要在类中增加依赖,那么并不需要改变该类对应bean的配置。
缺点和限制:
1.如果在bean中有明确的配置对应的property或者构造参数的值,那么该值会覆盖自动装配,基本类型和String不能自动装配
2.明确的配置会比自动装配更家准确
3.自动装配的对象不得出现多次,不然会报错在<bean/>中设置autowire-candidate=false会取消自动装配,即使使用了 @Autowired注解initialization method:
org.springframework.beans.factory.InitializingBean 接口允许bean在必要属性被设值后做一些初始化的操作,一般不推荐直接使用这个接口,而是使用@PostConstruct 具体的POJO初始化方法,xml配置中,可以使用 init-method 来配置初始化
void afterPropertiesSet() throws Exception;<bean id="exampleInitBean" class="examples.ExampleBean" init-method="init"/>public class ExampleBean {
public void init() {
// do some initialization work
}
}destruction method:
org.springframework.beans.factory.DisposableBean接口 允许bean在destroy的时候执行一些后续动作,推荐使用注解@PreDestroy
void destroy() throws Exception;或者在xml中配置
<bean id="exampleInitBean" class="examples.ExampleBean" destroy-method="cleanup"/>public class ExampleBean {
public void cleanup() {
// do some destruction work (like releasing pooled connections)
}
}Method injection 方法注入:
如果一个bean中依赖另外一个bean,但是两个bean的生命周期不一样,这时候将导致程序出现问题。
一种解决方法是放弃一些控制反转,
import org.springframework.beans.BeansException;
import org.springframework.context.ApplicationContext;
import org.springframework.context.ApplicationContextAware;
//实现该接口后,容器会将ApplicationContext 自动设值给该bean
public class CommandManager implements ApplicationContextAware {
    private ApplicationContext applicationContext;
    public Object process(Map commandState) {
        // grab a new instance of the appropriate Command
        Command command = createCommand();
        // set the state on the (hopefully brand new) Command instance
        command.setState(commandState);
        return command.execute();
    }
    protected Command createCommand() {
        // notice the Spring API dependency!
        return this.applicationContext.getBean("command", Command.class);
    }
    public void setApplicationContext(
            ApplicationContext applicationContext) throws BeansException {
        this.applicationContext = applicationContext;
    }
}上述方法中,通过实现ApplicationContextAware 获取 applicationContext 对象 ,使得应用可以在需要的时候获取不同生命周期的bean,这样做的代价是放弃了一下ioc的特性。
Lookup method injection 使用lookup-method属性
先看一个例子:
public abstract class CommandManager {

    public Object process(Object commandState) {
        Command command = createCommand();
        command.setState(commandState);
        return command.execute();
    }

    protected abstract Command createCommand();
}
在上述的类中有一个抽象方法,此方法返回值是 一个对象,在spring中,可以通过在<bean/> 中加上lookup-method 自动形成这个抽象方法的实现。
<!-- a stateful bean deployed as a prototype (non-singleton) -->
<bean id="myCommand" class="fiona.apple.AsyncCommand" scope="prototype">
    <!-- inject dependencies here as required -->
</bean>
<!-- commandProcessor uses statefulCommandHelper -->
<bean id="commandManager" class="fiona.apple.CommandManager">
    <lookup-method name="createCommand" bean="myCommand"/>
</bean>
这种形式的注入有一定条件:
<public|protected> [abstract] <return-type> theMethodName(no-arguments);也可以在bean的方法中使用@Lookup("myCommand") 注解
scope
在容器中初始化一个bean的同时,相当与创建了一个bean的“处方”,具体如何是配置,是由自己配置了。我们可以通过同一个“处方”根据需要创建出对应数量的bean,bean的scope分为7种:
- singleton : (默认)单例bean,spring 每个IoC容器中只有一个bean
- prototype: IoC容器中有多个bean
- request:每一个HTTP Request请求会创建一个bean
- session:每一个Session的生命周期中有一个bean,只在web应用中有用
- globalSession : 每一个globalSession 的生命周期中有一个bean,只在web应用中有用
- application:每一个application的生命周期中有一个bean,只在web应用中有用
- websocket:每一个websocket的生命周期中有一个bean,只在web应用中有用


 509
509


 被折叠的 条评论
为什么被折叠?
被折叠的 条评论
为什么被折叠?
 到【灌水乐园】发言


