


 本教程详细介绍了如何创建一个Windows应用,利用Direct2D库绘制网格背景和两个矩形。从创建DemoApp类开始,逐步实现资源初始化、消息循环处理、图形绘制和窗口大小调整。教程涵盖设备独立资源和设备相关资源的创建,以及Direct2D的基本绘图操作。
本文将带领您完成创建DemoApp类,该类将创建一个窗口,并使用Direct2D绘制一个网格和两个矩形。在本教程中,您将学习如何创建Direct2D资源和绘制基本图像。您还将学习如何构建应用程序,并通过最小化资源的创建来提高程序的性能。
Demo下载路径:https://download.csdn.net/download/xiaoyafang123/17507434
本教程包含以下部分:
- 第1部分:创建DemoApp类的声明部分
- 第2部分:实现DemoApp类的方法
- 第3分部:创建Direct2D所需的资源
- 第4部分:通过Direct2D绘制图形
- 总结
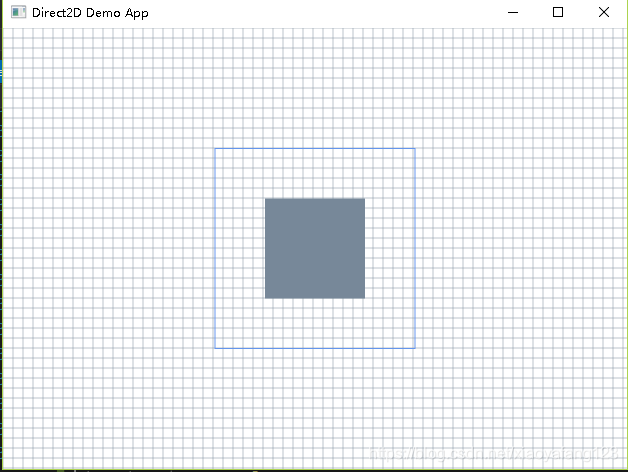
完成以上的操作后,你将得到如下所示的图形:
第1部分:创建DemoApp类的声明部分
在本部分中,首先你将添加Direct2D所依赖的头文件和必须宏定义。然后你还需要声明DemoApp类的数据成员和方法。
1.添加所必须的头文件
// Windows Header Files:
    #include <windows.h>

    // C RunTime Header Files:
    #include <stdlib.h>
    #include <malloc.h>
    #include <memory.h>
    #include <wchar.h>
    #include <math.h>

    #include <d2d1.h>
    #include <d2d1helper.h>
    #include <dwrite.h>
    #include <wincodec.h>
2.定义释放函数和必要的宏
template<class Interface>
    inline void SafeRelease(
        Interface **ppInterfaceToRelease
        )
    {
        if (*ppInterfaceToRelease != NULL)
        {
            (*ppInterfaceToRelease)->Release();

            (*ppInterfaceToRelease) = NULL;
        }
    }


    #ifndef Assert
    #if defined( DEBUG ) || defined( _DEBUG )
    #define Assert(b) do {if (!(b)) {OutputDebugStringA("Assert: " #b "\n");}} while(0)
    #else
    #define Assert(b)
    #endif //DEBUG || _DEBUG
    #endif


    #ifndef HINST_THISCOMPONENT
    EXTERN_C IMAGE_DOS_HEADER __ImageBase;
    #define HINST_THISCOMPONENT ((HINSTANCE)&__ImageBase)
    #endif
3.声明用于初始化类、创建和丢弃资源、处理消息循环、呈现内容和windows过程的方法。
class DemoApp
    {
    public:
        DemoApp();
        ~DemoApp();

        // Register the window class and call methods for instantiating drawing resources
        HRESULT Initialize();

        // Process and dispatch messages
        void RunMessageLoop();

    private:
        // Initialize device-independent resources.
        HRESULT CreateDeviceIndependentResources();

        // Initialize device-dependent resources.
        HRESULT CreateDeviceResources();

        // Release device-dependent resource.
        void DiscardDeviceResources();

        // Draw content.
        HRESULT OnRender();

        // Resize the render target.
        void OnResize(
            UINT width,
            UINT height
            );

        // The windows procedure.
        static LRESULT CALLBACK WndProc(
            HWND hWnd,
            UINT message,
            WPARAM wParam,
            LPARAM lParam
            );


};
4.声明一个ID2D1Factory对象、一个ID2D1HwndRenderTarget对象和两个ID2D1SolidColorBrush对象的指针作为类成员。
private:
    HWND m_hwnd;
    ID2D1Factory* m_pDirect2dFactory;
    ID2D1HwndRenderTarget* m_pRenderTarget;
    ID2D1SolidColorBrush* m_pLightSlateGrayBrush;
    ID2D1SolidColorBrush* m_pCornflowerBlueBrush;
第2部分:实现DemoApp类的方法
在本部分中,您将实现DemoApp构造函数和析构函数、它的初始化和消息循环方法以及WinMain函数。这些方法中的大多数看起来与其他Win32应用程序中的方法相同。惟一的例外是初始化方法,该方法调用CreateDeviceIndependentResources方法(您将在下一部分中看到该方法),该方法创建几个Direct2D资源。
1.实现类的构造函数和析构函数。构造函数将其成员初始化为NULL。析构函数释放作为类成员的任何接口。
DemoApp::DemoApp() :
        m_hwnd(NULL),
        m_pDirect2dFactory(NULL),
        m_pRenderTarget(NULL),
        m_pLightSlateGrayBrush(NULL),
        m_pCornflowerBlueBrush(NULL)
    {
    }


DemoApp::~DemoApp()
    {
        SafeRelease(&m_pDirect2dFactory);
        SafeRelease(&m_pRenderTarget);
        SafeRelease(&m_pLightSlateGrayBrush);
        SafeRelease(&m_pCornflowerBlueBrush);

    }
2.实现DemoApp::RunMessageLoop方法
void DemoApp::RunMessageLoop()
    {
        MSG msg;

        while (GetMessage(&msg, NULL, 0, 0))
        {
            TranslateMessage(&msg);
            DispatchMessage(&msg);
        }
    }
3.现Initialize方法来创建窗口,显示窗口,并调用DemoApp::CreateDeviceIndependentResources方法。您将在下一节中实现CreateDeviceIndependentResources方法。
HRESULT DemoApp::Initialize()
    {
        HRESULT hr;

        // Initialize device-indpendent resources, such
        // as the Direct2D factory.
        hr = CreateDeviceIndependentResources();

        if (SUCCEEDED(hr))
        {
            // Register the window class.
            WNDCLASSEX wcex = { sizeof(WNDCLASSEX) };
            wcex.style         = CS_HREDRAW | CS_VREDRAW;
            wcex.lpfnWndProc   = DemoApp::WndProc;
            wcex.cbClsExtra    = 0;
            wcex.cbWndExtra    = sizeof(LONG_PTR);
            wcex.hInstance     = HINST_THISCOMPONENT;
            wcex.hbrBackground = NULL;
            wcex.lpszMenuName  = NULL;
            wcex.hCursor       = LoadCursor(NULL, IDI_APPLICATION);
            wcex.lpszClassName = L"D2DDemoApp";

            RegisterClassEx(&wcex);


            // Because the CreateWindow function takes its size in pixels,
            // obtain the system DPI and use it to scale the window size.
            FLOAT dpiX, dpiY;

            // The factory returns the current system DPI. This is also the value it will use
            // to create its own windows.
            m_pDirect2dFactory->GetDesktopDpi(&dpiX, &dpiY);


            // Create the window.
            m_hwnd = CreateWindow(
                L"D2DDemoApp",
                L"Direct2D Demo App",
                WS_OVERLAPPEDWINDOW,
                CW_USEDEFAULT,
                CW_USEDEFAULT,
                static_cast<UINT>(ceil(640.f * dpiX / 96.f)),
                static_cast<UINT>(ceil(480.f * dpiY / 96.f)),
                NULL,
                NULL,
                HINST_THISCOMPONENT,
                this
                );
            hr = m_hwnd ? S_OK : E_FAIL;
            if (SUCCEEDED(hr))
            {
                ShowWindow(m_hwnd, SW_SHOWNORMAL);
                UpdateWindow(m_hwnd);
            }
        }

        return hr;
    }
4.创建作为应用程序入口点的WinMain方法。初始化DemoApp类的一个实例并开始其消息循环。
int WINAPI WinMain(
        HINSTANCE /* hInstance */,
        HINSTANCE /* hPrevInstance */,
        LPSTR /* lpCmdLine */,
        int /* nCmdShow */
        )
    {
        // Use HeapSetInformation to specify that the process should
        // terminate if the heap manager detects an error in any heap used
        // by the process.
        // The return value is ignored, because we want to continue running in the
        // unlikely event that HeapSetInformation fails.
        HeapSetInformation(NULL, HeapEnableTerminationOnCorruption, NULL, 0);

        if (SUCCEEDED(CoInitialize(NULL)))
        {
            {
                DemoApp app;

                if (SUCCEEDED(app.Initialize()))
                {
                    app.RunMessageLoop();
                }
            }
            CoUninitialize();
        }

        return 0;
    }
第3分部:创建Direct2D所需的资源
在本部分中,您将创建用于绘图的Direct2D资源。Direct2D提供两种类型的资源:设备无关资源,可以在整个应用程序生命周期保留;设备相关资源,需要和具体的设备绑定,如果设备被移除,资源失效。
1.实现DemoApp::CreateDeviceIndependentResources方法。在该方法中,创建一个设备无关资源(ID2D1Factory),该资源用于创建其他的Direct2D资源。使用m_pDirect2DdFactory类成员来存储。
HRESULT DemoApp::CreateDeviceIndependentResources()
    {
        HRESULT hr = S_OK;

        // Create a Direct2D factory.
        hr = D2D1CreateFactory(D2D1_FACTORY_TYPE_SINGLE_THREADED, &m_pDirect2dFactory);

        return hr;
    }
2.实现DemoApp::CreateDeviceResources方法。此方法创建窗口的设备相关资源:一个渲染目标和两个画刷。通过已知的窗口句柄获取到窗口的客户端区域,然后创建一个相同大小的 ID2D1HwndRenderTarget 渲染目标对象,并用m_pRenderTarget 成员变量保存该渲染目标对象。
RECT rc;
GetClientRect(m_hwnd, &rc);

D2D1_SIZE_U size = D2D1::SizeU(
  rc.right - rc.left,
  rc.bottom - rc.top
  );

// Create a Direct2D render target.
hr = m_pDirect2dFactory->CreateHwndRenderTarget(
  D2D1::RenderTargetProperties(),
  D2D1::HwndRenderTargetProperties(m_hwnd, size),
  &m_pRenderTarget
  );
3.使用渲染目标对象创建一个灰色的ID2D1SolidColorBrush对象和一个菊蓝的ID2D1SolidColorBrush对象。
if (SUCCEEDED(hr))
{
    // Create a gray brush.
   hr = m_pRenderTarget->CreateSolidColorBrush(
           D2D1::ColorF(D2D1::ColorF::LightSlateGray),
            &m_pLightSlateGrayBrush
            );
}
if (SUCCEEDED(hr))
{
    // Create a blue brush.
    hr = m_pRenderTarget->CreateSolidColorBrush(
          D2D1::ColorF(D2D1::ColorF::CornflowerBlue),
          &m_pCornflowerBlueBrush
          );
}
4.因为这个方法会被反复调用,所以添加一个if语句来检查渲染目标对象(m_pRenderTarget)是否已经存在。下面的代码显示了完整的CreateDeviceResources方法。
HRESULT DemoApp::CreateDeviceResources()
    {
        HRESULT hr = S_OK;

        if (!m_pRenderTarget)
        {
            RECT rc;
            GetClientRect(m_hwnd, &rc);

            D2D1_SIZE_U size = D2D1::SizeU(
                rc.right - rc.left,
                rc.bottom - rc.top
                );

            // Create a Direct2D render target.
            hr = m_pDirect2dFactory->CreateHwndRenderTarget(
                D2D1::RenderTargetProperties(),
                D2D1::HwndRenderTargetProperties(m_hwnd, size),
                &m_pRenderTarget
                );


            if (SUCCEEDED(hr))
            {
                // Create a gray brush.
                hr = m_pRenderTarget->CreateSolidColorBrush(
                    D2D1::ColorF(D2D1::ColorF::LightSlateGray),
                    &m_pLightSlateGrayBrush
                    );
            }
            if (SUCCEEDED(hr))
            {
                // Create a blue brush.
                hr = m_pRenderTarget->CreateSolidColorBrush(
                    D2D1::ColorF(D2D1::ColorF::CornflowerBlue),
                    &m_pCornflowerBlueBrush
                    );
            }
        }

        return hr;
    }
5.实现DemoApp::DiscardDeviceResources方法。在这个方法中,释放在DemoApp::CreateDeviceResources方法中创建的渲染目标对象和两个画刷对象。
    void DemoApp::DiscardDeviceResources()
    {
        SafeRelease(&m_pRenderTarget);
        SafeRelease(&m_pLightSlateGrayBrush);
        SafeRelease(&m_pCornflowerBlueBrush);
    }
第4部分:通过Direct2D绘制图形
在本部分中,您将实现窗口过程,绘制内容的OnRender方法,以及当窗口大小改变时调整渲染目标对象大小的OnResize方法。
1.实现处理窗口消息的DemoApp::WndProc方法:收到WM_SIZE消息时,调用DemoApp::OnResize方法并传递新的宽度和高度。收到WM_PAINT和WM_DISPLAYCHANGE消息时,调用DemoApp::OnRender方法来绘制窗口。您可以在后面的步骤中看到OnRender和OnResize方法的实现。
    LRESULT CALLBACK DemoApp::WndProc(HWND hwnd, UINT message, WPARAM wParam, LPARAM
    lParam)
    {
        LRESULT result = 0;

        if (message == WM_CREATE)
        {
            LPCREATESTRUCT pcs = (LPCREATESTRUCT)lParam;
            DemoApp *pDemoApp = (DemoApp *)pcs->lpCreateParams;

            ::SetWindowLongPtrW(
                hwnd,
                GWLP_USERDATA,
                reinterpret_cast<LONG_PTR>(pDemoApp)
                );

            result = 1;
        }
        else
        {
            DemoApp *pDemoApp = reinterpret_cast<DemoApp *>(static_cast<LONG_PTR>(
                ::GetWindowLongPtrW(
                    hwnd,
                    GWLP_USERDATA
                    )));

            bool wasHandled = false;

            if (pDemoApp)
            {
                switch (message)
                {
                case WM_SIZE:
                    {
                        UINT width = LOWORD(lParam);
                        UINT height = HIWORD(lParam);
                        pDemoApp->OnResize(width, height);
                    }
                    result = 0;
                    wasHandled = true;
                    break;

                case WM_DISPLAYCHANGE:
                    {
                        InvalidateRect(hwnd, NULL, FALSE);
                    }
                    result = 0;
                    wasHandled = true;
                    break;

                case WM_PAINT:
                    {
                        pDemoApp->OnRender();
                        ValidateRect(hwnd, NULL);
                    }
                    result = 0;
                    wasHandled = true;
                    break;

                case WM_DESTROY:
                    {
                        PostQuitMessage(0);
                    }
                    result = 1;
                    wasHandled = true;
                    break;
                }
            }

            if (!wasHandled)
            {
                result = DefWindowProc(hwnd, message, wParam, lParam);
            }
        }

        return result;
    }
2.实现DemoApp::OnRender方法。首先,定义一个HRESULT。然后调用CreateDeviceResource方法。每次绘制窗口时都会调用此方法。回想一下,在第3部分的第4步中,您添加了一个if语句,以便在渲染目标对象已经存在的情况下阻止该方法执行任何工作。
    HRESULT DemoApp::OnRender()
    {
        HRESULT hr = S_OK;

        hr = CreateDeviceResources();
3.验证CreateDeviceResource方法是否调用成功。如果没有,就不要绘制任何图形。
        if (SUCCEEDED(hr))
        {
4.在刚刚的If语句里面,通过调用渲染目标对象的BeginDraw方法开始渲染,然后设置一个单位矩阵给渲染目标对象用于变换,并且清空窗口。
            m_pRenderTarget->BeginDraw();

            m_pRenderTarget->SetTransform(D2D1::Matrix3x2F::Identity());

            m_pRenderTarget->Clear(D2D1::ColorF(D2D1::ColorF::White));
5.获取绘图区域的大小。
D2D1_SIZE_F rtSize = m_pRenderTarget->GetSize();6.通过一个for循环和渲染目标对象的DrawLine 方法绘制一个网格背景。
            // Draw a grid background.
            int width = static_cast<int>(rtSize.width);
            int height = static_cast<int>(rtSize.height);

            for (int x = 0; x < width; x += 10)
            {
                m_pRenderTarget->DrawLine(
                    D2D1::Point2F(static_cast<FLOAT>(x), 0.0f),
                    D2D1::Point2F(static_cast<FLOAT>(x), rtSize.height),
                    m_pLightSlateGrayBrush,
                    0.5f
                    );
            }

            for (int y = 0; y < height; y += 10)
            {
                m_pRenderTarget->DrawLine(
                    D2D1::Point2F(0.0f, static_cast<FLOAT>(y)),
                    D2D1::Point2F(rtSize.width, static_cast<FLOAT>(y)),
                    m_pLightSlateGrayBrush,
                    0.5f
                    );
            }
7.创建两个位于屏幕中心的矩形图像。
            // Draw two rectangles.
            D2D1_RECT_F rectangle1 = D2D1::RectF(
                rtSize.width/2 - 50.0f,
                rtSize.height/2 - 50.0f,
                rtSize.width/2 + 50.0f,
                rtSize.height/2 + 50.0f
                );

            D2D1_RECT_F rectangle2 = D2D1::RectF(
                rtSize.width/2 - 100.0f,
                rtSize.height/2 - 100.0f,
                rtSize.width/2 + 100.0f,
                rtSize.height/2 + 100.0f
                );
8.使用渲染目标对象的 FillRectangle 方法和灰色画刷对象填充第一个矩形的内部。
            // Draw a filled rectangle.
m_pRenderTarget->FillRectangle(&rectangle1, m_pLightSlateGrayBrush);9.使用渲染目标对象的DrawRectangle 方法和菊蓝色画刷绘制第二个矩形的轮廓线。
            // Draw the outline of a rectangle.
            m_pRenderTarget->DrawRectangle(&rectangle2, m_pCornflowerBlueBrush);
10.调用渲染目标对象的EndDraw方法。EndDraw方法返回一个HRESULT来表示绘图操作是否成功。结束步骤3中开始的if语句。
    hr = m_pRenderTarget->EndDraw();
 }
11.检查EndDraw返回的HRESULT。如果返回D2DERR_RECREATE_TARGET值,表示需要重新创建渲染目标对象,调用DemoApp::DiscardDeviceResources方法来释放它;它将在下次窗口接收到WM_PAINT或WM_DISPLAYCHANGE消息时重新创建。
        if (hr == D2DERR_RECREATE_TARGET)
        {
            hr = S_OK;
            DiscardDeviceResources();
        }
12.返回HRESULT并结束该方法。
    return hr;
}
13.实现DemoApp::OnResize方法,使其将渲染目标对象调整为窗口的新大小。
    void DemoApp::OnResize(UINT width, UINT height)
    {
        if (m_pRenderTarget)
        {
            // Note: This method can fail, but it's okay to ignore the
            // error here, because the error will be returned again
            // the next time EndDraw is called.
            m_pRenderTarget->Resize(D2D1::SizeU(width, height));
        }
    }
您已经完成了本教程。
注意:要使用Direct2D,请确保您的应用程序包含d2d1.h头文件,并添加了对d2d1.lib库的依赖。你可以在Windows SDK中找到d2d1.h和d2d1.lib 。
总结
在本教程中,您学习了如何创建Direct2D资源和绘制基本图形。您还学习了如何构建应用程序,并通过最小化资源的创建来提高程序的性能。


 被折叠的 条评论
为什么被折叠?
被折叠的 条评论
为什么被折叠?
 到【灌水乐园】发言


