


- 修改系统参数
vi /etc/security/limits.conf #文件句柄数量的配置
* soft nofile 65536
* hard nofile 65536
* soft nproc 131072
* hard nproc 131072
:wq! #保存退出
vi /etc/security/limits.d/20-nproc.conf
* soft nofile 65536
* hard nofile 65536
* soft nproc 131072
* hard nproc 131072
:wq! #保存退出
安装依赖
yum install -y libtool *unixODBC*
如果163源太慢,可以更改为腾讯源
创建存储目录
1.3、目录说明
/etc/clickhouse-server #服务端的配置文件目录,包括全局配置config.xml和用户配置users.xml等
/etc/clickhouse-client #客户端配置,包括conf.d文件夹和config.xml文件
/var/lib/clickhouse #默认的数据存储目录,建议修改路径到大容量磁盘
/var/log/clickhouse-server #默认保存日志的目录,建议修改路径到大容量磁盘
mkdir /data460/uploadfiles
chown -R lrops:lrops /data460/uploadfiles/
scp -P29022 -r /data460/uploadfiles/* lrops@172.29.0.62:/data460/uploadinstalls/
安装clickhouse的服务端和客户端
cd /data460/uploadfiles/clickhouse24
yum localinstall -y clickhouse-common-static-24.4.1.2088.x86_64.rpm
yum localinstall -y clickhouse-server-24.4.1.2088.x86_64.rpm
yum localinstall -y clickhouse-client-24.4.1.2088.x86_64.rpm
1.4、新建存储目录
#数据存储目录
mkdir -p /data460/server/clickhouse/data
#日志存放目录
mkdir -p /data460/server/clickhouse/log
#修改目录权限:
chown clickhouse:clickhouse /data460/server/clickhouse/data -R
chown clickhouse:clickhouse /data460/server/clickhouse/log -R
chmod 755 /data460/server/clickhouse/data -R
chmod 755 /data460/server/clickhouse/log -R
5)启动服务daunt
service clickhouse-server start
Linux transparent hugepages are set to "always". Check /sys/kernel/mm/transparent_hugepage/enabled
需要关闭透明大页
echo 'never' > /sys/kernel/mm/transparent_hugepage/enabled
在 /etc/rc.local 或启动脚本中添加以下行,使 THP 禁用设置永久生效:
echo 'never' > /sys/kernel/mm/transparent_hugepage/enabled
echo 'never' > /sys/kernel/mm/transparent_hugepage/defrag
最佳实践
vim /etc/systemd/system/disable-transparent-huge-pages.service
写入以下内容
[Unit]
Description=Disable Transparent Huge Pages (THP)
DefaultDependencies=no
After=sysinit.target local-fs.target
Before=mongod.service
[Service]
Type=oneshot
ExecStart=/bin/sh -c 'echo never | tee /sys/kernel/mm/transparent_hugepage/enabled > /dev/null'
[Install]
WantedBy=basic.target
启动服务
systemctl daemon-reload
systemctl enable disable-transparent-huge-pages
systemctl start disable-transparent-huge-pages
6)启动交互式客户端
clickhouse-client
1.5、设置数据库密码,默认用户名是:default
cp /etc/clickhouse-server/users.xml /etc/clickhouse-server/users.xml.bak
vim /etc/clickhouse-server/users.xml
<password>test*123</password>
修改用户权限控制
<!-- User can create other users and grant rights to them. -->
<access_management>1</access_management> # 该部分控制权限,把原本注释去掉就能建用户了
# 下面这几行也要加,不然授权all的时候会提示权限不足 <named_collection_control>1</named_collection_control>
<show_named_collections>1</show_named_collections>
<show_named_collections_secrets>1</show_named_collections_secrets>
:wq! #保存退出
2、修改配置文件
修改3台服务器ClickHouse配置文件 /etc/clickhouse-server/config.xml
cp /etc/clickhouse-server/config.xml /etc/clickhouse-server/config.xml.bak #备份
2.1、修改全局配置信息
vim /etc/clickhouse-server/config.xml
<timezone>Asia/Shanghai</timezone> #修改时区
<listen_host>::</listen_host> #开启外部访问
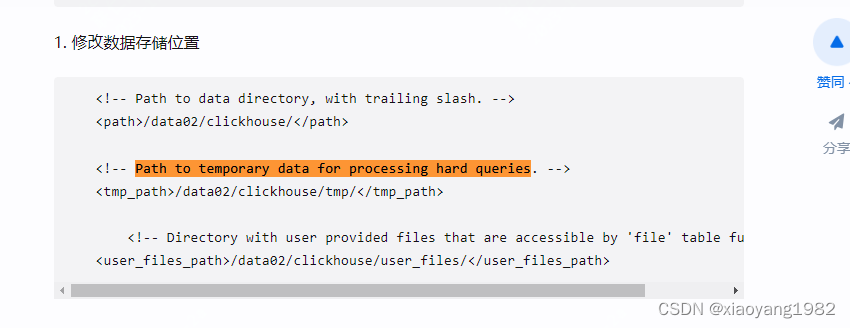
<path>/data460/server/clickhouse/data/</path> #修改数据存放路径,默认是<path>/var/lib/clickhouse</path>
<level>error</level> #不记录日志 trace 记录日志,设置为error
<log>/data460/server/clickhouse/log/clickhouse-server.log</log> <errorlog>/data460/server/clickhouse/log/clickhouse-server.err.log</errorlog>
<max_open_files>1048576</max_open_files> #文件句柄数量的配置
<http_port>8123</http_port> #http默认端口
<tcp_port>9000</tcp_port> #tcp默认端口
:wq! #保存退出
#临时文件目录暂时不修改,系统盘空间应该够。
提示报错DNS error: EAI: Address family for hostname not supported
本机没有开放ipv6 更改<listen_host>0.0.0.0</listen_host> ,再次启动服务成功。
service clickhouse-server start
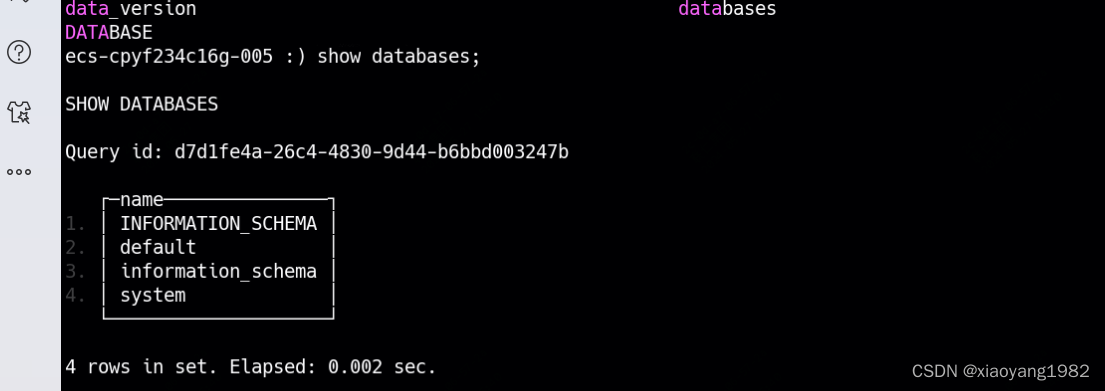
clickhouse-client 登入
show databases;
Clickhouse备份工具安装
yum -y localinstall clickhouse-backup-2.5.10-1.x86_64.rpm
简单备份操作。
查看readonly策略组是否存在
cat /etc/clickhouse-server/users.xml|grep readonly

创建备份用户,使用'default'策略组
CREATE USER bkuser IDENTIFIED WITH plaintext_password BY 'backupUser*2' SETTINGS PROFILE 'default';
alter user bkuser setting profile 'default';
GRANT SHOW TABLES, SELECT ON *.* TO bkuser;
//GRANT ALL ON *.* TO bkuser with grant option ; //全部权限,如果不授予此权限,一般不需要
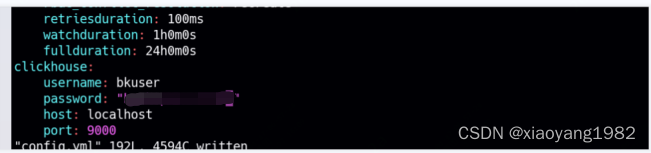
cd /etc/clickhouse-backup/
cp config.yml.example config.yml
vim config.yml
以root用户或者clickhouse用户执行本地备份
clickhouse-backup create
提示报错,没有表可以备份。

我们创建test库和表进行测试
建库
CREATE DATABASE IF NOT EXISTS test01;
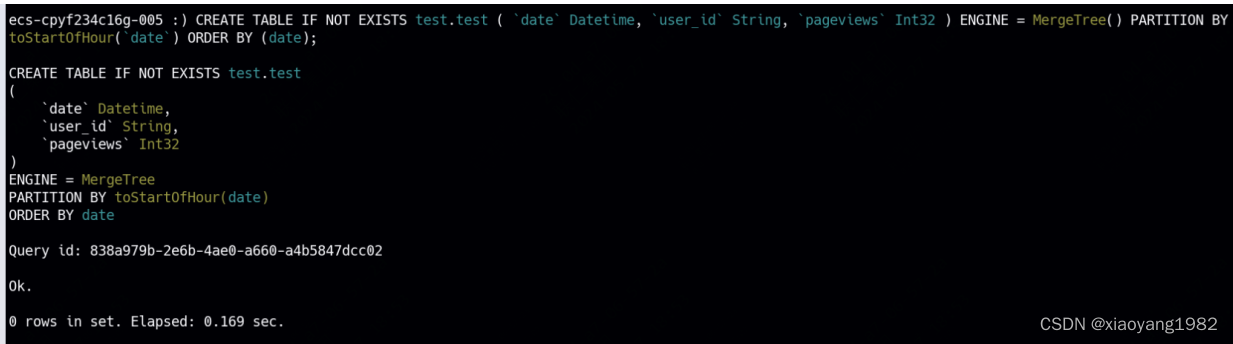
建表
CREATE TABLE IF NOT EXISTS test01.test ( `date` Datetime, `user_id` String, `pageviews` Int32 ) ENGINE = MergeTree() PARTITION BY toStartOfHour(`date`) ORDER BY (`date`);
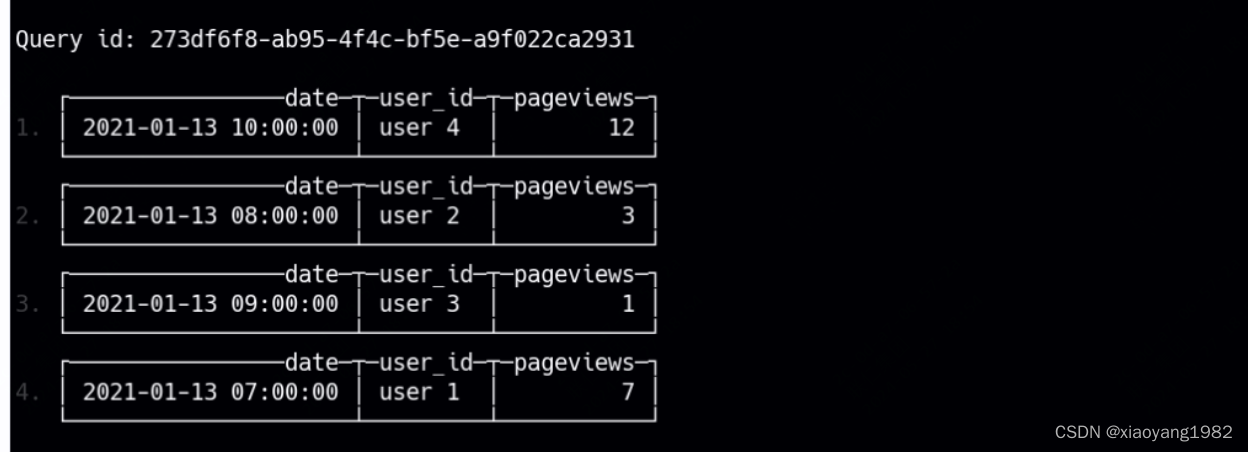
插入测试数据
INSERT INTO test01.test VALUES ('2021-01-13 07:00:00', 'user 1', 7), ('2021-01-13 08:00:00', 'user 2', 3), ('2021-01-13 09:00:00', 'user 3', 1), ('2021-01-13 10:00:00', 'user 4', 12);
选择
Use test01;
Select * from test;
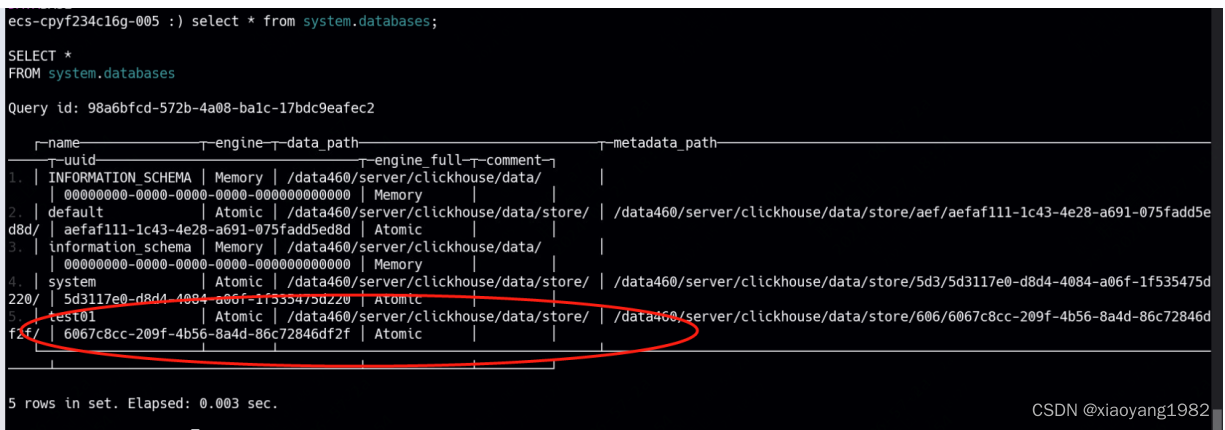
//查看system.databases库存储
再次创建备份。
提示报错
Not enough privilege
s. To execute this query, it's necessary to have the grant ALTER FREEZE PARTITION ON test01.test
进入clickhouse增加授权
GRANT ALTER FREEZE PARTITION ON *.* TO bkuser;
再次备份 clickhouse-backup create
备份成功
查看备份 clickhouse-backup list

有个坑注意一下:
我默认执行了clickhouse然后竟然进入服务了,然后创建数据库、表、插入数据,然后其实创建的实在/tmp目录,退出重进就没有了。我以为出了灵异事件,大家记得用clickhouse-client进入。再次部署后,执行clickhouse命令就会有报错提示,不知道当时是咋了。


 2429
2429

 被折叠的 条评论
为什么被折叠?
被折叠的 条评论
为什么被折叠?
 到【灌水乐园】发言


