


1. Ceph RGW的使用
1.1 对象存储
- Object是数据和数据属性的综合体。
- 是无层次结构的数据存储方法。
- 数据作为单独的对象进行存储。
- 数据不放置在目录层次结构中,而是存在于平面地址空间内的同一个级别。
- 应用通过唯一地址来识别单个独立数据对象。
- 每个对象可以包含有助于检索的元数据。
- 是为使用API在应用级别(而非用户级别)进行访问而设计。
1.2 RadosGW
- 是一种服务。
- 运行于librados之上。
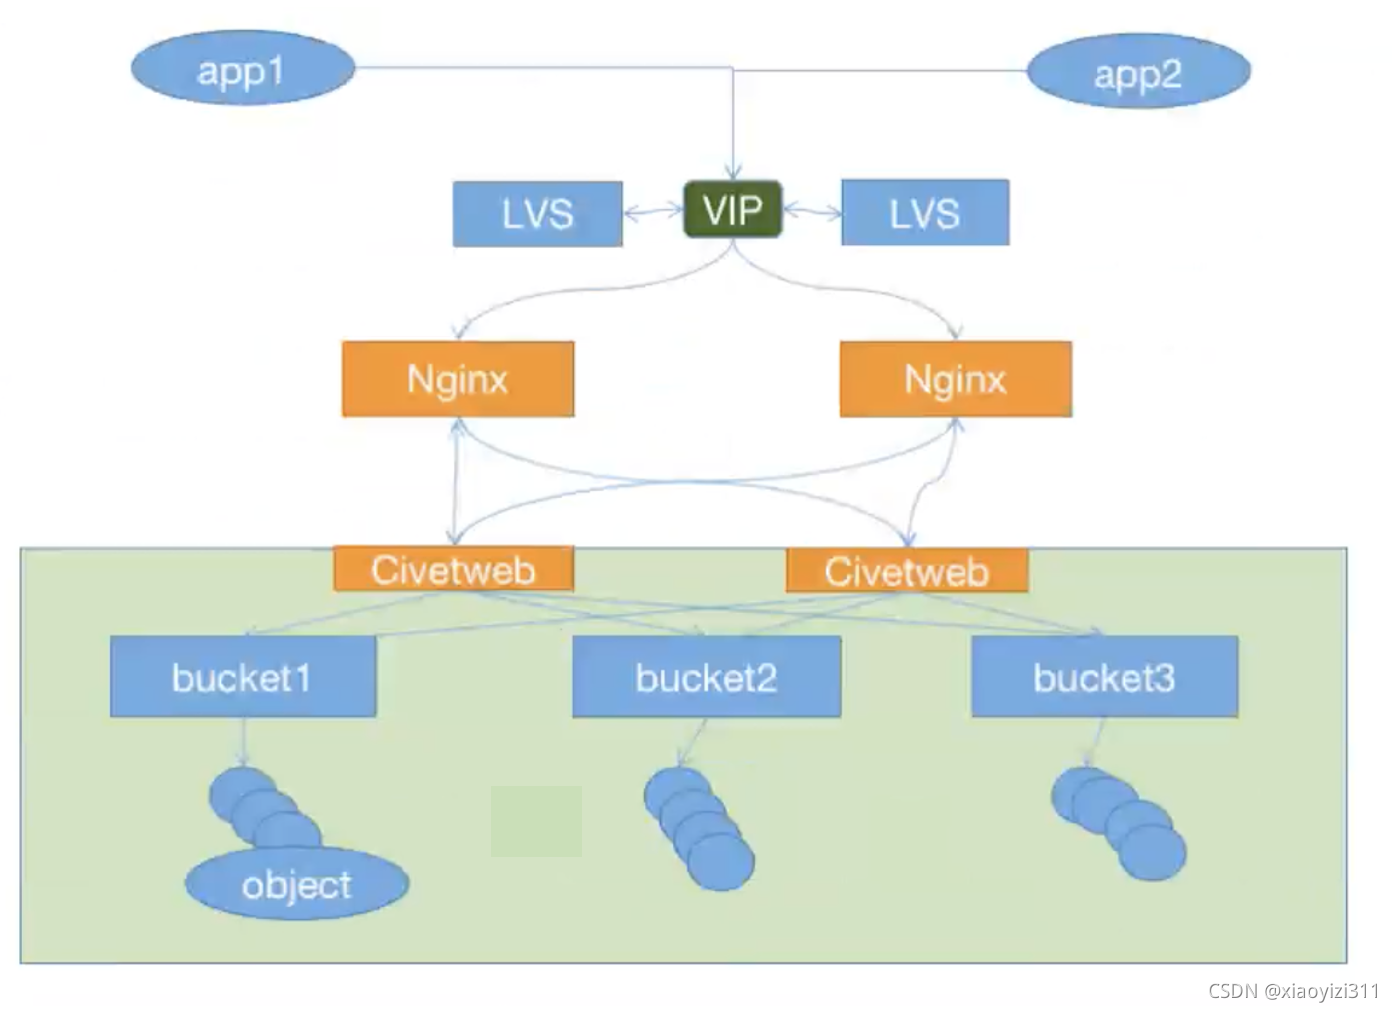
- 在ceph0.8以后使用Civetweb 的web服务响应API的请求(也可以使用Nginx或者Apache代替)。
- 客户端基于http/https,通过RESTful Api 与RGW通信,RGW使用librados与ceph集群通信。
- RGW客户端通过S3或者Swift Api使用RGW进行身份认证,然后RGW网关代表用户使用Cephx与Ceph集群进行身份认证。
1.3 对象存储的特点
- 通过对象存储将数据存储为对象,每个对象包含数据和数据自身的元数据。
- 对象通过Object ID来检索,无法通过普通文件系统的方式通过文件路径或者文件及文件夹名称来操作,只能通过API或者第三方客户端来访问。
- Bucket或者容器都不能嵌套。
- Bucket需要授权才能访问,一个账户可以对多个Bucket授权,且权限可不同。
- 横向扩展方便,检索数据快。
- 不支持客户端挂载,需要客户端在访问的时候指定文件名称。
- 不适用于文件过于频繁修改及删除的场景
1.3.1 Ceph RGW
- 使用Bucket作为存储桶(存储空间),实现对象数据存储和多用户的隔离。
- 可以设置和修改存储空间属性,控制地域,访问权限,生命周期等。
- 存储空间的名称在OSS范围内必须是全局唯一的,一旦创建无法修改名称。
- 存储空间内的对象数目没有限制。
1.3.2 Bucket的命名规范:
- 只能包含小写字母、数字、短横线(-)
- 必须以小写字母或者数字开头
- 长度在3-36个字节之间
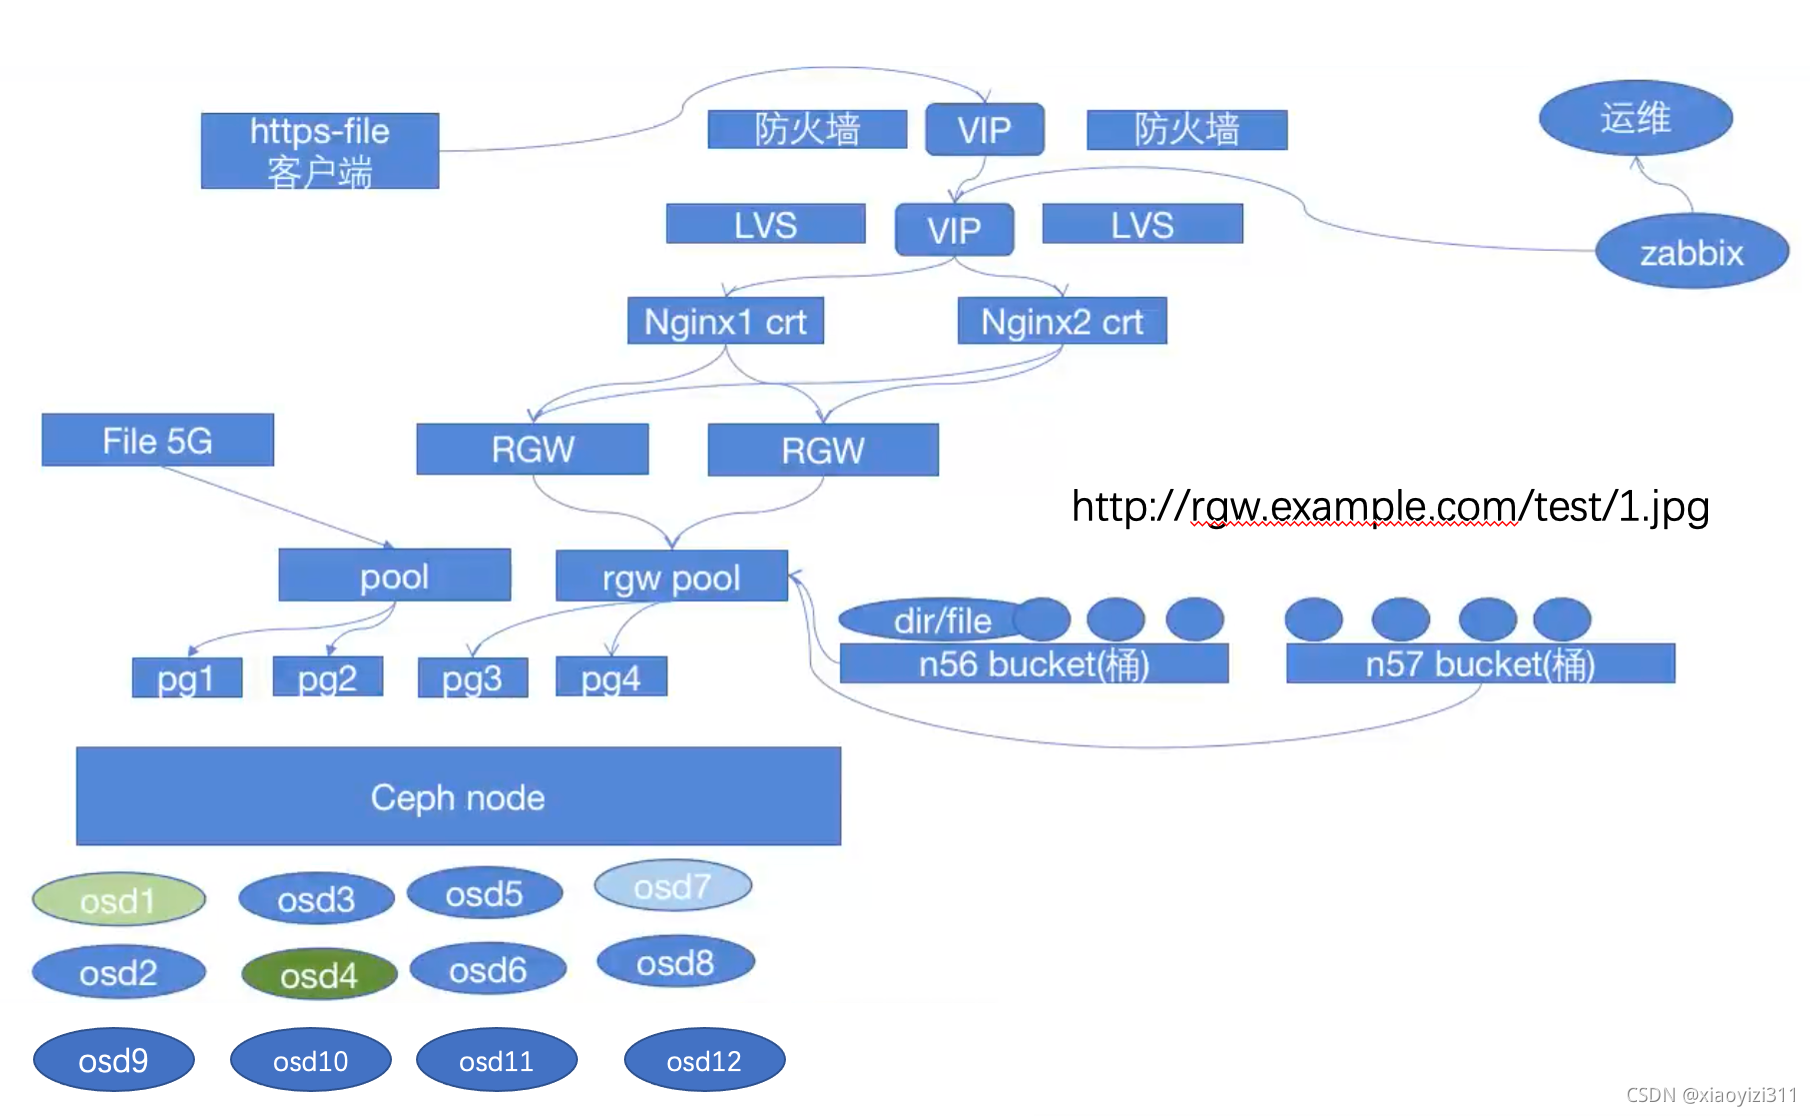
1.4 RGW的部署:
1.4.1 部署RadosGW的基本架构
1.4.2 部署RGW服务及初始化
1.4.2.1 安装RGW服务
Ubuntu:
root@ceph_mgr1:~# apt install -y radosgw
root@ceph_mgr2:~# apt install -y radosgw

CentOS:
root@ceph_mgr1:~# yum install ceph-radosgw
1.4.2.2 初始化rgw节点
ceph@ceph_deploy:~/ceph_deploy$ ceph-deploy  rgw create ceph_mgr1
ceph@ceph_deploy:~/ceph_deploy$ ceph-deploy  rgw create ceph_mgr2
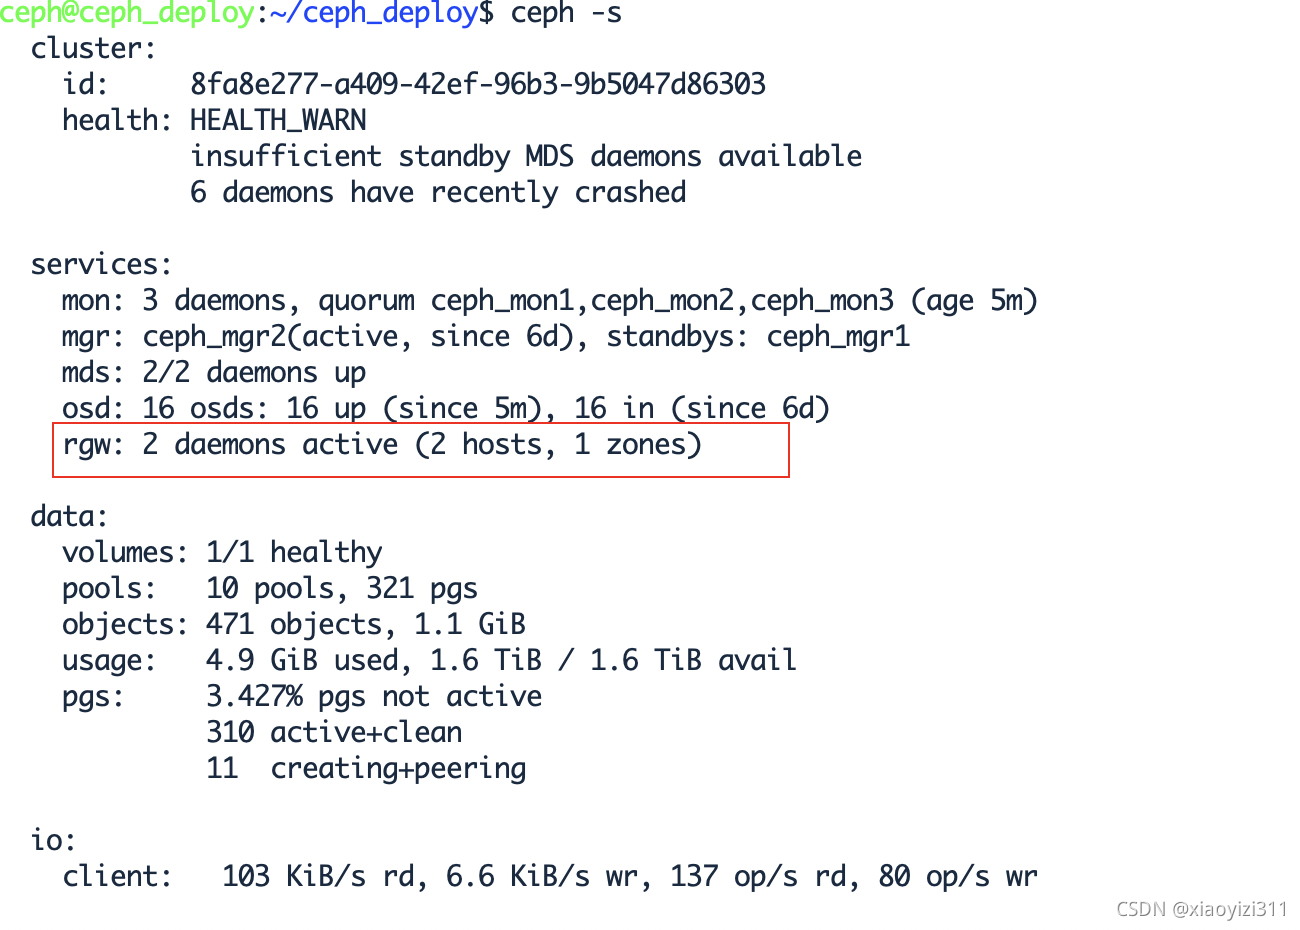
1.4.2.3 验证服务状态
ceph@ceph_deploy:~/ceph_deploy$ ceph -s
1.4.2.4 验证服务进程
root@ceph_mgr1:~# ps -ef | grep radosgw

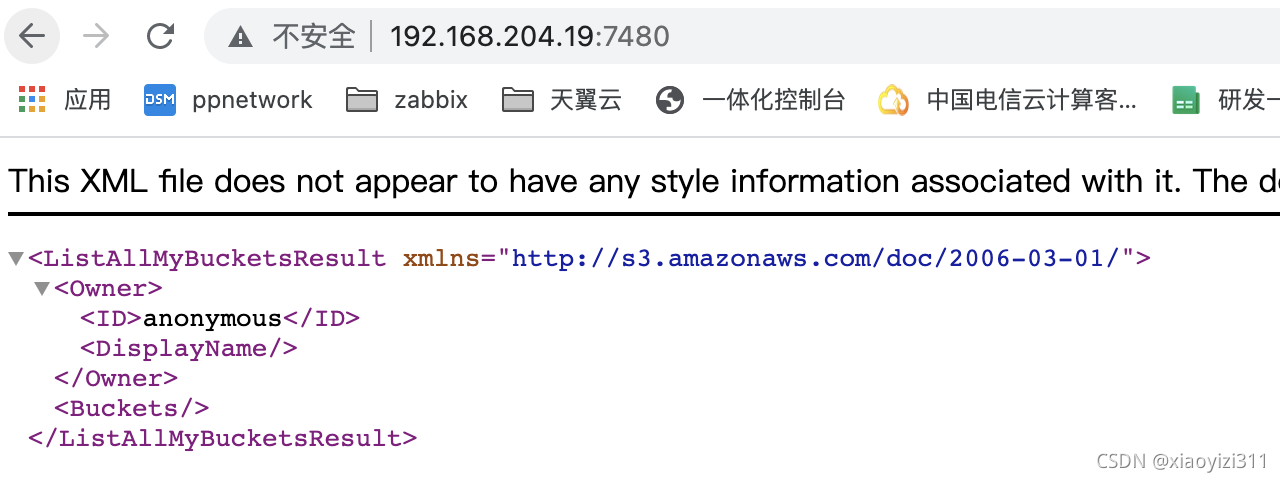
1.4.2.5 访问验证RGW服务
1.4.2.6 验证RGW Zone信息
ceph@ceph_deploy:~/ceph_deploy$ radosgw-admin  zone get --rgw-zone=default
{
    "id": "8f9d2a7a-148c-4db6-8f56-a80f6466bee8",
    "name": "default",
    "domain_root": "default.rgw.meta:root",
    "control_pool": "default.rgw.control",
    "gc_pool": "default.rgw.log:gc",
    "lc_pool": "default.rgw.log:lc",
    "log_pool": "default.rgw.log",
    "intent_log_pool": "default.rgw.log:intent",
    "usage_log_pool": "default.rgw.log:usage",
    "roles_pool": "default.rgw.meta:roles",
    "reshard_pool": "default.rgw.log:reshard",
    "user_keys_pool": "default.rgw.meta:users.keys",
    "user_email_pool": "default.rgw.meta:users.email",
    "user_swift_pool": "default.rgw.meta:users.swift",
    "user_uid_pool": "default.rgw.meta:users.uid",
    "otp_pool": "default.rgw.otp",
    "system_key": {
        "access_key": "",
        "secret_key": ""
    },
    "placement_pools": [
        {
            "key": "default-placement",
            "val": {
                "index_pool": "default.rgw.buckets.index",
                "storage_classes": {
                    "STANDARD": {
                        "data_pool": "default.rgw.buckets.data"
                    }
                },
                "data_extra_pool": "default.rgw.buckets.non-ec",
                "index_type": 0
            }
        }
    ],
    "realm_id": "",
    "notif_pool": "default.rgw.log:notif"
}
1.4.3 RadosGW的使用
1.4.3.1 RadosGW创建用户认证
ceph@ceph_deploy:~/ceph_deploy$ radosgw-admin  user create --uid="user1" --display-name="description_user1"
{
    "user_id": "user1",
    "display_name": "description_user1",
    "email": "",
    "suspended": 0,
    "max_buckets": 1000,
    "subusers": [],
    "keys": [
        {
            "user": "user1",
            "access_key": "3P1OVIEXESZ7ZPE0KD5P",
            "secret_key": "3laucbWxpkJOzdm6UszpO9XZAZgmWTWZbK37ZoEO"
        }
    ],
    "swift_keys": [],
    "caps": [],
    "op_mask": "read, write, delete",
    "default_placement": "",
    "default_storage_class": "",
    "placement_tags": [],
    "bucket_quota": {
        "enabled": false,
        "check_on_raw": false,
        "max_size": -1,
        "max_size_kb": 0,
        "max_objects": -1
    },
    "user_quota": {
        "enabled": false,
        "check_on_raw": false,
        "max_size": -1,
        "max_size_kb": 0,
        "max_objects": -1
    },
    "temp_url_keys": [],
    "type": "rgw",
    "mfa_ids": []
}
1.4.3.2 RadosGW的存储池类型
ceph@ceph_deploy:~/ceph_deploy$ ceph osd pool ls
device_health_metrics
cephfs-metadata
cephfs-data
.rgw.root
default.rgw.log
default.rgw.control
default.rgw.meta
default.rgw.buckets.index
default.rgw.buckets.non-ec
default.rgw.buckets.data

ceph@ceph_deploy:~/ceph_deploy$ ceph osd pool get default.rgw.buckets.data crush_rule
crush_rule: replicated_rule                       #默认数据存储池是副本池
ceph@ceph_deploy:~/ceph_deploy$ ceph osd pool get default.rgw.buckets.data size
size: 3
ceph@ceph_deploy:~/ceph_deploy$ ceph osd pool get default.rgw.buckets.data pgp_num
pgp_num: 32
ceph@ceph_deploy:~/ceph_deploy$ ceph osd pool get default.rgw.buckets.data pg_num
pg_num: 32

ceph@ceph_deploy:~/ceph_deploy$ ceph osd pool get default.rgw.buckets.data   #后面需要跟参数,如下:
Invalid command: missing required parameter var(size|min_size|pg_num|pgp_num|crush_rule|hashpspool|nodelete|nopgchange|nosizechange|write_fadvise_dontneed|noscrub|nodeep-scrub|hit_set_type|hit_set_period|hit_set_count|hit_set_fpp|use_gmt_hitset|target_max_objects|target_max_bytes|cache_target_dirty_ratio|cache_target_dirty_high_ratio|cache_target_full_ratio|cache_min_flush_age|cache_min_evict_age|erasure_code_profile|min_read_recency_for_promote|all|min_write_recency_for_promote|fast_read|hit_set_grade_decay_rate|hit_set_search_last_n|scrub_min_interval|scrub_max_interval|deep_scrub_interval|recovery_priority|recovery_op_priority|scrub_priority|compression_mode|compression_algorithm|compression_required_ratio|compression_max_blob_size|compression_min_blob_size|csum_type|csum_min_block|csum_max_block|allow_ec_overwrites|fingerprint_algorithm|pg_autoscale_mode|pg_autoscale_bias|pg_num_min|target_size_bytes|target_size_ratio|dedup_tier|dedup_chunk_algorithm|dedup_cdc_chunk_size)
osd pool get <pool> size|min_size|pg_num|pgp_num|crush_rule|hashpspool|nodelete|nopgchange|nosizechange|write_fadvise_dontneed|noscrub|nodeep-scrub|hit_set_type|hit_set_period|hit_set_count|hit_set_fpp|use_gmt_hitset|target_max_objects|target_max_bytes|cache_target_dirty_ratio|cache_target_dirty_high_ratio|cache_target_full_ratio|cache_min_flush_age|cache_min_evict_age|erasure_code_profile|min_read_recency_for_promote|all|min_write_recency_for_promote|fast_read|hit_set_grade_decay_rate|hit_set_search_last_n|scrub_min_interval|scrub_max_interval|deep_scrub_interval|recovery_priority|recovery_op_priority|scrub_priority|compression_mode|compression_algorithm|compression_required_ratio|compression_max_blob_size|compression_min_blob_size|csum_type|csum_min_block|csum_max_block|allow_ec_overwrites|fingerprint_algorithm|pg_autoscale_mode|pg_autoscale_bias|pg_num_min|target_size_bytes|target_size_ratio|dedup_tier|dedup_chunk_algorithm|dedup_cdc_chunk_size :  get pool parameter <var>
1.4.3.3 RGW个存储池的功能
- .rgw.root : 包含realm(领域信息),比如zone和zonegroup。
- default.rgw.log:存储日志信息,用户记录各种log信息。
- default.rgw.control:系统控制池,在有数据更新时,通知其它RGW更新缓存。
- default.rgw.meta:元数据存储池,通过不同的名称空间分别存储不同的rados对象,这些名称空间包括用户的UID,及其Bucket映射信息的名称空间users.uid,用户的密钥名称空间users.keys,用户的emai名称空间users.email,用户的subuser的名称空间 users.swift,bucket的名称空间root等。
- default.rgw.buckets.index:存放bucket到object的索引信息。
- default.rgw.buckets.non-ec:数据的额外信息存储池。
- default.rgw.buckets.data:存放对象的数据
1.4.4 RadosGW的高可用
1.4.4.1 http高可用
1.4.4.1.1 端口自定义
https://docs.ceph.com/en/latest/radosgw/frontends/
-
修改配置文件
ceph@ceph_deploy:~/ceph_deploy$ vim ceph.conf ... [client.rgw.ceph_mgr1] rgw_host = ceph_mgr1 rgw_frontends = civetweb port=8080 [client.rgw.ceph_mgr2] rgw_host = ceph_mgr2 rgw_frontends = civetweb port=8080 ... -
推送配置文件
ceph@ceph_deploy:~/ceph_deploy$ ceph-deploy --overwrite-conf config push ceph_mgr1 -
重启服务
root@ceph_mgr1:~# systemctl restart ceph-radosgw@rgw.ceph_mgr1 -
检查端口是否改变
root@ceph_mgr1:~# ss -anlptu |grep  radosgw
tcp  LISTEN 0      128                             0.0.0.0:8080         0.0.0.0:*                    users:(("radosgw",pid=6306,fd=71))
1.4.4.1.2 配置负载均衡
-
安装haproxy
root@ceph_mgr1:~# apt install haproxy -
配置haproxy
root@ceph_mgr1:~# vim /etc/haproxy/haproxy.cfg ... listen ceph-rgw bind 192.168.204.19:80 mode tcp server rgw1 192.168.204.19:8080 check inter 3s fall 3 rise 5 server rgw2 192.168.204.20:8080 check inter 3s fall 3 rise 5 ... -
重启haproxy服务
root@ceph_mgr1:~# systemctl restart haproxy
1.4.4.2 https高可用
一般在反向代理层开启SSL,由于RGW的Civetweb一般在内网环境,较少启用SSL认证,故以下只以自签名证书的形式简要介绍Radosgw启用SSL
1.4.4.2.1启用SSL
-
自签名证书
root@ceph_mgr2:~# cd /etc/ceph/ root@ceph_mgr2:/etc/ceph# mkdir cert root@ceph_mgr2:/etc/ceph# mv cert certs root@ceph_mgr2:/etc/ceph# cd certs/ root@ceph_mgr2:/etc/ceph/certs# ls root@ceph_mgr2:/etc/ceph/certs# openssl genrsa -out civetweb.key 2048 Generating RSA private key, 2048 bit long modulus (2 primes) ...............................................+++++ ...........................................................+++++ e is 65537 (0x010001) root@ceph_mgr2:/etc/ceph/certs# openssl req -new -x509 -key civetweb.key -out civetweb.crt -subj "/CN=rgw.mgr.net" Can't load /root/.rnd into RNG 140671091601856:error:2406F079:random number generator:RAND_load_file:Cannot open file:../crypto/rand/randfile.c:88:Filename=/root/.rnd root@ceph_mgr2:/etc/ceph/certs# cat civetweb.key civetweb.crt > civetweb.pem -
配置SSL
ceph@ceph_deploy:~/ceph_deploy$ vim ceph.conf ... [client.rgw.ceph_mgr1] rgw_host = ceph_mgr1 rgw_frontends = "civetweb port=8080+8443s ssl_certificate=/etc/ceph/certs/civetweb.pem" [client.rgw.ceph_mgr2] rgw_host = ceph_mgr2 rgw_frontends = "civetweb port=8080+8443s ssl_certificate=/etc/ceph/certs/civetweb.pem" ... -
推送配置文件,重启服务
ceph@ceph_deploy:~/ceph_deploy$ ceph-deploy --overwrite-conf config push ceph_mgr1
ceph@ceph_deploy:~/ceph_deploy$ ceph-deploy --overwrite-conf config push ceph_mgr2
root@ceph_mgr1:~# systemctl restart ceph-radosgw@rgw.ceph_mgr1
root@ceph_mgr2:~# systemctl restart ceph-radosgw@rgw.ceph_mgr2
1.4.4.2.2 日志及其它优化配置
-
创建日志路径
root@ceph_mgr1:~# mkdir /var/log/radosgw root@ceph_mgr1:~# chown ceph:ceph /var/log/radosgw root@ceph_mgr2:~# mkdir /var/log/radosgw root@ceph_mgr2:~# chown ceph:ceph /var/log/radosgw -
修改日志路径,重启服务
ceph@ceph_deploy:~/ceph_deploy$ vim ceph.conf ... [client.rgw.ceph_mgr1] rgw_host = ceph_mgr1 rgw_frontends = "civetweb port=8080+8443s ssl_certificate=/etc/ceph/certs/civetweb.pem request_timeout_ms=30000 error_log_file=/var/log/radosgw/civetweb.error.log access_log_file=/var/log/radosgw/civetweb.access.log num_threads=100" [client.rgw.ceph_mgr2] rgw_host = ceph_mgr2 rgw_frontends = "civetweb port=8080+8443s ssl_certificate=/etc/ceph/certs/civetweb.pem request_timeout_ms=30000 error_log_file=/var/log/radosgw/civetweb.error.log access_log_file=/var/log/radosgw/civetweb.access.log num_threads=100" ... ceph@ceph_deploy:~/ceph_deploy$ ceph-deploy --overwrite-conf config push ceph_mgr1 ceph@ceph_deploy:~/ceph_deploy$ ceph-deploy --overwrite-conf config push ceph_mgr2 root@ceph_mgr1:~# systemctl status ceph-radosgw@rgw.ceph_mgr1 root@ceph_mgr2:~# systemctl status ceph-radosgw@rgw.ceph_mgr2 -
访问测试,验证日志
root@ceph_mgr1:/var/log/radosgw# cat civetweb.access.log
192.168.204.1 - - [02/Sep/2021:15:04:50 +0800] "GET / HTTP/1.1" 200 438 - Mozilla/5.0 (Macintosh; Intel Mac OS X 10_15_7) AppleWebKit/537.36 (KHTML, like Gecko) Chrome/92.0.4515.159 Safari/537.36
1.4.5 数据的读写访问测试
1.4.5.1 安装s3cmd客户端
root@client:~# apt install s3cmd
1.4.5.2 配置s3cmd客户端
root@client:~# s3cmd --configure

Enter new values or accept defaults in brackets with Enter.
Refer to user manual for detailed description of all options.

Access key and Secret key are your identifiers for Amazon S3. Leave them empty for using the env variables.
Access Key [3P1OVIEXESZ7ZPE0KD5P]:
Secret Key [3laucbWxpkJOzdm6UszpO9XZAZgmWTWZbK37ZoEO]:
Default Region [US]:

Use "s3.amazonaws.com" for S3 Endpoint and not modify it to the target Amazon S3.
S3 Endpoint [rgw1.mgr1.com:7480]: 192.168.204.19:7480

Use "%(bucket)s.s3.amazonaws.com" to the target Amazon S3. "%(bucket)s" and "%(location)s" vars can be used
if the target S3 system supports dns based buckets.
DNS-style bucket+hostname:port template for accessing a bucket [rgw1.mgr1.com:7480/%(bucket)s]: 192.168.204.19:7480/%(bucket)  #˙注意此处%(bucket)后没有s,可以是IP,也可以是域名

Encryption password is used to protect your files from reading
by unauthorized persons while in transfer to S3
Encryption password:
Path to GPG program [/usr/bin/gpg]:

When using secure HTTPS protocol all communication with Amazon S3
servers is protected from 3rd party eavesdropping. This method is
slower than plain HTTP, and can only be proxied with Python 2.7 or newer
Use HTTPS protocol [No]:

On some networks all internet access must go through a HTTP proxy.
Try setting it here if you can't connect to S3 directly
HTTP Proxy server name:
New settings:
  Access Key: 3P1OVIEXESZ7ZPE0KD5P
  Secret Key: 3laucbWxpkJOzdm6UszpO9XZAZgmWTWZbK37ZoEO
  Default Region: US
  S3 Endpoint: 192.168.204.19:7480
  DNS-style bucket+hostname:port template for accessing a bucket: 192.168.204.19:7480/%(bucket)
  Encryption password:
  Path to GPG program: /usr/bin/gpg
  Use HTTPS protocol: False
  HTTP Proxy server name:
  HTTP Proxy server port: 0
Test access with supplied credentials? [Y/n] Y
Please wait, attempting to list all buckets...
Success. Your access key and secret key worked fine :-)
Now verifying that encryption works...
Not configured. Never mind.
Save settings? [y/N] Y
Configuration saved to '/root/.s3cfg'
1.4.5.3 创建桶
root@client:~# s3cmd mb s3://mytest/ #-d 可以开启debug模式
1.4.5.4 上传文件
root@client:~# s3cmd put buck s3://mytest/buck
1.4.5.5 查看帮助
root@client:~# s3cmd --help
2. Ceph Crush使用进阶
2.1 Ceph集群中由mon服务器维护的5种运行图
-
Monitor Map —监视器运行图
-
OSD Map —OSD运行图
-
PG Map —PG运行图
-
Crush Map —可控的,可复制的,可伸缩的一致性hash算法。Crush 运行图是基于OSD Map 创建出新的PG组合列表,用于存储数据
-
MDS Map — Cephfs Metadata运行图
2.2 Object 的映射
-
Obj —> PG hash(oid)%PG_num = pgid
-
Obj —> OSD Crush 根据当前的Mon运行图,返回PG内的最新OSD组合,数据即可往主的OSD写,然后在往OSD同步
2.3 Crush算法–针对节点选择
目前有5种算法来实现节点的选择,包括Uniform,List,Tree,Straw,Straw2,早期采用的是Straw,目前已经使用Straw2
2.4 PG与OSD的映射调整
默认情况下,Crush算法自行对创建的Pool 中的PG分配OSD,但可以手动基于权重设置Crush算法分配数据的倾向性,比如1T的磁盘权重是1,2T的是2,推荐使用相同大小的设备。
2.4.1 查看当前状态
ceph@ceph_deploy:~/ceph_deploy$ ceph osd df
ID  CLASS  WEIGHT   REWEIGHT  SIZE     RAW USE  DATA     OMAP     META     AVAIL    %USE  VAR   PGS  STATUS
 0    hdd  0.09769   1.00000  100 GiB   95 MiB   46 MiB   11 KiB   49 MiB  100 GiB  0.09  0.26   63      up
 1    hdd  0.09769   1.00000  100 GiB  527 MiB  388 MiB   18 KiB  140 MiB   99 GiB  0.52  1.43   69      up
 2    hdd  0.09769   1.00000  100 GiB  172 MiB  114 MiB    7 KiB   58 MiB  100 GiB  0.17  0.47   59      up
 3    hdd  0.09769   1.00000  100 GiB  433 MiB  357 MiB   23 KiB   76 MiB  100 GiB  0.42  1.17   81      up
 4    hdd  0.09769   1.00000  100 GiB  840 MiB  328 MiB    3 KiB  513 MiB   99 GiB  0.82  2.27   67      up
 5    hdd  0.09769   1.00000  100 GiB  225 MiB   89 MiB      0 B  136 MiB  100 GiB  0.22  0.61   71      up
 6    hdd  0.09769   1.00000  100 GiB  335 MiB  150 MiB      0 B  186 MiB  100 GiB  0.33  0.91   62      up
 7    hdd  0.09769   1.00000  100 GiB  904 MiB  365 MiB    2 KiB  539 MiB   99 GiB  0.88  2.44   72      up
 8    hdd  0.09769   1.00000  100 GiB  257 MiB  209 MiB   14 KiB   47 MiB  100 GiB  0.25  0.69   76      up
 9    hdd  0.09769   1.00000  100 GiB  480 MiB  350 MiB   16 KiB  130 MiB  100 GiB  0.47  1.30   60      up
10    hdd  0.09769   1.00000  100 GiB  156 MiB  109 MiB   16 KiB   47 MiB  100 GiB  0.15  0.42   61      up
11    hdd  0.09769   1.00000  100 GiB  232 MiB  164 MiB    8 KiB   69 MiB  100 GiB  0.23  0.63   72      up
12    hdd  0.09769   1.00000  100 GiB  388 MiB  309 MiB   16 KiB   79 MiB  100 GiB  0.38  1.05   79      up
13    hdd  0.09769   1.00000  100 GiB  276 MiB  215 MiB   11 KiB   62 MiB  100 GiB  0.27  0.75   67      up
14    hdd  0.09769   1.00000  100 GiB  332 MiB  271 MiB   14 KiB   61 MiB  100 GiB  0.32  0.90   71      up
15    hdd  0.09769   1.00000  100 GiB  265 MiB  203 MiB   23 KiB   62 MiB  100 GiB  0.26  0.72   77      up
                       TOTAL  1.6 TiB  5.8 GiB  3.6 GiB  191 KiB  2.2 GiB  1.6 TiB  0.36
MIN/MAX VAR: 0.26/2.44  STDDEV: 0.22
- weight,表示设备(device)的容量相对值,如1TB对应1.00, 则500G的OSD weight 为0.5。weight 是基于磁盘空间分配PG的数量,让Crush 算法尽可能往磁盘空间大的磁盘分配OSD。
- Reweight,参数的目的是重新平衡Ceph的Crush 算法随机分配的PG,默认的分配是概率上的均衡,即使OSD都是一样的磁盘空间,也会产生一些PG分配不均匀,此时可以通过调整reweight参数,让ceph集群立即重新分配当前磁盘的PG,以达到数据均匀分布的目的,Reweight是PG已经分配完成,要ceph集群重新分配PG分布。
2.4.2 修改weight参数
ceph@ceph_deploy:~/ceph_deploy$ ceph osd crush reweight osd.0 0.02
reweighted item id 0 name 'osd.0' to 0.02 in crush map

ceph@ceph_deploy:~/ceph_deploy$ ceph osd df
ID  CLASS  WEIGHT   REWEIGHT  SIZE     RAW USE  DATA     OMAP     META     AVAIL    %USE  VAR   PGS  STATUS
 0    hdd  0.01999   1.00000  100 GiB  439 MiB  209 MiB   11 KiB  230 MiB  100 GiB  0.43  1.02   29      up
 1    hdd  0.09769   1.00000  100 GiB  528 MiB  388 MiB   18 KiB  141 MiB   99 GiB  0.52  1.23   71      up
 2    hdd  0.09769   1.00000  100 GiB  273 MiB  162 MiB    7 KiB  111 MiB  100 GiB  0.27  0.63   64      up
 3    hdd  0.09769   1.00000  100 GiB  443 MiB  361 MiB   23 KiB   82 MiB  100 GiB  0.43  1.03   81      up
 4    hdd  0.09769   1.00000  100 GiB  847 MiB  328 MiB    3 KiB  519 MiB   99 GiB  0.83  1.96   69      up
 5    hdd  0.09769   1.00000  100 GiB  266 MiB  109 MiB      0 B  157 MiB  100 GiB  0.26  0.62   68      up
 6    hdd  0.09769   1.00000  100 GiB  434 MiB  198 MiB      0 B  236 MiB  100 GiB  0.42  1.01   57      up
 7    hdd  0.09769   1.00000  100 GiB  932 MiB  375 MiB    2 KiB  557 MiB   99 GiB  0.91  2.16   73      up
 8    hdd  0.09769   1.00000  100 GiB  250 MiB  201 MiB   14 KiB   49 MiB  100 GiB  0.24  0.58   73      up
 9    hdd  0.09769   1.00000  100 GiB  586 MiB  402 MiB   16 KiB  184 MiB   99 GiB  0.57  1.36   57      up
10    hdd  0.09769   1.00000  100 GiB  215 MiB  137 MiB   16 KiB   78 MiB  100 GiB  0.21  0.50   67      up
11    hdd  0.09769   1.00000  100 GiB  234 MiB  156 MiB    8 KiB   78 MiB  100 GiB  0.23  0.54   71      up
12    hdd  0.09769   1.00000  100 GiB  399 MiB  313 MiB   16 KiB   86 MiB  100 GiB  0.39  0.93   70      up
13    hdd  0.09769   1.00000  100 GiB  270 MiB  219 MiB   11 KiB   51 MiB  100 GiB  0.26  0.63   69      up
14    hdd  0.09769   1.00000  100 GiB  429 MiB  319 MiB   14 KiB  110 MiB  100 GiB  0.42  1.00   67      up
15    hdd  0.09769   1.00000  100 GiB  355 MiB  247 MiB   23 KiB  107 MiB  100 GiB  0.35  0.82   73      up
                       TOTAL  1.6 TiB  6.7 GiB  4.0 GiB  191 KiB  2.7 GiB  1.6 TiB  0.42
MIN/MAX VAR: 0.50/2.16  STDDEV: 0.20
2.4.3 修改reweight 参数
ceph@ceph_deploy:~/ceph_deploy$ ceph osd reweight 0 0.6
reweighted osd.0 to 0.6 (9999)

ceph@ceph_deploy:~/ceph_deploy$ ceph osd df
ID  CLASS  WEIGHT   REWEIGHT  SIZE     RAW USE  DATA     OMAP     META     AVAIL    %USE  VAR   PGS  STATUS
 0    hdd  0.01999   0.59999  100 GiB  269 MiB   30 MiB   11 KiB  239 MiB  100 GiB  0.26  0.63   17      up
 1    hdd  0.09769   1.00000  100 GiB  519 MiB  366 MiB   18 KiB  152 MiB   99 GiB  0.51  1.22   74      up
 2    hdd  0.09769   1.00000  100 GiB  248 MiB  103 MiB    7 KiB  145 MiB  100 GiB  0.24  0.58   68      up
 3    hdd  0.09769   1.00000  100 GiB  459 MiB  344 MiB   23 KiB  115 MiB  100 GiB  0.45  1.08   83      up
 4    hdd  0.09769   1.00000  100 GiB  873 MiB  340 MiB    3 KiB  532 MiB   99 GiB  0.85  2.05   72      up
 5    hdd  0.09769   1.00000  100 GiB  344 MiB  137 MiB      0 B  207 MiB  100 GiB  0.34  0.81   72      up
 6    hdd  0.09769   1.00000  100 GiB  356 MiB  118 MiB      0 B  237 MiB  100 GiB  0.35  0.83   57      up
 7    hdd  0.09769   1.00000  100 GiB  917 MiB  334 MiB    2 KiB  582 MiB   99 GiB  0.90  2.15   78      up
 8    hdd  0.09769   1.00000  100 GiB  268 MiB  210 MiB   14 KiB   58 MiB  100 GiB  0.26  0.63   80      up
 9    hdd  0.09769   1.00000  100 GiB  580 MiB  350 MiB   16 KiB  230 MiB   99 GiB  0.57  1.36   64      up
10    hdd  0.09769   1.00000  100 GiB  189 MiB  109 MiB   16 KiB   80 MiB  100 GiB  0.18  0.44   67      up
11    hdd  0.09769   1.00000  100 GiB  330 MiB  198 MiB    8 KiB  132 MiB  100 GiB  0.32  0.77   72      up
12    hdd  0.09769   1.00000  100 GiB  417 MiB  297 MiB   16 KiB  120 MiB  100 GiB  0.41  0.98   79      up
13    hdd  0.09769   1.00000  100 GiB  268 MiB  215 MiB   11 KiB   53 MiB  100 GiB  0.26  0.63   71      up
14    hdd  0.09769   1.00000  100 GiB  471 MiB  315 MiB   14 KiB  156 MiB  100 GiB  0.46  1.11   72      up
15    hdd  0.09769   1.00000  100 GiB  313 MiB  204 MiB   23 KiB  109 MiB  100 GiB  0.31  0.73   81      up
                       TOTAL  1.6 TiB  6.7 GiB  3.6 GiB  191 KiB  3.1 GiB  1.6 TiB  0.42
MIN/MAX VAR: 0.44/2.15  STDDEV: 0.20
2.5 Crush 运行图管理
2.5.1 Crush Map 导出
通过工具将ceph的crush 运行图导出,并进行修改后在导入
2.5.1.1 导出Crush运行图
root@ceph_deploy:~# mkdir /data/ceph -p
root@ceph_deploy:~# ceph osd getcrushmap -o /data/ceph/crushmap

root@ceph_deploy:~# apt install -y ceph-base
2.5.1.2 将运行图转换为文本
root@ceph_deploy:/data/ceph# crushtool -d /data/ceph/crushmap > /data/ceph/crushmap.txt

root@ceph_deploy:/data/ceph# cat crushmap.txt
# begin crush map  可以调整的ceph map参数
tunable choose_local_tries 0
tunable choose_local_fallback_tries 0
tunable choose_total_tries 50
tunable chooseleaf_descend_once 1
tunable chooseleaf_vary_r 1
tunable chooseleaf_stable 1
tunable straw_calc_version 1
tunable allowed_bucket_algs 54
# devices  当前的设备列表
device 0 osd.0 class hdd
device 1 osd.1 class hdd
device 2 osd.2 class hdd
device 3 osd.3 class hdd
device 4 osd.4 class hdd
device 5 osd.5 class hdd
device 6 osd.6 class hdd
device 7 osd.7 class hdd
device 8 osd.8 class hdd
device 9 osd.9 class hdd
device 10 osd.10 class hdd
device 11 osd.11 class hdd
device 12 osd.12 class hdd
device 13 osd.13 class hdd
device 14 osd.14 class hdd
device 15 osd.15 class hdd
# types

type 0 osd      #OSD守护进程,对应一个磁盘设备
type 1 host     #一个主机
type 2 chassis  #刀片服务器机箱
type 3 rack     #包含若干服务器的机柜/机架
type 4 row      #包含若干个机柜的一排机柜
type 5 pdu      #机柜的接入电源插座
type 6 pod      #一个机房的若干个小房间
type 7 room     #包含若干机柜的房间,一个数据中心中有多个这个样的房间组成
type 8 datacenter #一个数据中心/IDS
type 9 zone
type 10 region    #一个区域
type 11 root      #bucket 分层的最顶部,根

# buckets
host ceph_node1 {  类型为host,名称为ceph_node1
        id -3           # do not change unnecessarily
        id -2 class hdd         # do not change unnecessarily
        # weight 0.313
        alg straw2      #crush 算法,管理OSD角色
        hash 0  # rjenkins1   #使用哪个hash算法,0表示选择rjenkins1算法
        item osd.0 weight 0.020   #osd.0 的权重比例,Crush会自动根据磁盘空间计算,不同的大小的磁盘,权重不一样
        item osd.1 weight 0.098
        item osd.2 weight 0.098
        item osd.3 weight 0.098
}
host ceph_node2 {
        id -5           # do not change unnecessarily
        id -6 class hdd         # do not change unnecessarily
        # weight 0.391
        alg straw2
        hash 0  # rjenkins1
        item osd.4 weight 0.098
        item osd.5 weight 0.098
        item osd.6 weight 0.098
        item osd.7 weight 0.098
}
host ceph_node3 {
        id -7           # do not change unnecessarily
        id -8 class hdd         # do not change unnecessarily
        # weight 0.391
        alg straw2
        hash 0  # rjenkins1
        item osd.8 weight 0.098
        item osd.9 weight 0.098
        item osd.10 weight 0.098
        item osd.11 weight 0.098
}
host ceph_node4 {
        id -9           # do not change unnecessarily
        id -10 class hdd                # do not change unnecessarily
        # weight 0.391
        alg straw2
        hash 0  # rjenkins1
        item osd.12 weight 0.098
        item osd.13 weight 0.098
        item osd.14 weight 0.098
        item osd.15 weight 0.098
}
root default { #根的配置
        id -1           # do not change unnecessarily
        id -4 class hdd         # do not change unnecessarily
        # weight 1.485
        alg straw2
        hash 0  # rjenkins1
        item ceph_node1 weight 0.313
        item ceph_node2 weight 0.391
        item ceph_node3 weight 0.391
        item ceph_node4 weight 0.391
}
# rules
rule replicated_rule { #副本池的默认配置
        id 0
        type replicated
        min_size 1
        max_size 10  #默认最大副本数为10
        step take default  #基于default定义的主机分配OSD
        step chooseleaf firstn 0 type host  #选择主机,故障域的类型为主机
        step emit #弹出配置,即返回给客户端
}
# end crush map
2.5.2 修改Crush Map
通过修改Crush Map,实现如,以实际机柜分为不同的故障域,达到数据在不同机柜,不同磁盘类型(HDD,SSD)之间的分散排布,实现不同级别的高可用。
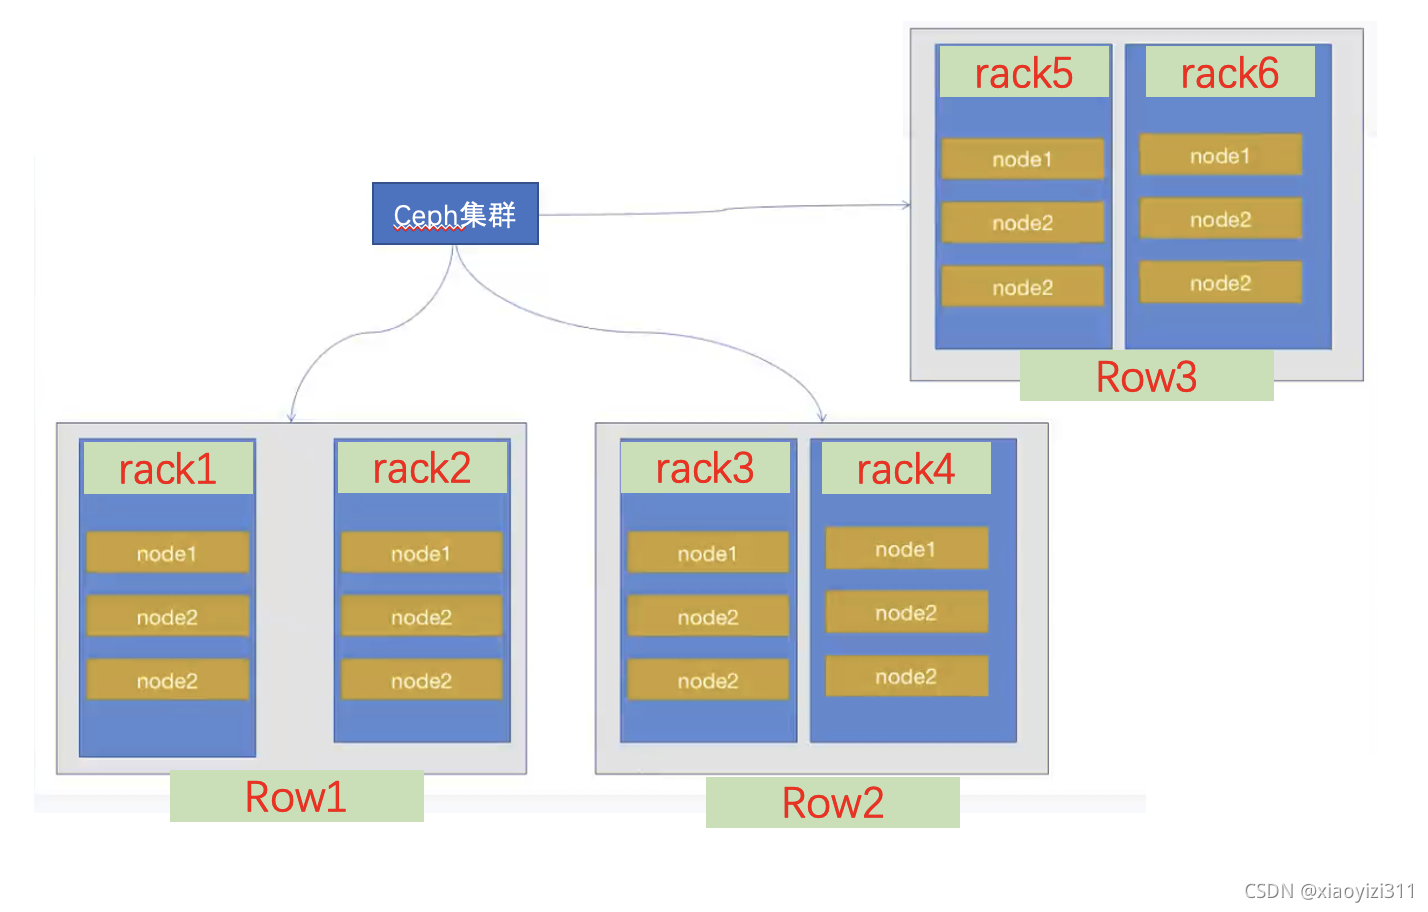
Ceph Crush 算法分配PG的时候,可以将PG分配到不同主机的OSD上,以实现以主机为单位高可用,这是默认机制,但无法保证不同PG位于不同机柜或者机房的主机上,如果要实现基于机柜或者更高级别的IDC等方式实现数据的高可用,或者实现A项目数据在SSD,B项目数据在HDD,则需要通过手动修改Crush Map,在导入集群的方式实现。
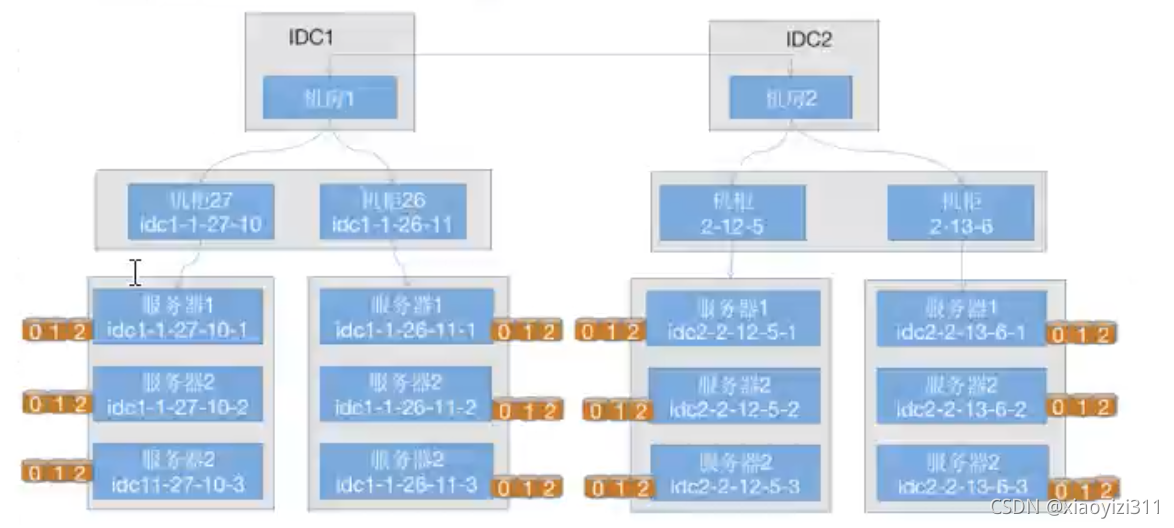
如下以不同类型的磁盘为例,实现HDD和SSD磁盘类型的OSD存放不同数据的目的。
vim /data/ceph/cephcrushmap.txt
...
#添加基本主机类型
#My SSD nodes
host ceph_ssd_node1 {
        id -10          # do not change unnecessarily
        id -11 class ssd                # do not change unnecessarily
        # weight 0.391
        alg straw2
        hash 0  # rjenkins1
        item osd.1 weight 0.098       #注意:这里的item 不要与配置文件中自带的冲突,冲突的要删掉
}
host ceph_ssd_node2 {
        id -11          # do not change unnecessarily
        id -12 class ssd                # do not change unnecessarily
        # weight 0.391
        alg straw2
        hash 0  # rjenkins1
        item osd.4 weight 0.098
}
host ceph_ssd_node3 {
        id -12          # do not change unnecessarily
        id -13 class ssd                # do not change unnecessarily
        # weight 0.391
        alg straw2
        hash 0  # rjenkins1
        item osd.8 weight 0.098
}
host ceph_ssd_node4 {
        id -13          # do not change unnecessarily
        id -14 class ssd                # do not change unnecessarily
        # weight 0.391
        alg straw2
        hash 0  # rjenkins1
        item osd.14 weight 0.098
}
...

#添加ssd bucket
...
#My SSD bucket
root ssd {
        id -2            # id不要冲突
        id -5 class ssd  # id不要冲突,这里的class ssd 是自动识别的,以实际识别的磁盘类型为准
        # weight 1.485
        alg straw2
        hash 0  # rjenkins1
        item ceph_ssd_node1 weight 0.391      #这里的osd.1,是上面ssd node中的osd编号,其编号不要变
        item ceph_ssd_node2 weight 0.391
        item ceph_ssd_node3 weight 0.391
        item ceph_ssd_node4 weight 0.391
}
...


#添加规则
...
#SSD rules
rule ssd_rule {
        id 1
        type replicated
        min_size 1
        max_size 10
        step take ssd  #使用哪个bucket 这里填ssd,也就是root ssd那个
        step chooseleaf firstn 0 type host
        step emit
}
...
2.5.3 导入新的Crush Map
2.5.3.1 将新的Crush Map文件转换为二进制
root@ceph_deploy:/data/ceph# crushtool -c /data/ceph/crushmap.txt -o /data/ceph/newcrushmap
2.5.3.2 导入新的Crush Map
root@ceph_deploy:/data/ceph# ceph osd setcrushmap -i /data/ceph/newcrushmap
2.5.4 创建新的存储池,使用ssd rule
root@ceph_deploy:/data/ceph# ceph osd pool create ssd-pool 32 32 ssd_rule    #ssd_rule 为新的Crush Map 中添加的新rule名称
pool 'ssd-pool' created
2.5.5 验证PGP状态
root@ceph_deploy:/data/ceph# ceph pg ls-by-pool ssd-pool | awk '{print $1,$2,$15}'
PG OBJECTS ACTING
14.0 0 [14,1,8]p14
14.1 0 [1,4,14]p1
14.2 0 [1,8,14]p1
14.3 0 [14,1,4]p14
14.4 0 [14,4,1]p14
14.5 0 [1,14,8]p1
14.6 0 [14,1,4]p14
14.7 0 [8,4,1]p8
14.8 0 [14,1,8]p14
14.9 0 [8,4,1]p8
14.a 0 [8,4,14]p8
14.b 0 [8,1,4]p8
14.c 0 [1,4,14]p1
14.d 0 [1,4,14]p1
14.e 0 [8,1,4]p8
14.f 0 [8,14,4]p8
14.10 0 [1,14,8]p1
14.11 0 [14,8,4]p14
14.12 0 [14,8,4]p14
14.13 0 [1,14,4]p1
14.14 0 [14,4,1]p14
14.15 0 [8,1,4]p8
14.16 0 [4,14,1]p4
14.17 0 [14,1,4]p14
14.18 0 [8,14,1]p8
14.19 0 [1,14,4]p1
14.1a 0 [1,4,14]p1
14.1b 0 [14,8,1]p14
14.1c 0 [4,14,8]p4
14.1d 0 [14,4,8]p14
14.1e 0 [4,14,1]p4
14.1f 0 [8,1,14]p8
3. Ceph Dashboard和监控
Dashboard 是mgr的一个插件,新版本必须安装在mgr节点
3.1安装Ceph Dashboard
3.1.1 安装包
root@ceph_mgr2:~# apt-cache madison ceph-mgr-dashboard
root@ceph_mgr2:~# apt install ceph-mgr-dashboard
3.1.2 启用模块
root@ceph_mgr2:~# ceph mgr module ls
root@ceph_mgr2:~# ceph mgr module enable dashboard
3.1.3 关闭ssl
root@ceph_mgr2:~# ceph config set mgr mgr/dashboard/ssl false
3.1.4 指定监听地址和端口
root@ceph_mgr2:~# ceph config set mgr mgr/dashboard/server_addr 192.168.204.20
root@ceph_mgr2:~# ceph config set mgr mgr/dashboard/server_port 9080
3.1.5 查看状态
root@ceph_mgr2:~# ceph mgr services
3.2 使用Prometheus+Grafana对Ceph进行监控
3.2.1 部署Prometheus
3.2.1.1 安装server端
root@ceph_mgr1:~# mkdir /apps
root@ceph_mgr1:~# cp prometheus-2.29.2.linux-amd64.tar.gz  /apps
root@ceph_mgr1:~# cd /apps

root@ceph_mgr1:/apps# tar xvf prometheus-2.29.2.linux-amd64.tar.gz

root@ceph_mgr1:/apps# cd prometheus-2.29.2.linux-amd64/

root@ceph_mgr1:/apps/prometheus-2.29.2.linux-amd64# ln -sv /apps/prometheus-2.29.2.linux-amd64 /apps/prometheus

root@ceph_mgr1:/apps# vim /etc/systemd/system/prometheus.service
[Unit]
Description=Prometheus Server
Documentation=https://prometheus.io/docs/introduction/overview/
After=network.target

[Service]
Restart=on-failure
WorkingDirectory=/apps/prometheus/
ExecStart=/apps/prometheus/prometheus

[Install]
WantedBy=multi-user.target

root@ceph_mgr1:/apps# systemctl restart prometheus
root@ceph_mgr1:/apps# systemctl status prometheus

#Prometheus server默认端口9090
3.2.1.2 部署node_exporter
在各个node节点安装node_exporter,收集节点主机的基本监控数据
root@ceph_node1:~# mkdir /apps
root@ceph_node1:~# cd /apps/
root@ceph_node1:/apps# mv ~/node_exporter-1.2.2.linux-amd64.tar.gz .
root@ceph_node1:/apps# tar xvf node_exporter-1.2.2.linux-amd64.tar.gz

root@ceph_node1:/apps/node_exporter-1.2.2.linux-amd64# ln -sv /apps/node_exporter-1.2.2.linux-amd64  /apps/node_exporter

root@ceph_node1:/apps# vim /etc/systemd/system/node-exporter.service
[Unit]
Description=Prometheus Node Exporter
After=network.target
[Service]
ExecStart=/apps/node_exporter/node_exporter
[Install]
WantedBy=multi-user.target

root@ceph_node1:/apps# systemctl restart node-exporter
root@ceph_node1:/apps# systemctl status node-exporter
3.2.1.3 配置server端并验证数据
root@ceph_mgr1:/apps/prometheus# vim prometheus.yml
# my global config

global:
  scrape_interval: 15s # Set the scrape interval to every 15 seconds. Default is every 1 minute.
  evaluation_interval: 15s # Evaluate rules every 15 seconds. The default is every 1 minute.

  # scrape_timeout is set to the global default (10s).

# Alertmanager configuration

alerting:
  alertmanagers:
    - static_configs:
        - targets:
          # - alertmanager:9093

# Load rules once and periodically evaluate them according to the global 'evaluation_interval'.

rule_files:

  # - "first_rules.yml"

  # - "second_rules.yml"

# A scrape configuration containing exactly one endpoint to scrape:

# Here it's Prometheus itself.

scrape_configs:

  # The job name is added as a label `job=<job_name>` to any timeseries scraped from this config.

  - job_name: "prometheus"

    # metrics_path defaults to '/metrics'

    # scheme defaults to 'http'.

    static_configs:

      - targets: ["localhost:9090"]

  - job_name: "ceph-node-monitor"
    static_configs:

      - targets: ["192.168.6.67:9100","192.168.6.68:9100"]

root@ceph_mgr1:/apps/prometheus# systemctl restart prometheus
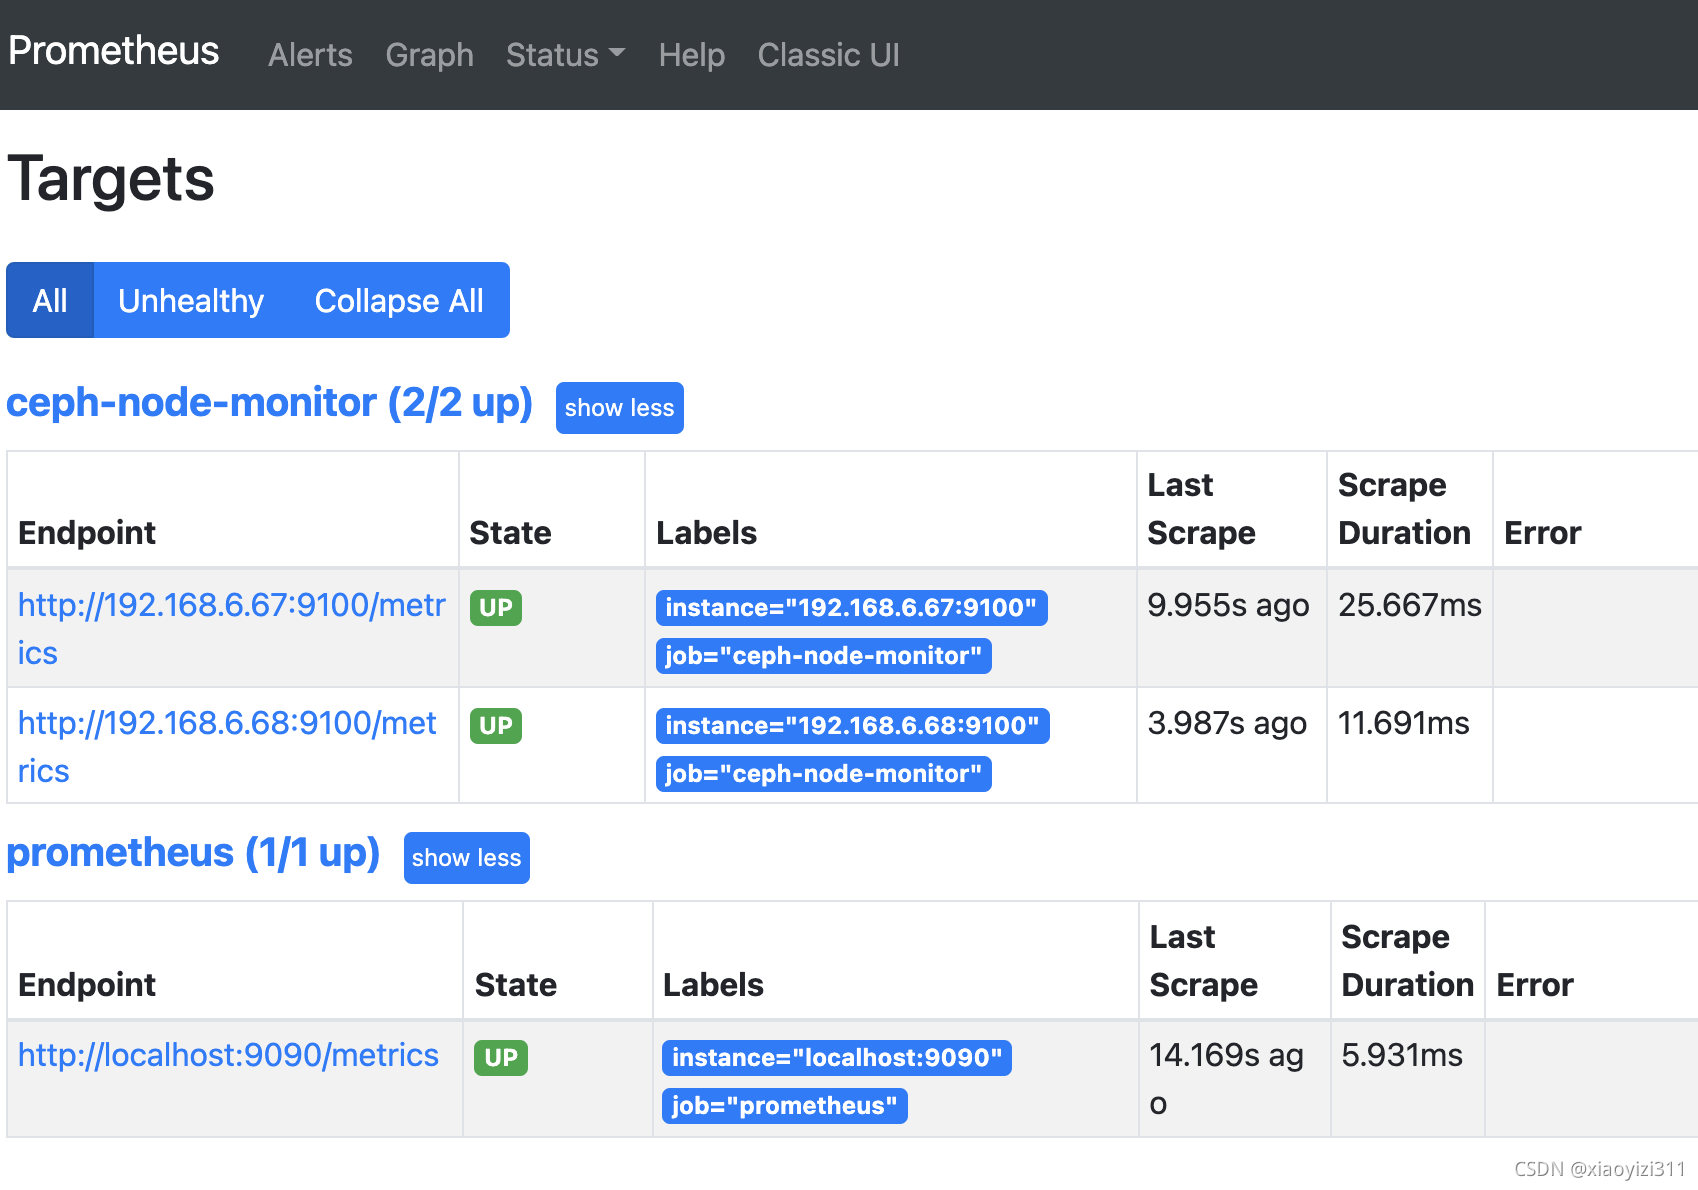
3.2.1.4 启用Ceph的Prometheus监控模块
ceph@ceph_deploy:~$ ceph mgr module enable prometheus

root@ceph_mgr1:/apps/prometheus# ss -tnl | grep 9283
LISTEN   0         5             192.168.204.19:9283             0.0.0.0:*
3.2.1.5 配置Prometheus采集数据
root@ceph_mgr1:/apps/prometheus# vim prometheus.yml
...
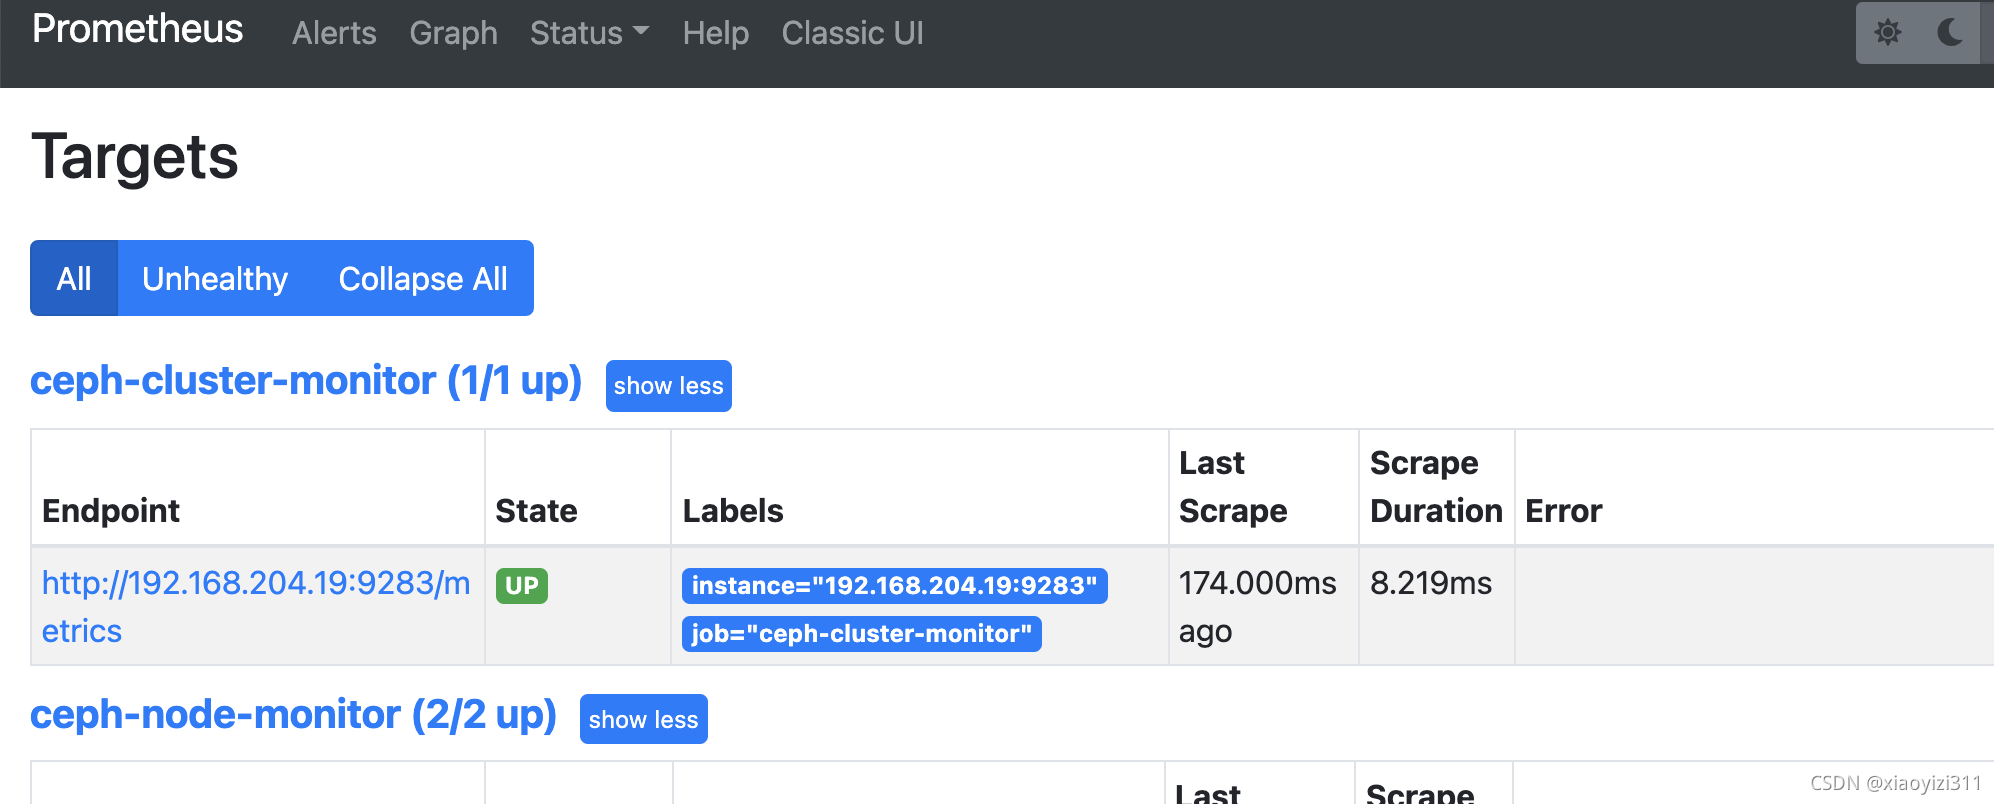
- job_name: "ceph-cluster-monitor"
static_configs:
- targets: ["192.168.204.19:9283"]
...
root@ceph_mgr1:/apps/prometheus# systemctl restart prometheus
3.2.1.6 验证数据
3.2.2 部署Grafana
3.2.2.1 安装Grafana
#https://grafana.com/grafana/download?pg=get&plcmt=selfmanaged-box1-cta1&edition=oss
sudo apt-get install -y adduser libfontconfig1
wget https://dl.grafana.com/oss/release/grafana_8.1.2_amd64.deb
sudo dpkg -i grafana_8.1.2_amd64.deb
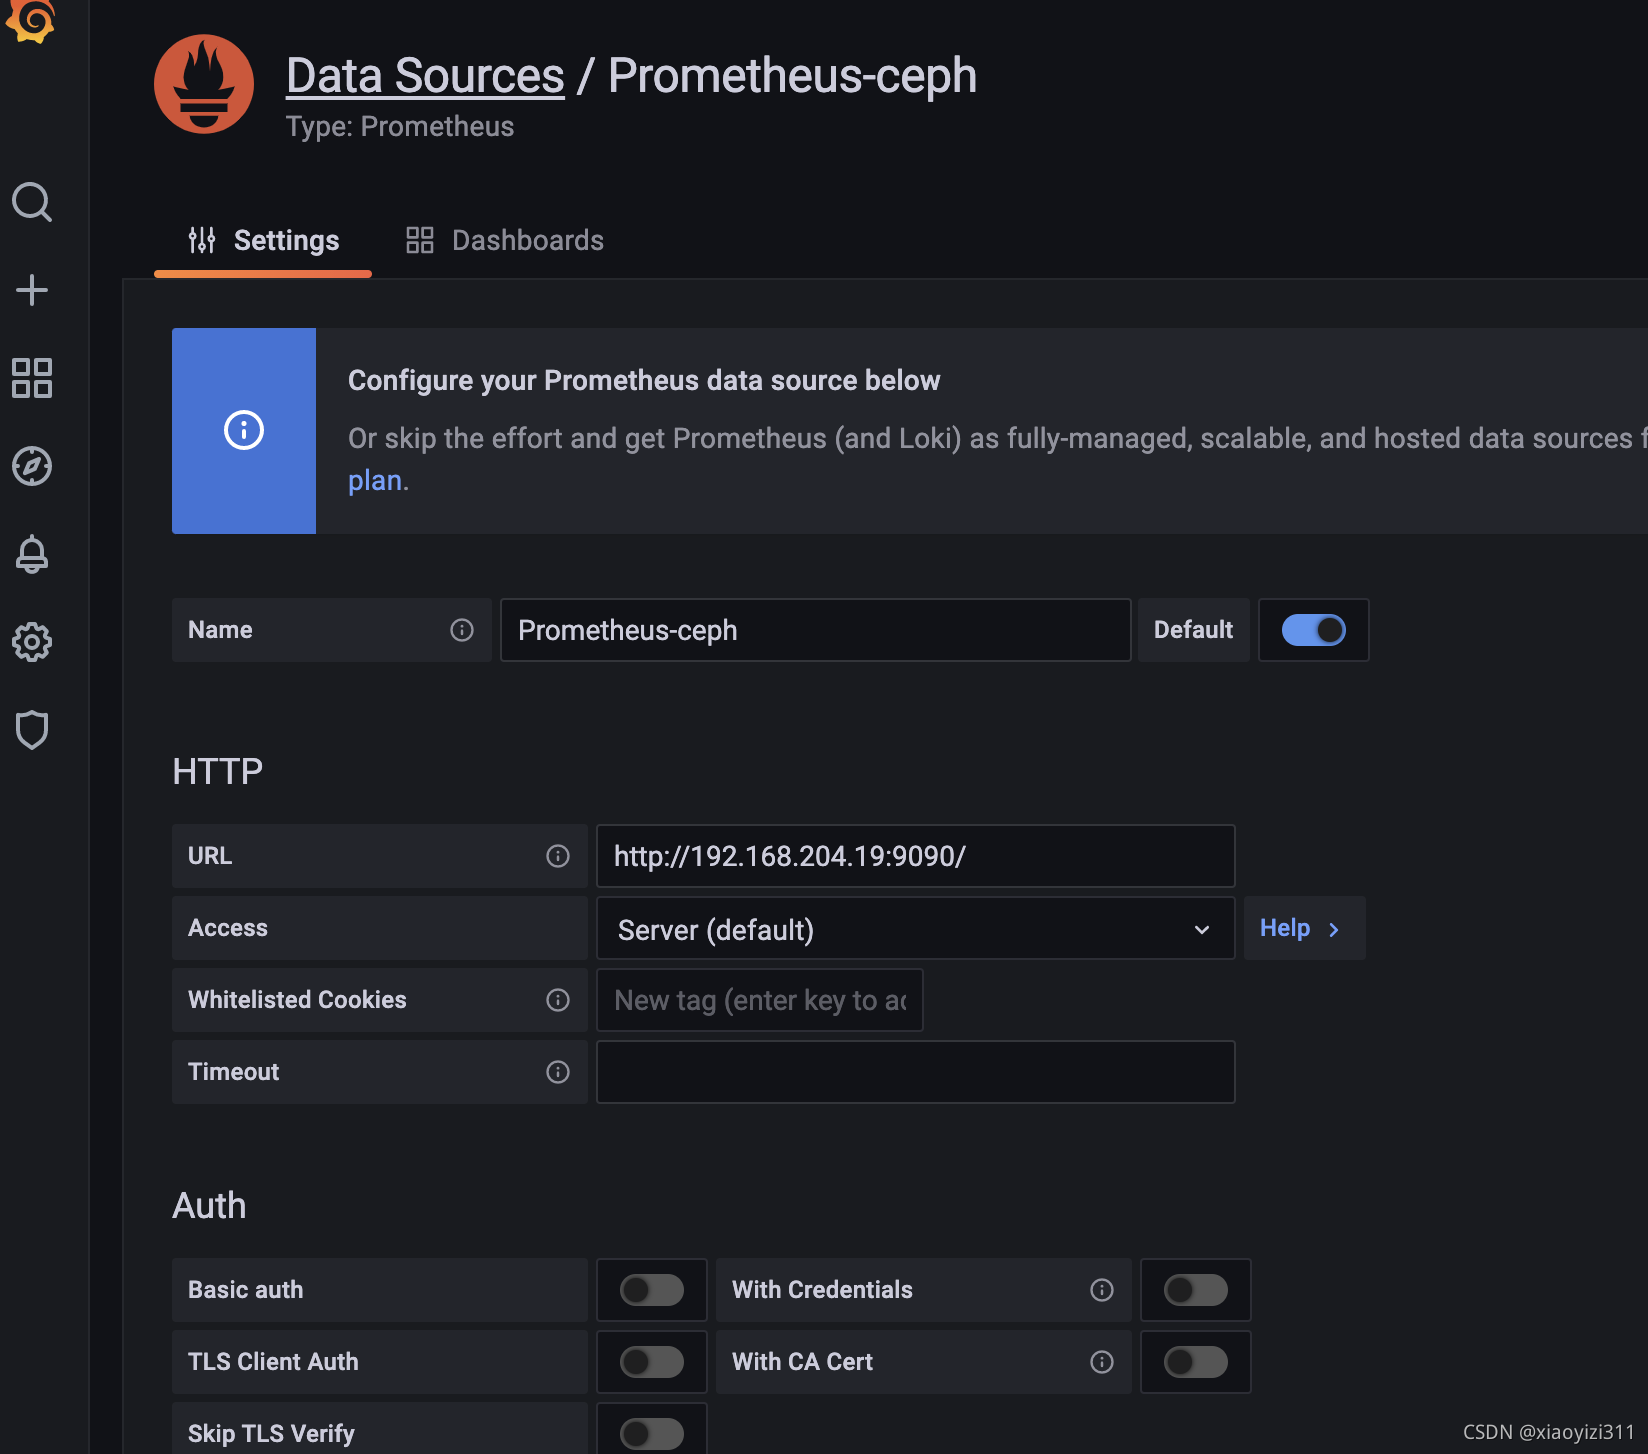
3.2.2.2 配置数据源
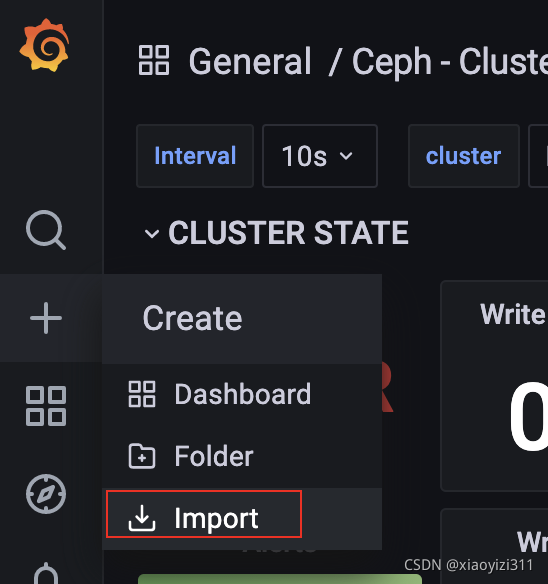
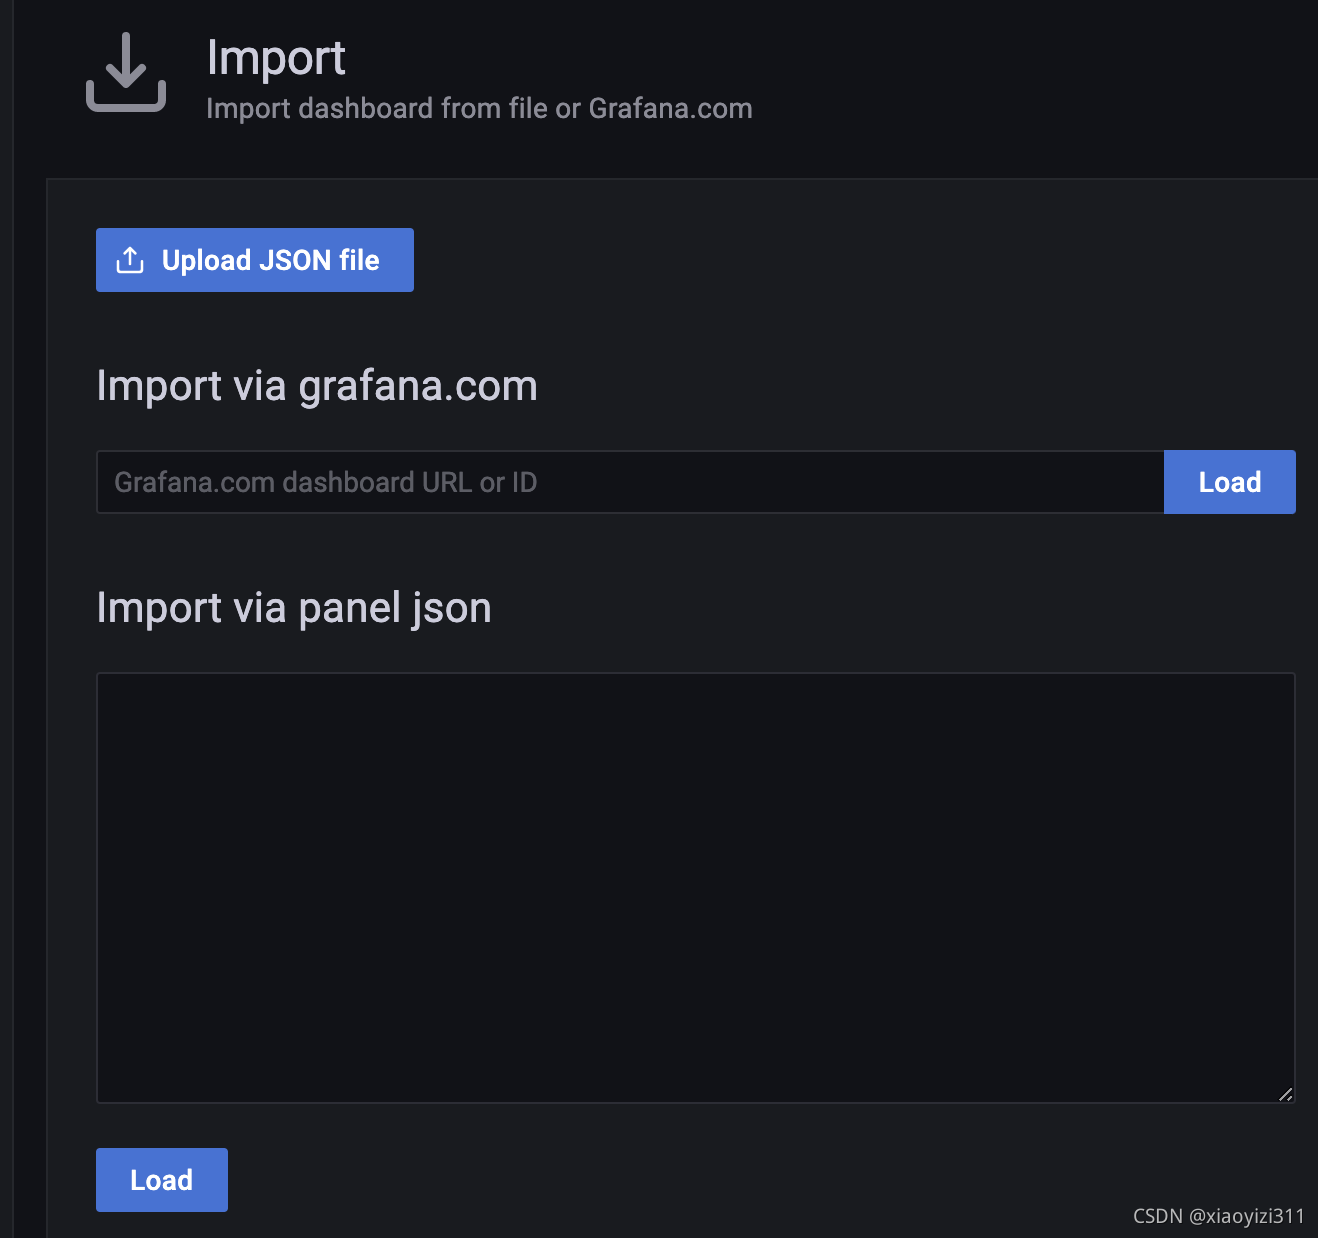
3.2.2.3 导入模版
3.2.2.4 常见的模板
-
https://grafana.com/grafana/dashboards/5336 #ceph OSD
-
https://grafana.com/grafana/dashboards/5342 #ceph pools
-
https://grafana.com/grafana/dashboards/7056 #ceph cluser
-
https://grafana.com/grafana/dashboards/2842


 1375
1375


 被折叠的 条评论
为什么被折叠?
被折叠的 条评论
为什么被折叠?
 到【灌水乐园】发言


