


配置jupyter notebook远程
- 登录远程服务器,生成配置文件
jupyter notebook --generate-config
- 生成密码 , 进入 python,注意这里需要把生成的密文复制下来,这里后面需要用到.
from notebook.auth import passwd
passwd()
Enter password:
Verify password:
Out[2]: ‘sha1:cd723d3e4b0a:e5ca450bbedb63511c78989ea16b8d26941227fb’
- 修改配置文件
vim ~/.jupyter/jupyter_notebook_config.py
- 在打开的文件头部添加如下字段:
c.NotebookApp.ip='*' #意思是任意IP都可以访问
c.NotebookApp.password = u'sha1:cd723d3e4b0a:e5ca450bbedb63511c78989ea16b8d26941227fb' #刚才那个生成的密文
c.NotebookApp.open_browser = False  #意思是默认不打开浏览器
c.NotebookApp.port =8888 #随便指定一个你想要的端口,后面可以从这个端口使用
c.NotebookApp.allow_root = True # 运行jupyter notebook出现“Running as root is not recommended. Use --allow-root to bypass”的解决方法
- 启动jupyter,在你想要启动jupyter的目录使用如下命令
jupyter notebook 或者
nohup jupyter notebook & 或者
nohup sudo jupyter notebook &
- 远程访问
随便的电脑上打开浏览器访问IP:端口就可以远程访问服务器上的jupyter.
- 启动jupyter notebook配置虚拟环境
安装 anaconda
安装虚拟环境:conda create -n your_env_name python=X.X
激活conda环境: source activate 环境名称
安装ipykernel:sudo conda install ipykernel
为虚拟环境下创建kernel文件:conda install -n 环境名称 ipykernel (和上一行执行其中一个就行)
sudo python -m ipykernel install --user --name 环境名称
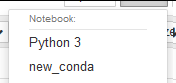
打开notebook服务器:jupyter notebook,浏览器打开对应地址,就会有对应的环境提示了
- 若出现Cannot connect to new jupyter notebook:解决办法是
ref: https://stackoverflow.com/questions/54954415/cannot-connect-to-new-jupyter-notebook
pip install --upgrade tornado==5.1.1


 1224
1224


 被折叠的 条评论
为什么被折叠?
被折叠的 条评论
为什么被折叠?
 到【灌水乐园】发言


