


使用两层网络实现手写数字识别(《深度学习入门:基于Python的理论与实现》实践笔记)
一、加载mnist数据集
这部分可以看看本人写的另一篇文章:将MNIST手写数字数据集导入NumPy数组。
二、构建两层网络
1. 两层网络结构
两层网络的结构图如下所示:
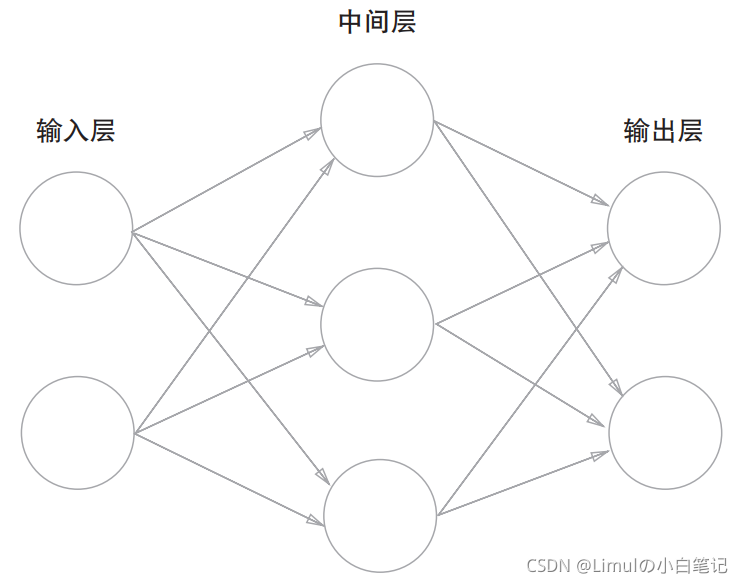
- 由于mnist手写数字的图片都是单通道28×28像素的图片,在将图片所有像素一维展开后得到784个像素,所以输入层一共784个神经元。
- 中间层的神经元个数可自己设定,这里就直接使用书中例子的50个神经元。
- 由于这个神经网络最后需要告诉我们这个图片是哪个数字,那么结果就可能为0~9这10个数字,所以输出层的神经元个数为10。
2. 参数
- 参数一共有4个:第一层权重w1,第一层偏置值b1,第二层权重w2,第二层偏置值b2。
- 由于两层都是全连接层,所以权重w1是784(输入层神经元个数)×50(隐藏层神经元个数)的数组,而权重w2是50(隐藏层神经元个数)×10(输出层神经元个数)的数组。
- 偏置值b1为50(隐藏层神经元个数),b2为10(输出层神经元个数)。
- 参数在构建网络之初就初始化。初始化时,权重w随机初始化,偏置值b初始化为0。
# 初始化权重
self.params = {
	'W1': weight_init_std * np.random.randn(input_size, hidden_size),
	'b1': np.zeros(hidden_size),
	'W2': weight_init_std * np.random.randn(hidden_size, output_size),
	'b2': np.zeros(output_size)
}
3. 信号传递
- 网络的第一层是全连接层,然后信号经过sigmoid激活函数后进入第二层全连接层,最后经过softmax归一化层得到输出。
def predict(self, x):
	w1, w2 = self.params['W1'], self.params['W2']
	b1, b2 = self.params['b1'], self.params['b2']
	a1 = np.dot(x, w1) + b1
	z1 = sigmoid(a1)
	a2 = np.dot(z1, w2) + b2
	y = softmax(a2)
	return y
4. 计算梯度
- 神经网络在训练的时候需要向前传递信号,然后反向传递计算梯度更新参数,所以在网络的定义中要提供计算梯度的函数。
    def gradient(self, x, t):
        w1, w2 = self.params['W1'], self.params['W2']
        b1, b2 = self.params['b1'], self.params['b2']
        grads = {}
        batch_num = x.shape[0]
        # forward
        a1 = np.dot(x, w1) + b1
        z1 = sigmoid(a1)
        a2 = np.dot(z1, w2) + b2
        y = softmax(a2)
        # backward
        dy = (y - t) / batch_num
        grads['W2'] = np.dot(z1.T, dy)
        grads['b2'] = np.sum(dy, axis=0)
        da1 = np.dot(dy, w2.T)
        dz1 = sigmoid_grad(a1) * da1
        grads['W1'] = np.dot(x.T, dz1)
        grads['b1'] = np.sum(dz1, axis=0)
        return grads
5. 计算精准度
- 最后体现训练结果的是网络的精准度,就是将输入放入网络,然后对比网络的输出和监督数据,计算这个网络的正确率。
    def accuracy(self, x, t):
        y = self.predict(x)
        y = np.argmax(y, axis=1)
        t = np.argmax(t, axis=1)
        accuracy = np.sum(y == t) / float(x.shape[0])
        return accuracy
三、训练模型
- 在构建好模型后,就可以开始训练了。训练模型就是将数据导入模型,然后向前传播,然后计算梯度并更新参数,然后再进行下一轮的训练。
- 为了反映这个训练情况,每完成一定次数的训练,要输出当前模型的准确度。
# 读入数据
(x_train, t_train), (x_test, t_test) = load_mnist(normalize=True, one_hot_label=True)
# 生成网络
if os.path.exists('model.pkl'):
with open('model.pkl', 'rb') as fp:
network = pickle.load(fp)
else:
network = TwoLayerNet(input_size=784, hidden_size=50, output_size=10)
iter_num = 10000
train_size = x_train.shape[0]
batch_size = 100
learning_rate = 0.1
train_loss_list = []
train_acc_list = []
test_acc_list = []
iter_per_epoch = max(train_size / batch_size, 1)
for i in range(iter_num):
batch_mask = np.random.choice(train_size, batch_size)
x_batch = x_train[batch_mask]
t_batch = t_train[batch_mask]
# 梯度
grad = network.gradient(x_batch, t_batch)
# 更新
for key in ('W1', 'b1', 'W2', 'b2'):
network.params[key] -= learning_rate * grad[key]
loss = network.loss(x_batch, t_batch)
train_loss_list.append(loss)
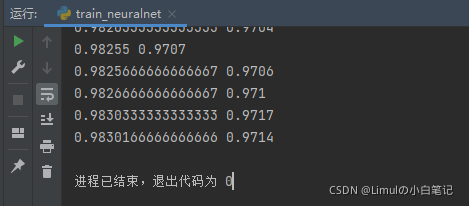
if i % iter_per_epoch == 0:
train_acc = network.accuracy(x_train, t_train)
test_acc = network.accuracy(x_test, t_test)
train_acc_list.append(train_acc)
test_acc_list.append(test_acc)
print(train_acc, test_acc)
# 保存模型,下次训练时不必从头训练
with open('model.pkl', 'wb') as fp:
pickle.dump(network, fp, -1)
四、创建及训练模型完整代码
构建并训练模型的完整代码如下所示:
import numpy as np
import urllib.request
import gzip
import os
import pickle


def sigmoid(x):
    return 1 / (1 + np.exp(-x))


def sigmoid_grad(x):
    return (1.0 - sigmoid(x)) * sigmoid(x)


def softmax(x):
    if x.ndim == 2:
        x = x.T
        x = x - np.max(x, axis=0)
        y = np.exp(x) / np.sum(np.exp(x), axis=0)
        return y.T
    x = x - np.max(x)  # 溢出对策
    return np.exp(x) / np.sum(np.exp(x))


def cross_entropy_error(y, t):
    if y.ndim == 1:
        t = t.reshape(1, t.size)
        y = y.reshape(1, y.size)
    # 监督数据是one-hot-vector的情况下,转换为正确解标签的索引
    if t.size == y.size:
        t = t.argmax(axis=1)
    y_batch_size = y.shape[0]
    return -np.sum(np.log(y[np.arange(batch_size), t] + 1e-7)) / y_batch_size


def numerical_gradient(f, x):
    h = 1e-4  # 0.0001
    x_grad = np.zeros_like(x)
    it = np.nditer(x, flags=['multi_index'], op_flags=['readwrite'])
    while not it.finished:
        idx = it.multi_index
        tmp_val = x[idx]
        x[idx] = float(tmp_val) + h
        fxh1 = f(x)  # f(x+h)
        x[idx] = tmp_val - h
        fxh2 = f(x)  # f(x-h)
        x_grad[idx] = (fxh1 - fxh2) / (2 * h)
        x[idx] = tmp_val  # 还原值
        it.iternext()
    return x_grad


class TwoLayerNet:

    def __init__(self, input_size, hidden_size, output_size, weight_init_std=0.01):
        # 初始化权重
        self.params = {
            'W1': weight_init_std * np.random.randn(input_size, hidden_size),
            'b1': np.zeros(hidden_size),
            'W2': weight_init_std * np.random.randn(hidden_size, output_size),
            'b2': np.zeros(output_size)
        }

    def predict(self, x):
        w1, w2 = self.params['W1'], self.params['W2']
        b1, b2 = self.params['b1'], self.params['b2']
        a1 = np.dot(x, w1) + b1
        z1 = sigmoid(a1)
        a2 = np.dot(z1, w2) + b2
        y = softmax(a2)
        return y

    # x:输入数据, t:监督数据
    def loss(self, x, t):
        y = self.predict(x)
        return cross_entropy_error(y, t)

    def accuracy(self, x, t):
        y = self.predict(x)
        y = np.argmax(y, axis=1)
        t = np.argmax(t, axis=1)
        accuracy = np.sum(y == t) / float(x.shape[0])
        return accuracy

    # x:输入数据, t:监督数据
    def numerical_gradient(self, x, t):
        def loss_w(): return self.loss(x, t)
        grads = {
            'W1': numerical_gradient(loss_w, self.params['W1']),
            'b1': numerical_gradient(loss_w, self.params['b1']),
            'W2': numerical_gradient(loss_w, self.params['W2']),
            'b2': numerical_gradient(loss_w, self.params['b2'])
        }
        return grads

    def gradient(self, x, t):
        w1, w2 = self.params['W1'], self.params['W2']
        b1, b2 = self.params['b1'], self.params['b2']
        grads = {}
        batch_num = x.shape[0]
        # forward
        a1 = np.dot(x, w1) + b1
        z1 = sigmoid(a1)
        a2 = np.dot(z1, w2) + b2
        y = softmax(a2)
        # backward
        dy = (y - t) / batch_num
        grads['W2'] = np.dot(z1.T, dy)
        grads['b2'] = np.sum(dy, axis=0)
        da1 = np.dot(dy, w2.T)
        dz1 = sigmoid_grad(a1) * da1
        grads['W1'] = np.dot(x.T, dz1)
        grads['b1'] = np.sum(dz1, axis=0)
        return grads


def load_mnist(normalize=True, flatten=True, one_hot_label=False):
    # 用dataset字典保存由4个文件读取得到的np数组
    dataset = {}
    # 若不存在pkl文件,下载文件导入numpy数组,并生成pkl文件
    if not os.path.exists('mnist.pkl'):
        # MNIST数据集的4个文件
        key_file = {
            'train_img': 'train-images-idx3-ubyte.gz', 'train_label': 'train-labels-idx1-ubyte.gz',
            'test_img': 't10k-images-idx3-ubyte.gz', 'test_label': 't10k-labels-idx1-ubyte.gz'
        }
        # 下载文件并导入numpy数组
        for _ in key_file.keys():
            print('Downloading ' + key_file[_] + '...')
            urllib.request.urlretrieve('http://yann.lecun.com/exdb/mnist/' + key_file[_], key_file[_])  # 下载文件
            print('Download finished!')
            # 用二进制只读方式打开.gz文件
            with gzip.open(key_file[_], 'rb') as f:
                # img文件前16个字节不是img数据,跳过读取;label文件前8个不是label数据,跳过读取
                dataset[_] = np.frombuffer(f.read(), np.uint8,
                                           offset=16 if _ == 'train_img' or _ == 'test_img' else 8)
                if _ == 'train_img' or _ == 'test_img':
                    dataset[_] = dataset[_].reshape(-1, 1, 28, 28)
        # 生成mnist.pkl
        print('Creating pickle file ...')
        with open('mnist.pkl', 'wb') as f:
            pickle.dump(dataset, f, -1)
        print('Create finished!')
    # 若存在pkl文件,把pkl文件内容导入numpy数组
    else:
        with open('mnist.pkl', 'rb') as f:
            dataset = pickle.load(f)
    # 标准化处理
    if normalize:
        for _ in ('train_img', 'test_img'):
            dataset[_] = dataset[_].astype(np.float32) / 255.0
    # one_hot_label处理
    if one_hot_label:
        for _ in ('train_label', 'test_label'):
            t = np.zeros((dataset[_].size, 10))
            for idx, row in enumerate(t):
                row[dataset[_][idx]] = 1
            dataset[_] = t
    # 展平处理
    if flatten:
        for _ in ('train_img', 'test_img'):
            dataset[_] = dataset[_].reshape(-1, 784)
    # 返回np数组
    return (dataset['train_img'], dataset['train_label']), (dataset['test_img'], dataset['test_label'])


if __name__ == '__main__':
    # 读入数据
    (x_train, t_train), (x_test, t_test) = load_mnist(normalize=True, one_hot_label=True)
    # 生成网络
    if os.path.exists('model.pkl'):
        with open('model.pkl', 'rb') as fp:
            network = pickle.load(fp)
    else:
        network = TwoLayerNet(input_size=784, hidden_size=50, output_size=10)
    iter_num = 10000
    train_size = x_train.shape[0]
    batch_size = 100
    learning_rate = 0.1
    train_loss_list = []
    train_acc_list = []
    test_acc_list = []
    iter_per_epoch = max(train_size / batch_size, 1)
    for i in range(iter_num):
        batch_mask = np.random.choice(train_size, batch_size)
        x_batch = x_train[batch_mask]
        t_batch = t_train[batch_mask]
        # 梯度
        # grad = network.numerical_gradient(x_batch, t_batch)
        grad = network.gradient(x_batch, t_batch)
        # 更新
        for key in ('W1', 'b1', 'W2', 'b2'):
            network.params[key] -= learning_rate * grad[key]
        loss = network.loss(x_batch, t_batch)
        train_loss_list.append(loss)
        if i % iter_per_epoch == 0:
            train_acc = network.accuracy(x_train, t_train)
            test_acc = network.accuracy(x_test, t_test)
            train_acc_list.append(train_acc)
            test_acc_list.append(test_acc)
            print(train_acc, test_acc)
    # 保存模型,下次训练时不必从头训练
    with open('model.pkl', 'wb') as fp:
        pickle.dump(network, fp, -1)
结果截图如下所示:
五、测试模型的完整代码
可用以下代码测试模型:
import os
import pickle
import cv2
import numpy as np
from train_neuralnet import TwoLayerNet

if __name__ == '__main__':
    if os.path.exists('model.pkl'):
        total = 0
        right = 0
        with open('model.pkl', 'rb') as fp:
            network = pickle.load(fp)
        for file in os.listdir('picture'):
            image = cv2.imread('./picture/' + file)
            label = file[7]
            img = cv2.cvtColor(image, cv2.COLOR_RGB2GRAY)  # RGB图像转为gray
            img = cv2.bitwise_not(img)
            img = cv2.resize(img, (28, 28), interpolation=cv2.INTER_CUBIC)
            predict = np.argmax(network.predict(img.reshape(1, 784)))
            total = total + 1
            print(str(label) + " 识别为:" + str(predict))
            if int(label) == int(predict):
                right = right + 1
        acc = float(right)/total
        print("acc", acc)
    else:
        print('model does not exist!')
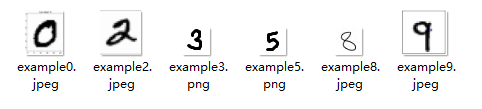
- 这里事先准备了一个叫“picture”的文件夹里面包含用来测试的图片,图片名称都以“example”+数字的形式表示,这个数字是监督标签,用于最后的结果对比,如下所示:
使用上面的代码测试模型可看到测试的结果,如下图所示:
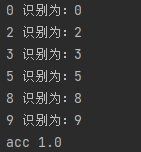
每个数字都准确地识别出来了。
完整的pycharm工程文件可查看:TrainNeuralnet.rar
本实例来自于,由[日]斋藤康毅所著的《深度学习入门:基于Python的理论与实现》。


 355
355


 被折叠的 条评论
为什么被折叠?
被折叠的 条评论
为什么被折叠?
 到【灌水乐园】发言


