


本文在上篇文章的基础上利用Vue与WebGL结合添加多重纹理。文中部分代码和资源源自《WebGL编程指南》。
代码如下:
<template>
  <div>
    <canvas ref="myglCanvas" width="400" height="400"></canvas>
  </div>
</template>

<script>
import Tools from "../lib/tools";
import pic0 from "../../static/img/sky.jpg";
import pic1 from "../../static/img/circle.gif";
export default {
  name: "glCanvas",
  data() {
    return {
      VSHEADER_SOURCE: `attribute vec4 a_Position;
                        attribute vec2 a_TexCoord;
                        varying vec2 v_TexCoord;
                        void main(){
                          gl_Position = a_Position;
                          v_TexCoord = a_TexCoord;
                        }`,
      FSHEADER_SOURCE: `precision mediump float;
                        uniform sampler2D u_Sampler0;
                        uniform sampler2D u_Sampler1;
                        varying vec2 v_TexCoord;
                        void main(){
                          vec4 color0 = texture2D(u_Sampler0, v_TexCoord);
                          vec4 color1 = texture2D(u_Sampler1, v_TexCoord);
                          gl_FragColor = color0 * color1;
                        }`,
      gl: null,
      g_texUnit0: false,
      g_texUnit1: false
    };
  },
  methods: {
    setBuffer: function(gl) {

      let verticesTexCoords = new Float32Array([
        // Vertex coordinates, texture coordinate
        -0.5, 0.5,0.0,1.0,
        -0.5,-0.5,0.0,0.0,
        0.5,0.5,1.0,1.0,
        0.5,-0.5,1.0,0.0
      ]);
      let n = 4; // The number of vertices
      const fSize = verticesTexCoords.BYTES_PER_ELEMENT; //每个元素占的大小
      // 创建缓冲区
      let vertexTexCoordBuffer = gl.createBuffer();
      if (!vertexTexCoordBuffer) {
        console.log("Failed to create the buffer object");
        return -1;
      }

      // 绑定缓冲区
      gl.bindBuffer(gl.ARRAY_BUFFER, vertexTexCoordBuffer);
      // 将数据写入缓冲区
      gl.bufferData(gl.ARRAY_BUFFER, verticesTexCoords, gl.STATIC_DRAW);

      this.initBuffer(gl, "a_Position", 2, fSize * 4, 0);
      this.initBuffer(gl, "a_TexCoord", 2, fSize * 4, fSize * 2);

      // Set texture
      if (!this.initTextures(gl, n)) {
        console.log("Failed to intialize the texture.");
        return;
      }

      // Unbind the buffer object
      gl.bindBuffer(gl.ARRAY_BUFFER, null);

      return n;
    },
    /**
     * 初始化缓冲区
     * paramStr  变量名
     * count     对象个数
     * stride    步长
     * offset    偏移量
     */
    initBuffer: function(gl, paramStr, count, stride, offset) {
      let a_param = this.gl.getAttribLocation(gl.program, paramStr);
      if (a_param < 0) {
        console.log(paramStr + " failed");
        return -1;
      }
      //  将缓冲区对象分配给attribute对象
      gl.vertexAttribPointer(a_param, count, gl.FLOAT, false, stride, offset);
      // 开启attribute对象
      gl.enableVertexAttribArray(a_param);
    },
    initTextures: function(gl, n) {
      // Create a texture object
      var texture0 = gl.createTexture();
      var texture1 = gl.createTexture();
      if (!texture0 || !texture1) {
        console.log("Failed to create the texture object");
        return false;
      }

      // Get the storage location of u_Sampler0 and u_Sampler1
      var u_Sampler0 = gl.getUniformLocation(gl.program, "u_Sampler0");
      var u_Sampler1 = gl.getUniformLocation(gl.program, "u_Sampler1");
      if (!u_Sampler0 || !u_Sampler1) {
        console.log("Failed to get the storage location of u_Sampler");
        return false;
      }

      // Create the image object
      var image0 = new Image();
      var image1 = new Image();
      if (!image0 || !image1) {
        console.log("Failed to create the image object");
        return false;
      }

      // Tell the browser to load an Image
      image0.src = pic0;
      image1.src = pic1;
      // Register the event handler to be called when image loading is completed
      let that = this;
      image0.onload = function() {
        that.loadTexture(gl, n, texture0, u_Sampler0, image0, 0);
      };
      image1.onload = function() {
        that.loadTexture(gl, n, texture1, u_Sampler1, image1, 1);
      };

      return true;
    },

    loadTexture: function(gl, n, texture, u_Sampler, image, texUnit) {
      gl.pixelStorei(gl.UNPACK_FLIP_Y_WEBGL, 1); // Flip the image's y-axis
      // Make the texture unit active
      if (texUnit == 0) {
        gl.activeTexture(gl.TEXTURE0);
        this.g_texUnit0 = true;
      } else {
        gl.activeTexture(gl.TEXTURE1);
        this.g_texUnit1 = true;
      }
      // Bind the texture object to the target
      gl.bindTexture(gl.TEXTURE_2D, texture);

      // Set texture parameters
      gl.texParameteri(gl.TEXTURE_2D, gl.TEXTURE_MIN_FILTER, gl.LINEAR);
      // Set the image to texture
      gl.texImage2D(
        gl.TEXTURE_2D,
        0,
        gl.RGBA,
        gl.RGBA,
        gl.UNSIGNED_BYTE,
        image
      );

      gl.uniform1i(u_Sampler, texUnit); // Pass the texure unit to u_Sampler

      // Clear <canvas>
      gl.clear(gl.COLOR_BUFFER_BIT);

      if (this.g_texUnit0 && this.g_texUnit1) {
        gl.drawArrays(gl.TRIANGLE_STRIP, 0, n); // Draw the rectangle
      }
    },

    setGL: function() {
      this.gl = this.$refs.myglCanvas.getContext("webgl");
    }
  },
  mounted() {
    this.setGL();

    Tools.initShaders(this.gl, this.VSHEADER_SOURCE, this.FSHEADER_SOURCE);
    let pointCount = this.setBuffer(this.gl);
    if (pointCount < 0) {
      console.log("set points failed");
      return;
    }

    //设置背景色
    this.gl.clearColor(0.0, 0.0, 0.0, 1);
    //设置缓冲区颜色
    this.gl.clear(this.gl.COLOR_BUFFER_BIT);
  }
};
</script>

<style scoped>
</style>
9-10行 导入需要用到的两个图片资源;
22-30行 在片元着色器中设置图片取样器,并将组合后的纹理赋值给gl_FragColor ;
121-127行 载入图片,这里需要先获取this,如果this放到onload里的function的话,this指的是当前的方法;
135-141行 设置激活的哪个纹理;
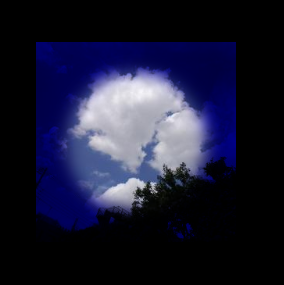
效果如下:
更多内容请扫码关注我的微信公众号,或者在微信里搜索公众号webgis学习,我会不定期更新自己的webgis方面的学习心得。


 1万+
1万+


 被折叠的 条评论
为什么被折叠?
被折叠的 条评论
为什么被折叠?
 到【灌水乐园】发言


