


1、第一个程序
1.1 项目创建及结构分析
1.1.1 项目创建
new -- spring initalizr -- 填写项目信息 -- 选择初始化的组件(初学勾选 Web 即可)-- 填写项目路径
1.1.2 结构分析
(主启动类、配置文件application.properties、测试类、pom.xml)
pom.xml:查看项目依赖
1.1.3 编写一个http接口
controller层新建一个hellocontroller类
@RestController
public class helloController {

    @RequestMapping("/hello")
    public String hello() {
        return "Hello World";
    }

}

1.2 运行原理
1.2.1 自动装配原理(初探)
1、pom.xml
父依赖、启动器
2.主启动类
@SpringBootApplication :SpringBoot的主配置类 , SpringBoot就应该运行这个类的main方法来启动SpringBoot应用;
结论:
-
SpringBoot在启动的时候从类路径下的META-INF/spring.factories中获取EnableAutoConfiguration指定的值
-
将这些值作为自动配置类导入容器 , 自动配置类就生效 , 帮我们进行自动配置工作;
-
整个J2EE的整体解决方案和自动配置都在springboot-autoconfigure的jar包中;
-
它会给容器中导入非常多的自动配置类 (xxxAutoConfiguration), 就是给容器中导入这个场景需要的所有组件 , 并配置好这些组件 ;
-
有了自动配置类 , 免去了我们手动编写配置注入功能组件等的工作;
3、配置文件
application.properties 或者 application.yaml(推荐)
yaml文件中
1、空格不能省略
2、以缩进来控制层级关系,只要是左边对齐的一列数据都是同一个层级的。
3、属性和值的大小写都是十分敏感的。
yaml配置注入到实体类完全OK!
@configurationProperties:默认从全局配置文件中获取值;
@PropertySource :加载指定的配置文件; (Properties文件)
测试:
配置一个person2,然后将 @ConfigurationProperties(prefix = "person2") 指向我们的person2;
@Component
@ConfigurationProperties(prefix = "person")
public class person {
    private String name;
    private Integer id;
    private Map maps;
功能强大
person:
    name: qinjiang${random.uuid} # 随机uuid
    age: ${random.int}  # 随机int
    happy: false
    birth: 2000/01/01
    maps: {k1: v1,k2: v2}
    lists:
      - code
      - girl
      - music
    dog:
      name: ${person.hello:other}_旺财
      age: 1
小结
@Value这个使用起来并不友好!我们需要为每个属性单独注解赋值,比较麻烦
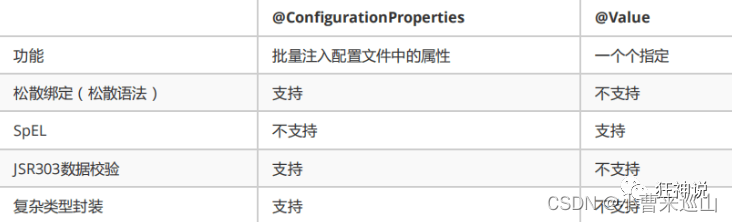
1、@ConfigurationProperties只需要写一次即可 , @Value则需要每个字段都添加
2、松散绑定:这个什么意思呢? 比如我的yml中写的last-name,这个和lastName是一样的, - 后面跟着的字母默认是大写的。这就是松散绑定。可以测试一下
3、JSR303数据校验 , 这个就是我们可以在字段是增加一层过滤器验证 , 可以保证数据的合法性
4、复杂类型封装,yml中可以封装对象 , 使用value就不支持
结论:
配置yml和配置properties都可以获取到值 , 强烈推荐 yml;
如果我们在某个业务中,只需要获取配置文件中的某个值,可以使用一下 @value;
如果说,我们专门编写了一个JavaBean来和配置文件进行一一映射,就直接@configurationProperties,不要犹豫!
1.2.2 自动装配原理(再探) 没看
2、 springboot web开发
jar:webapp!
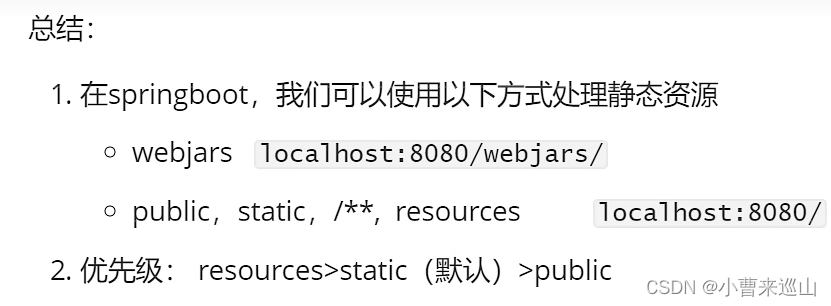
2.1 静态资源处理
2.2 首页如何定制
2.3 Thymeleaf模板引擎
模板引擎:模板引擎的作用就是我们来写一个页面模板,比如有些值呢,是动态的,我们写一些表达式。而这些值,从哪来呢,就是我们在后台封装一些数据。然后把这个模板和这个数据交给我们模板引擎,模板引擎按照我们这个数据帮你把这表达式解析、填充到我们指定的位置,然后把这个数据最终生成一个我们想要的内容给我们写出去,这就是我们这个模板引擎,不管是jsp还是其他模板引擎,都是这个思想。

查看Thymeleaf的自动配置类:ThymeleafProperties可以得知:把我们的html页面放在类路径下的templates下
测试:查出一些数据,在页面中展示
1.引入依赖(pom.xml)
2.增加controller类,在类中存入数据
@RequestMapping("/t1")
public String test1(Model model){
    //存入数据
    model.addAttribute("msg","Hello,Thymeleaf");
    //classpath:/templates/test.html
    return "test";
}
3. 新建html文件,并将thymeleaf命名空间的约束导入(xmlns:th="http://www.thymeleaf.org")
<!DOCTYPE html>
<html lang="en" xmlns:th="http://www.thymeleaf.org">
<head>
    <meta charset="UTF-8">
    <title>狂神说</title>
</head>
<body>
<h1>测试页面</h1>

<!--th:text就是将div中的内容设置为它指定的值,和之前学习的Vue一样-->
<div th:text="${msg}"></div>
</body>
</html>
4.测试
Thymeleaf的使用语法

2.4 装配扩展SpringMVC(重点)
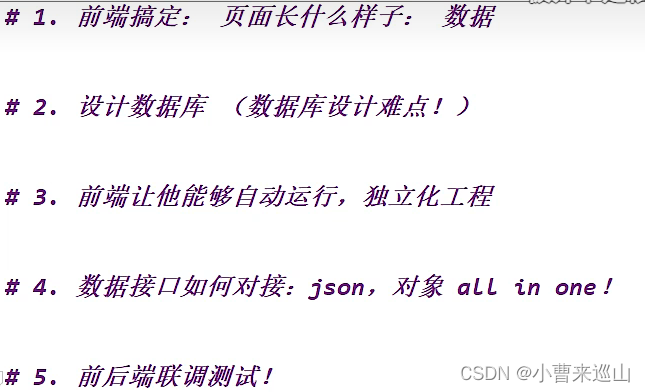
3. 员工管理系统
3.1 准备工作
html页面放入templates文件夹下,资源(css,js,img)放到static文件夹下
3.1.1、虚拟数据库数据(因为目前没有构建数据库)
pojo层新建部门表类
//部门表
@Data
@AllArgsConstructor
@NoArgsConstructor
public class Department {
    private Integer id;
    private String departmentName;
}
dao层新建部门dao类,(通过@Repository注解,spring将其进行托管)
//部门dao
@Repository
public class DepartmentDao {
//    模拟数据库中的数据
   private static Map<Integer, Department> departments = null;
   static {
       departments = new HashMap<>();
       departments.put(101,new Department(101,"教学部1"));
       departments.put(102,new Department(102,"教学部2"));
       departments.put(103,new Department(103,"教学部3"));
       departments.put(104,new Department(104,"教学部4"));
   }

//   获取所有部门信息
    public Collection<Department> getDepartments(){
       return departments.values();
    }
//    通过id获得部门
    public Department getbyid(Integer id){
       return departments.get(id);
    }

}
3.1.2、首页实现
首页控制,controller层新建首页控制类 或者 config层通过扩展springmvc进行设置首页
@Controller
public class IndexController {

    @RequestMapping({"/","/index.html"})
    public String index(){
        return "index";
    }
}
//扩展springmvc
@Configuration
public class MyMvcConfig implements WebMvcConfigurer {

    //    视图跳转
    @Override
    public void addViewControllers(ViewControllerRegistry registry) {
        registry.addViewController("/").setViewName("index");
        registry.addViewController("/index.html").setViewName("index");
    }
}
注意:
1.所有页面的静态资源都需要使用thymeleaf接管:@{}
2.
3.2 登录界面
3.2.1页面国际化(没看)
3.2.2 登录功能实现
目的:点击登录按钮实现页面跳转
首先index页面中from的action标签用thymeleaf
<form class="form-signin" th:action="@{/usr/login}">controller层创建一个登录跳转类
@Controller
public class LoginController {
    @RequestMapping("/usr/login")
//    Model是回显参数
    public String login(@RequestParam String username, @RequestParam String password, Model model){
//        具体业务

        if ("123456".equals(password)&& !StringUtils.isEmpty(username))
            return "dashboard";
        else {
            model.addAttribute("msg","用户名或密码错误");
            return "index";
        }
    }
注意,在html页面中添加回显信息显示
<p style="color: #bd2130" th:text="${msg}" th:if="${msg}!= null"></p>3.2.3 登录拦截器
在config层新建拦截器类(LoginHanderInterceptor)
//拦截器
public class LoginHanderInterceptor implements HandlerInterceptor {
//    重写方法,放行
    @Override
    public boolean preHandle(HttpServletRequest request, HttpServletResponse response, Object handler) throws Exception {
//        登陆成功之后,应该有用户的session;
        Object loginUsr = request.getSession().getAttribute("loginusr");
        if (loginUsr == null){ //没有登录
            request.setAttribute("msg","没有权限,请先登录");
            request.getRequestDispatcher("/index.html").forward(request,response); //将request和response发送到index
            return false;
        }

        return true;
    }
}
并在视图跳转类(MyMvcConfig)中添加拦截器设置
@Configuration
public class MyMvcConfig implements WebMvcConfigurer {

    //    视图跳转
    @Override
    public void addViewControllers(ViewControllerRegistry registry) {
        registry.addViewController("/").setViewName("index");
        registry.addViewController("/index.html").setViewName("index");
        registry.addViewController("/main.html").setViewName("dashboard");
    }

    @Override
    public void addInterceptors(InterceptorRegistry registry) {
        registry.addInterceptor(new LoginHanderInterceptor())
                .addPathPatterns("/**")//哪些需要拦截
                .excludePathPatterns("/index.html","/","/usr/login","/css/*","/js/*","/img/*"); //哪些直接放行(登录页,静态资源)
    }
}
3.3登录后主界面
3.3.1 展示员工列表
1、提取公共页面
通过thymeleaf中的th:fragment将公共部分抽取到一个html文件中,其他界面可以通过th:replace来引入
<!DOCTYPE html>
<html lang="en" xmlns:th="http://www.thymeleaf.org">

<!--头部导航栏-->
<nav class="navbar navbar-dark sticky-top bg-dark flex-md-nowrap p-0" th:fragment="frontbar">

</nav>


<!--侧边导航栏-->
<nav class="col-md-2 d-none d-md-block bg-light sidebar" th:fragment="sidebar">

</nav>

</html>
<div class="container-fluid">
<div class="row">
<!--侧边栏-->
<div th:replace="~{commons/common::sidebar}"></div>
2.根据页面显示高亮
(thymeleaf)页面对公共部分文件进行传参,从而进行判断。
如下,在list页面中向common文件中返回active=‘main.html’参数,common文件通过对传递过的参数进行判断。
<div th:replace="~{commons/common::sidebar(active='main.html')}"></div><a th:class="${active=='main.html'?'nav-link active':'nav-link'}" th:href="@{index.html}">3.展示员工列表(查)
(thymeleaf)通过th:each遍历dao层的数据
<tr th:each="emp:${emps}">
								<td th:text="${emp.getId()}"></td>
								<td th:text="${emp.getLastname()}"></td>
								<td th:text="${emp.getEmail()}"></td>
								<td th:text="${emp.getGender()}"></td>
								<td th:text="${emp.getDepartment().getDepartmentName()}"></td>
								<td th:text="${emp.getBrith()}"></td>
							</tr>
(其中,emps为controller层中将所有数据放置的容器,EmployeeController代码如下)
@Controller
public class EmployeeController {

//
    @Autowired
    EmployeeDao employeeDao;

    @RequestMapping("/emps")
    public String list(Model model){
        Collection<Employee> employees = employeeDao.getAll();
        model.addAttribute("emps",employees);
        return "emp/list";
    }

}
4.添加员工(增)
1).跳转到添加界面
<h3><a th:href="@{/emps/add}" class="btn btn-sm btn-success">添加员工</a> </h3>
@GetMapping("/emps/add")
    public String toadd(Model model){
//        获得所有的部门信息
        Collection<Department> departments = departmentDao.getDepartments();
        model.addAttribute("departments",departments);
        return "emp/addp";
    }
新建用户添加界面(emp/addp.html)
2).添加员工成功返回首页
<form th:action="@{/emps/add}" method="post">
       <button class="btn btn-primary">添加</button>
</form>
@PostMapping("/emps/add")
public String add(Employee employee){
System.out.println(employee.getEmail());
employeeDao.save(employee);//调用底层业务方法,保存员工信息
return "redirect:/emps";
}5.修改用户(改)
1).跳转到修改界面
<a class="btn btn-sm btn-primary" th:href="@{'/emps/'+${emp.getId()}}">编辑</a> @GetMapping("/emps/{id}")
public String update(@PathVariable("id") Integer id,Model model){
Employee employee = employeeDao.getbyID(id);
model.addAttribute("emp",employee);
// 获得所有的部门信息
Collection<Department> departments = departmentDao.getDepartments();
model.addAttribute("departments",departments);
return "emp/eptedit";
}新建修改界面(emp/eptdit.html)
2).修改员工信息成功返回首页
<form th:action="@{/updateEmp}" method="post">
                    <button class="btn btn-primary">确定</button>
            </form>
@PostMapping("/updateEmp")
public String updateEmp(Employee employee){
employeeDao.save(employee);
System.out.println(employee);
return "redirect:/emps";
}6.删除员工(删)
<a class="btn btn-sm btn-danger" th:href="@{'/delete/'+${emp.getId()}}">删除</a>// 删除员工
@GetMapping("/delete/{id}")
public String delete(@PathVariable("id") Integer id){
employeeDao.deletebyID(id);
return "redirect:/emps";
}3.4 如何快速写网站
模板: (别人写好的,拿来拼)bootstrap、模板之家
框架:(组件:自己手动拼接组合)bootstrap、layui、semantic-ui、element-ui
后台模板: xadmin
4、整合JDBC、Druid、MyBatis
4.1 整合JDBC
4.2 整合Druid
1、切换数据源
2、设置数据源连接
3.配置Druid数据源监控
4.配置 Druid web 监控 filter 过滤器
4.3 整合MyBatis(重点)
4.3.1 导入依赖
mapper层上的类需要添加@Mapper和@Repository
写mapper.xml文件(注意需要在配置文件中整合mybatis路径)
<?xml version="1.0" encoding="UTF-8" ?>
<!DOCTYPE mapper
        PUBLIC "-//mybatis.org//DTD Mapper 3.0//EN"
        "http://mybatis.org/dtd/mybatis-3-mapper.dtd">

<!--下面的手动配置-->
<mapper namespace="com.example.demo.mapper.DepartmentMapper">

    <select id="getDepartments" resultType="Department">
       select * from department;
    </select>

    <select id="getDepartment" resultType="Department" parameterType="int">
       select * from department where id = #{id};
    </select>

</mapper>
#整合mybatis
mybatis:
type-aliases-package: com.example.demo.pojo
mapper-locations: classpath:mybatis/mapper/*.xml测试:将数据库和mybatis整合进第一个项目
5 SpringSecurity、Shiro(安全)
5.1 SpringSecurity
权限问题(功能、访问、菜单),之前采用拦截器(冗余)
导入thymeleaf依赖(简单工程的步骤不写了,同上面)
<dependency>
            <groupId>org.thymeleaf</groupId>
            <artifactId>thymeleaf-spring5</artifactId>
        </dependency>
        <dependency>
            <groupId>org.thymeleaf.extras</groupId>
            <artifactId>thymeleaf-extras-java8time</artifactId>
        </dependency>
1、需要引入spring-boot-starter-security模块
<dependency>
<groupId>org.thymeleaf.extras</groupId>
<artifactId>thymeleaf-extras-springsecurity5</artifactId>
<version>3.0.4.RELEASE</version>
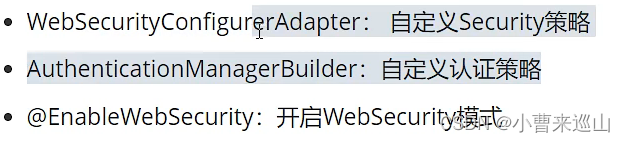
</dependency>这三个类很重要 (@EnableWebSecurity、AuthenticationManagerBuilder、W)
2、新建config类
WebSecurityConfigurerAdapter过期后SpringSecurityConfig授权与认证的写法_m0_64470824的博客-CSDN博客
Getting Started (spring.io)(官网)
@EnableWebSecurity
public class SecurityConfig  {
//
    @Bean
    public SecurityFilterChain filterChain(HttpSecurity http) throws Exception {
        http.authorizeRequests().antMatchers("/").permitAll()
                .antMatchers("/level1/**").hasRole("vip1")//http://.../level/..只有VIP1才能访问
                .antMatchers("/level2/**").hasRole("vip2")
                .antMatchers("/level3/**").hasRole("vip3");
        http.formLogin();//没有权限时返回login页面
        http.csrf().disable();//关闭csrf功能,登陆失败可能存在的原因
        http.logout().logoutSuccessUrl("/");//开启了注销功能,注销成功返回首页
        http.rememberMe();
        return http.build();
    }
//    认证
// 这些数据正常在数据库中读
@Bean
public InMemoryUserDetailsManager userDetailsService() {
    UserDetails user = User.withDefaultPasswordEncoder()
            .username("xiao")
            .password("123")
            .roles("vip1","vip2","vip3")
            .build();
    UserDetails user2 = User.withDefaultPasswordEncoder()
            .username("root")
            .password("123456")
            .roles("vip1")
            .build();
    UserDetails user3 = User.withDefaultPasswordEncoder()
            .username("admin")
            .password("123456")
            .roles("vip2")
            .build();
    return new InMemoryUserDetailsManager(user,user2,user3);
}
其中用户名称。密码等信息一般在数据库中读取,代码如下(DataSource是数据源)
@Autowired
    private DataSource dataSource;

    @Autowired
    public void configGlobal(AuthenticationManagerBuilder auth){
        User.UserBuilder user = User.withDefaultPasswordEncoder();
        auth
                .jdbcAuthentication()
                .dataSource(dataSource)
                .withDefaultSchema().withUser("user").password("password").roles("USER");
    }
3、增强版, 不同用户的界面不同(thymeleaf和security整合)
可以在thymeleaf中写springsecurity的操作
<dependency>
            <groupId>org.thymeleaf.extras</groupId>
            <artifactId>thymeleaf-extras-springsecurity4</artifactId>
            <version>3.0.4.RELEASE</version>
</dependency>html界面引入命名空间xmlns:sec="http://www.thymeleaf.org/thymeleaf-extras-springsecurity4"
当初在这部分困了很长时间,由于版本问题以及语法问题,最后根据官方文档重新编写,通过测试。【翻译】Thymeleaf – Spring Security集成模块 - Halloworlds - 博客园(整合语法文档)
用户名:<span th:text="${#authentication.name}"></span>
                        权限:<span th:if="${#authorization.expression('hasRole(''vip1'')')}"></span>
3,记住我功能 http.rememberMe(); 实际上就是cookie的实现(默认保存两周)

4、定制登录页(登录页必须要有名字和密码,且securityconfig和登录页中的字段名称要对应),如下登录页和配置类
<form th:action="@{/login}" method="post">
                            <div class="field">
                                <label>Username</label>
                                <div class="ui left icon input">
                                    <input type="text" placeholder="Username" name="user">
                                    <i class="user icon"></i>
                                </div>
                            </div>
                            <div class="field">
                                <label>Password</label>
                                <div class="ui left icon input">
                                    <input type="password" name="pwd">
                                    <i class="lock icon"></i>
                                </div>
                            </div>
/*定制登录页*/
http.formLogin().loginPage("/tologin")
.usernameParameter("user").passwordParameter("pwd")
.loginProcessingUrl("/login");//没有权限时返回login页面其中,/tologin对应登录页,登录页上的登陆按钮转到/login请求,并将“pwd”和“user”传递。
5.2 Shiro
认证、授权、加密、会话管理

5.2.1 Springboot集成 shiro(SpringBoot—shiro)
1、导包
<!--shiro整合spring的包-->
<dependency>
    <groupId>org.apache.shiro</groupId>
    <artifactId>shiro-spring-boot-web-starter</artifactId>
    <version>1.9.0</version>
</dependency>
2、初始化
自定义realm类
/*自定义的realm*/
public class UserRealm extends AuthorizingRealm {
//    授权
    @Override
    protected AuthorizationInfo doGetAuthorizationInfo(PrincipalCollection principalCollection) {
        return null;
    }
//   认证
    @Override
    protected AuthenticationInfo doGetAuthenticationInfo(AuthenticationToken authenticationToken) throws AuthenticationException {
        return null;
    }
}
编写ShiroConfig类(1.创建realm对象 2.defaulwebsecurityManager 3.shirofilterfactoryBean)
@Configuration
public class ShiroConfig {

//    shirofilterfactoryBean:3'
    @Bean(name = "shiroFilterFactoryBean")
    public ShiroFilterFactoryBean getshiroFilterFactoryBean(@Qualifier("defaultWebSecurityManager") DefaultWebSecurityManager defaultWebSecurityManager){
        ShiroFilterFactoryBean bean = new ShiroFilterFactoryBean();
//        设置安全管理器
        bean.setSecurityManager(defaultWebSecurityManager);
/*添加shiro的内置过滤器
        * anon:无需认证就能访问
        * authc:必修认证才能访问
        * user:必须拥有 记住我 才能访问
        * perms:拥有对某个资源的权限才能访问
        * role:拥有某个角色权限才能访问
        * */

        Map<String, String> filtration = new LinkedHashMap<>();
        filtration.put("/add","authc");
        filtration.put("/update","anon");
        bean.setFilterChainDefinitionMap(filtration);
        return bean;
    }

    //    defaulwebsecurityManager:2
    @Bean(name = "defaultWebSecurityManager")
    public DefaultWebSecurityManager defaultWebSecurityManager(@Qualifier("userRealm")UserRealm userRealm){
        DefaultWebSecurityManager securityManager = new DefaultWebSecurityManager();
        /*关联userrealm*/
        securityManager.setRealm(userRealm);
        return securityManager;
    }

//    创建realm对象,需要自定义类:1
    @Bean
    public UserRealm userRealm(){
        return new UserRealm();
    }
接下来就是连接数据库,先认证在授权(realm类中进行),固定代码,可以参考(springboot——shiro userRealm和shiroConfig)
5.2.2 shiro集成 thymeleaf(SpringBoot—shiro)
1、导入依赖
<dependency>
            <groupId>com.github.theborakompanioni</groupId>
            <artifactId>thymeleaf-extras-shiro</artifactId>
            <version>2.0.0</version>
        </dependency>
6、Swagger
6.1简介
前后端分离:vue+springboot
问题: 前后端集成联调,无法做到“及时协商,尽早解决”,最终导致集中爆发
解决:实时更新API,降低集成的风险;制定word计划文档;
前后端分离:前端测试后端接口:postman 后端提供接口,实时更新信息改动
Swagger:号称最流行的Api框架; Api文档与Api定义实时更新;直接运行,可以在线测试API接口;支持多种语言
6.2 Swagger集成Springboot
6.2.2、Swagger初始化
Swagger 3.0 使用指南_我是最菜程序员的博客-CSDN博客
1.导入相关依赖
<!-- https://mvnrepository.com/artifact/io.springfox/springfox-swagger2 -->
        <dependency>
            <groupId>io.springfox</groupId>
            <artifactId>springfox-swagger2</artifactId>
            <version>3.0.0</version>
        </dependency>
        <!-- https://mvnrepository.com/artifact/io.springfox/springfox-swagger-ui -->
        <dependency>
            <groupId>io.springfox</groupId>
            <artifactId>springfox-swagger-ui</artifactId>
            <version>3.0.0</version>
        </dependency>
2.配置swagger=》config
@Configuration
@EnableOpenApi  //开启swagger
public class SwaggerConfig
{

}
3.测试
点击http://localhost:8080/swagger-ui/index.html#/ ,显示当前工程项目的测试接口。 swagger信息、接口信息、实体类信息、
6.2.2、配置Swagger
@Configuration
@EnableOpenApi  //开启swagger
public class SwaggerConfig
{
    /*扫描那些包下的接口文档*/
    @Bean
    public Docket creatRestApi(){
        return new Docket(DocumentationType.SWAGGER_2)
                .apiInfo(apiInfo())
                .enable(true)
                .select()
//                RequestHandlerSelectors,扫描要配置接口的方式
                /*basePackage:指定扫描的包*/
                .apis(RequestHandlerSelectors.basePackage("com.example.swaggerdemo.controller"))
                .paths(PathSelectors.any()) //过滤什么路径
//                .paths(PathSelectors.ant("kuang/**")) //过滤什么路径
                .build();
    }
    /*配置swagger信息*/
    private ApiInfo apiInfo(){
        return new ApiInfoBuilder()
                .title("第一个接口文档")
                .description("薛定谔莫小锤")
                .contact(new Contact("ccc","http://localhost:8080/doc.html","2858262423@qq.com"))
                .version("1.0")
                .build();
    }
}小测试:希望开发的时候使用swagger,发布的时候关闭swagger
通过配置文件确定正在运行的环境,将运行环境传递给swaggerconfig下的enable
1.新建application-dev.properties和application-pro.properties文件,以及在application.properties文件中添加以下代碼
#在那个环境下运行(开发还是发布)
spring.profiles.active=dev
#spring.profiles.active=pro
2.在swaggerconfig下將运行环境通过environment传递给creatRestApi
@Bean
    public Docket creatRestApi(Environment environment){
        /*设置要显示的swagger环境*/
        Profiles profiles = Profiles.of("dev","test");
        /*判断是否处在自己设定的环境*/
        Boolean b = environment.acceptsProfiles(profiles);

        return new Docket(DocumentationType.SWAGGER_2)
                .apiInfo(apiInfo())
                .enable(b)
6.2.3、Swagger分组及接口配置
1.分组
扫描不同的包
 @Bean
    public Docket docket1(Environment environment){
        return new Docket(DocumentationType.SWAGGER_2).groupName("南京");
    }
 @Bean
   public Docket docket2(Environment environment){
      return new Docket(DocumentationType.SWAGGER_2).groupName("北京");
    }
2.接口配置
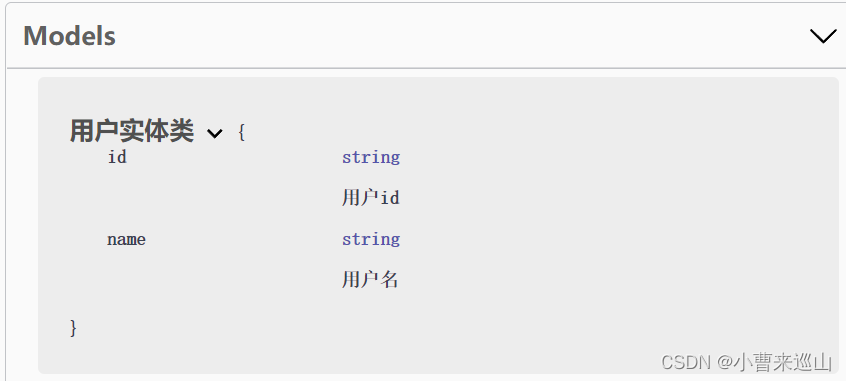
model区域显示:返回值存在实体类的接口
@PostMapping(value = "/user")
    public User user(){
        return new User();

    }


//在类上添加字段,展示更加方便易懂
@ApiModel("用户实体类")
public class User {
    @ApiModelProperty("用户名")
    public String name;
    @ApiModelProperty("用户id")
    public String id;
}
7、任务(工程:taskdemo)
7、1 异步任务
1、在service层的方法上加上@Async注解
    /*告诉spring这是一个异步的方法*/
    @Async
    public void hello(){
        try {
            Thread.sleep(10000);
        } catch (InterruptedException e) {
            e.printStackTrace();
        }
        System.out.println("正在补货");
}2.在启动类上添加@EnableAsync注解
@EnableAsync //开启异步注解功能
@SpringBootApplication
public class TaskdemoApplication {

    public static void main(String[] args) {
        SpringApplication.run(TaskdemoApplication.class, args);
    }

}
7、2 邮件任务
1.添加mail依赖
<!--邮件任务 mail:配置-->
        <dependency>
            <groupId>org.springframework.boot</groupId>
            <artifactId>spring-boot-starter-mail</artifactId>
        </dependency>
2.在配置文件中配置mail
spring.mail.username=2858262423@qq.com
spring.mail.password=vjpvwhkacqaadgjd
spring.mail.host=smtp.qq.com
#开启加密验证
spring.mail.properties.mail.smtp.ssl.enable=true
3.在测试类中测试一下(简单版和复杂版及展示)
@Autowired
    JavaMailSender mailSender;

    @Test
    void contextLoads() {
        //一个简单的邮件
        SimpleMailMessage messages = new SimpleMailMessage();
        messages.setSubject("你好"); //主题
        messages.setText("谢谢你");//内容
        messages.setTo("2758341195@qq.com");
        messages.setFrom("2858262423@qq.com");
        mailSender.send(messages);
    }
@Test
void contextLoads2() throws MessagingException {
//一个复杂的邮件
MimeMessage mimeMessages = mailSender.createMimeMessage();
//组装
MimeMessageHelper helper= new MimeMessageHelper(mimeMessages,true);
helper.setSubject("芜湖,这是主题");
helper.setText("<p style='color:red'>真的很想知道能不能使用html书写</p>",true); //true表示支持html格式
//附件
helper.addAttachment("1.jpg", new File("C:\\Users\\cao\\Pictures\\Camera Roll\\城市图.jpg"));
helper.setTo("2758341195@qq.com");
helper.setFrom("2858262423@qq.com");
mailSender.send(mimeMessages);
}
7、3 定时任务(corn表达式)
@EnableScheduling //开启定时功能的注解
@Scheduled
@Service
public class SchedualService {

//    在一个特定的是时间执行 Timer
    //cron表达式  秒 分 时 日 月 周几
    /*
    30 15 10 * * ? 每天10点15分30秒执行一次
    30 0/5 10,18 * * ? 每天10点和18点,每隔五分钟执行一次
    * 可以再网站上搜索表达式写法*/
    @Scheduled(cron = "0 0/1 16 * * 0-7")
    public void hello(){
        System.out.println("特定时间内执行");
    }
}
题外话:
1、Springboot所有的配置类,都有一个自动装配类 **AutoConfiguration
2、自动装配类会绑定一个 properties 配置文件 **Properties


 391
391


 被折叠的 条评论
为什么被折叠?
被折叠的 条评论
为什么被折叠?
 到【灌水乐园】发言


