


springmvc基于xml文件的方式案例步骤
-
创建maven模块,并且转换为web项目

-
导入依赖
<dependencies> <dependency> <groupId>org.springframework</groupId> <artifactId>spring-webmvc</artifactId> <version>5.2.12.RELEASE</version> </dependency> <dependency> <groupId>javax.servlet</groupId> <artifactId>javax.servlet-api</artifactId> <version>3.1.0</version> </dependency> </dependencies> -
编写springmvc.xml配置文件在resources目录下
<?xml version="1.0" encoding="UTF-8"?> <beans xmlns="http://www.springframework.org/schema/beans" xmlns:xsi="http://www.w3.org/2001/XMLSchema-instance" xmlns:context="http://www.springframework.org/schema/context" xmlns:mvc="http://www.springframework.org/schema/mvc" xsi:schemaLocation="http://www.springframework.org/schema/beans http://www.springframework.org/schema/beans/spring-beans.xsd http://www.springframework.org/schema/context https://www.springframework.org/schema/context/spring-context.xsd http://www.springframework.org/schema/mvc https://www.springframework.org/schema/mvc/spring-mvc.xsd"> <!--1. 基包扫描--> <context:component-scan base-package="com.itheima.controller"/> <!--2. 配置视图解析器--> <bean class="org.springframework.web.servlet.view.InternalResourceViewResolver"> <!--配置视图的前缀名--> <property name="prefix" value="/pages/"/> <!--配置视图的后缀--> <property name="suffix" value=".html"/> </bean> <!--3. 开启注解驱动, 启动springmvc的三大组件 注意: 这里千万别导错约束--> <mvc:annotation-driven/> <!--4. 释放所有的静态资源给tomcat去处理--> <mvc:default-servlet-handler/> </beans> -
编写controller
package com.itheima.controller; import org.springframework.stereotype.Controller; import org.springframework.web.bind.annotation.RequestMapping; @Controller public class HelloController { /** * 返回的是一个页面的视图名称, /pages/1.html * @return */ @RequestMapping("/hello") public String hello(){ System.out.println("=-===hello方法被调用了==="); return "1"; } } -
配置web.xml文件,web.xml文件的作用就是要加载springmvc.xml文件。
<?xml version="1.0" encoding="UTF-8"?>
<web-app xmlns:xsi="http://www.w3.org/2001/XMLSchema-instance"
	xmlns="http://java.sun.com/xml/ns/javaee"
	xsi:schemaLocation="http://java.sun.com/xml/ns/javaee http://java.sun.com/xml/ns/javaee/web-app_2_5.xsd"
	version="2.5">

	<!--1. 创建前端控制器, 并且使用前端控制器(核心控制器)-->
	<servlet>
		<servlet-name>dispatcherServlet</servlet-name>
		<servlet-class>org.springframework.web.servlet.DispatcherServlet</servlet-class>
		<!--加载springmvc.xml文件-->
		<init-param>
			<param-name>contextConfigLocation</param-name>
			<param-value>classpath:springmvc.xml</param-value>
		</init-param>
	</servlet>

	<!--2. 配置映射-->
	<servlet-mapping>
		<servlet-name>dispatcherServlet</servlet-name>
		<url-pattern>/*</url-pattern>
	</servlet-mapping>


</web-app>
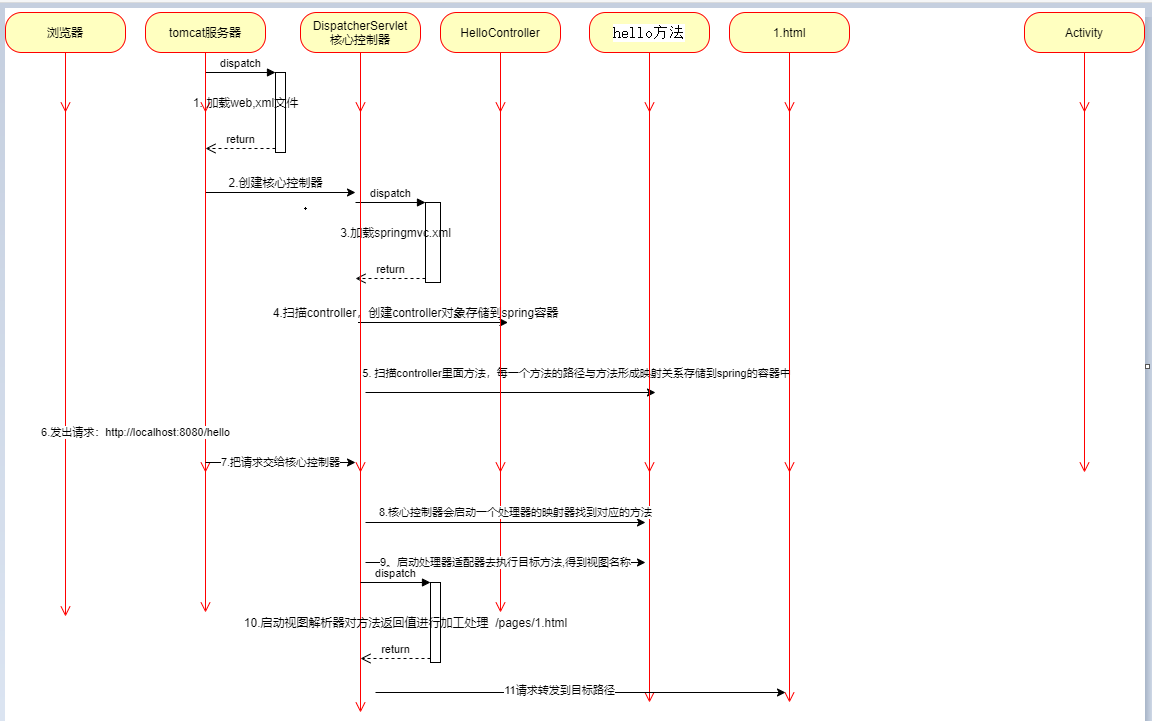
7.2 springmvc执行流程与三大组件


 1017
1017


 被折叠的 条评论
为什么被折叠?
被折叠的 条评论
为什么被折叠?
 到【灌水乐园】发言


