


 本文介绍了Spring MVC的配置过程,包括前端控制器DispatcherServlet的设置和spring-mvc.xml的配置,详细展示了视图解析器、静态资源放行及JSON结果类型的自动转换。同时,给出了Controller层的代码示例,演示了不同请求映射方法的使用。
1).配置前端控制
<?xml version="1.0" encoding="UTF-8"?>
<web-app xmlns="http://xmlns.jcp.org/xml/ns/javaee"
xmlns:xsi="http://www.w3.org/2001/XMLSchema-instance"
xsi:schemaLocation="http://xmlns.jcp.org/xml/ns/javaee http://xmlns.jcp.org/xml/ns/javaee/web-app_4_0.xsd"
version="4.0">
<welcome-file-list>
<welcome-file>/login.jsp</welcome-file>
</welcome-file-list>
<!-- 配置前端控制器-->
<servlet>
<servlet-name>springmvc</servlet-name>
<servlet-class>org.springframework.web.servlet.DispatcherServlet</servlet-class>
<init-param>
<param-name>contextConfigLocation</param-name>
<param-value>classpath:spring-mvc.xml</param-value>
</init-param>
</servlet>
<servlet-mapping>
<servlet-name>springmvc</servlet-name>
<url-pattern>/</url-pattern>
</servlet-mapping>
</web-app>
2).根据前端控制器里面的init- param里面的classpath配置spring-mvc.xml
<?xml version="1.0" encoding="UTF-8"?>
<beans xmlns="http://www.springframework.org/schema/beans"
xmlns:xsi="http://www.w3.org/2001/XMLSchema-instance"
xmlns:context="http://www.springframework.org/schema/context"
xmlns:mvc="http://www.springframework.org/schema/mvc"
xsi:schemaLocation="http://www.springframework.org/schema/beans
http://www.springframework.org/schema/beans/spring-beans.xsd
http://www.springframework.org/schema/context
https://www.springframework.org/schema/context/spring-context.xsd
http://www.springframework.org/schema/mvc
https://www.springframework.org/schema/mvc/spring-mvc.xsd">
<context:component-scan base-package="com.qiao"/>
<!-- 视图解析器-->
<bean id="viewResolver" class="org.springframework.web.servlet.view.InternalResourceViewResolver">
<property name="prefix" value="/WEB-INF/jsp/"/>
<property name="suffix" value=".jsp"/>
</bean>
<!--json结果类型转换为自动结果类型转换-->
<mvc:annotation-driven/>
<!-- 全部静态资源放行-->
<mvc:default-servlet-handler/>
<!-- 局部资源放行 mapping指定文件为js及其子包,location去对应的路径去寻找-->
<mvc:resources mapping="/js/**" location="/js/" />
</beans>-
在里面配置视图解析器
-
静态资源的放行
-
json结果类型的自动结果类型转换,一句代码搞定,不需要记住那么复杂的xml配置
3).写controller层代码
package com.qiao.controller;
import org.springframework.stereotype.Controller;
import org.springframework.ui.Model;
import org.springframework.ui.ModelMap;
import org.springframework.web.bind.annotation.RequestMapping;
import org.springframework.web.bind.annotation.RequestMethod;
import org.springframework.web.bind.annotation.RequestParam;
import org.springframework.web.bind.annotation.ResponseBody;
import javax.servlet.http.HttpServletRequest;
import javax.servlet.http.HttpServletResponse;
import javax.servlet.http.HttpSession;
@Controller
public class Param {
@RequestMapping("/param1")
public void method1(HttpServletRequest req, HttpServletResponse resp, HttpSession session) throws Exception{
req.setAttribute("data1","request域存的内容");
session.setAttribute("data2","session域存的内容");
req.getRequestDispatcher("/WEB-INF/jsp/result.jsp").forward(req,resp);
}
@RequestMapping("/param2")
public String method2(Model model , ModelMap modelMap){
model.addAttribute("data1","data1内容");
modelMap.addAttribute("data2","data2内容");
return "result2";
}
@RequestMapping(value = "/param3",method = RequestMethod.GET,produces = {"text/json;charset=utf-8"})
@ResponseBody
public String method3(@RequestParam(value = "id",defaultValue ="66") Integer UserId, String name){
return UserId+":"+name;
}
}
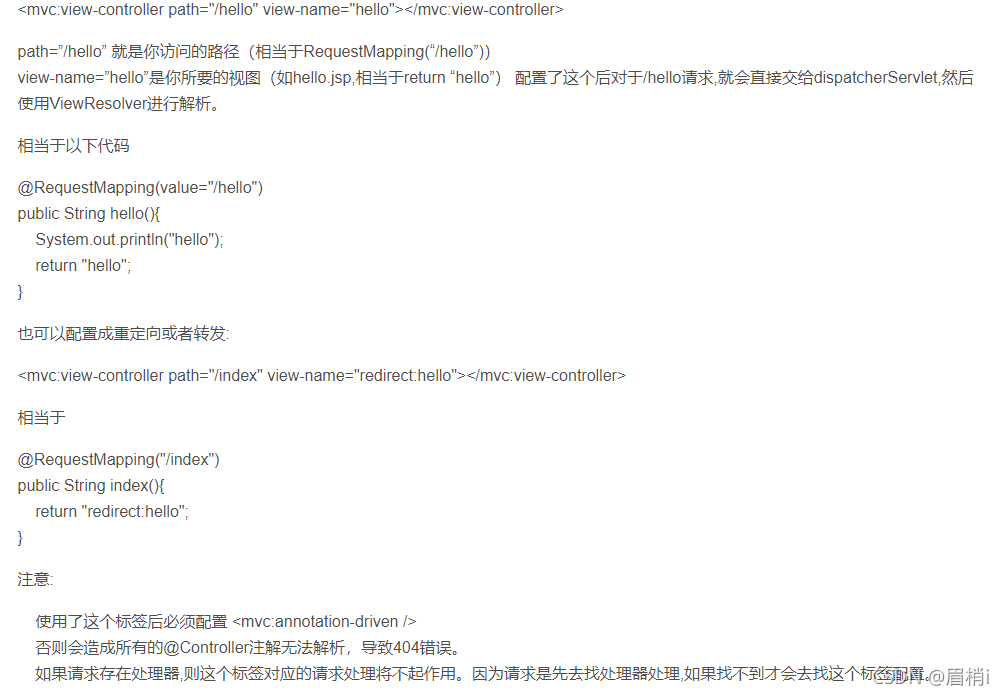
关于mvc:view-controller的用法


 6950
6950

 被折叠的 条评论
为什么被折叠?
被折叠的 条评论
为什么被折叠?
 到【灌水乐园】发言


