


虽然最近屁事很多,但是还是想抽时间出来学一学图形学的知识,感觉上个学期图形学学的不是很扎实,平时实验也基本都是在调包,对整个图形学没有一个基本的认识,因此就打算再学一遍GAMES101,把作业踏踏实实地做一下(其实上个学期看过一点,但是作业都没做,基本就是没学到什么东西==)
作业二确实碰到了许多问题(可能也是我太菜了吧),差不多花了一天的时间把这个搞搞完了,也看了很多大佬的文章(链接我贴在文末了),得到了一些启发,因此借助博客记录一下,也顺便帮帮后面的有缘人,毕竟这games101的课我看不久就可以突破200W了hhh。
课程总结与理解(光栅化)
写完作业后来总结一波,这一章主要解决的就是光栅化和反走样问题,我之前一直对光栅化没有深入的了解,这次总算懂了一点点,首先就是在通过MVP操作之后,我们得到一个标准立方体,接下来需要进行视口变换,将标准立方体的x和y与屏幕坐标x和y对应(作业代码里已经写得很清楚了),然后就是真正进行光栅化操作,以每个三角形为单位,逐个进行绘制:通过遍历图像上的像素点(这里有一些加速处理,比如bouding box,扫描线等等),然后判断像素点的中心点是否在三角形中(叉乘判断,若三者叉乘符号相同,便是在内部),若在三角形中,则首先需要对该像素进行深度测试,若该像素深度小于深度缓存的深度即表面通过深度测试,此时便对该像素进行着色,也就是给该像素赋予颜色值,如此往复,最终实现绘制。若要使用反走样技术,比如MSAA,就通过超采样实现,但这会带了更多的开销,不同的反走样技术实现起来也不同。解决了之前理论课一直没弄明白的点:先模糊再采样的本质是什么?即改变颜色再着色,而先采样再着色则是先着色再改变周围像素块的颜色。
基本要求实现
首先是实现基本需求,完成最基本的光栅化。主要解决的问题是创建bouding box,判断像素中心点是否在三角形内部,z-buffer深度测试。
创建bouding box,如下;我看有的人对max进行了向上取整,我感觉没有必要,直接用int截断就行,这个大家有空可以思考思考,我感觉挺有意思。
    int min_x, max_x, min_y, max_y;
    min_x = std::min(v[0].x(), std::min(v[1].x(), v[2].x()));
    max_x = std::max(v[0].x(), std::max(v[1].x(), v[2].x()));
    min_y = std::min(v[0].y(), std::min(v[1].y(), v[2].y()));
    max_y = std::max(v[0].y(), std::max(v[1].y(), v[2].y()));
判断像素中心点是否在三角形内部,如下;
static bool insideTriangle(float x, float y, const Vector3f* _v)
{
    // TODO : Implement this function to check if the point (x, y) is inside the triangle represented by _v[0], _v[1], _v[2]
    Vector3f Q = {x,y,0};

    Vector3f p0p1 = _v[1] - _v[0];
    Vector3f p0Q = Q - _v[0];

    Vector3f p1p2 = _v[2] - _v[1];
    Vector3f p1Q = Q - _v[1];

    Vector3f p2p0 = _v[0] - _v[2];
    Vector3f p2Q = Q - _v[2];

    //类定义里面已经定义是逆时针,所以只用考虑同正情况。
    return p0p1.cross(p0Q).z() > 0 && p1p2.cross(p1Q).z() > 0 && p2p0.cross(p2Q).z()>0;
}
z-buff深度测试,如下:
  iterate through the pixel and find if the current pixel is inside the triangle
   for (int x = min_x; x <= max_x; x++)
   {
       for (int y = min_y; y <= max_y; y++)
       {
           //判断像素中心点是否在连续三角形内,若在三角形内,就尝试对该像素进行着色,若深度测试通过,便着色
           if (insideTriangle(x + 0.5, y + 0.5, t.v))
           {
               // If so, use the following code to get the interpolated z value.
               auto tup = computeBarycentric2D((float)x + 0.5, (float)y + 0.5, t.v);
               float alpha;
               float beta;
               float gamma;
               std::tie(alpha, beta, gamma) = tup;
               float w_reciprocal = 1.0 / (alpha / v[0].w() + beta / v[1].w() + gamma / v[2].w());
               float z_interpolated = alpha * v[0].z() / v[0].w() + beta * v[1].z() / v[1].w() + gamma * v[2].z() / v[2].w();
               z_interpolated *= w_reciprocal;
               //深度测试,通过便着色,并同时将深度存入缓存
               //这里有个细节之前没注意,就是buf的取值要用get_index函数
               if (depth_buf[get_index(x, y)] > z_interpolated)
               {
                   // TODO : set the current pixel (use the set_pixel function) to the color of the triangle (use getColor function) if it should be painted.
                   //深度存入缓存
                   depth_buf[get_index(x, y)] = z_interpolated;
                   Vector3f point = { (float)x,(float)y,z_interpolated};
                   Vector3f color = t.getColor();
                   //着色
                   set_pixel(point, color);
               }
           }
       }
   }
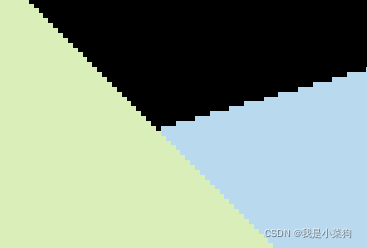
总体来说,难度不大,只是有一些小细节需要注意,其次要能看懂一点点源码,要不然有些地方不好写。结果如下:

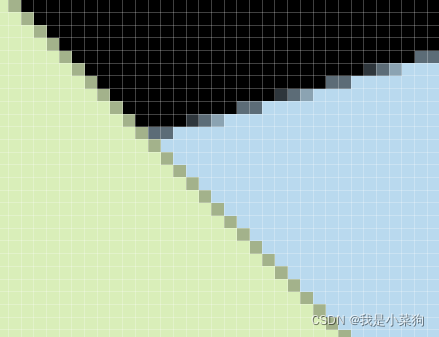
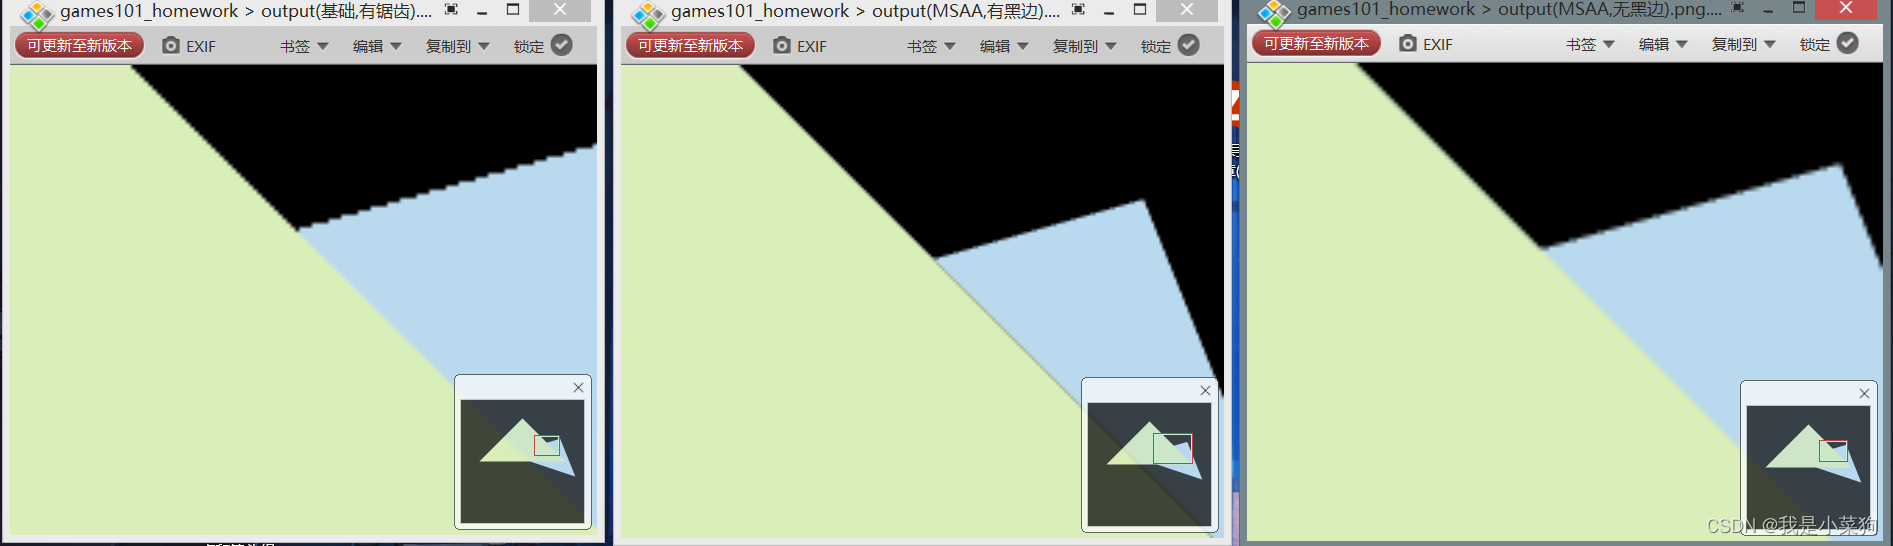
放大之后的锯齿感可以说相当的明显
MSAA实现(有黑边)
接下来是MSAA的实现(有黑边),我一开始感觉难度不大,后面就被坑了,出现了黑边==
    //MSAA超采样(有黑边),着色时仅仅考虑了背景色和三角形颜色,没有考虑其他三角形的颜色
    std::vector<Eigen::Vector2f> super_sample_step
    {
        {0.25,0.25},
        {0.75,0.25},
        {0.25,0.75},
        {0.75,0.75},
    };
    // iterate through the pixel and find if the current pixel is inside the triangle
    for (int x = min_x; x <= max_x; x++)
    {
        for (int y = min_y; y <= max_y; y++)
        {
            int count = 0;
            float minDepth = FLT_MAX;
            for (int i = 0; i < 4; i++)
            {
                if (insideTriangle(x + super_sample_step[i][0], y + super_sample_step[i][1], t.v))
                {
                    count++;
                }
            }
            if (count > 0)
            //若像素的四个样本中有一个在三角形内,就要对这个像素进行深度测试,然后颜色直接就是所占比例
            {
                auto tup = computeBarycentric2D(x + 0.5, y + 0.5, t.v);
                float alpha;
                float beta;
                float gamma;
                std::tie(alpha, beta, gamma) = tup;
                float w_reciprocal = 1.0 / (alpha / v[0].w() + beta / v[1].w() + gamma / v[2].w());
                float z_interpolated = alpha * v[0].z() / v[0].w() + beta * v[1].z() / v[1].w() + gamma * v[2].z() / v[2].w();
                z_interpolated *= w_reciprocal;
                //深度测试,通过便着色,并同时将深度存入缓存
                //这里有个细节之前没注意,就是buf的取值要用get_index函数
                if (depth_buf[get_index(x, y)] > z_interpolated)
                {
                    // TODO : set the current pixel (use the set_pixel function) to the color of the triangle (use getColor function) if it should be painted.
                    //深度存入缓存
                    depth_buf[get_index(x, y)] = z_interpolated;
                    Vector3f point = { (float)x,(float)y,z_interpolated };
                    Vector3f color = t.getColor()*count/4; //t.getColor()* count / 4.0f + (4 - count) * frame_buf[get_index(x, y)] / 4.0f
                    //着色
                    set_pixel(point, color);
                }
            }
        }
    }

不难发现,虽然图像整体锯齿感减弱,但是三角形交叉处出现黑边。
MSAA的实现(无黑边)
接下来是MSAA的实现(无黑边),花了差不多一个上午解决掉了,还是有点蛋疼的,首先要先去思考出现黑边问题的本质原因是什么?是由于上面那个MSAA的方法,对三角形光栅化时时仅仅考虑了背景色和该三角形颜色,没有考虑其他三角形的颜色,比如在交叉线上,可能绿色占四分之一,蓝色占四分之三,而上面那个方法实施的时候是绿色占四分之一,黑色占四分之三(或者反过来,这个不重要,关键是这个思想),因此解决这个问题的办法就是把每个像素的四个样本的深度和颜色都记录下来,说白了就是直接将其看作四倍的图像进行处理,然后再进行着色。
先照猫画虎地把记录样本的两个数组定义出来。(要对源码有一点明白,要不然你可能都不知道我在讲啥。。。)
        std::vector<Eigen::Vector3f> frame_buf;
        std::vector<Eigen::Vector3f> super_frame_buf;

        std::vector<float> depth_buf;
        std::vector<float> super_depth_buf;
void rst::rasterizer::clear(rst::Buffers buff)
{
    if ((buff & rst::Buffers::Color) == rst::Buffers::Color)
    {
        std::fill(frame_buf.begin(), frame_buf.end(), Eigen::Vector3f{0, 0, 0});
        std::fill(super_frame_buf.begin(), super_frame_buf.end(), Eigen::Vector3f{ 0, 0, 0 });

    }
    if ((buff & rst::Buffers::Depth) == rst::Buffers::Depth)
    {
        std::fill(depth_buf.begin(), depth_buf.end(), std::numeric_limits<float>::infinity());
        std::fill(super_depth_buf.begin(), super_depth_buf.end(), std::numeric_limits<float>::infinity());
    }
}

rst::rasterizer::rasterizer(int w, int h) : width(w), height(h)
{
    frame_buf.resize(w * h );
    depth_buf.resize(w * h );
    super_frame_buf.resize(w * h*4);
    super_depth_buf.resize(w * h*4);
}
再定义一个函数,用来取超采样数组里的值。
int rst::rasterizer::get_super_index(int x, int y)
{
    return (height*2 - 1 - y) * width*2 + x;
}
核心代码
std::vector<Eigen::Vector2f> super_sample_step
    {
        {0.25,0.25},
        {0.75,0.25},
        {0.25,0.75},
        {0.75,0.75},
    };
    // iterate through the pixel and find if the current pixel is inside the triangle
    for (int x = min_x; x <= max_x; x++)
    {
        for (int y = min_y; y <= max_y; y++)
        {
            //判断是否通过了深度测试
            int judge = 0;
            //具体思路就是记录四倍的数据量,把超采样的数据都记下来,直接就当做四倍的图像处理
            for (int i = 0; i < 4; i++)
            {
                if (insideTriangle(x + super_sample_step[i][0], y + super_sample_step[i][1], t.v))
                {
                    auto tup = computeBarycentric2D(x + super_sample_step[i][0], y + super_sample_step[i][1], t.v);
                    float alpha;
                    float beta;
                    float gamma;
                    std::tie(alpha, beta, gamma) = tup;
                    float w_reciprocal = 1.0 / (alpha / v[0].w() + beta / v[1].w() + gamma / v[2].w());
                    float z_interpolated = alpha * v[0].z() / v[0].w() + beta * v[1].z() / v[1].w() + gamma * v[2].z() / v[2].w();
                    z_interpolated *= w_reciprocal;
                    if (super_depth_buf[get_super_index(x*2 + i % 2, y*2 + i / 2)] > z_interpolated)
                    {
                        judge = 1;
                        // TODO : set the current pixel (use the set_pixel function) to the color of the triangle (use getColor function) if it should be painted.
                        //深度存入缓存
                        super_depth_buf[get_super_index(x*2 + i % 2, y*2 + i / 2)] = z_interpolated;
                        //颜色存入缓存
                        super_frame_buf[get_super_index(x*2 + i % 2, y*2 + i / 2)] = t.getColor();
                    }
                }
            }
            if (judge)
            //若像素的四个样本中有一个通过了深度测试,就需要对该像素进行着色,因为有一个通过就说明有颜色,就需要着色。
            {
                Vector3f point = { (float)x,(float)y,0 };
                Vector3f color = (super_frame_buf[get_super_index(x*2 , y*2)]+ super_frame_buf[get_super_index(x*2+1, y*2)]+ super_frame_buf[get_super_index(x*2, y*2+1)]+ super_frame_buf[get_super_index(x*2+1, y*2+1)])/4;
                //着色
                set_pixel(point, color);
            }
        }
    }
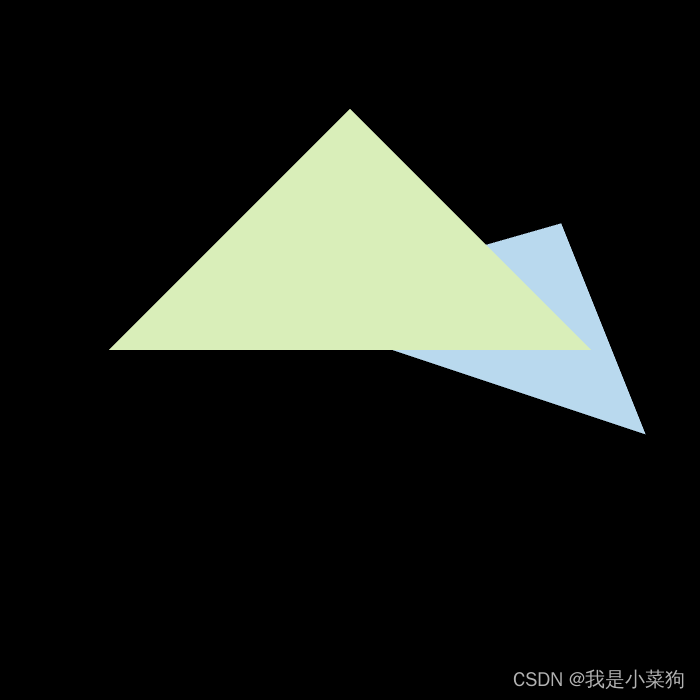
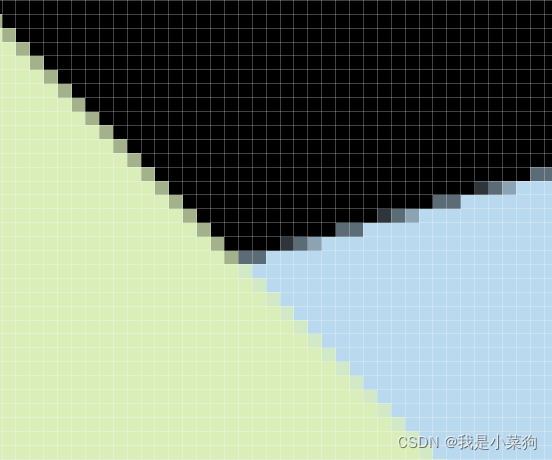
可以发现,这个过渡还是比较顺滑的。
最终效果对比
感悟
折腾了一天,感觉还是比较有收获的,对光栅化的流程有了初步的认识,不像以前一直调包调包,都不知道在干啥。。。感触最大的就是图形学的代码,调bug是比较困难的,因为你需要根据结果去找问题的原因,但往往这个过程比较困难,不像开发直接跟着错误找下去就行了,这里面有些错误真的是要思考很久才能发现,甚至一些很小的地方错了,整个结果就完全错了。。。希望这个月能把games101的作业做完==
参考链接
https://blog.csdn.net/ycrsw/article/details/123910834
https://www.freesion.com/article/4973968295/(三角形顺序反了的问题可以看这篇文章解决)
https://blog.csdn.net/weixin_51928794/article/details/117256226
https://blog.csdn.net/qq_36242312/article/details/105758619


 349
349


 被折叠的 条评论
为什么被折叠?
被折叠的 条评论
为什么被折叠?
 到【灌水乐园】发言


