


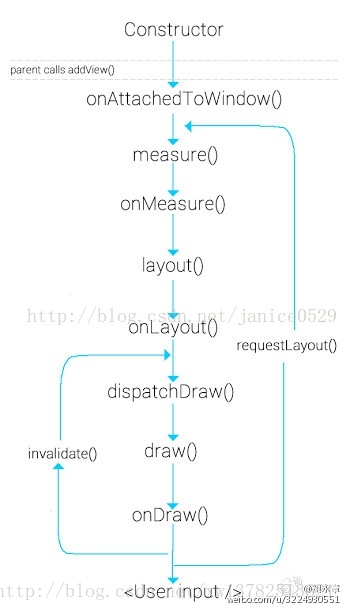
安卓中invalidate和requestLaoyout都是刷新View用的,用下面这张图来表示他们的流程
invalidate和postInvalidate的实现
两者的区别:invalidate是在主线程调用,postInvalidate在非主线程中调用。
首先看postInvalidate的实现
public void postInvalidate() {
        postInvalidateDelayed(0);
    }
public void postInvalidateDelayed(long delayMilliseconds) {
        // We try only with the AttachInfo because    there's no point in invalidating
        // if we are not attached to our window
        final AttachInfo attachInfo = mAttachInfo;
        if (attachInfo != null) {
                                 attachInfo.mViewRootImpl.dispatchInvalidateDelayed(this, delayMilliseconds);
        }
    }
会调用到ViewRootImpl的dispatchInvalidateDelayed方法
 public void dispatchInvalidateDelayed(View view, long delayMilliseconds) {
        Message msg = mHandler.obtainMessage(MSG_INVALIDATE, view);
        mHandler.sendMessageDelayed(msg, delayMilliseconds);
    }
就是用handler在非主线程发送了一个异步消息,接着来看Handler是怎么处理这个消息的
public void handleMessage(Message msg) {
            switch (msg.what) {
            case MSG_INVALIDATE:
                ((View) msg.obj).invalidate();
                break;
其中((View) msg.obj)就是最先调用postInvalidate的控件,也就是现在view在主线程实现了调用invalidate方法。
我们接着看invalidate方法
public void invalidate() {
        invalidate(true);
    }

void invalidate(boolean invalidateCache) {
        invalidateInternal(0, 0, mRight - mLeft, mBottom - mTop, invalidateCache, true);
    }

void invalidateInternal(int l, int t, int r, int b, boolean invalidateCache,
            boolean fullInvalidate) {
        ..........
        ..........
        ..........
            // Propagate the damage rectangle to the parent view.
            final AttachInfo ai = mAttachInfo;
            final ViewParent p = mParent;
            if (p != null && ai != null && l < r && t < b) {
                final Rect damage = ai.mTmpInvalRect;
                damage.set(l, t, r, b);
                p.invalidateChild(this, damage);
            }
        ..........
        ..........
        ..........
    }
主要看p.invalidateChild(this, damage)这个方法,其中p为ViewParent,可以理解为他的父布局,我们现在看看ViewGroup中的这个方法
public final void invalidateChild(View child, final Rect dirty) {
        ViewParent parent = this;
        ..........
        ..........
        ..........
            do {
                View view = null;
                if (parent instanceof View) {
                    view = (View) parent;
                }

                if (drawAnimation) {
                    if (view != null) {
                        view.mPrivateFlags |= PFLAG_DRAW_ANIMATION;
                    } else if (parent instanceof ViewRootImpl) {
                        ((ViewRootImpl) parent).mIsAnimating = true;
                    }
                }

                // If the parent is dirty opaque or not dirty, mark it dirty with the opaque
                // flag coming from the child that initiated the invalidate
                if (view != null) {
                    if ((view.mViewFlags & FADING_EDGE_MASK) != 0 &&
                            view.getSolidColor() == 0) {
                        opaqueFlag = PFLAG_DIRTY;
                    }
                    if ((view.mPrivateFlags & PFLAG_DIRTY_MASK) != PFLAG_DIRTY) {
                        view.mPrivateFlags = (view.mPrivateFlags & ~PFLAG_DIRTY_MASK) | opaqueFlag;
                    }
                }

                parent = parent.invalidateChildInParent(location, dirty);
                if (view != null) {
                    // Account for transform on current parent
                    Matrix m = view.getMatrix();
                    if (!m.isIdentity()) {
                        RectF boundingRect = attachInfo.mTmpTransformRect;
                        boundingRect.set(dirty);
                        m.mapRect(boundingRect);
                        dirty.set((int) Math.floor(boundingRect.left),
                                (int) Math.floor(boundingRect.top),
                                (int) Math.ceil(boundingRect.right),
                                (int) Math.ceil(boundingRect.bottom));
                    }
                }
            } while (parent != null);
        }
    }
可以看到这个方法会进入一个do while循环,不停地调用其ViewParent的invalidateChildInParent方法,直到返回值为空时才结束这个方法。最终的
ViewParent为ViewRootImpl类,他的这个方法实现为
    public ViewParent invalidateChildInParent(int[] location, Rect dirty) {
        ..........
        ..........
        ..........
        invalidateRectOnScreen(dirty);
        return null;
    }

private void invalidateRectOnScreen(Rect dirty) {
        ..........
        ..........
        ..........
        scheduleTraversals();
    }
首先确定他的返回值为null,可知前面的循环会结束,而最终会调用到scheduleTraversals方法中,这个方法会通过Handler的Runnable发送一个异步消息,最终会调用ViewRootImpl的performTraversals()方法执行重绘。
requestLayout的实现
requestLayout的实现相比于invalidate要简单点
public void requestLayout() {
        ..........
        ..........
        ..........
        mPrivateFlags |= PFLAG_FORCE_LAYOUT;
        ..........
        ..........
        ..........
        mParent.requestLayout();
        ..........
        ..........
        ..........
    }
主要看两个,一个是给View设置一个PFLAG_FORCE_LAYOUT标记为,一个就是继续调用ViewParent的requestLayout方法,还是直接看到ViewRootImpl的requestLayout方法
public void requestLayout() {
        if (!mHandlingLayoutInLayoutRequest) {
            checkThread();
            mLayoutRequested = true;
            scheduleTraversals();
        }
    }
可以看到最终也是调用了scheduleTraversals()方法通知界面重绘。
invalidate和requestLayout的区别
从最上面的图中我们可以看到invalidate不会经过measure和layout这两个过程,我们下面分析下为什么。
我们看下View的measure方法
public final void measure(int widthMeasureSpec, int heightMeasureSpec) {
        ..........
        ..........
        ..........
        final boolean forceLayout = (mPrivateFlags & PFLAG_FORCE_LAYOUT) == PFLAG_FORCE_LAYOUT;
        ..........
        ..........
        ..........
        if (forceLayout || needsLayout) {
        ..........
        ..........
        ..........
                onMeasure(widthMeasureSpec, heightMeasureSpec);
                mPrivateFlags |= PFLAG_LAYOUT_REQUIRED;
        }

    }
源码里在requestLayout时对View设置了PFLAG_FORCE_LAYOUT标记位,而invalidate则没有,所以在调用invalidate重绘时forceLayout 为false,也就是最上层的控件就不会调用onMeasure方法,那么下面的控件也肯定不会进行重新测量。而重新测量的控件又会被标记上PFLAG_LAYOUT_REQUIRED,下面看layout方法
public void layout(int l, int t, int r, int b) {
        ..........
        ..........
        ..........
        boolean changed = isLayoutModeOptical(mParent) ?
                setOpticalFrame(l, t, r, b) : setFrame(l, t, r, b);
        if (changed || (mPrivateFlags & PFLAG_LAYOUT_REQUIRED) == PFLAG_LAYOUT_REQUIRED) {
            onLayout(changed, l, t, r, b);
        }
        ..........
        ..........
        ..........
    }
可以看到如果要调用onLayout方法,要么位置发生了变化,changed为true,要PFLAG_LAYOUT_REQUIRED标记位,所以invalidate的重绘顶层控件也不会调用onLayout方法,这也就解释了为什么最上面的图里,invalidate不会经过measure和layout这两个过程。
在我看来invalidate应该是在控件内容或是可见性发生了变化,而其大小位置等不会发生变化时调用,所以自然也不需要重新测量布局,而requestLayout则是大小位置发生了变化则调用,使用场景有着区别。


 413
413

 被折叠的 条评论
为什么被折叠?
被折叠的 条评论
为什么被折叠?
 到【灌水乐园】发言


