


在Android 2.3(Gingerbread) 系统的时候,我写过一篇关于“Android 震动马达系统“的文章,当时的Linux内核还是2.6版本的。写那篇文章的目的,是想彻底的了解从硬件到驱动,再到应用的运作流程。完成了之后,文章一直仍在草稿箱里面没发表;今天看到,决定整理一下,重新发表。目的是想和大家分享自己对Android系统的一点认识:以马达为代表,来考究“Android是如何一步步工作的。它从硬件设计,到Linux驱动,再到HAL,再到JNI,再到Framework,最后到被应用调用,这整套的流程到底是怎么样的!”
Part 1 马达的硬件设计
马达的震动原理很简单,给马达通电,马达就能震动。至于马达是如何工作,如何将电能转化为机械能,这不是我们关心的重点。但是,我们要需要了解如何控制马达的通电。在硬件上,我们是通过一个IO口(GPIO)去控制;对于马达而言,我们可以将IO理解为一个开关。当开关合上时,马达震动;开关断开,马达停止震动。
GPIO(General Purpose Input Output),称为通用输入/输出。它可以被配置为中断、输入、输出等类型,从而对各个IO进行控制。对于马达而已,GPIO就相当于一个开关。下面看看硬件原理图中的马达部分,如下图:
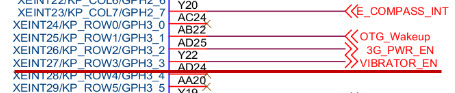
注:上面原理图对应CPU是“三星A8”。不同平台的马达,马达的接法和GPIO都不一样;但原理都是类似的。
原理图中红线标注部分的含义:GPH3_3是马达的GPIO。三星A8中有很多组GPIO,而马达对应和GPH3_3连接。
Part 2 马达的驱动代码
知道马达的硬件设计之后,我们就可以进行Linux Driver开发工作,也就是编写马达的驱动。Linux的一个非常重要的特点,一切都是文件!而我们进行Linux Driver开发的目的,就是将硬件设备映射成一个文件;然后,我们可以通过操作文件,来操作对应的硬件设备。
OK!理解了驱动的作用和原理之后,我们接下来开发讲解马达的驱动开发。
1. Datasheet中相关信息
我们知道,马达是通过GPIO去控制;接下来,我们就是找到马达对应的GPIO信息,然后控制该GPIO即可。
通过马达的原理图,我们知道马达和GPH3_3相连接。我们查阅“三星A8 的Datasheet”,查找GPH3_3的相关信息。
所谓Datasheet,就是CPU芯片的数据手册。
上面记载了CPU的功能特性和操作方式等信息。任何一个厂家在发布它的芯片时,都会提供对应的Datasheet给它的客户;客户根据Datasheet上面所描述的CPU的特性,就可以进行相关的开发(当然,实际开发中可能还需要芯片厂商的支持)。例如,国内手机都是采用MTK平台,对于MTK方案开发商来说,它要开发MTK6577的产品。那么首先,MTK原厂会提供一份MTK6577的BSP包,BSP包中包括了MTK6577的Datasheet,也就是该芯片的数据手册。方案开发商有任何关于MTK6577的问题,都可以查阅该Datasheet。
三星A8的Datasheet中,关于GPH3_3的信息如下:

说明:
(01) GPH3_3对应CPU中的寄存器是GPH3CON[3]。
(02) [15:12] 表示寄存器的第12~15位,一个寄存器共32 bits。而第三列的 0000, 0001, 0010, 0011, 1111表示“寄存器取不同值的时候,该GPIO的功能”。
例如, 0000表示将该GPIO作为输入,0001表示将GPIO作为输出,1111表示将该GPIO作为中断。
前面,我们已经说过,操作马达就是相当与将它作为一个开关操作。因此,我们需要将马达的GPIO设为“输入”类型;然后输入1,相当于开启马达;输入0,则是关闭马达!
下面,我们需要做的就是在Driver中将GPH3_3(也就是GPH3CON[3])映射为一个文件节点,并将它配置为“输入”类型,即将GPH3CON[3]的寄存器值设为0000。
2. 马达的驱动
我们编写马达驱动(drivers/misc/misc_sysfs.c),将马达(vibrator)注册道platform总线上。源码如下:
1 #include <linux/kernel.h>
2 #include <linux/types.h>
3 #include <linux/module.h>
4 #include <linux/device.h>
5 #include <linux/platform_device.h>
6 #include <linux/delay.h>
7 #include <linux/irq.h>
8 #include <linux/interrupt.h>
9 #include <linux/sysfs.h>
10 #include <linux/input.h>
11 #include <mach/gpio.h>
12
13 // vibrator 对应的GPIO
14 #define VIBRATOR_POWER_PORT (S5PV210_GPH3(3))
15
16 typedef struct combo_module__t {
17 unsigned char status_vibrator;
18 } combo_module_t ;
19
20 static combo_module_t combo_module;
21
22 /*
23 * vibrator初始化函数:申请GPIO,并初始化vibrator状态。
24 */
25 static void combo_module_init(void)
26 {
27 if(gpio_request(VIBRATOR_POWER_PORT, "vibrator power")) {
28 printk("misc_sysfs.c request vibrator gpio failse.\n");
29 }
30 gpio_pull_updown(VIBRATOR_POWER_PORT, PullDisable);
31 gpio_direction_output(VIBRATOR_POWER_PORT, GPIO_LOW);
32
33 combo_module.status_vibrator = 0;
34 }
35
36 /*
37 * vibrator控制函数
38 */
39 staticvoid combo_module_control(void)
40 {
41 if(combo_module.status_vibrator)
42 {
43 gpio_direction_output(VIBRATOR_POWER_PORT, GPIO_HIGH);
44 }
45 else
46 {
47 gpio_direction_output(VIBRATOR_POWER_PORT, GPIO_LOW);
48 }
49
50 }
51
52
53 ///
54
55 static ssize_t show_vibrator_onoff (struct device *dev, struct device_attribute *attr, char *buf)
56 {
57 return sprintf(buf, "%d\n", combo_module.status_vibrator);
58 }
59
60 static ssize_t set_vibrator_onoff (struct device *dev, struct device_attribute *attr, const char *buf, size_t count)
61 {
62 unsigned int val;
63
64 if(!(sscanf(buf, "%u\n", &val))) return -EINVAL;
65
66 //printk("set_vibrator_onoff:%d\n",val);
67
68 if(!val )
69 {
70 combo_module.status_vibrator = 0;
71 combo_module_control();
72 }
73 else
74 {
75 combo_module.status_vibrator = 1;
76 combo_module_control();
77
78 msleep(val);
79
80 combo_module.status_vibrator = 0;
81 combo_module_control();
82 }
83
84 return count;
85 }
86
87 static ssize_t show_vibrator_onoff (struct device *dev, struct device_attribute *attr, char *buf);
88 static ssize_t set_vibrator_onoff (struct device *dev, struct device_attribute *attr, const char *buf, size_t count);
89 // 将vibrator注册到sysfs文件系统。
90 // 参数说明:
91 // vibrator_onoff : vibrator对应在sysfs下的文件节点名称
92 // S_IRWXUGO : 文件节点的属性
93 // show_vibrator_onoff : 对应的读函数
94 // set_vibrator_onoff : 对应的写函数
95 static DEVICE_ATTR(vibrator_onoff, S_IRWXUGO, show_vibrator_onoff, set_vibrator_onoff);
96
97
98 static struct attribute *control_sysfs_entries[] = {
99 &dev_attr_vibrator_onoff.attr,
100 NULL
101 };
102
103 static struct attribute_group control_sysfs_attr_group = {
104 .name = NULL,
105 .attrs = control_sysfs_entries,
106 };
107
108 static int control_sysfs_probe(struct platform_device *pdev)
109 {
110 printk("vibrator probe");
111 combo_module_init();
112 combo_module_control();
113 return sysfs_create_group(&pdev->dev.kobj, &control_sysfs_attr_group);
114 }
115
116 staticint control_sysfs_remove(struct platform_device *pdev)
117 {
118 sysfs_remove_group(&pdev->dev.kobj, &control_sysfs_attr_group);
119
120 return 0;
121 }
122
123 #ifdef CONFIG_PM
124 static int control_sysfs_resume(struct platform_device *dev)
125 {
126
127 combo_module_control();
128
129 return 0;
130 }
131
132 static int control_sysfs_suspend(struct platform_device *dev, pm_message_t state)
133 {
134
135 combo_module_control();
136
137 return 0;
138 }
139 #else
140 #define control_sysfs_suspend NULL
141 #define control_sysfs_resume NULL
142 #endif
143
144
145 static struct platform_driver control_sysfs_driver = {
146 .driver = {
147 .name = "misc_ctl",
148 .owner = THIS_MODULE,
149 },
150 .probe = control_sysfs_probe,
151 .remove = control_sysfs_remove,
152 .suspend = control_sysfs_suspend,
153 .resume = control_sysfs_resume,
154 };
155
156 static int __init control_sysfs_init(void)
157 {
158 // 将vibrator注册到platform总线
159 printk("vibrator init");
160 return platform_driver_register(&control_sysfs_driver);
161 }
162
163 static void __exit control_sysfs_exit(void)
164 {
165 platform_driver_unregister(&control_sysfs_driver);
166 }
167
168
169 module_init(control_sysfs_init);
170 module_exit(control_sysfs_exit);
171
172
173 MODULE_DESCRIPTION("misc control driver");
174 MODULE_AUTHOR("other");
175 MODULE_LICENSE("GPL");
说明:
若您熟悉驱动开发,应该很容易理解上面的代码。不熟悉也不要紧,您只需要了解“Linux系统中,一切都是文件”,上面代码的作用是,
将马达(vibrator)映射到“/sys/devices/platform/misc_ctl/vibrator_onoff”文件上,我们可以通过读写vibrator_onoff来操作马达的开启和关闭。
有了马达的源码之后,我们还需要将该源码编译到Linux内核中。这就是通过Kconfig和Makefile来完成的,关于Kconfig和Makefile的知识,这里就不过多说明了。目前您只需要了解,通过Kconfig和Makefile,我们能将马达驱动编译到内核中,该驱动会在驱动加载的时候自动运行就可以了!
马达对应的Kconfig(driver/misc/Kconfig)内容如下:
config MISC_VIBRATOR
tristate"misc vabrator"
default y
马达对应的Makefile(driver/misc/Makefile)内容如下:
obj-$(CONFIG_MISC_VIBRATOR) += misc_sysfs.o
至此,我们已经完成马达的驱动开发了!也就是说,我们已经成功的将马达映射到文件节点上;接下来,我们通过操作文件节点,就可以操作马达了。下面从HAL层到Framework曾,都是基于Android4.2系统进行说明的。
Part 3 马达的HAL实现
HAL (Hardware Abstraction Layer), 又称为“硬件抽象层”。在Linux驱动中,我们已经将马达设为映射为文件了;而该HAL层的存在的意义,就是“对设备文件进行操作,从而相当于硬件进行操作”。HAL层的作用,一是操作硬件设备,二是操作接口封装,外界能方便的使用HAL提供的接口直接操作硬件设备。
理解了HAL之后,我们看看Android中如何在HAL层对马达进行操作。
在Android系统中,我们在libhardware_legacy中,实现马达的HAL层控制。
马达在HAL中的代码路径:hardware/libhardware_legacy/vibrator/vibrator.c
vibrator.c的代码如下:
![]()
1 /*
2 * Copyright (C) 2008 The Android Open Source Project
3 *
4 * Licensed under the Apache License, Version 2.0 (the "License");
5 * you may not use this file except in compliance with the License.
6 * You may obtain a copy of the License at
7 *
8 * http://www.apache.org/licenses/LICENSE-2.0
9 *
10 * Unless required by applicable law or agreed to in writing, software
11 * distributed under the License is distributed on an "AS IS" BASIS,
12 * WITHOUT WARRANTIES OR CONDITIONS OF ANY KIND, either express or implied.
13 * See the License for the specific language governing permissions and
14 * limitations under the License.
15 */
16 #include <hardware_legacy/vibrator.h>
17 #include "qemu.h"
18
19 #include <stdio.h>
20 #include <unistd.h>
21 #include <fcntl.h>
22 #include <errno.h>
23
24 #define THE_DEVICE "/sys/devices/platform/misc_ctl/vibrator_onoff"
25
26 int vibrator_exists()
27 {
28 int fd;
29
30 #ifdef QEMU_HARDWARE
31 if (qemu_check()) {
32 return 1;
33 }
34 #endif
35
36 fd = open(THE_DEVICE, O_RDWR);
37 if(fd < 0)
38 return 0;
39 close(fd);
40 return 1;
41 }
42
43 static int sendit(int timeout_ms)
44 {
45 int nwr, ret, fd;
46 char value[20];
47
48 #ifdef QEMU_HARDWARE
49 if (qemu_check()) {
50 return qemu_control_command( "vibrator:%d", timeout_ms );
51 }
52 #endif
53
54 fd = open(THE_DEVICE, O_RDWR);
55 if(fd < 0)
56 return errno;
57
58 nwr = sprintf(value, "%d\n", timeout_ms);
59 ret = write(fd, value, nwr);
60
61 close(fd);
62
63 return (ret == nwr) ? 0 : -1;
64 }
65
66 int vibrator_on(int timeout_ms)
67 {
68 /* constant on, up to maximum allowed time */
69 return sendit(timeout_ms);
70 }
71
72 int vibrator_off()
73 {
74 return sendit(0);
75 }
在kernel的驱动中,我们已经将马达注册到sys文件系统中(/sys/devices/platform/misc_ctl/vibrator_onoff)。在vibrator.c中,我们就是通过读写“vibrator_onoff文件节点”来实现对马达的操作。
Part 4 马达的JNI部分
1 马达的JNI实现
JNI(Java Native Interface),中文是“Java本地接口”。
JNI是Java中一种技术,它存在的意义,是保证本地代码(C/C++代码)能在任何Java虚拟机下工作。简单点说,Java通过JNI接口,能够调用到C/C++代码。 关于“JNI的更多内容”,请参考“Android JNI和NDK学习系列文章”。
在了解了vibrator的HAL层实现之后,我们再来看看android是如何通过JNI将震动马达注册到android系统中。马达对应的JNI层代码路径如下:frameworks/base/services/jni/com_android_server_VibratorService.cpp
com_android_server_VibratorService.cpp的源码如下:
![]()
1 /*
2 * Copyright (C) 2009 The Android Open Source Project
3 *
4 * Licensed under the Apache License, Version 2.0 (the "License");
5 * you may not use this file except in compliance with the License.
6 * You may obtain a copy of the License at
7 *
8 * http://www.apache.org/licenses/LICENSE-2.0
9 *
10 * Unless required by applicable law or agreed to in writing, software
11 * distributed under the License is distributed on an "AS IS" BASIS,
12 * WITHOUT WARRANTIES OR CONDITIONS OF ANY KIND, either express or implied.
13 * See the License for the specific language governing permissions and
14 * limitations under the License.
15 */
16
17 #define LOG_TAG "VibratorService"
18
19 #include "jni.h"
20 #include "JNIHelp.h"
21 #include "android_runtime/AndroidRuntime.h"
22
23 #include <utils/misc.h>
24 #include <utils/Log.h>
25 #include <hardware_legacy/vibrator.h>
26
27 #include <stdio.h>
28
29 namespace android
30 {
31
32 static jboolean vibratorExists(JNIEnv *env, jobject clazz)
33 {
34 return vibrator_exists() > 0 ? JNI_TRUE : JNI_FALSE;
35 }
36
37 static void vibratorOn(JNIEnv *env, jobject clazz, jlong timeout_ms)
38 {
39 // ALOGI("vibratorOn\n");
40 vibrator_on(timeout_ms);
41 }
42
43 static void vibratorOff(JNIEnv *env, jobject clazz)
44 {
45 // ALOGI("vibratorOff\n");
46 vibrator_off();
47 }
48
49 static JNINativeMethod method_table[] = {
50 { "vibratorExists", "()Z", (void*)vibratorExists },
51 { "vibratorOn", "(J)V", (void*)vibratorOn },
52 { "vibratorOff", "()V", (void*)vibratorOff }
53 };
54
55 int register_android_server_VibratorService(JNIEnv *env)
56 {
57 return jniRegisterNativeMethods(env, "com/android/server/VibratorService",
58 method_table, NELEM(method_table));
59 }
60
61 };
下面,对这部分的JNI代码进行简单说明。
(01) 通过 jniRegisterNativeMethods(),我们将method_table中的方法注册到 com.android.server.VibratorService.java 中。配对表格如下:
---------------------------------------------------++++-------------------------------------------
VibratorService.java com_android_server_VibratorService.cpp
native static boolean vibratorExists(); static jboolean vibratorExists(JNIEnv *env, jobject clazz)
native static void vibratorOn(long milliseconds); static void vibratorOn(JNIEnv *env, jobject clazz, jlong timeout_ms)
native static void vibratorOff(); static void vibratorOff(JNIEnv *env, jobject clazz)
通过JNI,我们就能将Java层和HAL层的代码联系起来。
以vibratorOff()来说,我们在VibratorService.java中调用vibratorOff();实际上会调用到com_android_server_VibratorService.cpp中的vibratorOff()函数;进一步会调用到vibrator_off()函数,而vibrator_off()是我们在 “HAL层的vibrator.c中的接口”。
2 马达的JNI如何和HAL关联方式
在继续接下来的研究之前,我们先搞清楚:JNI如何和HAL层代码关联起来的。即com_android_server_VibratorService.cpp是如何调用到vibrator.c中的代码的。
实际上道理很简单,我们先将vibrator.c封装成.so库;然后在com_android_server_VibratorService.cpp中导入该库,就可以调用vibrator.c的接口了。下面,看看Android中具体是如何做到的。
(01) vibrator.c封装到libhardware_legacy.so中的步骤
在hardware/libhardware_legacy/vibrator/Android.mk中,会将vibrator.c添加到 LOCAL_SRC_FILES 变量中。
hardware/libhardware_legacy/vibrator/Android.mk源码如下:
LOCAL_SRC_FILES += vibrator/vibrator.c
在hardware/libhardware_legacy/Android.mk中,它会调用子目录的Android.mk并将它们导入当前的Android.mk中。
hardware/libhardware_legacy/Android.mk源码如下:
legacy_modules := power uevent vibrator wifi qemu qemu_tracing
SAVE_MAKEFILES := $(call all-named-subdir-makefiles,$(legacy_modules))
LEGACY_AUDIO_MAKEFILES := $(call all-named-subdir-makefiles,audio)
include $(SAVE_MAKEFILES)
...
LOCAL_MODULE:= libhardware_legacy
include $(BUILD_SHARED_LIBRARY)
在“我们编译Android系统”或“通过 mmm hardware/libhardware_legacy进行模块编译”的时候,就会生成库libhardware_legacy.so;而且vibrator.c被包含在该库中。
(02) 在 com_android_server_VibratorService.cpp 对应的Android.mk中,会导入libhardware_legacy.so。
com_android_server_VibratorService.cpp 对应的frameworks/base/services/jni/Android.mk 的源码如下:
LOCAL_SRC_FILES:= \
com_android_server_VibratorService.cpp \
...
LOCAL_SHARED_LIBRARIES := \
libhardware_legacy \
...
LOCAL_MODULE:= libandroid_servers
include $(BUILD_SHARED_LIBRARY)
Part 5 马达的Framework层实现
应用层操作马达,是通过马达服务进行操作的。而马达服务是通过aidl实现的,aidl是Android进程间的通信方式。关于aidl的更多说明可以参考“Android Service总结06 之AIDL”。
马达服务涉及的主要文件如下:
1 frameworks/base/services/java/com/android/server/SystemServer.java
2 frameworks/base/services/java/com/android/server/VibratorService.java
3 frameworks/base/core/java/android/os/IVibratorService.aidl
4 frameworks/base/core/java/android/os/Vibrator.java
5 frameworks/base/core/java/android/os/SystemVibrator.java
下面,对这几个文件的功能进行简要说明。
文件1: SystemServer.java
它是系统服务,作用是启动、管理系统服务,包括“马达服务、Wifi服务、Activity管理服务”等等。
SystemServer是通过Zygote启动的,而Zygote又是在init中启动的,init则是kernel加载完毕之后启动的第一个进程。在这里,我们只需要知道“SystemServer是用来启动/管理马达服务即可。”
文件2: IVibratorService.aidl
它是马达服务对应的aidl配置文件。我们在aidl中定义了其它进程可以访问的外部接口;然后再通过VibratorService.java实现这些接口。
文件3: VibratorService.java
它是马达服务对应的aidl接口的实现程序。它实现IVibratorService.aidl的接口,从而实现马达服务;它的函数接口,是通过调用JNI层对应的马达控制函数来实现的。
文件4: Vibrator.java
它是马达服务开放给应用层的调用类。理论上讲,我们完全可以通过aidl直接调用马达服务,而不需要Vibrator.java类。但是!既然它存在,就肯定有它的理由。事实的确如此,Google之所以这么做。有以下几个原因:
第一,提供统一而且方便的服务调用方式。这里的“统一”,是指和所有其它的系统服务一样,我们调用服务时,需先通过getSystemService()获取服务,然后再调用服务的函数接口。这里的“方便”,是指若我们直接通过aidl调用,操作比较繁琐(若你用过aidl就会知道,需要先实现ServiceConnection接口以获取IBinder对象,然后再通过IBinder对象调用aidl的接口); 而Vibrator.java封装之后的接口,将许多细节都隐藏了,非常便于应用者调用!
第二,基于安全的考虑。Vibrator.java封装隐藏了许多细节,而这些都是应用开发者不必要知道的。
第三,Vibrator是抽象类。它便于我们支持不同类型的马达:包括“将马达直接映射到文件”以及“将马达注册到输入子系统”中。
文件5: SystemVibrator.java
它是Vibrator.java的子类,实现了马达的服务接口。
下面,我们继续Read The Fucking Source Code,加深对上面知识的理解。
1 SystemServer.java
在frameworks/base/services/java/com/android/server/SystemServer.java中关于马达的代码如下:
1 {
2 VibratorService vibrator = null;
3
4 Slog.i(TAG, "Vibrator Service");
5 vibrator = new VibratorService(context);
6 ServiceManager.addService("vibrator", vibrator);
7
8 ...
9
10 try {
11 vibrator.systemReady();
12 } catch (Throwable e) {
13 reportWtf("making Vibrator Service ready", e);
14 }
15 }
从中,我们知道:
(01) SystemServer中会通过VibratorService()新建马达服务,并将其添加到ServiceManager中。
(02) 在Android系统启动完成之后,SystemServer会调用vibrator.systemReady()。
2 IVibratorService.aidl
在查看VibratorService.java之前,我们先看看它对应的aidl文件。frameworks/base/core/java/android/os/IVibratorService.aidl源码如下:
1 package android.os;
2
3 /** {@hide} */
4 interface IVibratorService
5 {
6 boolean hasVibrator();
7 void vibrate(long milliseconds, IBinder token);
8 void vibratePattern(in long[] pattern, int repeat, IBinder token);
9 void cancelVibrate(IBinder token);
10 }
3 VibratorService.java
frameworks/base/services/java/com/android/server/VibratorService.java源码如下:
![]() View Code
View Code
其中,VibratorService实际上是通过“本地方法”去控制马达的。例如,hasVibratora()最终是通过vibratorExists()来判断马达是否存在的。
4 Vibrator.java
frameworks/base/core/java/android/os/Vibrator.java源码如下:
1 package android.os;
2
3 import android.content.Context;
4
5 public abstract class Vibrator {
6
7 public Vibrator() {
8 }
9
10 public abstract boolean hasVibrator();
11
12 public abstract void vibrate(long milliseconds);
13
14 public abstract void vibrate(long[] pattern, int repeat);
15
16 public abstract void cancel();
17 }
5 SystemVibrator.java
frameworks/base/core/java/android/os/SystemVibrator.java源码如下:
![]()
1 /*
2 * Copyright (C) 2012 The Android Open Source Project
3 *
4 * Licensed under the Apache License, Version 2.0 (the "License");
5 * you may not use this file except in compliance with the License.
6 * You may obtain a copy of the License at
7 *
8 * http://www.apache.org/licenses/LICENSE-2.0
9 *
10 * Unless required by applicable law or agreed to in writing, software
11 * distributed under the License is distributed on an "AS IS" BASIS,
12 * WITHOUT WARRANTIES OR CONDITIONS OF ANY KIND, either express or implied.
13 * See the License for the specific language governing permissions and
14 * limitations under the License.
15 */
16
17 package android.os;
18
19 import android.util.Log;
20
21 /**
22 * Vibrator implementation that controls the main system vibrator.
23 *
24 * @hide
25 */
26 public class SystemVibrator extends Vibrator {
27 private static final String TAG = "Vibrator";
28
29 private final IVibratorService mService;
30 private final Binder mToken = new Binder();
31
32 public SystemVibrator() {
33 mService = IVibratorService.Stub.asInterface(
34 ServiceManager.getService("vibrator"));
35 }
36
37 @Override
38 public boolean hasVibrator() {
39 if (mService == null) {
40 Log.w(TAG, "Failed to vibrate; no vibrator service.");
41 return false;
42 }
43 try {
44 return mService.hasVibrator();
45 } catch (RemoteException e) {
46 }
47 return false;
48 }
49
50 @Override
51 public void vibrate(long milliseconds) {
52 if (mService == null) {
53 Log.w(TAG, "Failed to vibrate; no vibrator service.");
54 return;
55 }
56 try {
57 mService.vibrate(milliseconds, mToken);
58 } catch (RemoteException e) {
59 Log.w(TAG, "Failed to vibrate.", e);
60 }
61 }
62
63 @Override
64 public void vibrate(long[] pattern, int repeat) {
65 if (mService == null) {
66 Log.w(TAG, "Failed to vibrate; no vibrator service.");
67 return;
68 }
69 // catch this here because the server will do nothing. pattern may
70 // not be null, let that be checked, because the server will drop it
71 // anyway
72 if (repeat < pattern.length) {
73 try {
74 mService.vibratePattern(pattern, repeat, mToken);
75 } catch (RemoteException e) {
76 Log.w(TAG, "Failed to vibrate.", e);
77 }
78 } else {
79 throw new ArrayIndexOutOfBoundsException();
80 }
81 }
82
83 @Override
84 public void cancel() {
85 if (mService == null) {
86 return;
87 }
88 try {
89 mService.cancelVibrate(mToken);
90 } catch (RemoteException e) {
91 Log.w(TAG, "Failed to cancel vibration.", e);
92 }
93 }
94 }
说明:
(01) 在构造函数SystemVibrator()中,我们通过 IVibratorService.Stub.asInterface(ServiceManager.getService("vibrator")) 获取马达服务,实际上获取的是VibratorService对象。
(02) SystemVibrator的接口都是调用VibratorService接口实现的。
在讲解“应用层如何通过getSystemService(VIBRATOR_SERVICE)获取马达服务,然后进一步的操作马达”之前,我们先看看应用层的马达操作示例!
Part 6 马达的应用示例
1 权限
调用马达服务,需要在manifest中添加相应的权限:
<!-- 震动马达权限 -->
<uses-permission android:name="android.permission.VIBRATE"/>
2 源码
源码如下:
1 package com.test;
2
3 import android.app.Activity;
4 import android.os.Bundle;
5 import android.os.Vibrator;
6 import android.view.View;
7 import android.view.View.OnClickListener;
8 import android.widget.Button;
9 import android.widget.ToggleButton;
10 import android.util.Log;
11
12 public class VibratorTest extends Activity {
13 private static final String TAG = "skywang-->VibratorTest";
14
15 private Vibrator mVibrator;
16 private Button mOnce = null;
17 private ToggleButton mEndless = null;
18
19 @Override
20 protected void onCreate(Bundle savedInstanceState) {
21 super.onCreate(savedInstanceState);
22 setContentView(R.layout.main);
23
24 // 获取震动马达服务
25 mVibrator= (Vibrator) getSystemService(VIBRATOR_SERVICE);
26
27 mOnce = (Button) findViewById(R.id.vib_once);
28 mOnce.setOnClickListener(new View.OnClickListener() {
29
30 @Override
31 public void onClick(View view) {
32 //震动指定时间
33 mVibrator.vibrate(100);
34 }
35 });
36
37 mEndless = (ToggleButton) findViewById(R.id.vib_endless);
38 mEndless.setOnClickListener(new OnClickListener() {
39 @Override
40 public void onClick(View v) {
41 if (mEndless.isChecked()) {
42 //等待100ms后,按数组所给数值间隔震动;其后为重复次数,-1为不重复,0一直震动
43 mVibrator.vibrate(new long[]{100,20,100,40,100,60}, 0);
44 } else {
45 // 取消震动
46 mVibrator.cancel();
47 }
48 }
49 });
50
51 }
52
53 @Override
54 protected void onStop() {
55 super.onStop();
56 if (mVibrator != null)
57 mVibrator= null;
58 }
59 }
点击下载:Android马达应用代码
Part 7 马达的应用如何调用到马达服务的
接下来,我们分析一下如何获取马达服务的:即 mVibrator= (Vibrator) getSystemService(VIBRATOR_SERVICE) 的工作原理。
1. Context.java中的getSystemService()
getSystemService()定义在frameworks/base/core/java/android/content/Context.java中,源码如下:
public abstract Object getSystemService(String name);
Context.java中的getSystemService() 是个抽象方法,它的实现在ContextImpl.java中。
2. ContextImpl.java中的getSystemService()
frameworks/base/core/java/android/app/ContextImpl.java中的 getSystemService() 源码如下:
1 @Override
2 public Object getSystemService(String name) {
3 ServiceFetcher fetcher = SYSTEM_SERVICE_MAP.get(name);
4 return fetcher == null ? null : fetcher.getService(this);
5 }
3. ContextImpl.java中的SYSTEM_SERVICE_MAP
SYSTEM_SERVICE_MAP是一个HashMap对象,它的相关代码如下:
1 private static final HashMap<String, ServiceFetcher> SYSTEM_SERVICE_MAP =
2 new HashMap<String, ServiceFetcher>();
3
4 SYSTEM_SERVICE_MAP的初始化,是在ContextImpl.java通过static静态模块完成的。源码如下:
5 static {
6
7 ...
8
9 // 注册“传感器服务”
10 registerService(SENSOR_SERVICE, new ServiceFetcher() {
11 public Object createService(ContextImpl ctx) {
12 return new SystemSensorManager(ctx.mMainThread.getHandler().getLooper());
13 }});
14
15 // 注册其它服务 ...
16
17 // 注册马达服务
18 registerService(VIBRATOR_SERVICE, new ServiceFetcher() {
19 public Object createService(ContextImpl ctx) {
20 return new SystemVibrator();
21 }});
22
23 ...
24 }
说明:在上面的static静态模块中,会通过registerService()注册一系列的服务,包括马达服务。注册服务是通过registerService()实现的,下面我们看看registerService()的定义。
1 private static int sNextPerContextServiceCacheIndex = 0;
2 private static void registerService(String serviceName, ServiceFetcher fetcher) {
3 if (!(fetcher instanceof StaticServiceFetcher)) {
4 fetcher.mContextCacheIndex = sNextPerContextServiceCacheIndex++;
5 }
6 SYSTEM_SERVICE_MAP.put(serviceName, fetcher);
7 }
从中,我们知道,在registerService()中,会通过 SYSTEM_SERVICE_MAP.put(serviceName, fetcher) 将serviceName和fetcher添加到哈希表SYSTEM_SERVICE_MAP中。
对马达服务而言,添加到哈希表SYSTEM_SERVICE_MAP中的key-value中的key是VIBRATOR_SERVICE,value则是ServiceFetcher对象;而且该匿名ServiceFetcher对象的createService()方法会“通过new SystemVibrator()”返回SystemVibrator对象。而SystemVibrator我们在前面已经介绍过了,它是马达服务对外提供接口的类。
OK,接着往下看。
3. ContextImpl.java中的fetcher.getService(this)
1 public Object getSystemService(String name) {
2 ServiceFetcher fetcher = SYSTEM_SERVICE_MAP.get(name);
3 return fetcher == null ? null : fetcher.getService(this);
4 }
我们已经知道SYSTEM_SERVICE_MAP是哈希表,通过SYSTEM_SERVICE_MAP.get(name)返回的是ServiceFetcher对象。
由于fetcher不为null,所以,getSystemService()会返回fetcher.getService(this)。我们看看ServiceFetcher中getService()源码:
1 static class ServiceFetcher {
2 int mContextCacheIndex = -1;
3
4 public Object getService(ContextImpl ctx) {
5 ArrayList<Object> cache = ctx.mServiceCache;
6 Object service;
7 synchronized (cache) {
8 if (cache.size() == 0) {
9
10 // “服务对象”缓冲
11 for (int i = 0; i < sNextPerContextServiceCacheIndex; i++) {
12 cache.add(null);
13 }
14 } else {
15 service = cache.get(mContextCacheIndex);
16 if (service != null) {
17 return service;
18 }
19 }
20 service = createService(ctx);
21 cache.set(mContextCacheIndex, service);
22 return service;
23 }
24 }
25
26 public Object createService(ContextImpl ctx) {
27 throw new RuntimeException("Not implemented");
28 }
29 }
从中,我们发现,getService()实际上返回的是“通过createService(ctx)创建的service对象”。
而在registerService()注册马达服务时,我们匿名实现了createService()方法:它实际上是通过 new SystemVibrator() 返回SystemVibrator对象。
至此,我们知道:getSystemService(VIBRATOR_SERVICE) 返回的是 SystemVibrator对象!SystemVibrator前面已经分析过,这里就不再说明了。


 565
565

 被折叠的 条评论
为什么被折叠?
被折叠的 条评论
为什么被折叠?
 到【灌水乐园】发言


