


【说明】先确认Keil对应C8T6配置完整写文章-CSDN创作中心
【参考】B站江科大自化协STM32入门教程-2022持续更新中_哔哩哔哩_bilibili
【功能】LED闪烁:点亮LED并每隔1s亮灭
LED流水灯:4个LED依次亮灭
LED按键:实现按键控制LED灯的亮灭,按下按键灯亮,再按一次灯灭
【接线】LED闪烁:LED长脚接PA0,短脚接地
LED流水灯:4个LED长脚分别接PA0、PA2、PA4、PA6,短脚接地,
LED按键:2个LED,长脚接+,短脚一个接PA2,一个接PA4,两个按键,均为一脚接地,另一脚分别接PB1,PB11
【工程】STM32: STM32F103 - Gitee.com
【代码】
1.LED闪烁
main.c
#include "stm32f10x.h"
#include "Delay.h"

int main(void)
{
	RCC_APB2PeriphClockCmd(RCC_APB2Periph_GPIOA,ENABLE);//使能时钟
	GPIO_InitTypeDef GPIO_InitStructure;//配置端口模式
	GPIO_InitStructure.GPIO_Pin=GPIO_Pin_0;
	GPIO_InitStructure.GPIO_Mode=GPIO_Mode_Out_PP;
	GPIO_InitStructure.GPIO_Speed=  GPIO_Speed_50MHz;
	GPIO_Init(GPIOA,&GPIO_InitStructure);
	GPIO_SetBits(GPIOA,GPIO_Pin_0);//置高位

	while(1)
	{
		//方法1,用GPIO_SetBits和GPIO_ResetBits
		GPIO_SetBits(GPIOA,GPIO_Pin_0);//置高位
		Delay_s(1);
		GPIO_ResetBits(GPIOA,GPIO_Pin_0);//置低位
		Delay_s(1);

		/*
		//方法2,用GPIO_WriteBit
		GPIO_WriteBit(GPIOA,GPIO_Pin_0,Bit_SET);//置高位
		Delay_s(1);
		GPIO_WriteBit(GPIOA,GPIO_Pin_0,Bit_RESET);//置低位
		Delay_s(1);
		*/

		/*
		//方法3,用GPIO_WriteBit结合强制0-1转换
		GPIO_WriteBit(GPIOA,GPIO_Pin_0,(BitAction)1);//置高位
		Delay_ms(200);
		GPIO_WriteBit(GPIOA,GPIO_Pin_0,(BitAction)0);//置低位
		Delay_ms(200);
		*/
	}
}
2.LED流水灯
main.c
#include "stm32f10x.h"
#include "Delay.h"

int main(void)
{
	RCC_APB2PeriphClockCmd(RCC_APB2Periph_GPIOA,ENABLE);//使能时钟
	GPIO_InitTypeDef GPIO_InitStructure;//配置端口模式
	GPIO_InitStructure.GPIO_Pin=GPIO_Pin_0|GPIO_Pin_2|GPIO_Pin_4|GPIO_Pin_6;//或者在这里定义所有引脚,在循环函数里面赋高低电平
	GPIO_InitStructure.GPIO_Mode=GPIO_Mode_Out_PP;
	GPIO_InitStructure.GPIO_Speed=  GPIO_Speed_50MHz;
	GPIO_Init(GPIOA,&GPIO_InitStructure);
	GPIO_SetBits(GPIOA,GPIO_Pin_0);//置高位

	while(1)
	{
		//方法1,用GPIO_WriteBit
		GPIO_WriteBit(GPIOA,GPIO_Pin_0,Bit_SET);//置高位
		Delay_ms(100);
		GPIO_WriteBit(GPIOA,GPIO_Pin_0,Bit_RESET);//置低位
		GPIO_WriteBit(GPIOA,GPIO_Pin_2,Bit_SET);
		Delay_ms(100);
		GPIO_WriteBit(GPIOA,GPIO_Pin_2,Bit_RESET);
		GPIO_WriteBit(GPIOA,GPIO_Pin_4,Bit_SET);
		Delay_ms(100);
		GPIO_WriteBit(GPIOA,GPIO_Pin_4,Bit_RESET);
		GPIO_WriteBit(GPIOA,GPIO_Pin_6,Bit_SET);
		Delay_ms(100);
		GPIO_WriteBit(GPIOA,GPIO_Pin_6,Bit_RESET);

		/*
		//方法2,用GPIO_Write
		GPIO_Write(GPIOA,~0x0001);//Keil只能识别十六进制,~表示取反
		Delay_ms(200);
		GPIO_Write(GPIOA,~0x0004);
		Delay_ms(200);
		GPIO_Write(GPIOA,~0x0010);
		Delay_ms(200);
		GPIO_Write(GPIOA,~0x0040);
		*/
	}
}
3.LED按键
main.c
LED.c
LED.h
Key.c
Key.h
main.c
#include "stm32f10x.h"
#include "Delay.h"
#include "Led.h"
#include "Key.h"

uint8_t num;//全局变量,整个项目都可以使用,可以和局部函数同名,同名时函数体里面优先使用局部变量

int main(void)
{
	LED_Init();
	Key_Init();

	while(1)
	{
		num=Key_GetNum();
		if (num==1)
			{
				LED_Turn(1);
			}
		if (num==2)
			{
				LED_Turn(2);
			}
	}
}
LED.c
#include "stm32f10x.h"

void LED_Init(void)
{
	RCC_APB2PeriphClockCmd(RCC_APB2Periph_GPIOA,ENABLE);//使能时钟
	GPIO_InitTypeDef GPIO_InitStructure;//配置端口模式
	GPIO_InitStructure.GPIO_Pin=GPIO_Pin_2|GPIO_Pin_4;
	GPIO_InitStructure.GPIO_Mode=GPIO_Mode_Out_PP;
	GPIO_InitStructure.GPIO_Speed=  GPIO_Speed_50MHz;
	GPIO_Init(GPIOA,&GPIO_InitStructure);

	GPIO_SetBits(GPIOA,GPIO_Pin_2|GPIO_Pin_4);//GPIO配置好之后默认低电平这里拉成高电平,使得灯初始化式不亮
}

void LED_ON(int num)
{
	if(num==1) GPIO_ResetBits(GPIOA, GPIO_Pin_2);
	else if(num==2) GPIO_ResetBits(GPIOA, GPIO_Pin_4);
}


void LED_OFF(int num)
{
	if(num==1) GPIO_SetBits(GPIOA, GPIO_Pin_2);
	else if(num==2) GPIO_SetBits(GPIOA, GPIO_Pin_4);
}

void LED_Turn(int num)//电平翻转,端口为低电平就置1,为高电平就置0
{
	if(num==1)
	{
		if(GPIO_ReadOutputDataBit(GPIOA,GPIO_Pin_2)==0)
		{
			GPIO_SetBits(GPIOA, GPIO_Pin_2);
		}
		else
		{
			GPIO_ResetBits(GPIOA, GPIO_Pin_2);
		}
	}
	else
	{
		if(GPIO_ReadOutputDataBit(GPIOA,GPIO_Pin_4)==0)
		{
			GPIO_SetBits(GPIOA, GPIO_Pin_4);
		}
		else
		{
			GPIO_ResetBits(GPIOA, GPIO_Pin_4);
		}
	}
}
LED.h
#ifndef _LED_H
#define _LED_H

void LED_Init(void);
void LED_ON(int num);
void LED_OFF(int num);
void LED_Turn(int num);

#endif
Key.c
#include "stm32f10x.h"
#include "Delay.h"
void Key_Init(void)
{
	RCC_APB2PeriphClockCmd(RCC_APB2Periph_GPIOB, ENABLE);

	GPIO_InitTypeDef GPIO_InitStructure;
	GPIO_InitStructure.GPIO_Mode = GPIO_Mode_IPU;//读取按键上拉输入
	GPIO_InitStructure.GPIO_Pin = GPIO_Pin_1|GPIO_Pin_11;
	GPIO_InitStructure.GPIO_Speed = GPIO_Speed_50MHz;//输入模式下无用,写着也可以
	GPIO_Init(GPIOB,&GPIO_InitStructure);

	//是否需要设置初始高电平?
}

uint8_t Key_GetNum(void)
{
	uint8_t num=0;

	if(GPIO_ReadInputDataBit(GPIOB, GPIO_Pin_1)==0)//按键按下,GPIO_ReadInputDataBit读取人为(按键,触摸)输入某个端口的电平
	{
		Delay_ms(20);//消抖
		while(GPIO_ReadInputDataBit(GPIOB, GPIO_Pin_1)==0);//本次使用按键松手才有用,如果一直按着,就停在这里
		Delay_ms(20);//消抖
		num=1;
	}

	if(GPIO_ReadInputDataBit(GPIOB, GPIO_Pin_11)==0)//按键按下,GPIO_ReadInputDataBit读取人为(按键,触摸)输入某个端口的电平
	{
		Delay_ms(20);//消抖
		while(GPIO_ReadInputDataBit(GPIOB, GPIO_Pin_11)==0);//本次使用按键松手才有用,如果一直按着,就停在这里
		Delay_ms(20);//消抖
		num=2;
	}
	return num;
}
Key.h
#ifndef KEY_H
#define KEY_H

void Key_Init(void);
uint8_t Key_GetNum(void);

#endif
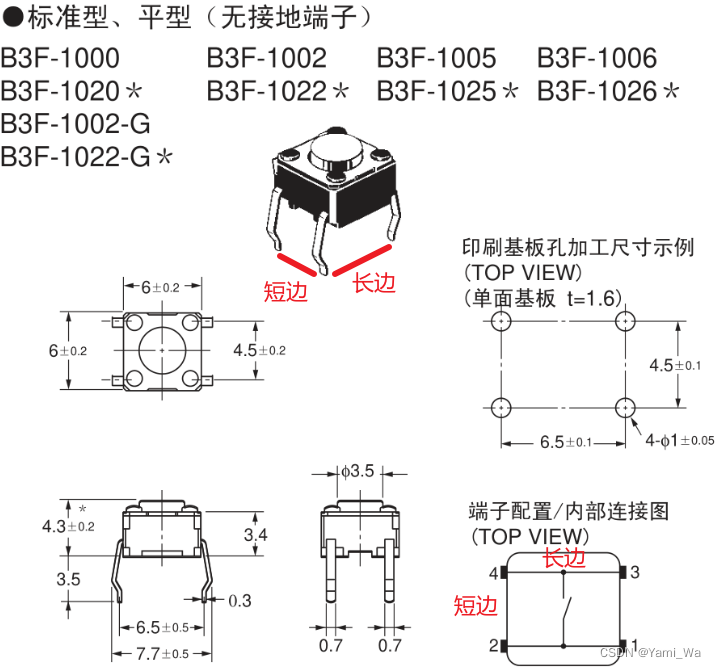
【注意】如果使用的是四角按键,其内部结构如下图,分长短边(其实不分,只是视觉方向显得长),长边内部短路,短边内部断路,要连接的话,选短边或对角线,内部横沟指向为长边方向,外部没有引脚紧贴一边为长边方向


 731
731


 被折叠的 条评论
为什么被折叠?
被折叠的 条评论
为什么被折叠?
 到【灌水乐园】发言


