


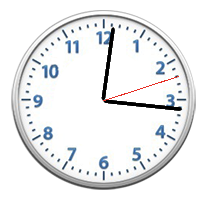
CALayer的基本属性在这里不多说了,网上对属性和方法介绍的很清楚,下面直接上demo效果
时钟
主要使用到的几个知识点
- anchorPoint(锚点)与position的使用
- 用NSCalendar和NSDateComponents拿到日期的组件
#import "ViewController.h"

// 每秒秒针转6°
#define kPerSecondA 6
// 每分钟分针转6°
#define kPerMinuteA 6

// 每小时时针转30°
#define kPerHourA 30

// 每分钟时针转0.5°
#define kPerMinHourA 0.5


@interface ViewController ()
@property (weak, nonatomic) IBOutlet UIImageView *imageView;

@property (weak, nonatomic)  CALayer *secLayer;

@property (weak, nonatomic)  CALayer *minLayer;

@property (weak, nonatomic)  CALayer *hourLayer;

@end

@implementation ViewController

- (void)viewDidLoad {
    [super viewDidLoad];
    // Do any additional setup after loading the view, typically from a nib.
    // 小时
    [self setUpHourLayer];

    // 分
    [self setUpMinLayer];

    // 秒
    [self setUpSecLayer];

    // 定时器
    [NSTimer scheduledTimerWithTimeInterval:1 target:self selector:@selector(timeChange) userInfo:nil repeats:YES];

    // 初始化始终
    [self timeChange];
}

- (void)timeChange
{
    // 获取当前是多少秒
    // 获取当前的日历对象
    NSCalendar *calendar = [NSCalendar currentCalendar];

    // 日期组件:秒,分,小时,年,月,日......
    // NSCalendarUnit:表示日期组件有哪些组成
    NSDateComponents *dataCmp = [calendar components:NSCalendarUnitSecond | NSCalendarUnitMinute | NSCalendarUnitHour fromDate:[NSDate date]];


    // 获取分
    NSInteger minute = dataCmp.minute;

    // 计算下分针转多少度
    CGFloat minA = (minute * kPerMinuteA) / 180.0 * M_PI;

    // 旋转分针
    _minLayer.transform = CATransform3DMakeRotation(minA, 0, 0, 1);


    // 获取小时
    NSInteger hour = dataCmp.hour;

    // 计算时针转多少度 = 当前有多少小时 * 每小时转的度数30° + 当前多少分钟 * 每分钟时针转多少0.5
    CGFloat hourA = (hour * kPerHourA + minute * kPerMinHourA) / 180.0 * M_PI;

    // 旋转时针
    _hourLayer.transform = CATransform3DMakeRotation(hourA, 0, 0, 1);

    // 获取秒数
    NSInteger sec = dataCmp.second;

    // 秒针转多少度
    CGFloat secA = (sec * kPerSecondA) / 180.0 * M_PI;

    // 旋转秒针
    _secLayer.transform = CATransform3DMakeRotation(secA, 0, 0, 1);
}

// 秒
- (void)setUpSecLayer
{
    CALayer *layer = [CALayer layer];

    _secLayer = layer;

    layer.backgroundColor = [UIColor redColor].CGColor;

    // 绕着锚点旋转,设置锚点
    layer.anchorPoint = CGPointMake(0.5, 1);

    layer.position = CGPointMake(_imageView.bounds.size.width * 0.5, _imageView.bounds.size.height * 0.5);

    layer.bounds = CGRectMake(0, 0, 1, 80);

    [_imageView.layer addSublayer:layer];
}

// 分
- (void)setUpMinLayer
{
    CALayer *layer = [CALayer layer];

    _minLayer = layer;

    layer.cornerRadius = 4;

    layer.backgroundColor = [UIColor blackColor].CGColor;

    // 绕着锚点旋转,设置锚点
    layer.anchorPoint = CGPointMake(0.5, 1);

    layer.position = CGPointMake(_imageView.bounds.size.width * 0.5, _imageView.bounds.size.height * 0.5);

    layer.bounds = CGRectMake(0, 0, 4, 80);

    [_imageView.layer addSublayer:layer];
}

// 小时
- (void)setUpHourLayer
{
    CALayer *layer = [CALayer layer];

    _hourLayer = layer;

    layer.cornerRadius = 4;

    layer.backgroundColor = [UIColor blackColor].CGColor;

    // 绕着锚点旋转,设置锚点
    layer.anchorPoint = CGPointMake(0.5, 1);

    layer.position = CGPointMake(_imageView.bounds.size.width * 0.5, _imageView.bounds.size.height * 0.5);

    layer.bounds = CGRectMake(0, 0, 4, 75);

    [_imageView.layer addSublayer:layer];
}


 8610
8610

 被折叠的 条评论
为什么被折叠?
被折叠的 条评论
为什么被折叠?
 到【灌水乐园】发言


