文章来源: http://blog.csdn.net/Yan_Joy/article/details/54343806
环境准备
deepdream还是基于python和caffe深度网络的,因此大概需要以下环境:
代码
导入库
相关的环境配置好了之后,可以先试试库能不能被导入进来:
from cStringIO import StringIO
import numpy as np
import scipy.ndimage as nd
import PIL.Image
from IPython.display import clear_output, Image, display
from google.protobuf import text_format
import caffe
caffe.set_mode_gpu();
caffe.set_device(2);
def showarray(a, fmt='jpeg'):
a = np.uint8(np.clip(a, 0, 255))
f = StringIO()
PIL.Image.fromarray(a).save(f, fmt)
display(Image(data=f.getvalue()))
- 1
- 2
- 3
- 4
- 5
- 6
- 7
- 8
- 9
- 10
- 11
- 12
- 13
- 14
- 15
- 16
- 17
- 18
- 19
加载模型
网络采用了GoogLeNet模型,需要提前下好。
model_path = '../caffe/models/bvlc_googlenet/'
net_fn = model_path + 'deploy.prototxt'
param_fn = model_path + 'bvlc_googlenet.caffemodel'
model = caffe.io.caffe_pb2.NetParameter()
text_format.Merge(open(net_fn).read(), model)
model.force_backward = True
open('tmp.prototxt', 'w').write(str(model))
net = caffe.Classifier('tmp.prototxt', param_fn,
mean = np.float32([104.0, 116.0, 122.0]),
channel_swap = (2,1,0))
def preprocess(net, img):
return np.float32(np.rollaxis(img, 2)[::-1]) - net.transformer.mean['data']
def deprocess(net, img):
return np.dstack((img + net.transformer.mean['data'])[::-1])
- 1
- 2
- 3
- 4
- 5
- 6
- 7
- 8
- 9
- 10
- 11
- 12
- 13
- 14
- 15
- 16
- 17
- 18
- 19
- 20
- 21
- 22
- 23
- 24
- 25
- 26
做梦
Making the “dream” images is very simple. Essentially it is just a gradient ascent process that tries to maximize the L2 norm of activations of a particular DNN layer. Here are a few simple tricks that we found useful for getting good images:
- offset image by a random jitter
- normalize the magnitude of gradient ascent steps
- apply ascent across multiple scales (octaves)
做梦其实很简单,本质上,它只是一个梯度上升过程,试图最大化特定DNN层激活的L2范数。 这里有一些简单的技巧,我们发现有用的获得良好的图像:
- 由随机抖动偏移图像
- 规则化梯度上升步长的幅度
- 在多个尺度上应用上升
首先我们实现一个基本的梯度上升阶跃函数,应用前两个技巧:
def objective_L2(dst):
dst.diff[:] = dst.data
def make_step(net, step_size=1.5, end='inception_4c/output',
jitter=32, clip=True, objective=objective_L2):
'''Basic gradient ascent step.'''
src = net.blobs['data']
dst = net.blobs[end]
ox, oy = np.random.randint(-jitter, jitter+1, 2)
src.data[0] = np.roll(np.roll(src.data[0], ox, -1), oy, -2)
net.forward(end=end)
objective(dst)
net.backward(start=end)
g = src.diff[0]
src.data[:] += step_size/np.abs(g).mean() * g
src.data[0] = np.roll(np.roll(src.data[0], -ox, -1), -oy, -2)
if clip:
bias = net.transformer.mean['data']
src.data[:] = np.clip(src.data, -bias, 255-bias)
- 1
- 2
- 3
- 4
- 5
- 6
- 7
- 8
- 9
- 10
- 11
- 12
- 13
- 14
- 15
- 16
- 17
- 18
- 19
- 20
- 21
- 22
- 23
- 24
- 25
- 26
- 27
- 28
- 29
- 30
- 31
- 32
Next we implement an ascent through different scales. We call these scales “octaves”.
接下来,我们通过不同的尺度实现上升。 我们称这些尺度为“octaves”。
iter_n是迭代次数,octave_n是尺度缩放次数,octave_scale是尺度缩放比例。
def deepdream(net, base_img, iter_n=10, octave_n=4, octave_scale=1.4,
end='inception_4c/output', clip=True, **step_params):
octaves = [preprocess(net, base_img)]
for i in xrange(octave_n-1):
octaves.append(nd.zoom(octaves[-1], (1, 1.0/octave_scale,1.0/octave_scale), order=1))
src = net.blobs['data']
detail = np.zeros_like(octaves[-1])
for octave, octave_base in enumerate(octaves[::-1]):
h, w = octave_base.shape[-2:]
if octave > 0:
h1, w1 = detail.shape[-2:]
detail = nd.zoom(detail, (1, 1.0*h/h1,1.0*w/w1), order=1)
src.reshape(1,3,h,w)
src.data[0] = octave_base+detail
for i in xrange(iter_n):
make_step(net, end=end, clip=clip, **step_params)
vis = deprocess(net, src.data[0])
if not clip:
vis = vis*(255.0/np.percentile(vis, 99.98))
showarray(vis)
print octave, i, end, vis.shape
clear_output(wait=True)
detail = src.data[0]-octave_base
return deprocess(net, src.data[0])
- 1
- 2
- 3
- 4
- 5
- 6
- 7
- 8
- 9
- 10
- 11
- 12
- 13
- 14
- 15
- 16
- 17
- 18
- 19
- 20
- 21
- 22
- 23
- 24
- 25
- 26
- 27
- 28
- 29
- 30
- 31
- 32
- 33
- 34
- 35
- 36
- 37
- 38
开始做梦
img = np.float32(PIL.Image.open('sky1024px.jpg'))
showarray(img)

_=deepdream(net, img)


一共会得到4(尺度)*10(迭代)=40张图片。
更改结束层会改变结果,如:
_=deepdream(net, img, end='inception_3b/5x5_reduce')

具体的层可以参考配置文件,googlenet还是比较复杂的。而且结束的越晚,就更能从图像识别出现实物体。
如:_=deepdream(net, img, end='inception_4e/output')

左边的云已经可以看出是一只狗的脸了。
前方高能!
上面一步就得到了奇怪的结果,
如果把这样的输出再作为输入放到网络里呢?
结果比较精神污染:
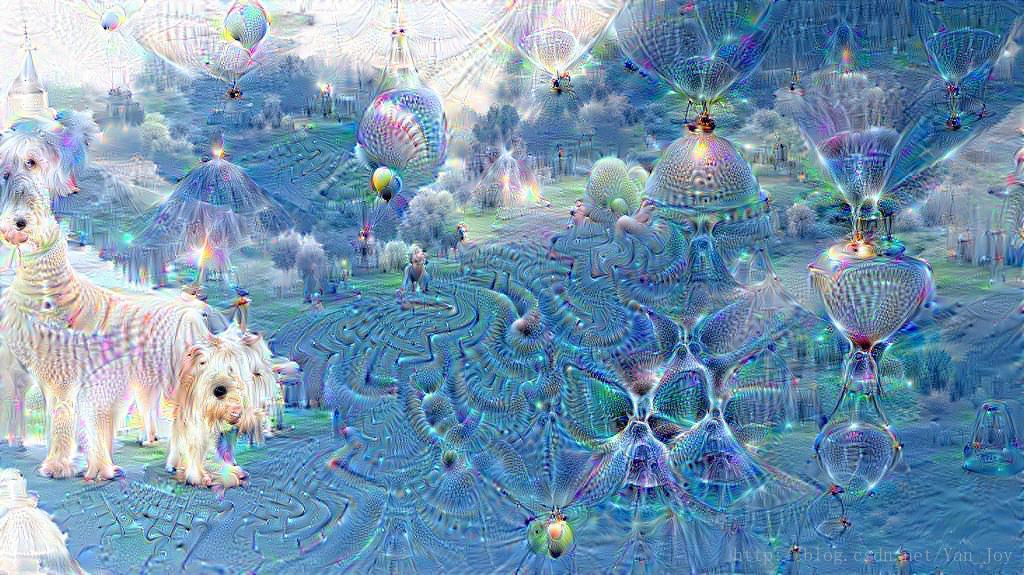
这是经过大概5轮反复输入得到的结果。
官方迭代了100次,丧心病狂啊= =
控制做梦
如果调整了我们的优化目标,就可以控制我们想要的结果。
比如我们想把原始图像往另一张图像上靠近,可以定义一个指向性的优化目标:
def objective_guide(dst):
x = dst.data[0].copy()
y = guide_features
ch = x.shape[0]
x = x.reshape(ch,-1)
y = y.reshape(ch,-1)
A = x.T.dot(y)
dst.diff[0].reshape(ch,-1)[:] = y[:,A.argmax(1)]
guide_features是需要预先提取的目标特征:
end = 'inception_3b/output'
h, w = guide.shape[:2]
src, dst = net.blobs['data'], net.blobs[end]
src.reshape(1,3,h,w)
src.data[0] = preprocess(net, guide)
net.forward(end=end)
guide_features = dst.data[0].copy()
好了,运行!
_=deepdream(net, img, end=end, objective=objective_guide)
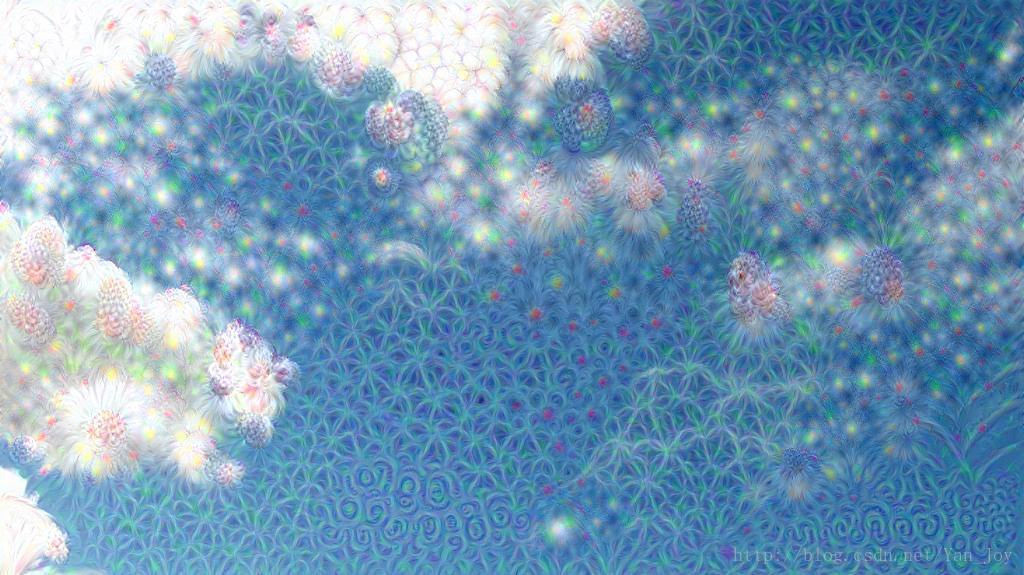
有了花的感觉啊~
总结
正着传播过来是分类,反着过去是生成,用深度学习产生艺术作品似乎是一个很有意思的方向。而目前也有较为成熟甚至是商业化的项目了,比如deepart。如果你能够承受一定的精神污染,建议挑战一下Nightmare,这是YOLO大神的另一个作品。
deepdream-github


 2275
2275

 被折叠的 条评论
为什么被折叠?
被折叠的 条评论
为什么被折叠?
 到【灌水乐园】发言


