


spring boot动态多数据源
前言
工作中经常会遇到在spring boot项目查询不同数据库数据的场景,如果数据源固定,比如就2、3个还好,就通过配置文件方式固定配置几个数据源,通过yml文件配置数据源信息,通过@configuration @primary @bean等方式初始化不同数据库数据源、和数据访问对象,然后在不同的service层注入不同的数据源查询对象查询数据。
如果涉及数据源太多了或者有变化的情况,这样配置就工作量会成倍增加,配置不仅繁琐,还不好动态处理变化情况,费时费力还不通用,让人苦不堪言。为解决这个问题,我在查阅大量多数据源配置资料和文章并结合工作实践的基础上开发了一个简单实用的spring boot动态多数据源demo,该demo主要功能如下:
- 自定义多数据源类MultiplyDataSource(继承HikariDataSource),通过多线程类ThreadLocal控制当前需要使用的数据源id,实现多数据源动态切换查询功能(默认数据源和其他数据源都统一使用这一个,简化了配置)。
- 多数据源获取功能封装,通过类MultiplyDataSourceUpdateSchedule实现多数据源从yml配置文件获取,或者定时动态从默认数据库获取。
- 该demo使用内嵌数据库h2和derby运行,h2为默认主数据源,无需额外配置数据库就可运行。
- demo中添加了多数据源查询api接口MultiplyDatasourceController,和单元测试ApplicationTests可直接运行测试效果。
- 该demo 使用gradle和maven都可以运行。
项目目录结构
项目文件目录结构如下:

api包:测试多数据源MultiplyDatasourceController。
config包:配置多数据源初始化。
database包:自定义多数据源类MultiplyDataSource,数据源实体类DataSourceInfo,多线程下数据源切换控制MultiplyDataSourceKeyHolder。
schedule包:设置定时更新数据库数据源或者直接使用配置文件(spring.datasources.datasourceList)里配置的多个固定数据源。
集成使用步骤
1.配置包依赖
gradle:build.gradle
plugins {
	id 'org.springframework.boot' version '2.7.0'
	id 'io.spring.dependency-management' version '1.0.11.RELEASE'
	id 'java'
}
group = 'com.multiplyds'
version = '0.0.1-SNAPSHOT'
sourceCompatibility = '1.8'
repositories {
	maven{url "https://maven.aliyun.com/repository/central"}
}
dependencies {
	implementation 'org.springframework.boot:spring-boot-starter-web:2.7.0'
	implementation 'org.springframework.boot:spring-boot-starter-jdbc:2.7.0'
    implementation 'junit:junit:4.13.1'
    runtimeOnly 'com.h2database:h2:2.1.212'
	runtimeOnly 'org.apache.derby:derby:10.14.2.0'
	testImplementation 'org.springframework.boot:spring-boot-starter-test:2.7.0'
}
tasks.named('test') {
	useJUnitPlatform()
}
maven:pom.xml
<?xml version="1.0" encoding="UTF-8"?>
<project xmlns="http://maven.apache.org/POM/4.0.0" xmlns:xsi="http://www.w3.org/2001/XMLSchema-instance"
         xsi:schemaLocation="http://maven.apache.org/POM/4.0.0 https://maven.apache.org/xsd/maven-4.0.0.xsd">
    <modelVersion>4.0.0</modelVersion>
    <groupId>com.springboot</groupId>
    <artifactId>multiplyds</artifactId>
    <version>0.1.0</version>
    <parent>
        <groupId>org.springframework.boot</groupId>
        <artifactId>spring-boot-starter-parent</artifactId>
        <version>2.7.1</version>
        <relativePath/>
    </parent>
    <dependencies>
        <dependency>
            <groupId>org.springframework.boot</groupId>
            <artifactId>spring-boot-starter</artifactId>
        </dependency>
        <dependency>
            <groupId>org.springframework.boot</groupId>
            <artifactId>spring-boot-starter-web</artifactId>
        </dependency>
        <dependency>
            <groupId>org.springframework.boot</groupId>
            <artifactId>spring-boot-starter-jdbc</artifactId>
        </dependency>
        <dependency>
            <groupId>junit</groupId>
            <artifactId>junit</artifactId>
            <version>4.13.1</version>
            <scope>test</scope>
        </dependency>
        <dependency>
            <groupId>com.h2database</groupId>
            <artifactId>h2</artifactId>
            <version>2.1.212</version>
        </dependency>
        <dependency>
            <groupId>org.apache.derby</groupId>
            <artifactId>derby</artifactId>
            <version>10.14.2.0</version>
        </dependency>
        <dependency>
            <groupId>org.springframework.boot</groupId>
            <artifactId>spring-boot-starter-test</artifactId>
            <version>2.7.0</version>
            <scope>test</scope>
        </dependency>

    </dependencies>

    <properties>
        <java.version>1.8</java.version>
    </properties>

    <repositories>
        <repository>
            <id>aliyun</id>
            <url>https://maven.aliyun.com/repository/public</url>
            <releases>
                <enabled>true</enabled>
            </releases>
            <snapshots>
                <enabled>false</enabled>
            </snapshots>
        </repository>
    </repositories>
    <pluginRepositories>
        <pluginRepository>
            <id>aliyun-plugin</id>
            <url>https://maven.aliyun.com/repository/public</url>
            <releases>
                <enabled>true</enabled>
            </releases>
            <snapshots>
                <enabled>false</enabled>
            </snapshots>
        </pluginRepository>
    </pluginRepositories>
    <build>
        <plugins>
            <plugin>
                <groupId>org.springframework.boot</groupId>
                <artifactId>spring-boot-maven-plugin</artifactId>
            </plugin>
        </plugins>
    </build>

</project>
2.修改配置文件application.yml
server:
  servlet:
    context-path: /api
spring:
  datasource:
    name: h2
    driverClassName: org.h2.Driver
    url: jdbc:h2:mem:test
    username: h2
    password: h2
    platform: h2
    hikari:
      connection-timeout: 30000
      max-lifetime: 1800000
      idle-timeout: 600000
      maximum-pool-size: 100
      minimum-idle: 10
  sql:
    init:
      username: h2
      password: h2
      platform: h2
      schema-locations: classpath:sql/schema-h2.sql
      dataLocations: classpath:sql/data-h2.sql
      mode: ALWAYS
  datasources:
    datasourceList:
      - id: 2
        driverClassName: org.apache.derby.jdbc.EmbeddedDriver
        url: jdbc:derby:derbyDb;create=true
        username: derby
        password: derby
  #h2 web consloe远程访问
  h2:
    console:
      settings:
        web-allow-others: true
      #通过URL/h2访问h2 web consloe
      path: /h2
      #启动h2 web consloe
      enabled: true
logging:
  level:
    com.springboot: debug
    com.zaxxer.hikari: debug
    org.springframework: debug
3.添加测试数据sql文件:resorces/sql下
data-h2.sql
INSERT INTO t_user VALUES ('0', '张三','zs20', 20);
INSERT INTO t_user VALUES ('1', '李四','ls30' ,30);
INSERT INTO t_user VALUES ('2', '王五', 'wu40',40);
INSERT INTO t_datasource VALUES ('1', 'org.apache.derby.jdbc.EmbeddedDriver', 'jdbc:derby:derbyDb;create=true','derby','derby');
schema-h2.sql
DROP TABLE IF EXISTS t_user;
CREATE TABLE t_user(id varchar(225) not null,user_name varchar(225) not null,pwd varchar(225) not null,age int);
DROP TABLE IF EXISTS t_datasource;
CREATE TABLE t_datasource
(
id varchar(225) not null,
driverClassName varchar(225) not null,
url varchar(225) not null,
username  varchar(225) not null,
password varchar(225) not null
);
4.5.datasouce下增加多数据源核心类
MultiplyDataSource.java
package com.springboot.multiplyds.datasource;

import com.zaxxer.hikari.HikariConfig;
import com.zaxxer.hikari.HikariDataSource;
import org.slf4j.Logger;
import org.slf4j.LoggerFactory;
import org.springframework.beans.factory.InitializingBean;
import org.springframework.boot.jdbc.DataSourceBuilder;

import javax.sql.DataSource;
import java.sql.Connection;
import java.sql.SQLException;
import java.util.List;
import java.util.Map;
import java.util.Set;
import java.util.concurrent.ConcurrentHashMap;
import java.util.stream.Collectors;

/**
 * 自定义多数据源类
 */
public class MultiplyDataSource extends HikariDataSource implements InitializingBean {
    private static final Logger LOGGER = LoggerFactory.getLogger(MultiplyDataSource.class);
    /**
     * 所有数据源
     */
    private final Map<String, HikariDataSource> allDataSource = new ConcurrentHashMap<>();
    /**
     * 其他需要切换控制的数据源
     */
    private final Map<String, String> dsInfoIdKeyMap = new ConcurrentHashMap<>();

    public MultiplyDataSource() {
        super();
    }

    public MultiplyDataSource(HikariConfig configuration) {
        super(configuration);
    }

    public Map<String, HikariDataSource> getAllDataSource() {
        return allDataSource;
    }

    /**
     * 获取数据源,如果多线程下设置了数据源就取设置的,如果没有取到就用默认的
     *
     * @return 数据源
     */
    public DataSource getMultiplyDataSource() throws SQLException {
        String key = MultiplyDataSourceKeyHolder.getKey();
        DataSource dataSource;
        if (key == null) {
            dataSource = this;
        } else {
            dataSource = this.allDataSource.get(dsInfoIdKeyMap.get(key));
        }
        if (dataSource == null) {
            throw new SQLException("未找到和key[" + key + "]匹配的数据源。");
        }
        return dataSource;
    }

    /**
     * 如果不存在,添加一个新数据源
     *
     * @param key 数据连接信息
     * @return 数据源
     * @throws SQLException
     */
    private HikariDataSource createIfNotExistsDataSource(DataSourceInfo key) throws SQLException {
        HikariDataSource dataSource = allDataSource.get(key.toString());
        String keyToString = key.toString();
        if (dataSource == null) {
            synchronized (allDataSource) {
                if (allDataSource.get(keyToString) == null) {
                    HikariDataSource newDataSource = DataSourceBuilder.derivedFrom(this).type(HikariDataSource.class).driverClassName(key.getDriverClassName()).url(key.getUrl()).username(key.getUsername()).password(key.getPassword()).build();
                    newDataSource.setLoginTimeout(this.getLoginTimeout());
                    newDataSource.setValidationTimeout(this.getValidationTimeout());
                    newDataSource.setConnectionTimeout(this.getConnectionTimeout());
                    newDataSource.setIdleTimeout(this.getIdleTimeout());
                    newDataSource.setMaxLifetime(this.getMaxLifetime());
                    newDataSource.setMaximumPoolSize(this.getMaximumPoolSize());
                    newDataSource.setMinimumIdle(this.getMinimumIdle());
                    allDataSource.put(keyToString, newDataSource);
                    dataSource = newDataSource;
                } else {
                    dataSource = allDataSource.get(keyToString);
                }
            }
        }
        return dataSource;
    }

    @Override
    public Connection getConnection() throws SQLException {
        DataSource multiplyDataSource = this.getMultiplyDataSource();
        if (this.equals(multiplyDataSource)) {
            return super.getConnection();
        }
        return multiplyDataSource.getConnection();
    }

    @Override
    public Connection getConnection(String username, String password) throws SQLException {
        DataSource multiplyDataSource = this.getMultiplyDataSource();
        if (this.equals(multiplyDataSource)) {
            return super.getConnection(username, password);
        }
        return this.getMultiplyDataSource().getConnection(username, password);
    }

    /**
     * 更新数据源信息
     *
     * @param newDatasourceList 数据源列表
     */
    public void updateMultiplyDataSources(List<DataSourceInfo> newDatasourceList) {
        if (newDatasourceList == null) {
            //清理之前的数据源
            if (dsInfoIdKeyMap.size() > 0) {
                dsInfoIdKeyMap.values().forEach(row -> allDataSource.remove(row).close());
                dsInfoIdKeyMap.clear();
            }
        } else {
            newDatasourceList.forEach(row -> {
                try {
                    allDataSource.putIfAbsent(row.toString(), createIfNotExistsDataSource(row));
                } catch (SQLException e) {
                    e.printStackTrace();
                    LOGGER.error("MultiplyDataSource init datasource exception:{}", e.getMessage());
                }
            });
            //通过toString()为key,删除为用到的,数据源信息可能会被修改,id未该,所以不通过id删除。
            if (dsInfoIdKeyMap.size() > 0) {
                Set<String> keySet = newDatasourceList.stream().map(DataSourceInfo::toString).collect(Collectors.toSet());
                dsInfoIdKeyMap.values().forEach(key -> {
                    if (!keySet.contains(key)) {
                        allDataSource.remove(key).close();
                    }
                });
            }
            dsInfoIdKeyMap.clear();
            newDatasourceList.forEach(row -> dsInfoIdKeyMap.put(row.getId(), row.toString()));
        }
    }

    @Override
    public void afterPropertiesSet() {
        allDataSource.put(DataSourceInfo.of(this.getDriverClassName(), this.getJdbcUrl(), this.getUsername(), this.getPassword()).toString(), this);
        LOGGER.info("MultiplyDataSource init,datasource.size:{}", getAllDataSource().size());
    }
}
DataSourceInfo.java
package com.springboot.multiplyds.datasource;

import java.io.Serializable;

public class DataSourceInfo implements Serializable {
    private String id;
    /**
     * Fully qualified name of the JDBC driver. Auto-detected based on the URL by default.
     */
    private String driverClassName;

    /**
     * JDBC URL of the database.
     */
    private String url;

    /**
     * Login username of the database.
     */
    private String username;

    /**
     * Login password of the database.
     */
    private String password;

    public DataSourceInfo() {
    }

    private DataSourceInfo(String driverClassName, String url, String username, String password) {
        this.driverClassName = driverClassName;
        this.url = url;
        this.username = username;
        this.password = password;
    }

    public String getId() {
        return id;
    }

    public void setId(String id) {
        this.id = id;
    }

    public String getDriverClassName() {
        return driverClassName;
    }

    public void setDriverClassName(String driverClassName) {
        this.driverClassName = driverClassName;
    }

    public String getUrl() {
        return url;
    }

    public void setUrl(String url) {
        this.url = url;
    }

    public String getUsername() {
        return username;
    }

    public void setUsername(String username) {
        this.username = username;
    }

    public String getPassword() {
        return password;
    }

    public void setPassword(String password) {
        this.password = password;
    }

    public static DataSourceInfo of(String driverClassName, String url, String username, String password) {
        return new DataSourceInfo(driverClassName, url, username, password);
    }

    @Override
    public String toString() {
        return "DataSourceInfo{" +
                "driverClassName='" + driverClassName + '\'' +
                ", url='" + url + '\'' +
                ", username='" + username + '\'' +
                ", password='" + password + '\'' +
                '}';
    }
}
MultiplyDataSourceKeyHolder.java
package com.springboot.multiplyds.datasource;


/**
 * 多数据源连接信息多线程切换缓存
 */
public final class MultiplyDataSourceKeyHolder {
    /**
     * 线程变量,线程内有效
     */
    private static final ThreadLocal<String> dataSourceKey = new ThreadLocal<>();
    private MultiplyDataSourceKeyHolder() {
    }

    /**
     * @return 线程key
     */
    public static String getKey() {
        return dataSourceKey.get();
    }
    /**
     * @return 线程key
     */
    public static String getStrKey() {
        return dataSourceKey.get();
    }

    /**
     * 设置多线程下数据源
     *
     * @param key 数据源连接信息
     */
    public static void setKey(String key) {
        dataSourceKey.set(key);
    }
    /**
     * 移除当前线程数据源key
     */
    public static void removeKey() {
        dataSourceKey.remove();
    }
}
5.添加数据源初始化配置类DataSourceConfig.java
package com.springboot.multiplyds.config;

import com.springboot.multiplyds.datasource.MultiplyDataSource;
import org.springframework.boot.autoconfigure.jdbc.DataSourceProperties;
import org.springframework.boot.context.properties.ConfigurationProperties;
import org.springframework.context.annotation.Bean;
import org.springframework.context.annotation.Configuration;

/**
 * 数据源初始化配置
 */
@Configuration
public class DataSourceConfig{
    /**
     * 初始化数据库连接池
     *
     * @param properties 数据库连接池信息
     * @return 初始化数据库源
     */
    @Bean
    @ConfigurationProperties(prefix = "spring.datasource.hikari")
    MultiplyDataSource dataSource(DataSourceProperties properties) {
//        DataSource build = DataSourceBuilder.create(MultiplyDataSource.class.getClassLoader()).url("").driverClassName("").username("").password("").build();
        return properties.initializeDataSourceBuilder().type(MultiplyDataSource.class).build();
    }
}
6.添加动态多数据源更新任务类
MultiplyDataSourceUpdateSchedule.java:可调整该类getDatasourceList() 方法选择从配置文件或者从主数据库里获取数据源信息。
package com.springboot.multiplyds.schedule;

import com.springboot.multiplyds.datasource.DataSourceInfo;
import com.springboot.multiplyds.datasource.MultiplyDataSource;
import org.springframework.beans.factory.InitializingBean;
import org.springframework.beans.factory.annotation.Autowired;
import org.springframework.boot.autoconfigure.AutoConfigureAfter;
import org.springframework.boot.autoconfigure.sql.init.SqlInitializationAutoConfiguration;
import org.springframework.boot.context.properties.ConfigurationProperties;
import org.springframework.jdbc.core.BeanPropertyRowMapper;
import org.springframework.jdbc.core.namedparam.NamedParameterJdbcTemplate;
import org.springframework.scheduling.annotation.Scheduled;

import java.util.HashMap;
import java.util.List;

/**
 * 多数据源初始化配置
 */
@AutoConfigureAfter(SqlInitializationAutoConfiguration.class)
@ConfigurationProperties(prefix = "spring.datasources")
public class MultiplyDataSourceUpdateSchedule implements InitializingBean{
    /**
     * 配置的数据源列表,可以走配置文件spring.datasources.datasourceList;也可以在getDatasourceList里自定义从主数据源查询
     */
    List<DataSourceInfo> datasourceList;
    @Autowired
    MultiplyDataSource multiplyDataSource;
    @Autowired
    NamedParameterJdbcTemplate jdbcTemplate;

    public List<DataSourceInfo> getDatasourceList() {
        //走数据库查询
        datasourceList = jdbcTemplate.query("select id,driverClassName,url,username,password from t_datasource", new HashMap<>(), new BeanPropertyRowMapper<>(DataSourceInfo.class));
        return datasourceList;
    }

    public void setDatasourceList(List<DataSourceInfo> datasourceList) {
        this.datasourceList = datasourceList;
    }

    /**
     * 间隔30秒更新一次需要切换的数据源
     */
    @Scheduled(fixedDelay = 30000)
    public void updateMultiplyDataSources() {
        multiplyDataSource.updateMultiplyDataSources(this.getDatasourceList());
    }

    @Override
    public void afterPropertiesSet() throws Exception {
        updateMultiplyDataSources();
    }
}
7.添加测试controller
MultiplyDatasourceController.java
通过方法“MultiplyDataSourceKeyHolder.setKey(dsId);”设置使用哪个数据源。
package com.springboot.multiplyds.api.base;

import com.springboot.multiplyds.datasource.DataSourceInfo;
import com.springboot.multiplyds.datasource.MultiplyDataSourceKeyHolder;
import org.springframework.beans.factory.annotation.Autowired;
import org.springframework.jdbc.core.BeanPropertyRowMapper;
import org.springframework.jdbc.core.JdbcTemplate;
import org.springframework.jdbc.core.namedparam.NamedParameterJdbcTemplate;
import org.springframework.web.bind.annotation.GetMapping;
import org.springframework.web.bind.annotation.RequestMapping;
import org.springframework.web.bind.annotation.RestController;

import java.util.HashMap;
import java.util.List;
import java.util.Map;

/**
 * 多数据源测试controller
 */
@RestController
@RequestMapping("base")
public class MultiplyDatasourceController {
    @Autowired
    JdbcTemplate jdbcTemplate;
    @Autowired
    NamedParameterJdbcTemplate namedParameterJdbcTemplate;

    @GetMapping("getAllDatasource")
    public List<DataSourceInfo> getAllDatasource() {
        return namedParameterJdbcTemplate.query("select id,driverClassName,url,username,password from t_datasource", new HashMap<>(), new BeanPropertyRowMapper<>(DataSourceInfo.class));
    }

    /**
     * @param dsId 数据源id
     * @return 获取数据源下的用户表数据
     */
    @GetMapping("getByDsId")
    public Map<String, Object> getAllDatasource(String dsId) {
        MultiplyDataSourceKeyHolder.setKey(dsId);
        jdbcTemplate.execute("CREATE TABLE t_user_derby(id varchar(225) not null,user_name varchar(225) not null,pwd varchar(225) not null,age int)");
        jdbcTemplate.execute("INSERT INTO t_user_derby VALUES ('0', '张三','zs20', 20)");
        Map<String, Object> userMap = namedParameterJdbcTemplate.queryForMap(("select id,user_name,pwd,age from t_user_derby"), new HashMap<>());
        jdbcTemplate.execute("drop TABLE t_user_derby");
        MultiplyDataSourceKeyHolder.removeKey();
        return userMap;
    }
}
8.运行演示效果
启动后访问“http://localhost:8080/api/base/getAllDatasource“获取h2数据库里所有数据源。

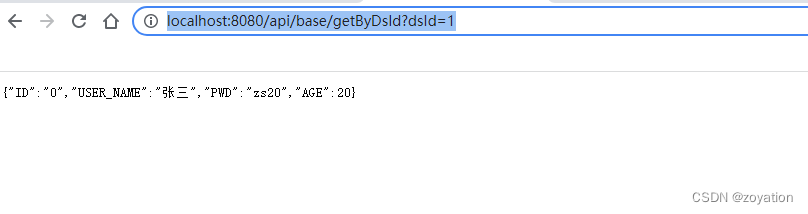
启动后访问“http://localhost:8080/api/base/getByDsId?dsId=1”获取derby数据库里数据:
总结
本文主要结合个人工作经验总结为大家分享spring boot动态多数据源的简单配置和使用,解放双手,后面还可以在此基础上扩展如下功能:
(1)多数据库多数据源通用分页功能。
(2)多数据库多数据源通用增删改查功能。
(3)多数据库多数据源多线程事务控制功能。
完整代码可到我的资源中下载:
spring boot动态多数据源demo


 1008
1008


 被折叠的 条评论
为什么被折叠?
被折叠的 条评论
为什么被折叠?
 到【灌水乐园】发言


