


一:介绍泛洪算法(都是抄的)
泛洪填充算法又称洪水填充算法是在很多图形绘制软件中常用的填充算法,最熟悉不过就是windows paint的油漆桶功能。算法的原理很简单,就是从一个点开始附近像素点,填充成新的颜色,直到封闭区域内的所有像素点都被填充新颜色为止。泛红填充实现最常见有四邻域像素填充法,八邻域像素填充法,基于扫描线的像素填充方法。根据实现又可以分为递归与非递归(基于栈)。一般来说对于递归的算法我们比较容易实现,但是若所需处理的对象非常大,递归算法非常消耗内存。
二:在unity3d中实现图片填充(八邻域像素填充法)
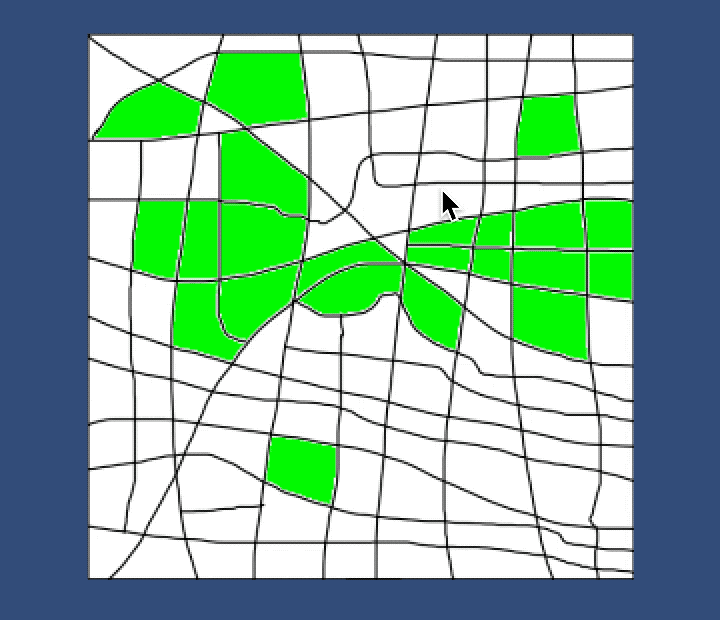
1,效果如下:
2,在unity3d中该图片需要有两点设置:


递归方法的实现:递归方法只是思想方法,让你容易理解,但一般不采用。所以也是抄的。
public void floodFill8(int x, int y, int newColor, int oldColor)
	{
	    if(x >= 0 && x < width && y >= 0 && y < height &&
	    		getColor(x, y) == oldColor && getColor(x, y) != newColor)
	    {
	    	setColor(x, y, newColor); //set color before starting recursion
	        floodFill8(x + 1, y,     newColor, oldColor);
	        floodFill8(x - 1, y,     newColor, oldColor);
	        floodFill8(x,     y + 1, newColor, oldColor);
	        floodFill8(x,     y - 1, newColor, oldColor);
	        floodFill8(x + 1, y + 1, newColor, oldColor);
	        floodFill8(x - 1, y - 1, newColor, oldColor);
	        floodFill8(x - 1, y + 1, newColor, oldColor);
	        floodFill8(x + 1, y - 1, newColor, oldColor);
	    }
	}
非递归方法实现:这个需要好好看下了,用的是栈,不过也比较容易理解。
   private void CaculateVector2()
    {
        colorPos.x = (Input.mousePosition.x - textureOriginScreenPosition.x) / (textureEndUPScreenPosition.x - textureOriginScreenPosition.x) * clickTexture2D.width;
        colorPos.y = (Input.mousePosition.y - textureOriginScreenPosition.y) / (textureEndUPScreenPosition.y - textureOriginScreenPosition.y) * clickTexture2D.height;
      //  print("x:--" + colorPos.x + "--y:---" + colorPos.y);

        if (!(getColor((int)colorPos.x, (int)colorPos.y) == Color.white))
        {
            return;
        }
        int[] dx = new int[8] { 0, 1, 1, 1, 0, -1, -1, -1 };
        int[] dy = new int[8] { -1, -1, 0, 1, 1, 1, 0, -1 };

        stackX.Push((int)colorPos.x);
        stackY.Push((int)colorPos.y);
        int x;
        int y;
        int xx;
        int yy;
        print(clickTexture2D.width + "_" + clickTexture2D.height);
        while (stackX.Count > 0)
        {
            x = stackX.Pop();
            y = stackY.Pop();
            setColor(x, y, Color.green);
            for (int i = 0; i < 8; i++)
            {
                xx = x + dx[i];
                yy = y + dy[i];
                if (xx > 0 && xx < clickTexture2D.width && yy > 0 && yy < clickTexture2D.height && getColor(xx, yy) == Color.white)
                {

                    stackX.Push(xx);
                    stackY.Push(yy);
                }
            }
        }
        clickTexture2D.Apply();
    }
有可能只看这个方法,看不出啥名堂,在这里说下实现的过程:获取鼠标点击的点所在图片上的像素点的位置,然后使用八临域算法找出这个封闭区间的所有白色像素点,并改变颜色,这样说应该就明了很多了。
工程文件在我的资源中下载,unity版本2018.2.7
https://download.csdn.net/download/yffgamestart/11505309
整个代码如下:
using System.Collections;
using System.Collections.Generic;
using UnityEngine;
using UnityEngine.UI;
public class Demo_texture : MonoBehaviour
{
    //计算鼠标点击位置 对应的像素位置,一个是image的左下角,一个是图片的右上角
    public Transform textureOrigin;
    public Transform textureUPEnd;
    //存储点击的图片的texture2D getpixel() 使用
    private Texture2D clickTexture2D;
    //存储鼠标点击位置的像素值
    private Color testColor;
    //存储计算出来的像素点的位置
    private Vector2 colorPos;
    //存储图片定位点的屏幕坐标
    private Vector3 textureOriginScreenPosition;
    private Vector3 textureEndUPScreenPosition;
    //测试用的显示颜色的图片
    public Image image;
    private void Start()
    {
        textureOriginScreenPosition = Camera.main.WorldToScreenPoint(textureOrigin.position);
        textureEndUPScreenPosition = Camera.main.WorldToScreenPoint(textureUPEnd.position);
    }
    private void Update()
    {
        Ray r = Camera.main.ScreenPointToRay(Input.mousePosition);
        RaycastHit hit;
        if (Input.GetMouseButtonDown(0))
        {
            if (Physics.Raycast(r, out hit))
            {
                HitColorChooseImage(hit);
            }
        }
    }
    private void HitColorChooseImage(RaycastHit hit)
    {
        // print(hit.collider.name);
        if (hit.collider.name == "Image")
        {
            //  print(3);
            clickTexture2D = hit.collider.gameObject.GetComponent<Image>().sprite.texture;
            CaculateVector2();

        }
    }
    public Stack<int> stackX = new Stack<int>();
    public Stack<int> stackY = new Stack<int>();
    private void CaculateVector2()
    {
        colorPos.x = (Input.mousePosition.x - textureOriginScreenPosition.x) / (textureEndUPScreenPosition.x - textureOriginScreenPosition.x) * clickTexture2D.width;
        colorPos.y = (Input.mousePosition.y - textureOriginScreenPosition.y) / (textureEndUPScreenPosition.y - textureOriginScreenPosition.y) * clickTexture2D.height;
      //  print("x:--" + colorPos.x + "--y:---" + colorPos.y);

        if (!(getColor((int)colorPos.x, (int)colorPos.y) == Color.white))
        {
            return;
        }
        int[] dx = new int[8] { 0, 1, 1, 1, 0, -1, -1, -1 };
        int[] dy = new int[8] { -1, -1, 0, 1, 1, 1, 0, -1 };

        stackX.Push((int)colorPos.x);
        stackY.Push((int)colorPos.y);
        int x;
        int y;
        int xx;
        int yy;
        print(clickTexture2D.width + "_" + clickTexture2D.height);
        while (stackX.Count > 0)
        {
            x = stackX.Pop();
            y = stackY.Pop();
            setColor(x, y, Color.green);
            for (int i = 0; i < 8; i++)
            {
                xx = x + dx[i];
                yy = y + dy[i];
                if (xx > 0 && xx < clickTexture2D.width && yy > 0 && yy < clickTexture2D.height && getColor(xx, yy) == Color.white)
                {

                    stackX.Push(xx);
                    stackY.Push(yy);
                }
            }
        }
        clickTexture2D.Apply();
    }
    public Color getColor(int x, int y)
    {
        return clickTexture2D.GetPixel(x, y);
    }
    public void setColor(int x, int y, Color c)
    {
        clickTexture2D.SetPixel(x, y, c);
    }
}
下次内容:泛红算法之扫描线算法
https://download.csdn.net/download/yffgamestart/11505309
这里有一个qq群:群号:319506028,名字:Unity、AR、VR俱乐部,里面有很多技术大神,可以在群里问问题(关于unity的任何问题,不限VR AR,群名不重要),欢迎你的加入。


 1万+
1万+


 被折叠的 条评论
为什么被折叠?
被折叠的 条评论
为什么被折叠?
 到【灌水乐园】发言


