


一、 什么是图像边缘
图像边缘简单理解就是一张照片中,物体的边缘线。例如:一个人站在绿幕中拍一张照片,那么这个人的衣服和背景绿幕在图片中交界的部分我们就称之为边缘。
二、 边缘的基本特征
要理解边缘的基本特征,我们需要先明白边缘出现的两种情况,以及分别对应的函数图像。
1) 阶跃变化
原图:
 函数图像:
函数图像:
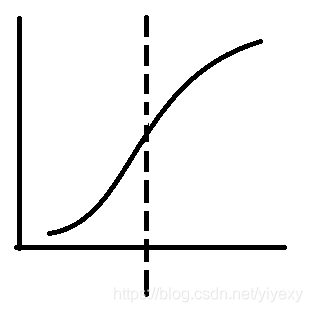 注:虚线即代表边缘出现的位置,横轴代表位置,纵轴代表灰度值。此函数图像仅代表类似原图边缘的一般情况,非严格对照。
2) 屋顶变化
原图:
 函数图像:
函数图像:
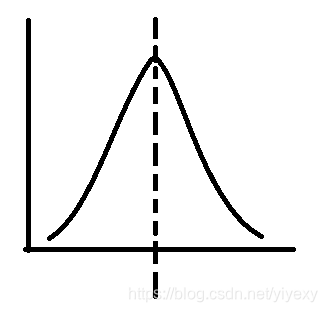 注:虚线即代表边缘出现的位置,横轴代表位置,纵轴代表灰度值。此函数图像仅代表类似原图边缘的一般情况,非严格对照。
三、 图像边缘特征总结
从上述图像我们不难看出,边缘大致分为两种,其对应的函数图像也就大致分为两种。
第一种:一阶导数在边缘处达峰值,二阶导数在边缘处达零值;
第二种:一阶导数在边缘处达零值,二阶导数在边缘处达峰值。
至此我们的边缘特征基本总结完毕,下面开始介绍拉普拉斯算子以及其在图像上的作用。
四、 拉普拉斯算子
拉普拉斯算子是一个二阶微分算子。在二维空间中,x,y表示该点的二维坐标,利用拉普拉斯算子代表的笛卡尔坐标: 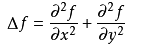
这里,我们将一张图像看成是一个二维空间,而各个点的像素值则表示该位置的函数值大小,即f(x,y)。我们再利用拉普拉斯算子表达式,计算某一点的△ f。如此我们便可以求出上面第二种边缘的二阶导数,从而轻易得出边缘。
现在我们来看一下拉普拉斯算子推导出图像的卷积模板的过程:
1) 根据公式,我们先求出对x的二阶导,而后对y的二阶导也是依次类推即可。
2) 根据导数公式,我们可以先计算出点(x,y)右侧的一阶导数,即:f(x,y)的右一阶导数等于[f(x+1,y)-f(x,y)]/[(x+1)-x]即等于f(x+1,y)-f(x,y);同理f(x,y)的左一阶导数等于f(x,y)-f(x-1,y);
3) 而后我们再根据f(x,y)的两侧一阶导数可求出x轴的二阶导为:f(x+1,y)+f(x-1,y)-2f(x,y);至此,我们的像素值函数对x轴的二阶导求得完毕;
4) 以此类推,我们可得出f(x,y)对y的二阶导为
f(x,y+1)+f(x,y-1)-2f(x,y);
5) 综上,我们可得出拉普拉斯算子运算结果△f为
f(x,y+1)+f(x,y-1)+ f(x+1,y)+f(x-1,y)- 4*f(x,y);
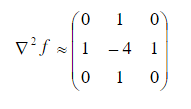
五、 卷积模板
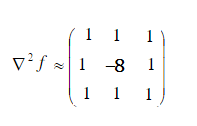
结合上面的推导过程,我们可以得出拉普拉斯算子的标准卷积模板:
 根据该卷积模板,我们还可以进一步扩展,如下:
 至此,我们基本可以根据该卷积模板进行代码的编写了。
六、 边缘提取代码展示
//拉普拉斯算子边缘提取
	public static BufferedImage LaplaceEdge(BufferedImage leftImage) {
		int width = leftImage.getWidth();
		int height = leftImage.getHeight();
		int srcRGBs[] = leftImage.getRGB(0, 0, width, height, null, 0, width);
		//BufferedImage destImage = new BufferedImage(width, height, BufferedImage.TYPE_INT_RGB);

		int rgb[]=new int[3];
		int rs[][]=new int[width+2][ height+2]; //
		int gs[][]=new int[width+2][ height+2];
		int bs[][]=new int[width+2][ height+2];

		for(int j=1; j<height+1; j++) {
			for (int i = 1; i < width+1; i++) {
				ImageUtil.decodeColor(srcRGBs[(j-1)*width+i-1],rgb); //rgb[0]=R,rgb[1]=G,rgb[2]=B
				rs[i][j]=rgb[0];   //Rֵ
				gs[i][j]=rgb[1];   //Gֵ
				bs[i][j]=rgb[2];   //bֵ
			}
		}
		BufferedImage destImage = new BufferedImage(width, height, BufferedImage.TYPE_INT_RGB);

		for (int j = 1; j < height+1; j++) {
			for(int i=1; i<width+1; i++) {
				try {
					ImageUtil.decodeColor(srcRGBs[(j-1)*width+i-1],rgb); //rgb[0]=R,rgb[1]=G,rgb[2]=B
				} catch (Exception e) {
					// TODO Auto-generated catch block
					e.printStackTrace();

				}
					rgb[0]=(int)((rs[i-1][j-1]*(-1)+rs[i][j-1]*(-1)+rs[i+1][j-1]*(-1)+
							rs[i-1][j]*(-1)+rs[i][j]*8+rs[i+1][j]*(-1)+
							rs[i-1][j+1]*(-1)+rs[i][j+1]*(-1)+rs[i+1][j+1]*(-1))/9);
					rgb[1]=(int)((gs[i-1][j-1]*(-1)+gs[i][j-1]*(-1)+gs[i+1][j-1]*(-1)+
							gs[i-1][j]*(-1)+gs[i][j]*8+gs[i+1][j]*(-1)+
							gs[i-1][j+1]*(-1)+gs[i][j+1]*(-1)+gs[i+1][j+1]*(-1))/9);
					rgb[2]=(int)((bs[i-1][j-1]*(-1)+bs[i][j-1]*(-1)+bs[i+1][j-1]*(-1)+
							bs[i-1][j]*(-1)+bs[i][j]*(8)+bs[i+1][j]*(-1)+
							bs[i-1][j+1]*(-1)+bs[i][j+1]*(-1)+bs[i+1][j+1]*(-1))/9);
					if(rgb[0]<0){
						rgb[0]=0;
					}
					if(rgb[0]>255){
						rgb[0]=255;
						}
					if(rgb[1]<0){
						rgb[1]=0;
					}
					if(rgb[1]>255){
						rgb[1]=255;
					}
					if(rgb[2]<0){
						rgb[2]=0;
					}
					if(rgb[2]>255){
						rgb[2]=255;
					}
				destImage.setRGB(i-1,j-1, ImageUtil.encodeColor(rgb));
			}
		}

		return destImage;
	}
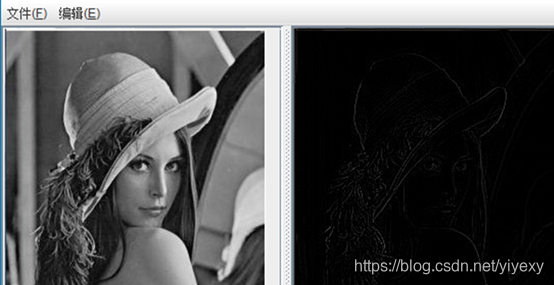
细心的同学可能,我使用的卷积模板是拓展的模板,并且我对最后的结果进行了除以9,这里我是希望可以提取更加突出明显的边缘。
七、 边缘提取效果展示
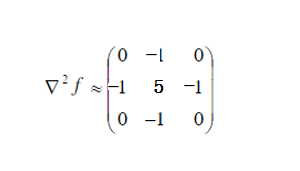
八、 边缘锐化原理与展示
现在我们再来简单总结一下拉普拉斯算子边缘锐化的简单原理。稍稍总结一下边缘提取的卷积模板,我们不难得出可以使用一下的卷积模板进行边缘锐化:
 因此代码如下:
//拉普拉斯算子边缘锐化
	public static BufferedImage LaplaceSharpen(BufferedImage leftImage) {
		int width = leftImage.getWidth();
		int height = leftImage.getHeight();
		int srcRGBs[] = leftImage.getRGB(0, 0, width, height, null, 0, width);
		//BufferedImage destImage = new BufferedImage(width, height, BufferedImage.TYPE_INT_RGB);

		int rgb[]=new int[3];
		int rs[][]=new int[width][ height]; //
		int gs[][]=new int[width][ height];
		int bs[][]=new int[width][ height];

		for(int j=0; j<height; j++) {
			for (int i = 0; i < width; i++) {
				ImageUtil.decodeColor(srcRGBs[j*width+i],rgb); //rgb[0]=R,rgb[1]=G,rgb[2]=B
				rs[i][j]=rgb[0];   //Rֵ
				gs[i][j]=rgb[1];   //Gֵ
				bs[i][j]=rgb[2];   //bֵ
				//System.out.println("i="+i+" j="+j+"  rs="+rs[i][j]+"  gs="+gs[i][j]+"  bs="+bs[i][j]);
			}
		}
		BufferedImage destImage = new BufferedImage(width, height, BufferedImage.TYPE_INT_RGB);

		int r=0,g=0,b=0;
		for (int j = 0; j < height; j++) {
			for(int i=0; i<width; i++) {
				try {
					ImageUtil.decodeColor(srcRGBs[j*width+i],rgb); //rgb[0]=R,rgb[1]=G,rgb[2]=B
				} catch (Exception e) {
					// TODO Auto-generated catch block
					e.printStackTrace();
					System.out.println(i);
				}
				if (j>=1&&i>=1&&j<height-1&&i<width-1){
					rgb[0]=(int)((rs[i+1][j]*(-1)+
							rs[i-1][j]*(-1)+rs[i][j]*5+
							rs[i][j+1]*(-1)+rs[i][j-1]*(-1)));
					if (rgb[0]<0){
						rgb[0]=0;
					}
					if (rgb[0]>255){
						rgb[0]=255;
					}
					rgb[1]=(int)((gs[i][j-1]*(-1)+
							gs[i-1][j]*(-1)+gs[i][j]*5+gs[i+1][j]*(-1)+
							gs[i][j+1]*(-1)));
					if (rgb[1]<0){
						rgb[1]=0;
					}
					if (rgb[1]>255){
						rgb[1]=255;
					}
					rgb[2]=(int)((bs[i][j-1]*(-1)+
							bs[i-1][j]*(-1)+bs[i][j]*5+bs[i+1][j]*(-1)+
							bs[i][j+1]*(-1)));
					if (rgb[2]<0){
						rgb[2]=0;
					}
					if (rgb[2]>255){
						rgb[2]=255;
					}
				}else {
					rgb[0]=rs[i][j];
					rgb[1]=gs[i][j];
					rgb[2]=bs[i][j];
				}
				destImage.setRGB(i,j, ImageUtil.encodeColor(rgb));
			}
		}

		return destImage;
	}
效果展示如下:
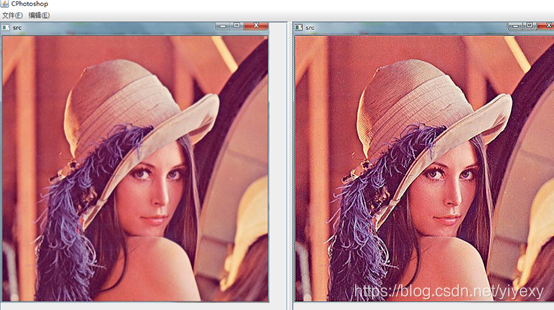 综上,我们对于拉普拉斯算子进行边缘提取和锐化的简单原理基本已经介绍完毕,其实出了拉普拉斯算子外,还有多种算子可进行边缘提取,且均大同小异。
总代码包下载:https://download.csdn.net/download/yiyexy/12323645


 4万+
4万+

 被折叠的 条评论
为什么被折叠?
被折叠的 条评论
为什么被折叠?
 到【灌水乐园】发言


