


什么是零拷贝
零拷贝的“零”是指用户态和内核态间copy数据的次数为零,即Zero CPU Copy。
零拷贝可以提高数据传输效率,但对于需要在用户传输过程中对数据进行加工的场景(如加密)就不适合使用零拷贝。
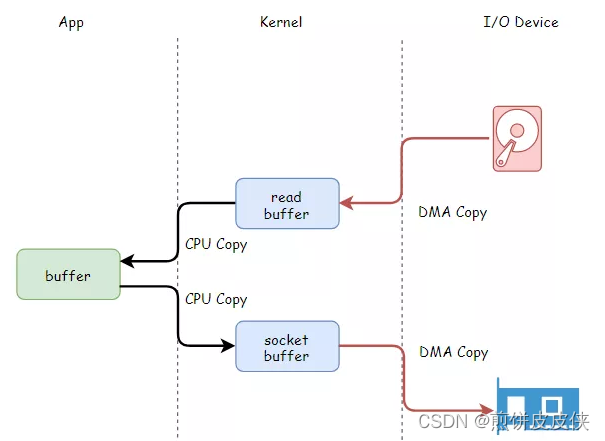
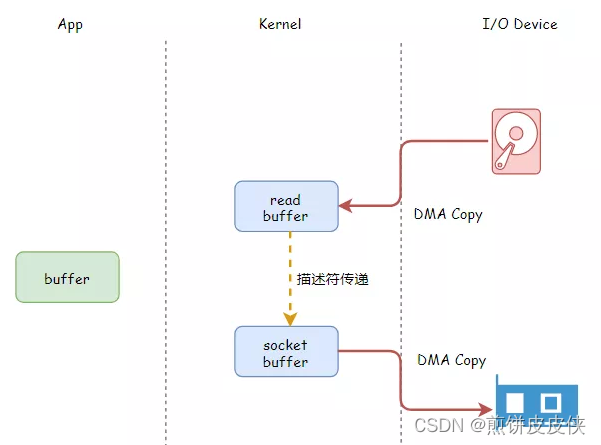
传统拷贝与零拷贝的区别,见下图
零拷贝相关知识
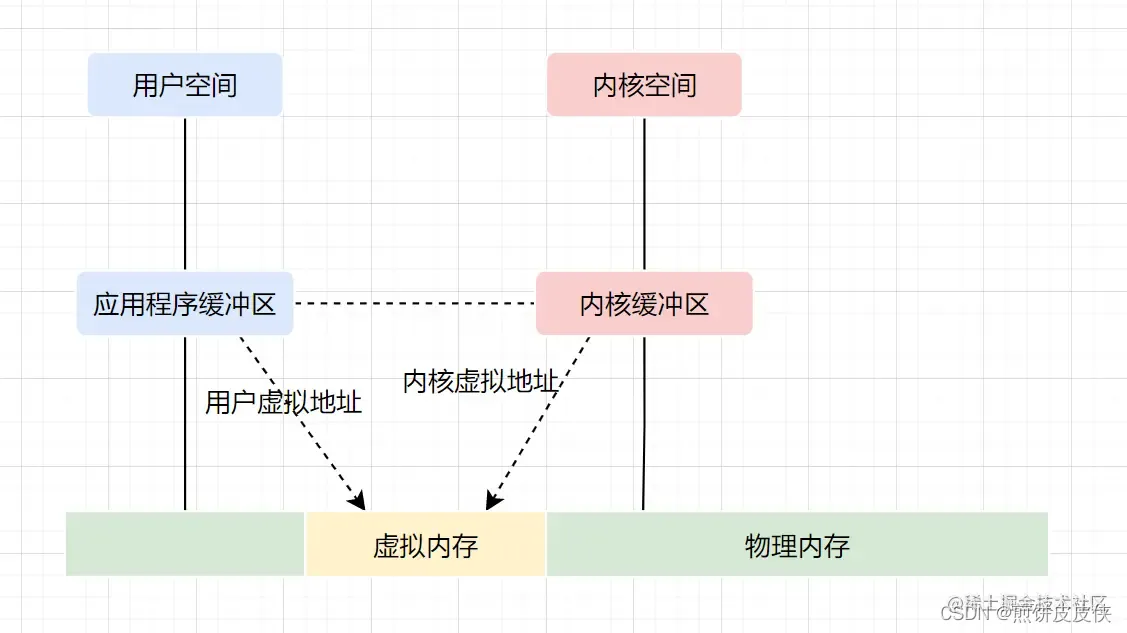
虚拟内存
现代操作系统使用虚拟内存,即虚拟地址取代物理地址,使用虚拟内存可以有2个好处:
- 虚拟内存空间可以远远大于物理内存空间
- 多个虚拟内存可以指向同一个物理地址
正是多个虚拟内存可以指向同一个物理地址,可以把内核空间和用户空间的虚拟地址映射到同一个物理地址,这样的话,就可以减少IO的数据拷贝次数啦,示意图如下
DMA技术
DMA,英文全称是Direct Memory Access,即直接内存访问。DMA本质上是一块主板上独立的芯片,允许外设设备和内存存储器之间直接进行IO数据传输,其过程不需要CPU的参与。
我们一起来看下IO流程,DMA帮忙做了什么事情。
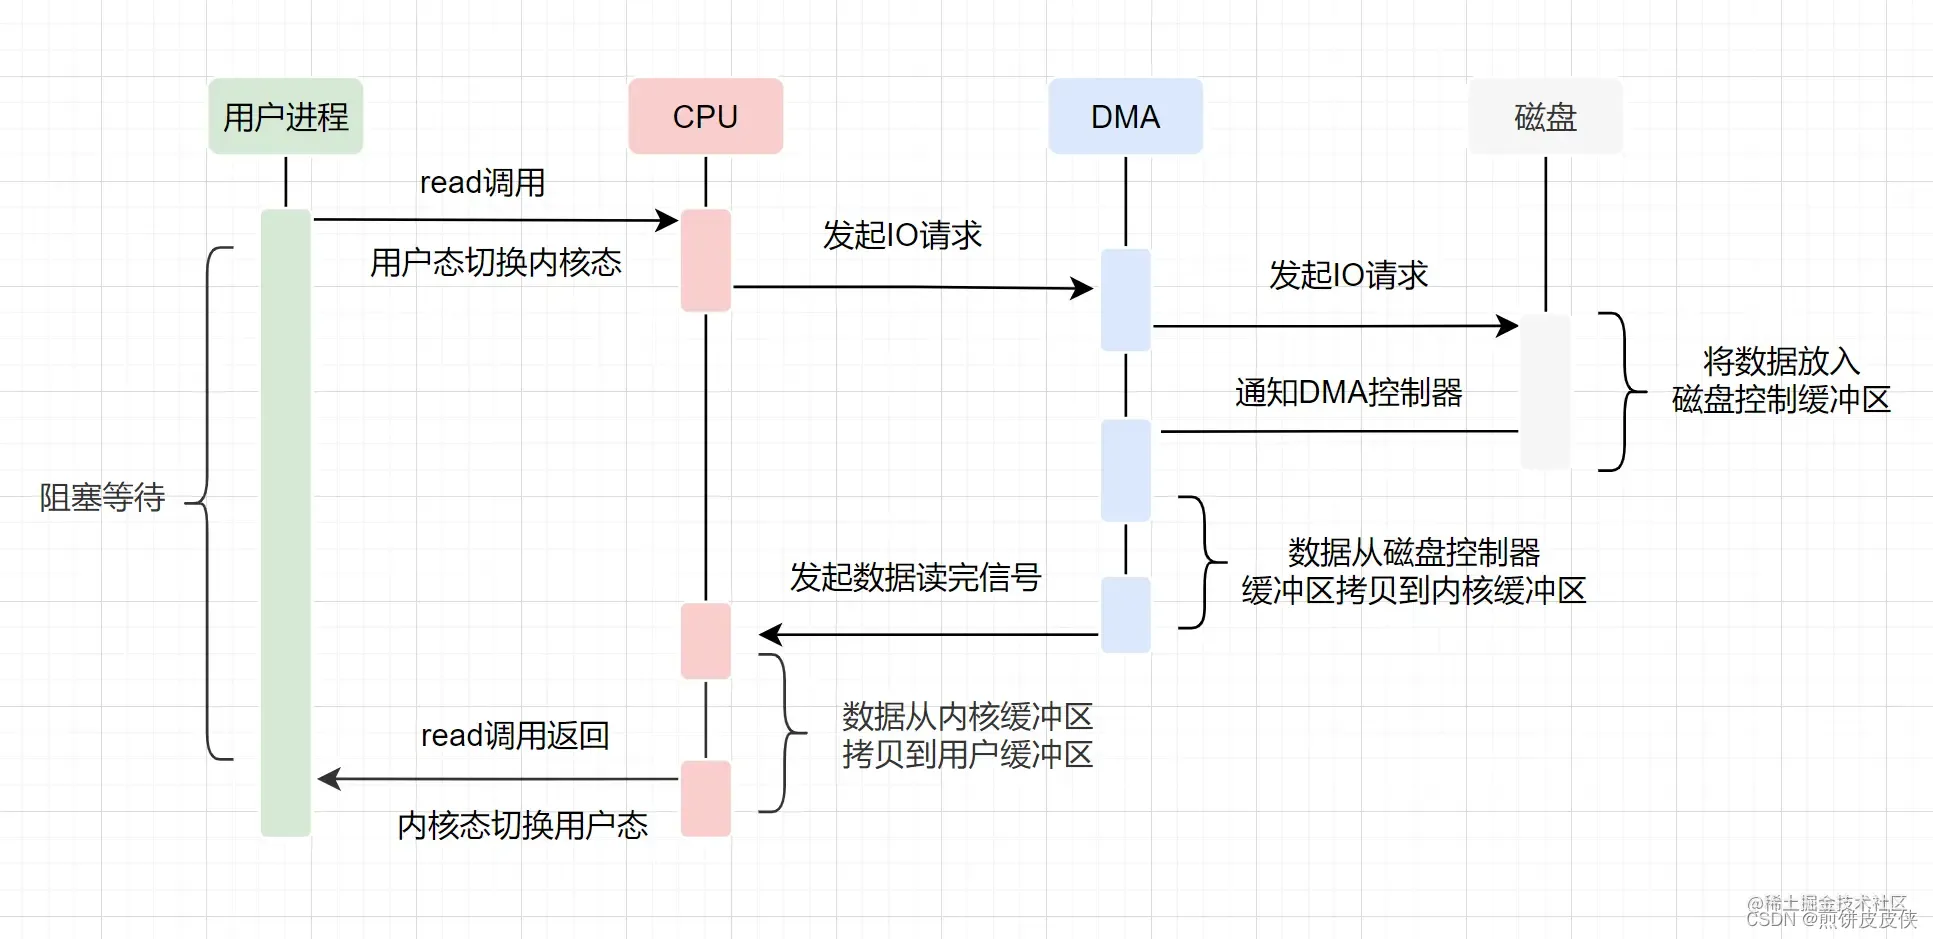
- 用户应用进程调用read函数,向操作系统发起IO调用,进入阻塞状态,等待数据返回。
- CPU收到指令后,对DMA控制器发起指令调度。
- DMA收到IO请求后,将请求发送给磁盘;
- 磁盘将数据放入磁盘控制缓冲区,并通知DMA
- DMA将数据从磁盘控制器缓冲区拷贝到内核缓冲区。
- DMA向CPU发出数据读完的信号,把工作交换给CPU,由CPU负责将数据从内核缓冲区拷贝到用户缓冲区。
- 用户应用进程由内核态切换回用户态,解除阻塞状态
可以发现,DMA做的事情很清晰啦,它主要就是帮忙CPU转发一下IO请求,以及拷贝数据
Linux支持的(常见)零拷贝
mmap+write
data loaded from disk is stored in a kernel buffer by DMA copy. Then the pages of the application buffer are mapped to the kernel buffer, so that the data copy between kernel buffers and application buffers are omitted.
DMA加载磁盘数据到kernel buffer后,应用程序缓冲区(application buffers)和内核缓冲区(kernel buffer)进行映射,数据再应用缓冲区和内核缓存区的改变就能省略。

mmap内存映射将会经历:3次拷贝: 1次cpu copy,2次DMA copy; 以及4次上下文切换
sendfile
linux 2.1支持的sendfile
when calling the sendfile() system call, data are fetched from disk and copied into a kernel buffer by DMA copy. Then data are copied directly from the kernel buffer to the socket buffer. Once all data are copied into the socket buffer, the sendfile() system call will return to indicate the completion of data transfer from the kernel buffer to socket buffer. Then, data will be copied to the buffer on the network card and transferred to the network.
当调用sendfile()时,DMA将磁盘数据复制到kernel buffer,然后将内核中的kernel buffer直接拷贝到socket buffer;
一旦数据全都拷贝到socket buffer,sendfile()系统调用将会return、代表数据转化的完成。 socket buffer里的数据就能在网络传输了。
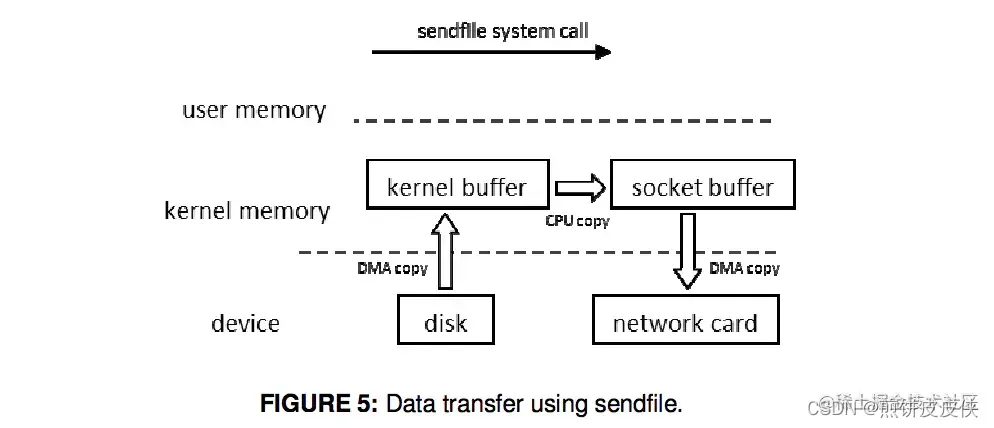
sendfile会经历:3次拷贝,1次CPU copy 2次DMA copy; 以及2次上下文切换
Sendfile With DMA Scatter/Gather Copy
Scatter/Gather可以看作是sendfile的增强版,批量sendfile。
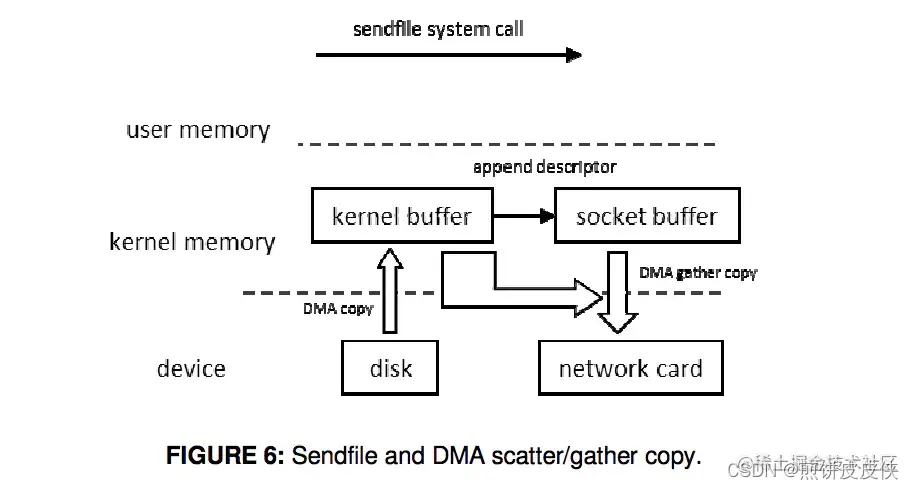
Scatter/Gather会经历2次拷贝: 0次cpu copy,2次DMA copy
splice
数据从磁盘读取到OS内核缓冲区后,在内核缓冲区直接可将其转成内核空间其他数据buffer,而不需要拷贝到用户空间。 如下图所示,从磁盘读取到内核buffer后,在内核空间直接与socket buffer建立pipe管道。 和sendfile()不同的是,splice()不需要硬件支持。
![[外链图片转存失败,源站可能有防盗链机制,建议将图片保存下来直接上传(img-u8ZfnVUq-1673533359371)(../static/img/Java零拷贝/45ecfeabfffce44d639b9654adfebdd5.png)]](https://img-blog.csdnimg.cn/17491301be9e446488e1d8c4ef0484c3.png)
注意splice和sendfile的不同,sendfile是将磁盘数据加载到kernel buffer后,需要一次CPU copy,拷贝到socket buffer。 而splice是更进一步,连这个CPU copy也不需要了,直接将两个内核空间的buffer进行set up pipe。
splice会经历 2次拷贝: 0次cpu copy 2次DMA copy; 以及2次上下文切换
![[外链图片转存失败,源站可能有防盗链机制,建议将图片保存下来直接上传(img-03kROwS1-1673533359371)(../static/img/Java零拷贝/6dbb332c2137ea1dd542c9b2311f7ae0.png)]](https://img-blog.csdnimg.cn/c90426a6d963482cb0269cbcedf52296.png)
Java中的零拷贝
在 Java NIO 中的通道(Channel)*就相当于操作系统的*内核空间(kernel space)的缓冲区,而缓冲区**(Buffer)对应的相当于操作系统的用户空间(user space)中的用户缓冲区(user buffer)。
- 通道(Channel)是全双工的(双向传输),它既可能是读缓冲区(read buffer),也可能是网络缓冲区(socket buffer)。
- 缓冲区(Buffer)分为堆内存(HeapBuffer)和堆外内存(DirectBuffer),这是通过 malloc() 分配出来的用户态内存。
堆外内存(DirectBuffer)在使用后需要应用程序手动回收,而堆内存(HeapBuffer)的数据在 GC 时可能会被自动回收。因此,在使用 HeapBuffer 读写数据时,为了避免缓冲区数据因为 GC 而丢失,NIO 会先把 HeapBuffer 内部的数据拷贝到一个临时的 DirectBuffer 中的本地内存(native memory),这个拷贝涉及到 sun.misc.Unsafe.copyMemory() 的调用,背后的实现原理与 memcpy() 类似。 最后,将临时生成的 DirectBuffer 内部的数据的内存地址传给 I/O 调用函数,这样就避免了再去访问 Java 对象处理 I/O 读写。
Java NIO对mmap的支持
Java NIO有一个MappedByteBuffer的类,可以用来实现内存映射。它的底层是调用了Linux内核的mmap的API。
先看例子:
public class MappedByteBufferTest {
    private final static String CONTENT = "Zero copy implemented by MappedByteBuffer";
    private final static String FILE_NAME = "D:/temp/test.txt";
    private final static String CHARSET = "UTF-8";

    @Test
    public void writeToFileByMappedByteBuffer() {
        Path path = Paths.get(FILE_NAME);
        byte[] bytes = CONTENT.getBytes(Charset.forName(CHARSET));
        try (FileChannel fileChannel = FileChannel.open(path, StandardOpenOption.READ,
                StandardOpenOption.WRITE, StandardOpenOption.TRUNCATE_EXISTING)) {
            MappedByteBuffer mappedByteBuffer = fileChannel.map(READ_WRITE, 0, bytes.length);
            if (mappedByteBuffer != null) {
                mappedByteBuffer.put(bytes);
                mappedByteBuffer.force();
            }
        } catch (IOException e) {
            e.printStackTrace();
        }
    }

    @Test
    public void readFromFileByMappedByteBuffer() {
        Path path = Paths.get(FILE_NAME);
        int length = CONTENT.getBytes(Charset.forName(CHARSET)).length;
        try (FileChannel fileChannel = FileChannel.open(path, StandardOpenOption.READ)) {
            MappedByteBuffer mappedByteBuffer = fileChannel.map(READ_ONLY, 0, length);
            if (mappedByteBuffer != null) {
                byte[] bytes = new byte[length];
                mappedByteBuffer.get(bytes);
                String content = new String(bytes, StandardCharsets.UTF_8);
                System.out.println(content);
                assertEquals(content, "Zero copy implemented by MappedByteBuffer");
            }
        } catch (IOException e) {
            e.printStackTrace();
        }
    }
}
下面介绍 map() 方法的底层实现原理。map() 方法是 java.nio.channels.FileChannel 的抽象方法,由子类 sun.nio.ch.FileChannelImpl.java 实现,下面是和内存映射相关的核心代码:
public abstract MappedByteBuffer map(MapMode mode, long position, long size)
        throws IOException;
mode:限定内存映射区域(MappedByteBuffer)对内存映像文件的访问模式,包括只可读(READ_ONLY)、可读可写(READ_WRITE)和写时拷贝(PRIVATE)三种模式。
position:文件映射的起始地址,对应内存映射区域(MappedByteBuffer)的首地址。
size:文件映射的字节长度,从 position 往后的字节数,对应内存映射区域(MappedByteBuffer)的大小。
下面介绍 map() 方法的底层实现原理。map() 方法是 java.nio.channels.FileChannel 的抽象方法,由子类 sun.nio.ch.FileChannelImpl.java 实现,下面是和内存映射相关的核心代码:
public MappedByteBuffer map(MapMode mode, long position, long size) throws IOException {
    int pagePosition = (int)(position % allocationGranularity);
    long mapPosition = position - pagePosition;
    long mapSize = size + pagePosition;
    try {
        addr = map0(imode, mapPosition, mapSize);
    } catch (OutOfMemoryError x) {
        System.gc();
        try {
            Thread.sleep(100);
        } catch (InterruptedException y) {
            Thread.currentThread().interrupt();
        }
        try {
            addr = map0(imode, mapPosition, mapSize);
        } catch (OutOfMemoryError y) {
            throw new IOException("Map failed", y);
        }
    }

    int isize = (int)size;
    Unmapper um = new Unmapper(addr, mapSize, isize, mfd);
    if ((!writable) || (imode == MAP_RO)) {
        return Util.newMappedByteBufferR(isize, addr + pagePosition, mfd, um);
    } else {
        return Util.newMappedByteBuffer(isize, addr + pagePosition, mfd, um);
    }
}
map() 方法通过本地方法 map0() 为文件分配一块虚拟内存,作为它的内存映射区域,然后返回这块内存映射区域的起始地址。
private native long map0(int prot, long position, long mapSize) throws IOException;
上面是本地方法(native method)map0 的定义,它通过 JNI(Java Native Interface)调用底层 C 的实现,这个 native 函数(Java_sun_nio_ch_FileChannelImpl_map0)的实现位于 JDK 源码包下的 native/sun/nio/ch/FileChannelImpl.c这个源文件里面。
JNIEXPORT jlong JNICALL
Java_sun_nio_ch_FileChannelImpl_map0(JNIEnv *env, jobject this,
                                     jint prot, jlong off, jlong len)
{
    void *mapAddress = 0;
    jobject fdo = (*env)->GetObjectField(env, this, chan_fd);
    jint fd = fdval(env, fdo);
    int protections = 0;
    int flags = 0;

    if (prot == sun_nio_ch_FileChannelImpl_MAP_RO) {
        protections = PROT_READ;
        flags = MAP_SHARED;
    } else if (prot == sun_nio_ch_FileChannelImpl_MAP_RW) {
        protections = PROT_WRITE | PROT_READ;
        flags = MAP_SHARED;
    } else if (prot == sun_nio_ch_FileChannelImpl_MAP_PV) {
        protections =  PROT_WRITE | PROT_READ;
        flags = MAP_PRIVATE;
    }

    mapAddress = mmap64(
        0,                    /* Let OS decide location */
        len,                  /* Number of bytes to map */
        protections,          /* File permissions */
        flags,                /* Changes are shared */
        fd,                   /* File descriptor of mapped file */
        off);                 /* Offset into file */

    if (mapAddress == MAP_FAILED) {
        if (errno == ENOMEM) {
            JNU_ThrowOutOfMemoryError(env, "Map failed");
            return IOS_THROWN;
        }
        return handle(env, -1, "Map failed");
    }

    return ((jlong) (unsigned long) mapAddress);
}
可以看出 map0() 函数最终是通过 mmap64() 这个函数对 Linux 底层内核发出内存映射的调用, mmap64() 函数的原型如下:
#include <sys/mman.h>

void *mmap64(void *addr, size_t len, int prot, int flags, int fd, off64_t offset);
下面详细介绍一下 mmap64() 函数各个参数的含义以及参数可选值:
-
addr:文件在用户进程空间的内存映射区中的起始地址,是一个建议的参数,通常可设置为 0 或 NULL,此时由内核去决定真实的起始地址。当 + flags 为 MAP_FIXED 时,addr 就是一个必选的参数,即需要提供一个存在的地址。 -
len:文件需要进行内存映射的字节长度 -
prot:控制用户进程对内存映射区的访问权限PROT_READ:读权限PROT_WRITE:写权限PROT_EXEC:执行权限PROT_NONE:无权限
-
flags:控制内存映射区的修改是否被多个进程共享MAP_PRIVATE:对内存映射区数据的修改不会反映到真正的文件,数据修改发生时采用写时复制机制MAP_SHARED:对内存映射区的修改会同步到真正的文件,修改对共享此内存映射区的进程是可见的MAP_FIXED:不建议使用,这种模式下 addr 参数指定的必须的提供一个存在的 addr 参数
-
fd:文件描述符。每次 map 操作会导致文件的引用计数加 1,每次 unmap 操作或者结束进程会导致引用计数减 1 -
offset:文件偏移量。进行映射的文件位置,从文件起始地址向后的位移量
Java NIO对sendfile的支持 FileChannel
FileChannel的transferTo()/transferFrom(),底层就是sendfile() 系统调用函数。Kafka 就用到它。
先看例子:
public class FileChannelTest {
    private static final String CONTENT = "Zero copy implemented by FileChannel";
    private static final String SOURCE_FILE = "D:/temp/source.txt";
    private static final String TARGET_FILE = "D:/temp/target.txt";
    private static final String CHARSET = "UTF-8";

    @Before
    public void setup() {
        Path source = Paths.get(SOURCE_FILE);
        byte[] bytes = CONTENT.getBytes(Charset.forName(CHARSET));
        try (FileChannel fromChannel = FileChannel.open(source, StandardOpenOption.READ,
                StandardOpenOption.WRITE, StandardOpenOption.TRUNCATE_EXISTING)) {
            fromChannel.write(ByteBuffer.wrap(bytes));
        } catch (IOException e) {
            e.printStackTrace();
        }
    }

    @Test
    public void transferTo() throws Exception {
        try (FileChannel fromChannel = new RandomAccessFile(SOURCE_FILE, "rw").getChannel();
             FileChannel toChannel = new RandomAccessFile(TARGET_FILE, "rw").getChannel()) {
            long position = 0L;
            long offset = fromChannel.size();
            fromChannel.transferTo(position, offset, toChannel);
        }
    }

    @Test
    public void transferFrom() throws Exception {
        try (FileChannel fromChannel = new RandomAccessFile(SOURCE_FILE, "rw").getChannel();
             FileChannel toChannel = new RandomAccessFile(TARGET_FILE, "rw").getChannel()) {
            long position = 0L;
            long offset = fromChannel.size();
            toChannel.transferFrom(fromChannel, position, offset);
        }
    }
}
下面介绍 transferTo() 和 transferFrom() 方法的底层实现原理,这两个方法也是 java.nio.channels.FileChannel 的抽象方法,由子类 sun.nio.ch.FileChannelImpl.java 实现。transferTo() 和 transferFrom() 底层都是基于 sendfile 实现数据传输的,其中 FileChannelImpl.java 定义了 3 个常量,用于标示当前操作系统的内核是否支持 sendfile 以及 sendfile 的相关特性。
private static volatile boolean transferSupported = true;
private static volatile boolean pipeSupported = true;
private static volatile boolean fileSupported = true;
transferSupported:用于标记当前的系统内核是否支持 sendfile() 调用,默认为 true。
pipeSupported:用于标记当前的系统内核是否支持文件描述符(fd)基于管道(pipe)的 sendfile() 调用,默认为 true。
fileSupported:用于标记当前的系统内核是否支持文件描述符(fd)基于文件(file)的 sendfile() 调用,默认为 true。
下面以 transferTo() 的源码实现为例。
FileChannelImpl 首先执行 transferToDirectly() 方法,以 sendfile 的零拷贝方式尝试数据拷贝。
如果系统内核不支持 sendfile,进一步执行 transferToTrustedChannel() 方法,以 mmap 的零拷贝方式进行内存映射,这种情况下目的通道必须是 FileChannelImpl 或者 SelChImpl 类型。
如果以上两步都失败了,则执行 transferToArbitraryChannel() 方法,基于传统的 I/O 方式完成读写,具体步骤是初始化一个临时的 DirectBuffer,将源通道 FileChannel 的数据读取到 DirectBuffer,再写入目的通道 WritableByteChannel 里面。
public long transferTo(long position, long count, WritableByteChannel target)
        throws IOException {
    // 计算文件的大小
    long sz = size();
    // 校验起始位置
    if (position > sz)
        return 0;
    int icount = (int)Math.min(count, Integer.MAX_VALUE);
    // 校验偏移量
    if ((sz - position) < icount)
        icount = (int)(sz - position);

    long n;

    if ((n = transferToDirectly(position, icount, target)) >= 0)
        return n;

    if ((n = transferToTrustedChannel(position, icount, target)) >= 0)
        return n;

    return transferToArbitraryChannel(position, icount, target);
}
接下来重点分析一下 transferToDirectly() 方法的实现,也就是 transferTo() 通过 sendfile 实现零拷贝的精髓所在。可以看到,transferToDirectlyInternal() 方法先获取到目的通道 WritableByteChannel 的文件描述符 targetFD,获取同步锁然后执行 transferToDirectlyInternal() 方法。
private long transferToDirectly(long position, int icount, WritableByteChannel target)
        throws IOException {
    // 省略从target获取targetFD的过程
    if (nd.transferToDirectlyNeedsPositionLock()) {
        synchronized (positionLock) {
            long pos = position();
            try {
                return transferToDirectlyInternal(position, icount,
                        target, targetFD);
            } finally {
                position(pos);
            }
        }
    } else {
        return transferToDirectlyInternal(position, icount, target, targetFD);
    }
}
最终由 transferToDirectlyInternal() 调用本地方法 transferTo0() ,尝试以 sendfile 的方式进行数据传输。如果系统内核完全不支持 sendfile,比如 Windows 操作系统,则返回 UNSUPPORTED 并把 transferSupported 标识为 false。如果系统内核不支持 sendfile 的一些特性,比如说低版本的 Linux 内核不支持 DMA gather copy 操作,则返回 UNSUPPORTED_CASE 并把 pipeSupported 或者 fileSupported 标识为 false。
private long transferToDirectlyInternal(long position, int icount,
                                        WritableByteChannel target,
                                        FileDescriptor targetFD) throws IOException {
    assert !nd.transferToDirectlyNeedsPositionLock() ||
            Thread.holdsLock(positionLock);

    long n = -1;
    int ti = -1;
    try {
        begin();
        ti = threads.add();
        if (!isOpen())
            return -1;
        do {
            n = transferTo0(fd, position, icount, targetFD);
        } while ((n == IOStatus.INTERRUPTED) && isOpen());
        if (n == IOStatus.UNSUPPORTED_CASE) {
            if (target instanceof SinkChannelImpl)
                pipeSupported = false;
            if (target instanceof FileChannelImpl)
                fileSupported = false;
            return IOStatus.UNSUPPORTED_CASE;
        }
        if (n == IOStatus.UNSUPPORTED) {
            transferSupported = false;
            return IOStatus.UNSUPPORTED;
        }
        return IOStatus.normalize(n);
    } finally {
        threads.remove(ti);
        end (n > -1);
    }
}
本地方法(native method)transferTo0() 通过 JNI(Java Native Interface)调用底层 C 的函数,这个 native 函数(Java_sun_nio_ch_FileChannelImpl_transferTo0)同样位于 JDK 源码包下的 native/sun/nio/ch/FileChannelImpl.c 源文件里面。JNI 函数 Java_sun_nio_ch_FileChannelImpl_transferTo0() 基于条件编译对不同的系统进行预编译,下面是 JDK 基于 Linux 系统内核对 transferTo() 提供的调用封装。
#if defined(__linux__) || defined(__solaris__)
#include <sys/sendfile.h>
#elif defined(_AIX)
#include <sys/socket.h>
#elif defined(_ALLBSD_SOURCE)
#include <sys/types.h>
#include <sys/socket.h>
#include <sys/uio.h>

#define lseek64 lseek
#define mmap64 mmap
#endif

JNIEXPORT jlong JNICALL
Java_sun_nio_ch_FileChannelImpl_transferTo0(JNIEnv *env, jobject this,
                                            jobject srcFDO,
                                            jlong position, jlong count,
                                            jobject dstFDO)
{
    jint srcFD = fdval(env, srcFDO);
    jint dstFD = fdval(env, dstFDO);

#if defined(__linux__)
    off64_t offset = (off64_t)position;
    jlong n = sendfile64(dstFD, srcFD, &offset, (size_t)count);
    return n;
#elif defined(__solaris__)
    result = sendfilev64(dstFD, &sfv, 1, &numBytes);
    return result;
#elif defined(__APPLE__)
    result = sendfile(srcFD, dstFD, position, &numBytes, NULL, 0);
    return result;
#endif
}
对 Linux、Solaris 以及 Apple 系统而言,transferTo0() 函数底层会执行 sendfile64 这个系统调用完成零拷贝操作,sendfile64() 函数的原型如下:
#include <sys/sendfile.h>

ssize_t sendfile64(int out_fd, int in_fd, off_t *offset, size_t count);
下面简单介绍一下 sendfile64() 函数各个参数的含义:
out_fd:待写入的文件描述符in_fd:待读取的文件描述符offset:指定 in_fd 对应文件流的读取位置,如果为空,则默认从起始位置开始count:指定在文件描述符 in_fd 和 out_fd 之间传输的字节数
整理参考
https://juejin.cn/post/7043948967729561607
https://developer.aliyun.com/article/942716
https://pdai.tech/md/java/io/java-io-nio-zerocopy.html
https://zhuanlan.zhihu.com/p/83398714


 652
652

 被折叠的 条评论
为什么被折叠?
被折叠的 条评论
为什么被折叠?
 到【灌水乐园】发言


